やりたかったこと
ajaxを使ってCRUD機能を持ったアプリを作っていたところ、入力や削除などでちょっとモダンなウィンドウ作りたくなったので、
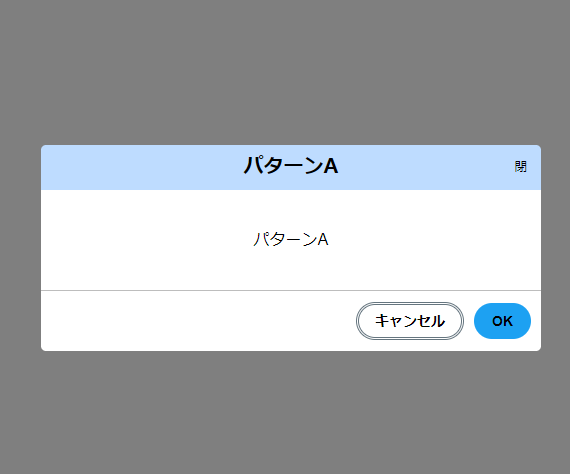
某SNS風のモーダルウィンドウを見よう見まねで作ってみました。
どうやったか
SPAで要素を逐次追加するのではなく、予めhtmlファイルにモーダルウィンドウの要素を作成し、クラスを付与しておきます。
CSSのプロパティの一つである、要素の透明度を指定するopacityを使うことで、クラスの有無で表示非表示の表現を。
javascriptでクラス要素を操作することで、表示と非表示の切り替えを行うようにしました。
HTML
コード
        <section id="main">
            //コンテンツ
        </section>
        <section id="modal" class = "modal--is_hidden">
            <div class="modal__body">
                <div class="modal__header modal__base">
                    <h2 class="modal__titletext"></h2>
                    <button class="modal__close">閉</button>
                </div>
                <div class="modal__item modal__base"></div>
                <div class="modal__footer modal__base">
                    <button class = 'modal_buttom modal__Cancel'>キャンセル</button>
                    <button class = 'modal_buttom modal__Submit'></button>
                </div>
            </div>
            <div class="modal__back modal__back--is_hidden"></div>
        </section>
解説
最初のsectionで囲まれた箇所が、このページのコンテンツを記載するところです。
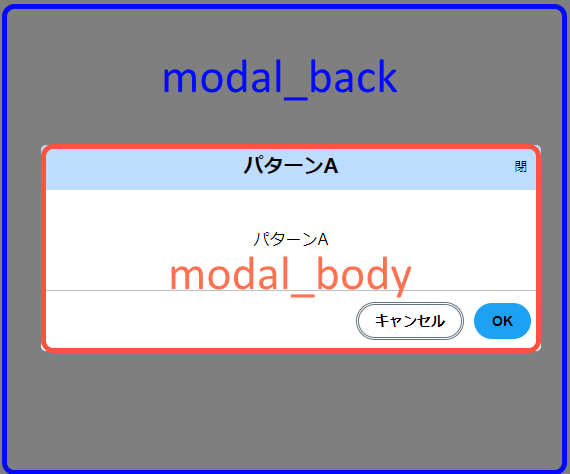
idがmodalのsectionが、モーダルウィンドウ部分です。
次にその中身ですが、
            <div class="modal__body">
         //中略//
            </div>
            <div class="modal__back modal__back--is_hidden"></div>
クラスがmodal__bodyに表示したいコンテンツのパーツを挿入する部分で、
クラスがmodal__backがそれ以外の背景部分です。

背景の部分は、モーダルウィンドウを表示中に画面全体を黒く半透明を覆い被せるUIとしての働きと、
この部分をクリックするとモーダルウィンドウを閉じる、といった2つの役割を持っています。
閉じる機能自体は、キャンセルボタンと右上の閉ボタンとか、複数の箇所でできるようにしておくべきかなと思ってます。
次にmodal__bodyの中身をさらっと
        <div class="modal__header modal__base">
            <h2 class="modal__titletext"></h2>
            <button class="modal__close">閉</button>
        </div>
        <div class="modal__item modal__base"></div>
        <div class="modal__footer modal__base">
            <button class = 'modal_buttom modal__Cancel'>キャンセル</button>
            <button class = 'modal_buttom modal__Submit'></button>
        </div>
header、item(body)、footerの3つに分割しています。
headerの中のh2や、footerのbuttonの一つに文字を書いていませんが、
これはjavascript側で動的に変更できるようにし、汎用的に使えるようにするためにそうしています。
item(body)も箱だけを作っておき、中身はjavascript側でDOMを作り内容を変更できるようにしてあります。
CSS
コード
.modal__back--is_hidden
{
    opacity: 0;
    pointer-events: none;
}

.modal--is_hidden
{
    opacity: 0;
    pointer-events: none;
    transition: opacity 0.2s ease-out;
}
***--is_hiddenにはopacityプロパティの値を0にし、設定し完全な透明状態にしています。
ただ、その状態だと透明になっただけで、モーダルウィンドウに対しての反応は残り続けているので、
クリックしてもモーダルウィンドウより下にある要素に対してのクリックを行うことはできません。
そこでpointer-eventsプロパティを使い値をnoneに設定することで、
クリックのターゲットから外すことで、下にあるものをクリックできるようにします。
また、opacityだけでは表示と非表示のアニメーション行われず、すぐに表示・非表示になるので、
transitionを使い、0.2sの極短時間ではありますがアニメーションを指定することで、ウィンドウが徐々に消えるようにしました。
ただ、display:noneでも非表示にすることができますが、その場合は徐々に半透明にするなどのアニメーションをいれることができないため、opacityを今回使用致しました。
(実は、keyframeとanimationを使えば同じ事が可能ですが、今回はtransitionを選択しました。)
.modal__base
{
    margin:0;
    padding:0;
    justify-content: center;
    text-align: center;
    align-items: center;
    display: flex;
}

.modal__header
{
    height: 45px;
    background-color: #bedcff;
    border-radius: 5px 5px 0 0;
    flex-direction: row;
}

.modal__item
{
    min-height: 100px;
    background-color: #ffffff;
    flex-direction: column;
}

.modal__footer
{
    height: 50px;
    background-color: #ffffff;
    border-top:1px solid #bdbdbd;
    border-radius:0 0 5px 5px ;
    justify-content: flex-end;
}
header、item(body)、footerのデザインです。
modal__baseでフレックボックスを指定し、小要素が中央表示になるよう指定してあります。
javascript
コード
    function openModalWindow()
    {
       //非表示にしているクラスを取り除き、表示状態にする
        document.querySelector('#modal').classList.remove('modal--is_hidden');
        document.querySelector('.modal__back').classList.remove('modal__back--is_hidden');

       //モーダルウィンドウを閉じるためのイベントを追加する
        document.querySelector('.modal__back').addEventListener('click',closeModalWindow,false);
        document.querySelector('.modal__Cancel').addEventListener('click',closeModalWindow,false);
        document.querySelector('.modal__close').addEventListener('click',closeModalWindow,false);
    }
こちらはモーダルウィンドウを表示させるための処理です。
htmlのclassで非表示状態にしている***--is_hiddenを、removeメソッドで除去しています。
また、背景、キャンセルボタン、右上の閉じるボタンに対してモーダルウィンドウを閉じるイベントを追加しています。
CSS側でtransitionをしてしていますので、javascript
    function closeModalWindow()
    {
        //モーダルウィンドウを非表示に
        document.querySelector('#modal').classList.add('modal--is_hidden');
        document.querySelector('.modal__back').classList.add('modal__back--is_hidden');

       //モーダルウィンドウを閉じるためのイベントを削除
        document.querySelector('.modal__back').removeEventListener('click',closeModalWindow,false);
        document.querySelector('.modal__Cancel').removeEventListener('click',closeModalWindow,false);
        document.querySelector('.modal__close').removeEventListener('click',closeModalWindow,false);
    }
こちらは逆にモーダルウィンドウを非表示させるための処理です。
ほとんど表示する側の反対のことやってて、特になにかあるわけではないですね(´・ω・`)
        //タイトルを設定する
        document.querySelector('.modal__titletext').appendChild(document.createTextNode('ほげほげウィンドウ'));
タイトルや子要素を追加する方法は、appendChildを使いました。
文字列の追加も、innerHTMLなどを使わずに'createTextNode'を用いてTextノードを生成して追加してます。
やってみた感想
某SNS風のデザインでしたが、一からモーダルウィンドウを作ってみてhtmlの構成の仕方、cssの設計、javascriptのコーディング等、色々学ぶことができて大変よい機会となりました。
次の課題
次に同じモーダルウィンドウを作るとしましたら、Vueなどのフレームワークを使って作り、色々なフレームワークでの作り方などを習得していきたいなと思っております。
