はじめに
Single Page Application(以下SPAと表記します)でアプリを作るには色々な理由があると思います。
- リッチなUIを作りたい
- 仮想DOMを使って高速なアプリを作りたい
- 通信量を少なくして負荷を減らしたい、または高速化したい
- デザインを再利用したい
- 単純に流行っている
私は個人でアプリを作るために React.js を習得しました。理由は主に デザインを再利用したい からです。
SoundCloud のように別の画面に遷移しても再生中の音がそのままの UI/UX は非常に魅力的ですが、そこまでの事をしたいわけでもないですし、サーバーサイドへの HTTP Request を減らして高速に動かしたい、というわけでもないです。
ただ、HTML と CSS を関数化してデザインを再利用する事ができるので React.js を使い始めました。
さて、React.js を使い始めると今度は Redux が登場します。React.js 自体は View だけの話なので学習コストがそこまでかかりません。なのですが Redux になった途端やや難しくなってきます。厄介なのは React.js を使いこなす前に Redux を学び始めると物事が複雑になってきます。
そんな中 React.js 入門者達を率いて React.js + redux なアプリを作る案件に挑戦したのですが React.js の概念をチーム全体で共有するのに日数がかかってしまいました。
苦肉の策として react + react-router のみでアプリを作り、redux の導入を取りやめたのですが、案外うまく行きました。脱落者もいましたが、学習範囲が少なくなった分チームメイトのほとんどが React.js を使いこなす状況になったため、フロントエンドのメンテナンスが属人化する事態を避けられました。
という経験を踏まえて redux を使う必要があるなら使うべきなのですが、そうでない場面も存在すると思います。というわけでこの Tutorial が役に立てばうれしいです。
使用するコマンドとバージョン
私は MacOSX を使用していて以下のバージョンで動作確認しました。
% node --version
v8.1.0

% create-react-app --version
1.4.0

% getstorybook --version
3.2.12
雛形作成
create-react-app コマンドを使用して雛形を作成します。
% create-react-app advent2017-react.js && cd _
yarn start を実行すると以下の画面が表示できるようになる事を確認してください。
サーバーサイドを準備
フロントエンドを開発する前に WEB API を用意します。ここでは faker と json-server というモジュールを使ってダミーな API を作成します。
必要なモジュールをインストール
% yarn add faker static-server json-server --save
create server.js
const path = require('path')
const faker = require('faker')
const jsonServer = require('json-server')
const server = jsonServer.create()
const serverStatic = require('serve-static')

server.use((req, res, next) => {
  res.header("Access-Control-Allow-Origin", "*")
  res.header("Access-Control-Allow-Headers", "Origin, X-Requested-With, Content-Type, Accept")
  res.header("Access-Control-Allow-Methods", "GET, POST, PUT, PATCH, DELETE, HEAD, OPTIONS")
  next()
})

server.use('/api/', jsonServer.router(getArticles()))
server.use('/static', serverStatic(__dirname + '/public/static'))
server.get('*', function (req, res, next) {
  res.sendFile(path.join(__dirname + '/public/index.html'));
});


function getArticles() {
  const articles = []

  for (var id = 1; id < 51; id++) {

    articles.push({
      "id": id,
      "title": faker.lorem.words(),
      "description": faker.lorem.paragraphs(),
      "isFavorite": false
    })
  }

  return { "articles": articles }
}

if (module.parent === null) {
  server.listen(4000)
  console.log('listening on port 4000')
}

module.exports = server
実行して api が動作する事を確認します。
% node server.js
listening on port 4000
上記のプロセスが動いている状態で curl コマンドを実行して動作確認をします。とりあえず今回は以下の3パターンだけ使ってデモアプリを作成します。
一覧
curl "http://localhost:4000/api/articles"
詳細
curl "http://localhost:4000/api/articles/1"
更新
curl -H "Content-type: application/json" -X PATCH -d '{"isFavorite":true}'"http://localhost:4000/api/articles/1"
HTTP Request で使用する関数を用意
使用するモジュールをインストール
yarn add axios parse-link-header --save
src/Api.js を用意します
import axios from 'axios'
import parse from 'parse-link-header'

export default class Api {

  constructor({ baseUrl, successHandler, failureHandler }) {
    this.baseUrl = baseUrl;
    this.handleSuccess =
      successHandler ||
      function(result) {
        return Promise.resolve(result);
      };
    this.handleFailure =
      failureHandler ||
      function(e) {
        return Promise.reject(e);
      };
  }

  listArticles(page=1) {
    return axios.get(`${this.baseUrl}/articles?_page=${page}`).then((res) => {
      return {
        "articles": res.data || [],
        "links": parse(res.headers.link)
      }
    }).catch(this.handleFailure)
  }

  listFavoriteArticles(page=1) {
    return axios.get(`${this.baseUrl}/articles?isFavorite=true&_page=${page}`).then((res) => {
      return {
        "articles": res.data || [],
        "links": parse(res.headers.link)
      }
    }).catch(this.handleFailure)
  }

  showArticle(id) {
    return axios.get(`${this.baseUrl}/articles/${id}`).then((res) => {
      return { "article": res.data }
    }).catch(this.handleFailure)
  }

  updateArticle(id, params) {
    return axios.put(`${this.baseUrl}/articles/${id}`, params).then((res) => {
      return { "article": res.data }
    }).catch(this.handleFailure)
  }

  createArticle(params) {
    return axios.post(`${this.baseUrl}/articles`, params).then((res) => {
      this.handleSuccess("Create Article Success")
      return { "article": res.data }
    }).catch(this.handleFailure)
  }
}
続いて src/Api.test.js を用意します。ここでは listArticles しかテストしていないですが興味がある方はテストを追加してみてください。テストが走るたびにデータが初期化されるのでデータを変更しても大丈夫です。
import server from '../server'
import Api from '../src/Api'

const port = server.listen(0).address().port
const api = new Api({baseUrl: `http://127.0.0.1:${port}/api`})

describe('Api', function() {

  test('listArticles', async () => {
    const result = await api.listArticles()
    expect(result.articles.length).toEqual(10)
  })
})
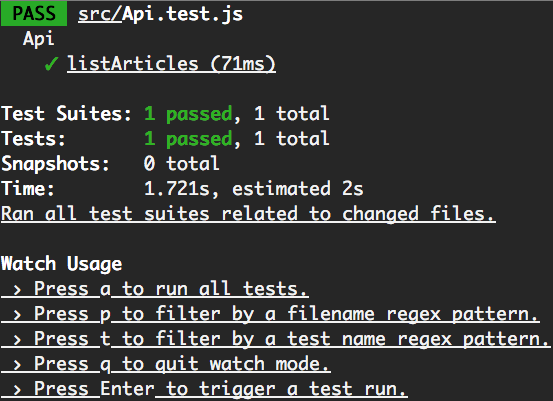
テストを実行して動作確認をします。create-react-app で作成されたアプリは以下のコマンドで jest が起動します。テストが成功するかどうか確認して下さい。
yarn test
ちなみにファイルへの書き込みを watch しているので jest のプロセスを起動したままにしていればファイルを修正する毎に自動的にテストが実行されます。
component を作成する
次に storybook を使って component 単位で開発をします。最初に getstorybook を追加して react-storybook を起動します。
getstorybook
yarn run storybook
各自の環境によって使用される port が違うと思いますが私の環境だと http://localhost:9009/ へアクセスできるようになります。react-storybook が何をどうするものなのかは多分別日程の担当者が詳しく書いてくれる気がするのでここでは説明をッ割愛します。という事で簡単な button を作成します。
使用するモジュールをインストールします。
yarn add styled-components --save
コンポーネントを追加します。
mkdir src/components
touch src/components/Button.js
create src/components/button.js
import React, { Components } from "react"
import styled from "styled-components"

export default styled.div`
  display: inline-block;
  background: ${props => props.primary ? '#0275d8' : 'white'};
  color: ${props => props.primary ? 'white' : '#ccc'};
  font-size: 1em;
  padding: 0.25em 1em;
  border: 2px solid ${props => props.primary ? '#0275d8' : '#ccc'};
  border-radius: 3px;
  cursor: ${props => props.disabled ? "not-allowed" : "pointer"};
  opacity: ${props => props.disabled ? 0.65 : 1};
  &:hover {
    opacity: ${props => props.disabled ? 0.65 : 0.8};
  }
`;
次に src/stories/index.js を以下のように修正します。
import React from 'react';

import { storiesOf } from '@storybook/react';
import { action } from '@storybook/addon-actions';
import Button from '../components/Button';

storiesOf('Button', module)
  .add('basic', () => (
    <div>
      <div>
        <Button onClick={action('clicked')}>Normal</Button>
        {' '}
        <Button primary onClick={action('clicked')}>Primary</Button>
      </div>
    </div>
  ))
再び http://localhost:9009/ へアクセスすると Button の Component を使った例が表示されると思います。React.js のような View ライブラリを使用する場合はこのようにUIカタログを用意しておくとデザイナーさんとのやりとりがスムーズに行えると思います。
Input Form
続いて Form Component を作成します。Form Validation を実装するのに便利なモジュールをインストールします。
% yarn add validator --save
src/forms/ArticleForm.js を作成します。
import React, { Component } from "react"
import styled, { css } from "styled-components"
import validator from "validator"
import Button from '../components/Button'

const Input = styled.input`
  width: 100%;
  -moz-box-sizing: border-box;
  -webkit-box-sizing: border-box;
  box-sizing: border-box;
  padding: 0.8em;
  outline: none;
  border: 1px solid #DDD;
  -webkit-border-radius: 3px;
  -moz-border-radius: 3px;
  border-radius: 3px;
  font-size: 16px;
  &:focus {
    box-shadow: 0 0 7px #3498db;
    border: 1px solid #3498db;
  }
`;

const Textarea = styled.textarea`
  width: 100%;
  -moz-box-sizing: border-box;
  -webkit-box-sizing: border-box;
  box-sizing: border-box;
  padding: 0.8em;
  outline: none;
  border: 1px solid #DDD;
  -webkit-border-radius: 3px;
  -moz-border-radius: 3px;
  border-radius: 3px;
  font-size: 16px;
  &:focus {
    box-shadow: 0 0 7px #3498db;
    border: 1px solid #3498db;
  }

`;


export default class ArticleForm extends Component {

  constructor(props) {
    super(props);
    this.state = {
      pristine: true,
      submitting: false,
      title: "",
      description: "",
      errorOf: {}
    };
  }

  validate(name, value) {
    switch (name) {
      case "title":
        return validator.isEmpty(value) ? "title は入力必須項目です" : null
      case "description":
        return validator.isEmpty(value) ? "description は入力必須項目です" : null
      default:
        return null;
    }
  }

  async handleChange(event) {
    const { name, value } = event.target;
    const errorMessage = this.validate(name, value)
    await this.setState({
      pristine: false,
      [name]: value,
      errorOf: Object.assign(this.state.errorOf, { [name]: errorMessage })
    });
  }

  handleSubmit() {
    const { pristine } = this.state;

    ["title", "description"].forEach(async name => {
      const errorMessage = this.validate(name, this.state[name])
      await this.setState({
        errorOf: Object.assign(this.state.errorOf, { [name]: errorMessage })
      });
    })
    console.log(Object.values(this.state.errorOf).filter(x =>x))
    if (pristine || Object.values(this.state.errorOf).filter(x => x).length > 0) {
      return;
    }
    console.log(this.state);
    this.props.onSubmit(this.state)
  }

  render() {
    const { pristine, errorOf } = this.state;

    return (
      <div>
        <div>
          <p>Title</p>
          <Input name="title" type="text" value={this.state.title} onChange={this.handleChange.bind(this)} />
          {errorOf["title"] && (
            <p style={{ color: "red" }}>{errorOf["title"]}</p>
          )}
        </div>
        <div>
          <p>Description</p>
          <Textarea name="description" type="text" value={this.state.description} onChange={this.handleChange.bind(this)} />
          {errorOf["description"] && (
            <p style={{ color: "red" }}>{errorOf["description"]}</p>
          )}
        </div>
        <div style={{textAlign: "right", paddingTop: "30px"}}>
          <Button primary disabled={pristine} onClick={this.handleSubmit.bind(this)}>追加</Button>
        </div>
      </div>
    )
  }
}
src/stories/index.js を以下のように修正します
import React from 'react';

import { storiesOf } from '@storybook/react';
import { action } from '@storybook/addon-actions';
import { linkTo } from '@storybook/addon-links';

import Button from '../components/Button';
import ArticleForm from '../forms/ArticleForm';

storiesOf('Button', module)
  .add('basic', () => (
    <div>
      <div>
        <Button onClick={action('clicked')}>Normal</Button>
        {' '}
        <Button primary onClick={action('clicked')}>Primary</Button>
      </div>
    </div>
  ))

storiesOf('Form', module)
  .add('basic', () => (
    <div>
      <div style={{"maxWidth": "500px"}}>
        <ArticleForm onSubmit={action('submit')} />
      </div>
    </div>
  ))
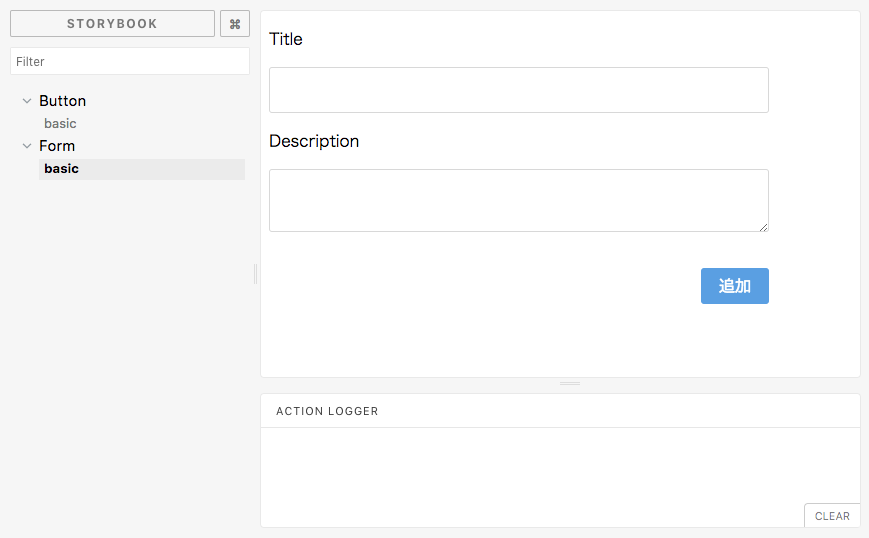
react-storybook 上で動作を確認してください。
なお、ここで使用している CSS は以下の URL を真似しました。
controller
最後にこれまで作成したパーツを組み合わます。
mkdir src/controllers
touch src/controllers/Articles.js
必要なモジュールをインストールします
% yarn add bootstrap react-icons react-paginators react-notifications --save
src/index.js に bootstrap の css を追加します。
 import React from 'react';
 import ReactDOM from 'react-dom';
+import 'bootstrap/dist/css/bootstrap.css'
 import './index.css';
 import App from './App';
 import registerServiceWorker from './registerServiceWorker';
create src/controllers/Articles.js
import React, {Component} from 'react'
import { Link } from 'react-router-dom'

import FaStar from 'react-icons/lib/fa/star'
import immutable from 'immutable'

import { Bootstrap3ishPaginator } from 'react-paginators'

import ArticleForm from '../forms/ArticleForm'

const FavoriteButton = ({isFavorite, onClick}) => (
  <FaStar style={{cursor: "pointer"}} color={isFavorite ? "#ffa500" : "#eee"} onClick={onClick} />)

class List extends Component {

  constructor(props) {
    super(props)
    this.state = { articles: [] }
  }

  componentWillMount() {
    this.props.api.listArticles().then((result) => {
      this.setState({articles: result.articles, current: 1, last: result.links.last._page})
    })
  }

  handleFavorite(article, index) {
    article.isFavorite = article.isFavorite !== true
    this.props.api.updateArticle(article.id, article).then((result) => {
      const nextArticles = immutable.List(this.state.articles)
      nextArticles[index] = result.article
      this.setState({articles: nextArticles})
    })
  }

  handlePageClick(page) {
    this.props.api.listArticles(page).then((result) => {
       this.setState({articles: result.articles, current: page, last: result.links.last._page})
    })
  }

  render() {

    const current = (this.state && this.state.current) || 1
    const last = (this.state && parseInt(this.state.last, 10)) || 1

    return (
      <div>
        <h2>Articles</h2>
        <ul>
          {this.state.articles.map((x, index) => (
            <li key={index}>
              <Link to={`/articles/${x.id}`}>{x.title}</Link>
              {" "}
              <FavoriteButton isFavorite={x.isFavorite} onClick={() => this.handleFavorite(x, index)} />
            </li>
          ))}
        </ul>

        <div style={{padding: "30px",  display: "flex", justifyContent: "center" }}>
          <Bootstrap3ishPaginator
            current={current}
            last={last}
            maxPageCount={10}
            onClick={this.handlePageClick.bind(this)}
          />
        </div>
      </div>
    )
  }
}

class FavoriteList extends Component {

  constructor(props) {
    super(props)
    this.state = { articles: [] }
  }

  componentWillMount() {
    this.props.api.listFavoriteArticles().then((result) => {
      this.setState({articles: result.articles})
    })
  }

  render() {

    const {articles} = this.state

    return (
      <div>
        <h2>Favorites</h2>
        <ul>
        {articles.map((x, index) => (
          <li key={index}><Link to={`/articles/${x.id}`}>{x.title}</Link></li>
        ))}
        </ul>
      </div>
    )
  }
}

class Show extends Component {

  constructor(props) {
    super(props)
    this.state = { article: {} }
  }

  componentWillMount() {
    const { id } = this.props.match.params
    this.props.api.showArticle(parseInt(id, 10)).then((result) => {
      this.setState({article: result.article})
    })
  }

  render() {
    const {article} = this.state
    return (
      <div>
        <h2>{article.title}</h2>
        <p>{article.description}</p>
      </div>
    )
  }
}

class Create extends Component {

  handleSubmit({title, description}) {
    this.props.api.createArticle({title, description, isFavorite: false}).then( _ => this.props.history.push("/"))
  }

  render() {
    return (
      <div>
        <h2>Create</h2>
        <div style={{padding: "50px"}}>
          <ArticleForm onSubmit={this.handleSubmit.bind(this)} />
        </div>
      </div>
    )
  }
}

export default { List, FavoriteList, Show, Create }
edit src/App.js
import React, { Component } from 'react'
import { BrowserRouter as Router, Switch, Route, NavLink, withRouter } from 'react-router-dom'

import {
  NotificationContainer,
  NotificationManager
} from "react-notifications";
import "react-notifications/lib/notifications.css";

import Api from "./Api";
import Articles from './controllers/Articles'

const Header = ({onClick}) => (
  <h1 className="text-center" style={{cursor: "pointer" }} onClick={onClick}>Favorite Articles</h1>
)

const Nav = () => (
  <ul className="nav nav-pills">
    <li><NavLink exact to="/articles">Articles</NavLink></li>
    <li><NavLink exact to="/articles/favorite">Favorite Articles</NavLink></li>
    <li><NavLink exact to="/articles/create">Create</NavLink></li>
  </ul>
)

const Footer = () => (<p className="text-center">Favorite Articles</p>)

const Routes = withRouter(({api, history}) => (
  <div className="container">
    <Header onClick={() => history.push("/")} />
    <Nav />
    <Switch>
      <Route exact path="/" component={props => <Articles.List {...props} api={api} />} />
      <Route exact path="/articles" component={props => <Articles.List {...props} api={api} />} />
      <Route exact path="/articles/favorite" component={props => <Articles.FavoriteList {...props} api={api} />} />
      <Route exact path="/articles/create" component={props => <Articles.Create {...props} api={api} />} />
      <Route exact path="/articles/:id" component={props => <Articles.Show {...props} api={api} />} />
    </Switch>
    <Footer />
  </div>
))

class App extends Component {
  constructor(props) {
    super(props);
    this.api = new Api({
      baseUrl: process.env.NODE_ENV === "production" ? "/api" : `http://127.0.0.1:4000/api`,
      failureHandler: this.handleHttpError,
      successHandler: this.handleHttpSuccess
    });
  }

  handleHttpError(error) {
    return new Promise((resolve, reject) => {
      NotificationManager.error(error + "", "", 5000, () => {
        return reject(error);
      });
    });
  }

  handleHttpSuccess(message) {
    return new Promise((resolve, reject) => {
      NotificationManager.success(message, "", 5000, () => {
        return resolve(true);
      });
    });
  }

  render() {
    return (
      <div>
        <NotificationContainer />
        <Router>
          <Routes api={this.api} />
        </Router>
      </div>
    );
  }
}

export default App
さて、react-paginators が jest でエラーを起こすので src/App.test.js を以下のようにコメントアウトしておきます。テストでしか影響しないので問題はありません。
 it('renders without crashing', () => {
   const div = document.createElement('div');
-  ReactDOM.render(<App />, div);
+  // ReactDOM.render(<App />, div);
 });
動作確認をして実装はこれでおしまいです。
Github と Glitch
今回用意したソースコードを Github と Glitch に公開しています。


