Github PagesからFirebase Hostingへ移行したときの履歴です。
対象のリポジトリ
なぜ移行したのか
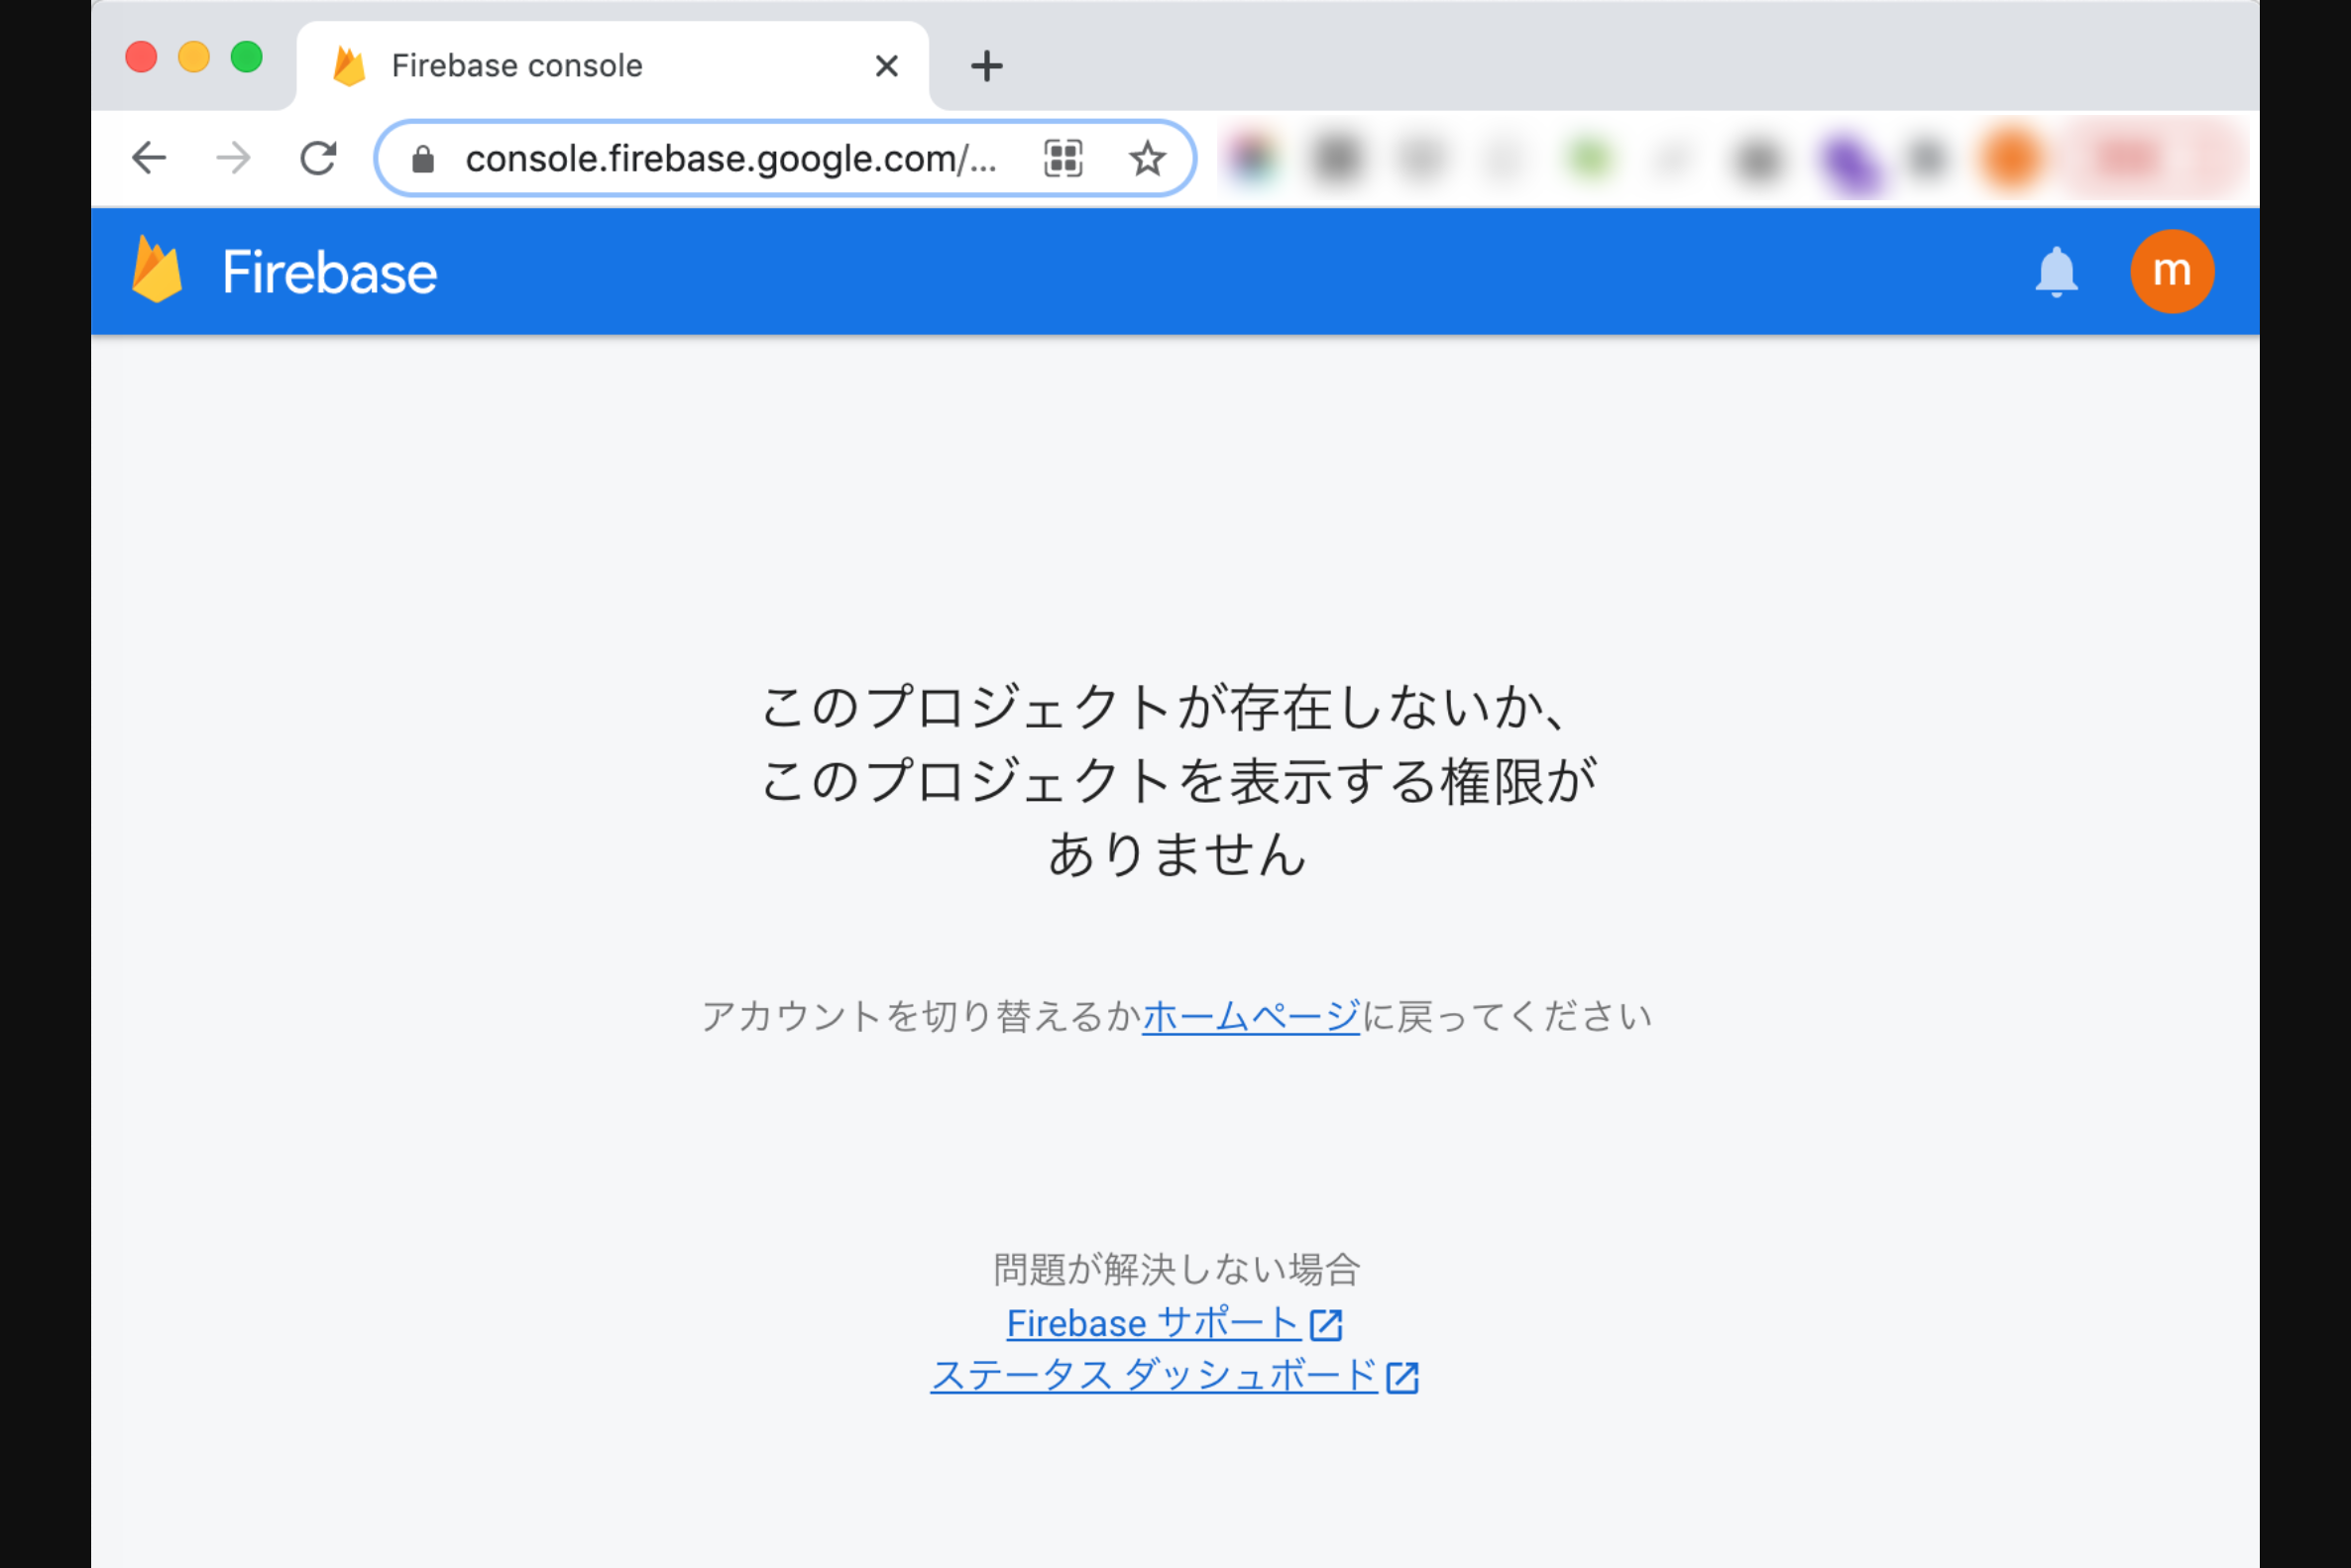
Github Pagesでは、URLがサブディレクトリになってしまうため。
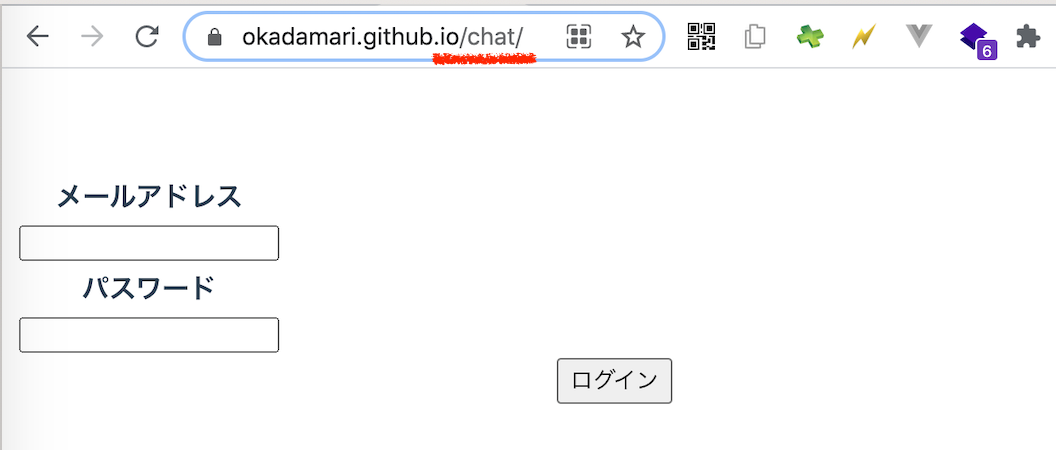
下層ページでリロードすると、
404になってしまう ![]()
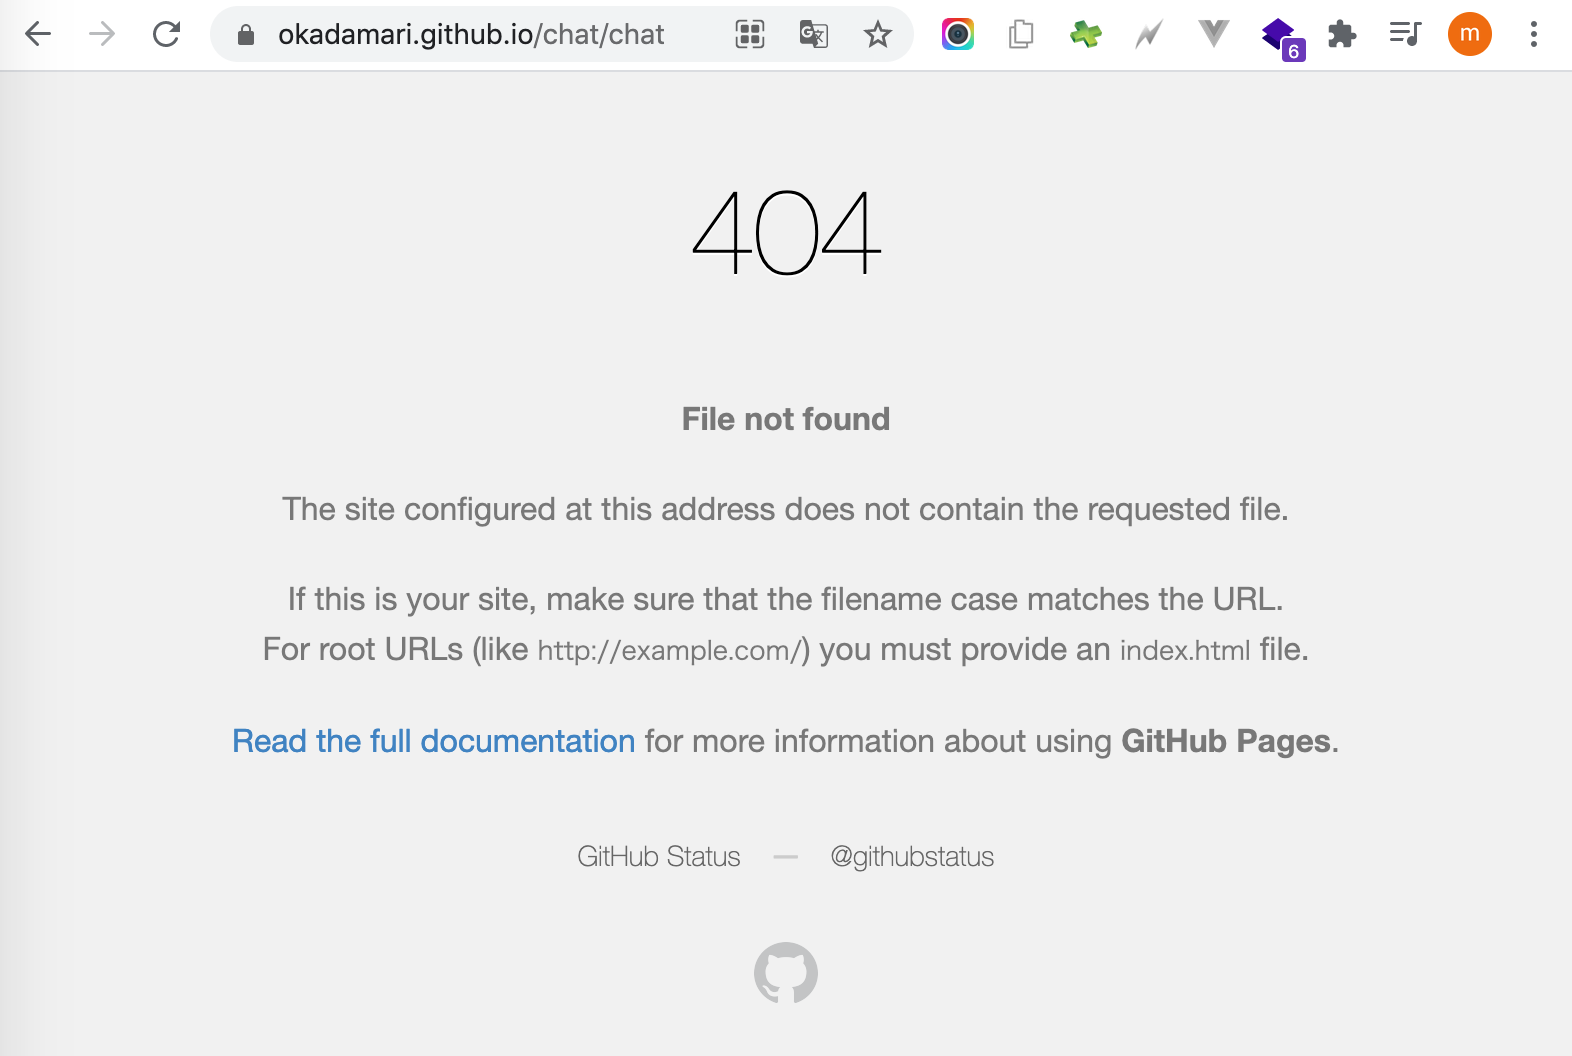
対応するには、サーバーの設定が必要なようです。
ですが、Github Pagesではサーバーの設定は変更できません。
サブディレクトリであればこの問題は起きないのですが、Github Pagesでサブディレクトリを使うためには独自ドメインが必要です。(そして私はドメインを持っていません)
そのため、Firebase Hostingを使ってみることにしました。
Firebase Hostingの初期設定
こちらの手順で進めました。
https://firebase.google.com/docs/hosting/quickstart?authuser=2
始める前に
Firebase Hostingを使うためには、Firebase プロジェクトが必要です。
今回設定するアプリでは、すでにFirestoreを使っているので、Firebase プロジェクトは作成済みなので、特に作業はありませんでした。
ちなみにFirebase プロジェクト作成時の記事はこちらです。
ステップ 1: Firebase CLI をインストールする
まず、Firebase CLIが入っているかどうか確認しました。
$ npx firebase login
コマンドが見つかりません: firebase
入っていないようです。
公式に記載されていたコマンドでインストールしました。
$ npm install -g firebase-tools
インストールできたので、もう一度ログインしてみました。
$ npx firebase login
今度は実行できました。
続けて以下の質問があったので「Yes」にしました。
? Allow Firebase to collect CLI usage and error reporting info
rmation? Yes
次に、ブラウザが起動してGoogleにログインするように言われました。
ログインすると以下のような画面になりました。
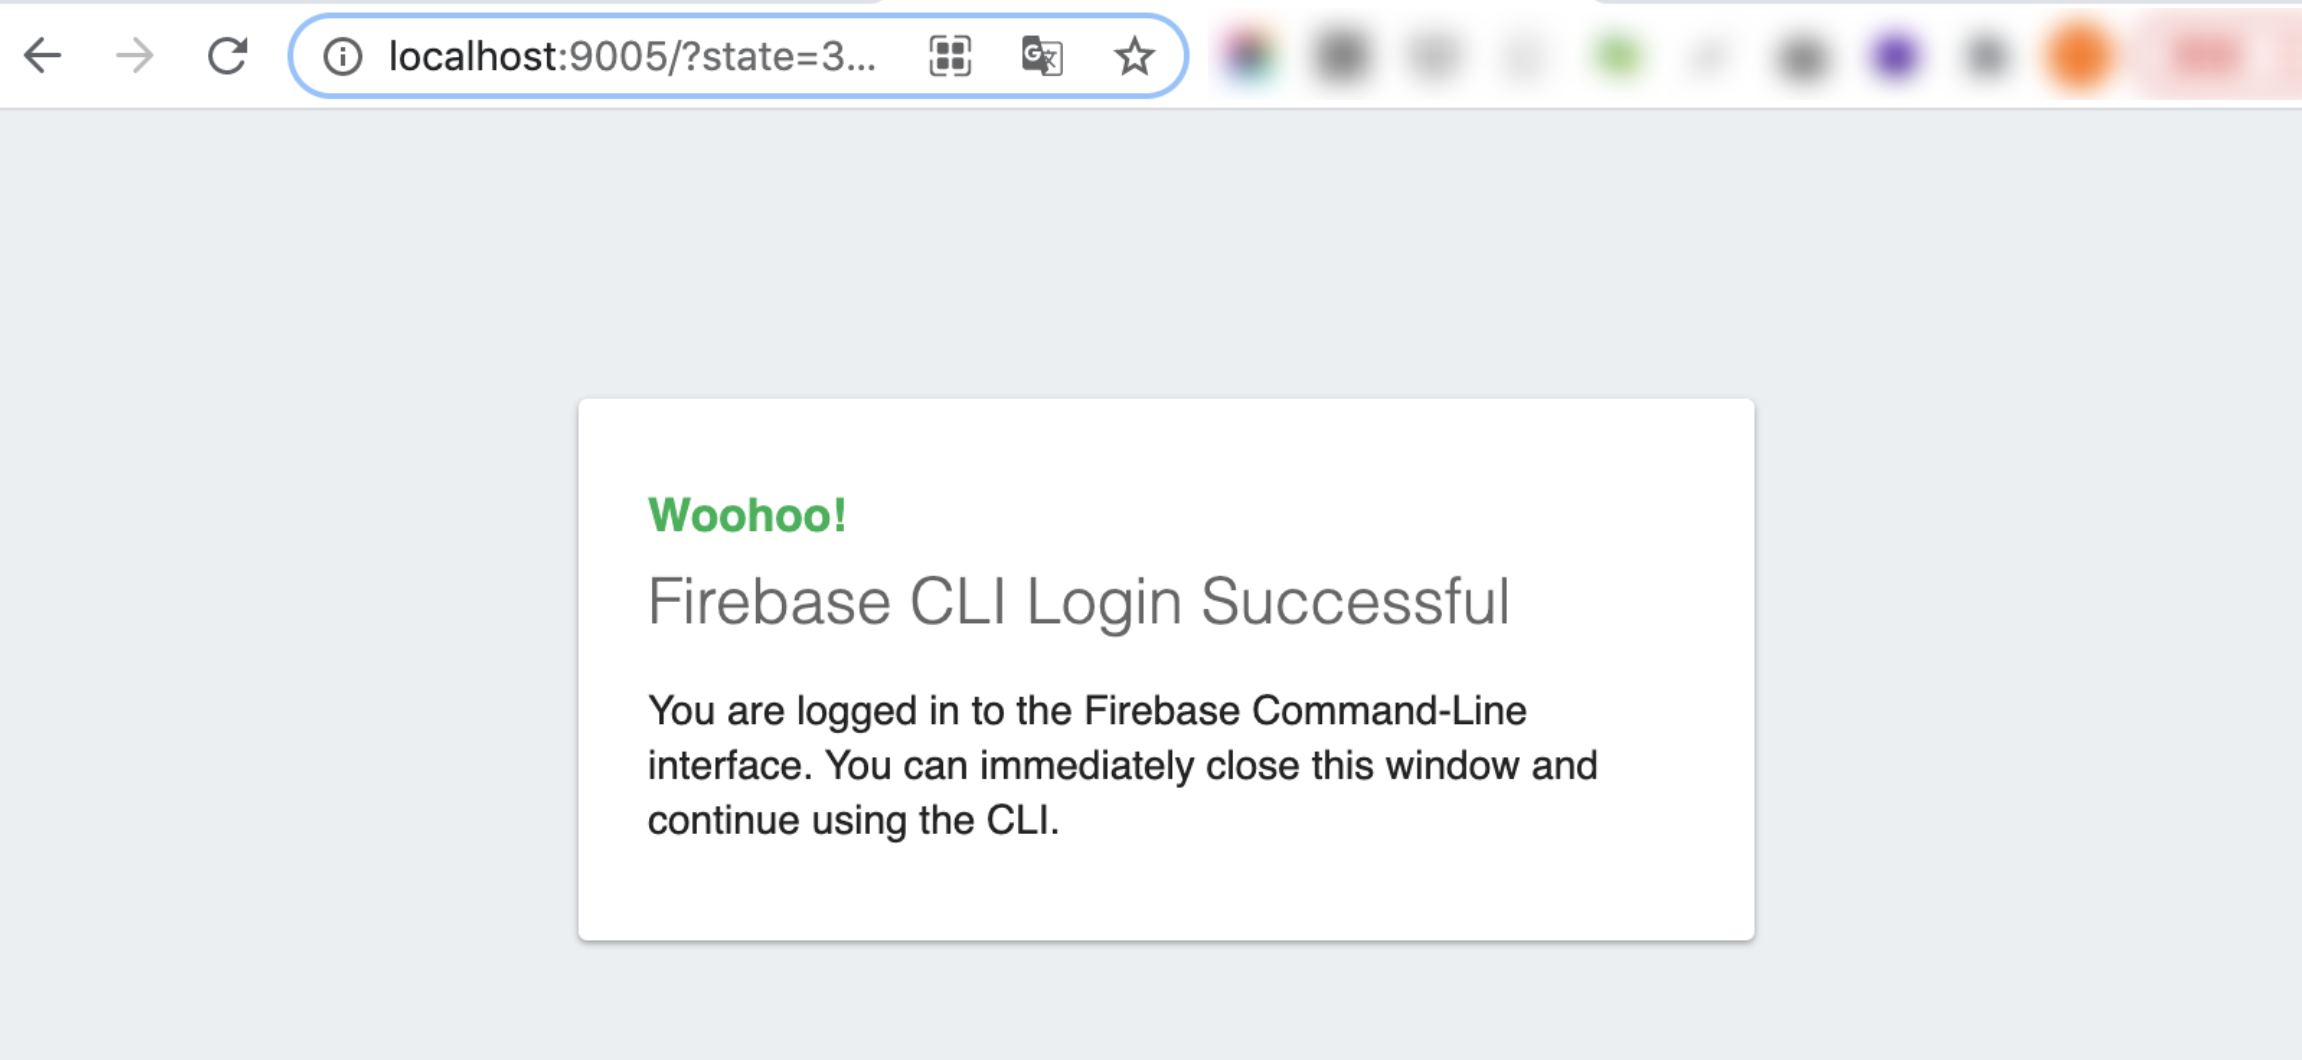
ターミナルに戻ると、以下のように表示されていました。
ログインできたようです。
✔ Success! Logged in as [mailアドレス]@gmail.com
firebase projects:listで確認します。
$ npx firebase projects:list
✔ Preparing the list of your Firebase projects
┌──────────────────────┬────────────────┬────────────────┬──────────────────────┐
│ Project Display Name │ Project ID     │ Project Number │ Resource Location ID │
├──────────────────────┼────────────────┼────────────────┼──────────────────────┤
│ book                 │ book-xxxxx     │ xxxxxxxxxxxx   │ [Not specified]      │
├──────────────────────┼────────────────┼────────────────┼──────────────────────┤
│ chat                 │ chat-xxxxx     │ xxxxxxxxxxxx   │ asia-northeast1      │
├──────────────────────┼────────────────┼────────────────┼──────────────────────┤
│ chat-dev             │ chat-dev-xxxxx │ xxxxxxxxxxx    │ asia-northeast1      │
└──────────────────────┴────────────────┴────────────────┴──────────────────────┘

3 project(s) total.
大丈夫そうです。CLIがインストールできました。
ステップ 2: プロジェクトを初期化する
公式の通りにコマンドを打ち、質問に答えていきました。
たしかほとんどデフォルトのままだったと思います。
$ npx firebase init hosting

     ######## #### ########  ######## ########     ###     ######  ########
     ##        ##  ##     ## ##       ##     ##  ##   ##  ##       ##
     ######    ##  ########  ######   ########  #########  ######  ######
     ##        ##  ##    ##  ##       ##     ## ##     ##       ## ##
     ##       #### ##     ## ######## ########  ##     ##  ######  ########

You're about to initialize a Firebase project in this directory:

  /Users/okada/Documents/project/chat


=== Project Setup

First, let's associate this project directory with a Firebase project.
You can create multiple project aliases by running firebase use --add,
but for now we'll just set up a default project.

? Please select an option: Use an existing project
? Select a default Firebase project for this directory: chat-c5491 (chat)
i  Using project chat-c5491 (chat)

=== Hosting Setup

Your public directory is the folder (relative to your project directory) that
will contain Hosting assets to be uploaded with firebase deploy. If you
have a build process for your assets, use your build's output directory.

? What do you want to use as your public directory? public
? Configure as a single-page app (rewrite all urls to /index.html)? Yes
? Set up automatic builds and deploys with GitHub? Yes
? File public/index.html already exists. Overwrite? Yes
✔  Wrote public/index.html

i  Detected a .git folder at /Users/okada/Documents/project/chat
i  Authorizing with GitHub to upload your service account to a GitHub repository's secrets store.

Visit this URL on this device to log in:
https://github.com/login/oauth/authorize?client_id=[client_id]&state=764004045&redirect_uri=http%3A%2F%2Flocalhost%3A9005&scope=read%3Auser%20repo%20public_repo

Waiting for authentication...
ここまで選択するとブラウザが開きました。
Firebase CLIにGithubへのアクセスを許可する画面ですね。
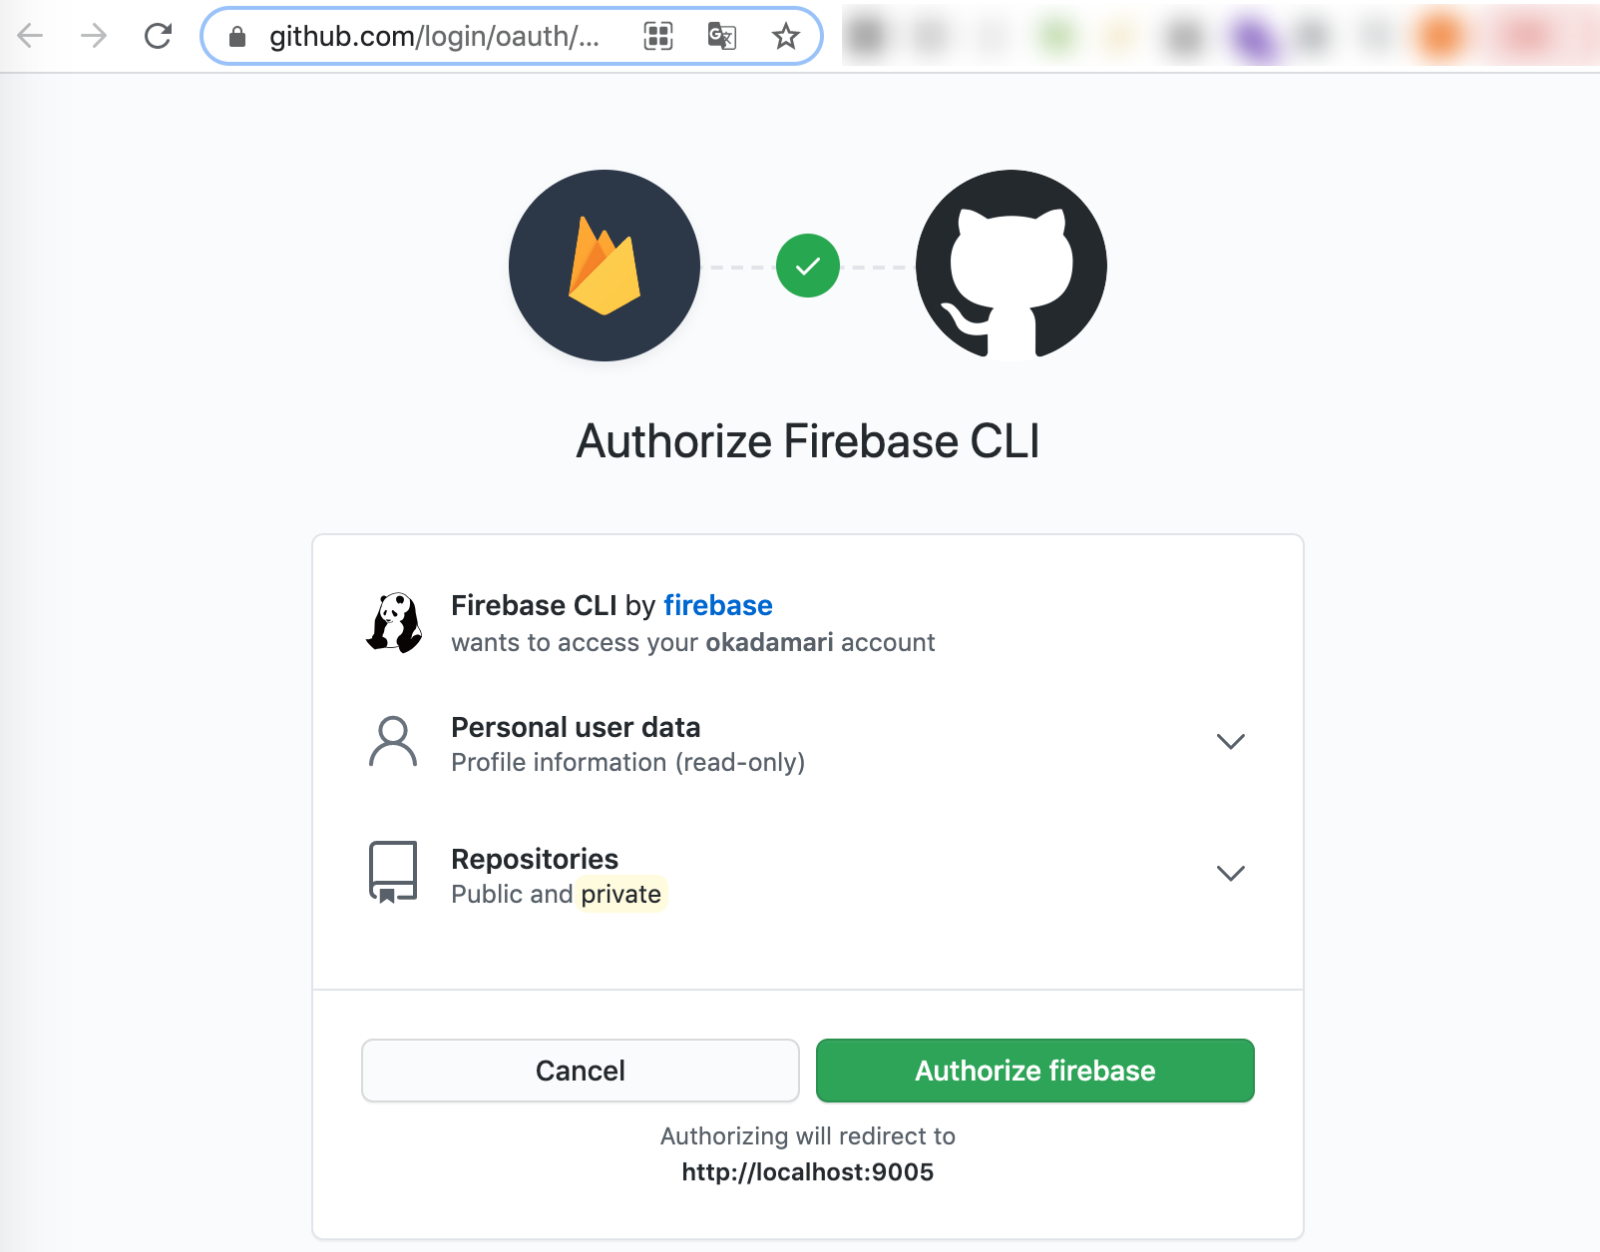
承認しました。
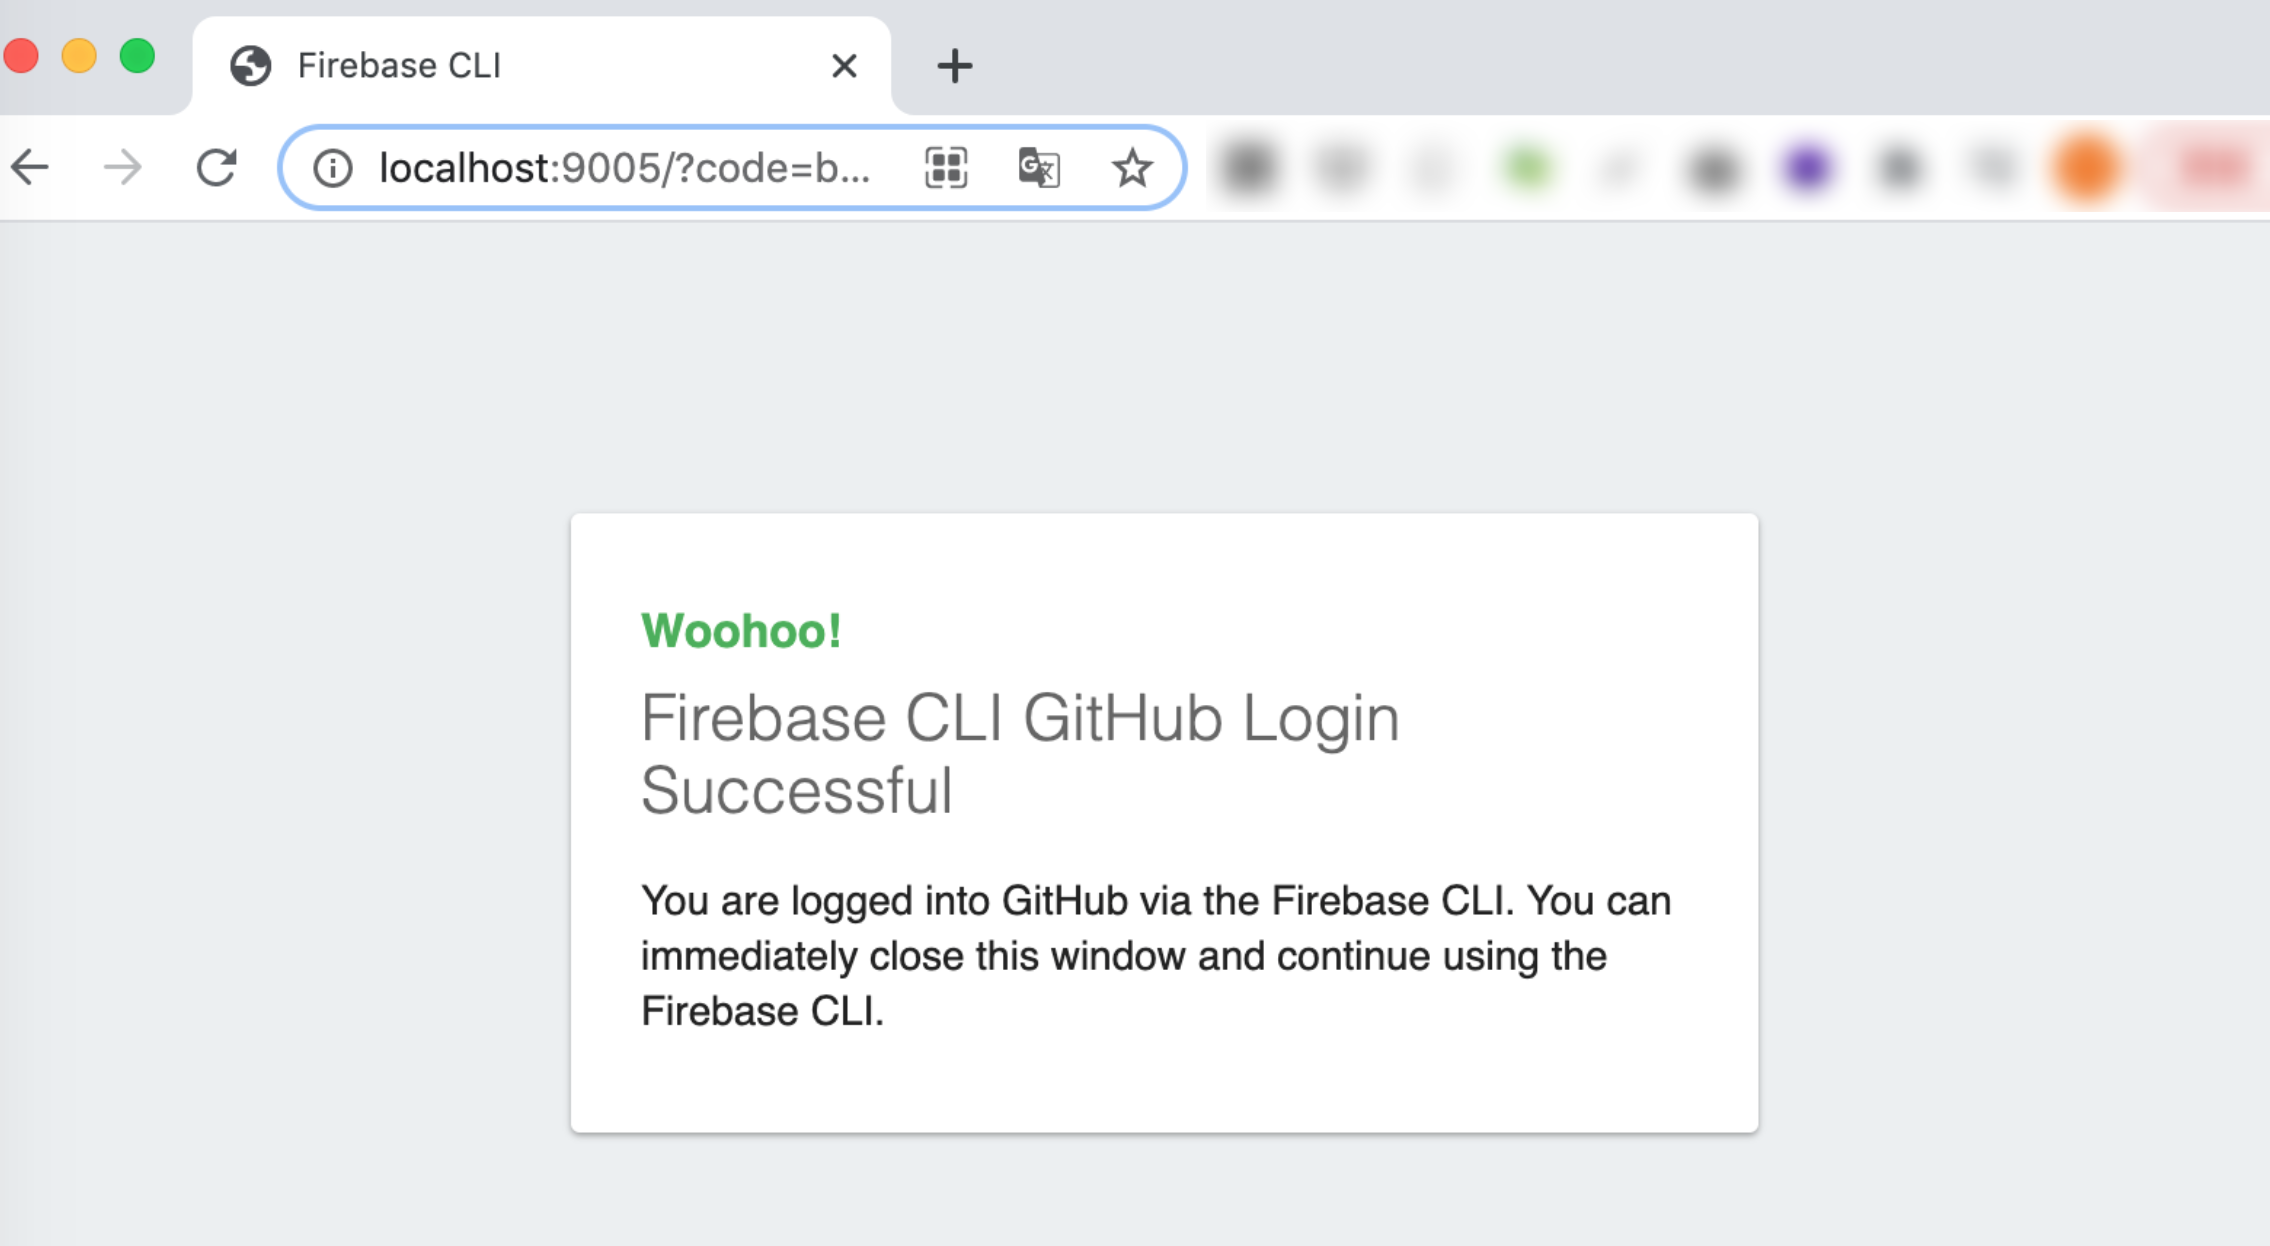
consoleに戻ると、さらに質問が表示されてました。
✔ Success! Logged into GitHub as okadamari
? For which GitHub repository would you like to set up a GitHub workflow? (format: user
/repository) okadamari/chat
✔ Created service account github-action-347200910 with Firebase Hosting admin permissions.
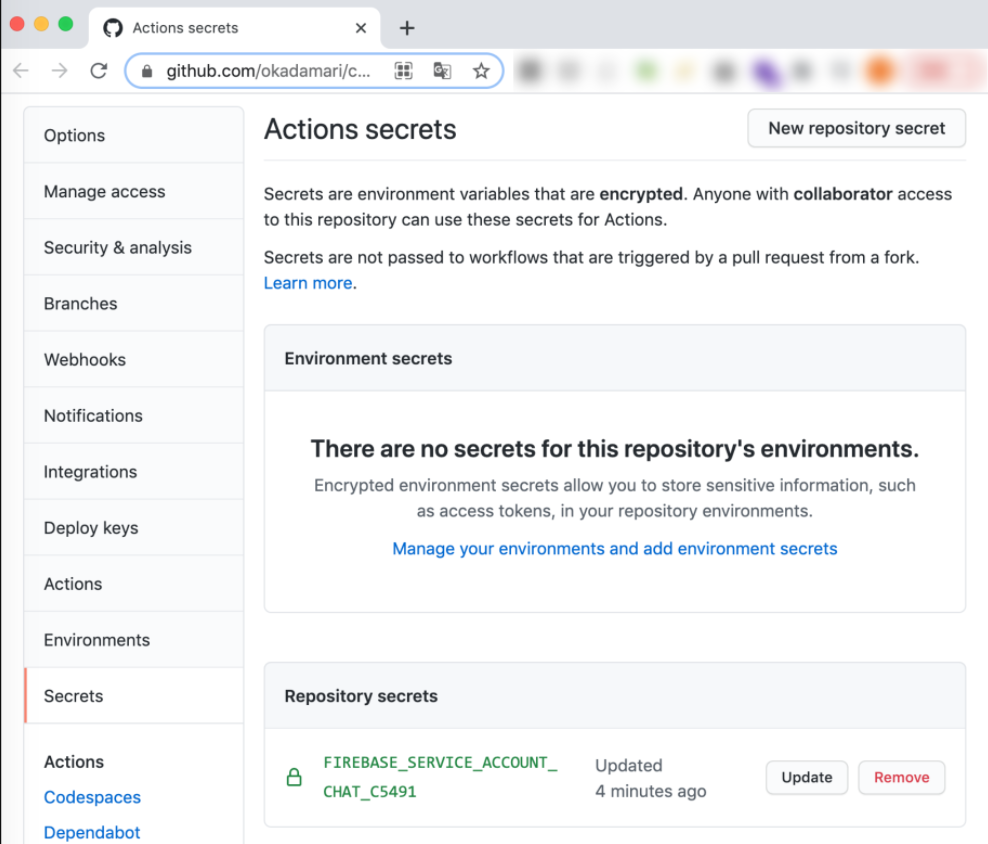
✔ Uploaded service account JSON to GitHub as secret FIREBASE_SERVICE_ACCOUNT_CHAT_C5491.
i You can manage your secrets at https://github.com/okadamari/chat/settings/secrets.
URLにアクセスすると、GithubのRepository secretsにFIREBASE_SERVICE_ACCOUNT_CHAT_C5491が保存されていました。
続きます。
? Set up the workflow to run a build script before every deploy? Yes
? What script should be run before every deploy? npm run build

✔  Created workflow file /Users/okada/Documents/project/chat/.github/workflows/firebase-hosting-pull-request.yml
? Set up automatic deployment to your site's live channel when a PR is merged? (Y/n)
以下の質問で手が止まりました。
? Set up automatic deployment to your site's live channel when a PR is merged? (Y/n)
live channelってなんだろう? ![]()
以下のサイトによると、本番環境のことのようです。
ライブチャンネル(本番環境)にプルリクエストのマージと同時に自動デプロイするかを尋ねられるのでそのままエンターキーを押してYesを選択します。
https://btj0.com/blog/react/firebase-github-ci/
PRマージ時に自動的に本番に反映してほしいので、Yesで続けます。
その後も選択していくと、無事設定が終わりました🎉
? What is the name of the GitHub branch associated with your site's l? What is the name of the GitHub branch associated with your site's l
ive channel? main

✔  Created workflow file /Users/okada/Documents/project/chat/.github/workflows/firebase-hosting-merge.yml

i  Action required: Visit this URL to revoke authorization for the Firebase CLI GitHub OAuth App:
https://github.com/settings/connections/applications/[client_id]
i  Action required: Push any new workflow file(s) to your repo

i  Writing configuration info to firebase.json...
i  Writing project information to .firebaserc...

✔  Firebase initialization complete!
設定全文です。
$ npx firebase init hosting

     ######## #### ########  ######## ########     ###     ######  ########
     ##        ##  ##     ## ##       ##     ##  ##   ##  ##       ##
     ######    ##  ########  ######   ########  #########  ######  ######
     ##        ##  ##    ##  ##       ##     ## ##     ##       ## ##
     ##       #### ##     ## ######## ########  ##     ##  ######  ########

You're about to initialize a Firebase project in this directory:

  /Users/okada/Documents/project/chat


=== Project Setup

First, let's associate this project directory with a Firebase project.
You can create multiple project aliases by running firebase use --add,
but for now we'll just set up a default project.

? Please select an option: Use an existing project
? Select a default Firebase project for this directory: chat-c5491 (chat)
i  Using project chat-c5491 (chat)

=== Hosting Setup

Your public directory is the folder (relative to your project directory) that
will contain Hosting assets to be uploaded with firebase deploy. If you
have a build process for your assets, use your build's output directory.

? What do you want to use as your public directory? public
? Configure as a single-page app (rewrite all urls to /index.html)? Yes
? Set up automatic builds and deploys with GitHub? Yes
? File public/index.html already exists. Overwrite? Yes
✔  Wrote public/index.html

i  Detected a .git folder at /Users/okada/Documents/project/chat
i  Authorizing with GitHub to upload your service account to a GitHub repository's secrets store.

Visit this URL on this device to log in:
https://github.com/login/oauth/authorize?client_id=[client_id]&state=764004045&redirect_uri=http%3A%2F%2Flocalhost%3A9005&scope=read%3Auser%20repo%20public_repo

Waiting for authentication...

✔  Success! Logged into GitHub as okadamari

? For which GitHub repository would you like to set up a GitHub workflow? (format: user
/repository) okadamari/chat

✔  Created service account github-action-347200910 with Firebase Hosting admin permissions.
✔  Uploaded service account JSON to GitHub as secret FIREBASE_SERVICE_ACCOUNT_CHAT_C5491.
i  You can manage your secrets at https://github.com/okadamari/chat/settings/secrets.

? Set up the workflow to run a build script before every deploy? Yes
? What script should be run before every deploy? npm run build

✔  Created workflow file /Users/okada/Documents/project/chat/.github/workflows/firebase-hosting-pull-request.yml
? Set up automatic deployment to your site's live channel when a PR is merged? Yes
? What is the name of the GitHub branch associated with your site's l? What is the name of the GitHub branch associated with your site's l
ive channel? main

✔  Created workflow file /Users/okada/Documents/project/chat/.github/workflows/firebase-hosting-merge.yml

i  Action required: Visit this URL to revoke authorization for the Firebase CLI GitHub OAuth App:
https://github.com/settings/connections/applications/[client_id]
i  Action required: Push any new workflow file(s) to your repo

i  Writing configuration info to firebase.json...
i  Writing project information to .firebaserc...

✔  Firebase initialization complete!
差分が出ていたのでとりあえずコミットしました。
https://github.com/okadamari/chat/commit/47dbd0fe3d50509a90db2b1a01ca915c8a8c4d64
が、.firebasercはプロジェクトによってはコミットしないほうが良いそうです。
オープンソース プロジェクトまたはスターター テンプレートについては、通常 .firebaserc ファイルをチェックインするべきではありません。
https://firebase.google.com/docs/cli?hl=ja
ファイルの中身は、プロジェクトIDしか記載されていなかったのですが、今後秘匿情報が入ってくることがあるんですかね ![]()
わかったら追記します。
ステップ 3: サイトにデプロイする
以下を叩いてみます。
$ npx firebase deploy --only hosting
以下のファイルが書き出されました。
.firebase/hosting.xxxxxx.cache
このファイルはなんだろう ![]()
検索してみると、要らないとのことだったので、.gitignoreへ登録しました。
デプロイはできたようです。
$ npx firebase deploy --only hosting
=== Deploying to 'chat-c5491'...
i deploying hosting
i hosting[chat-c5491]: beginning deploy...
i hosting[chat-c5491]: found 2 files in public
✔ hosting[chat-c5491]: file upload complete
i hosting[chat-c5491]: finalizing version...
✔ hosting[chat-c5491]: version finalized
i hosting[chat-c5491]: releasing new version...
✔ hosting[chat-c5491]: release complete
✔ Deploy complete!
Project Console: https://console.firebase.google.com/project/chat-c5491/overview
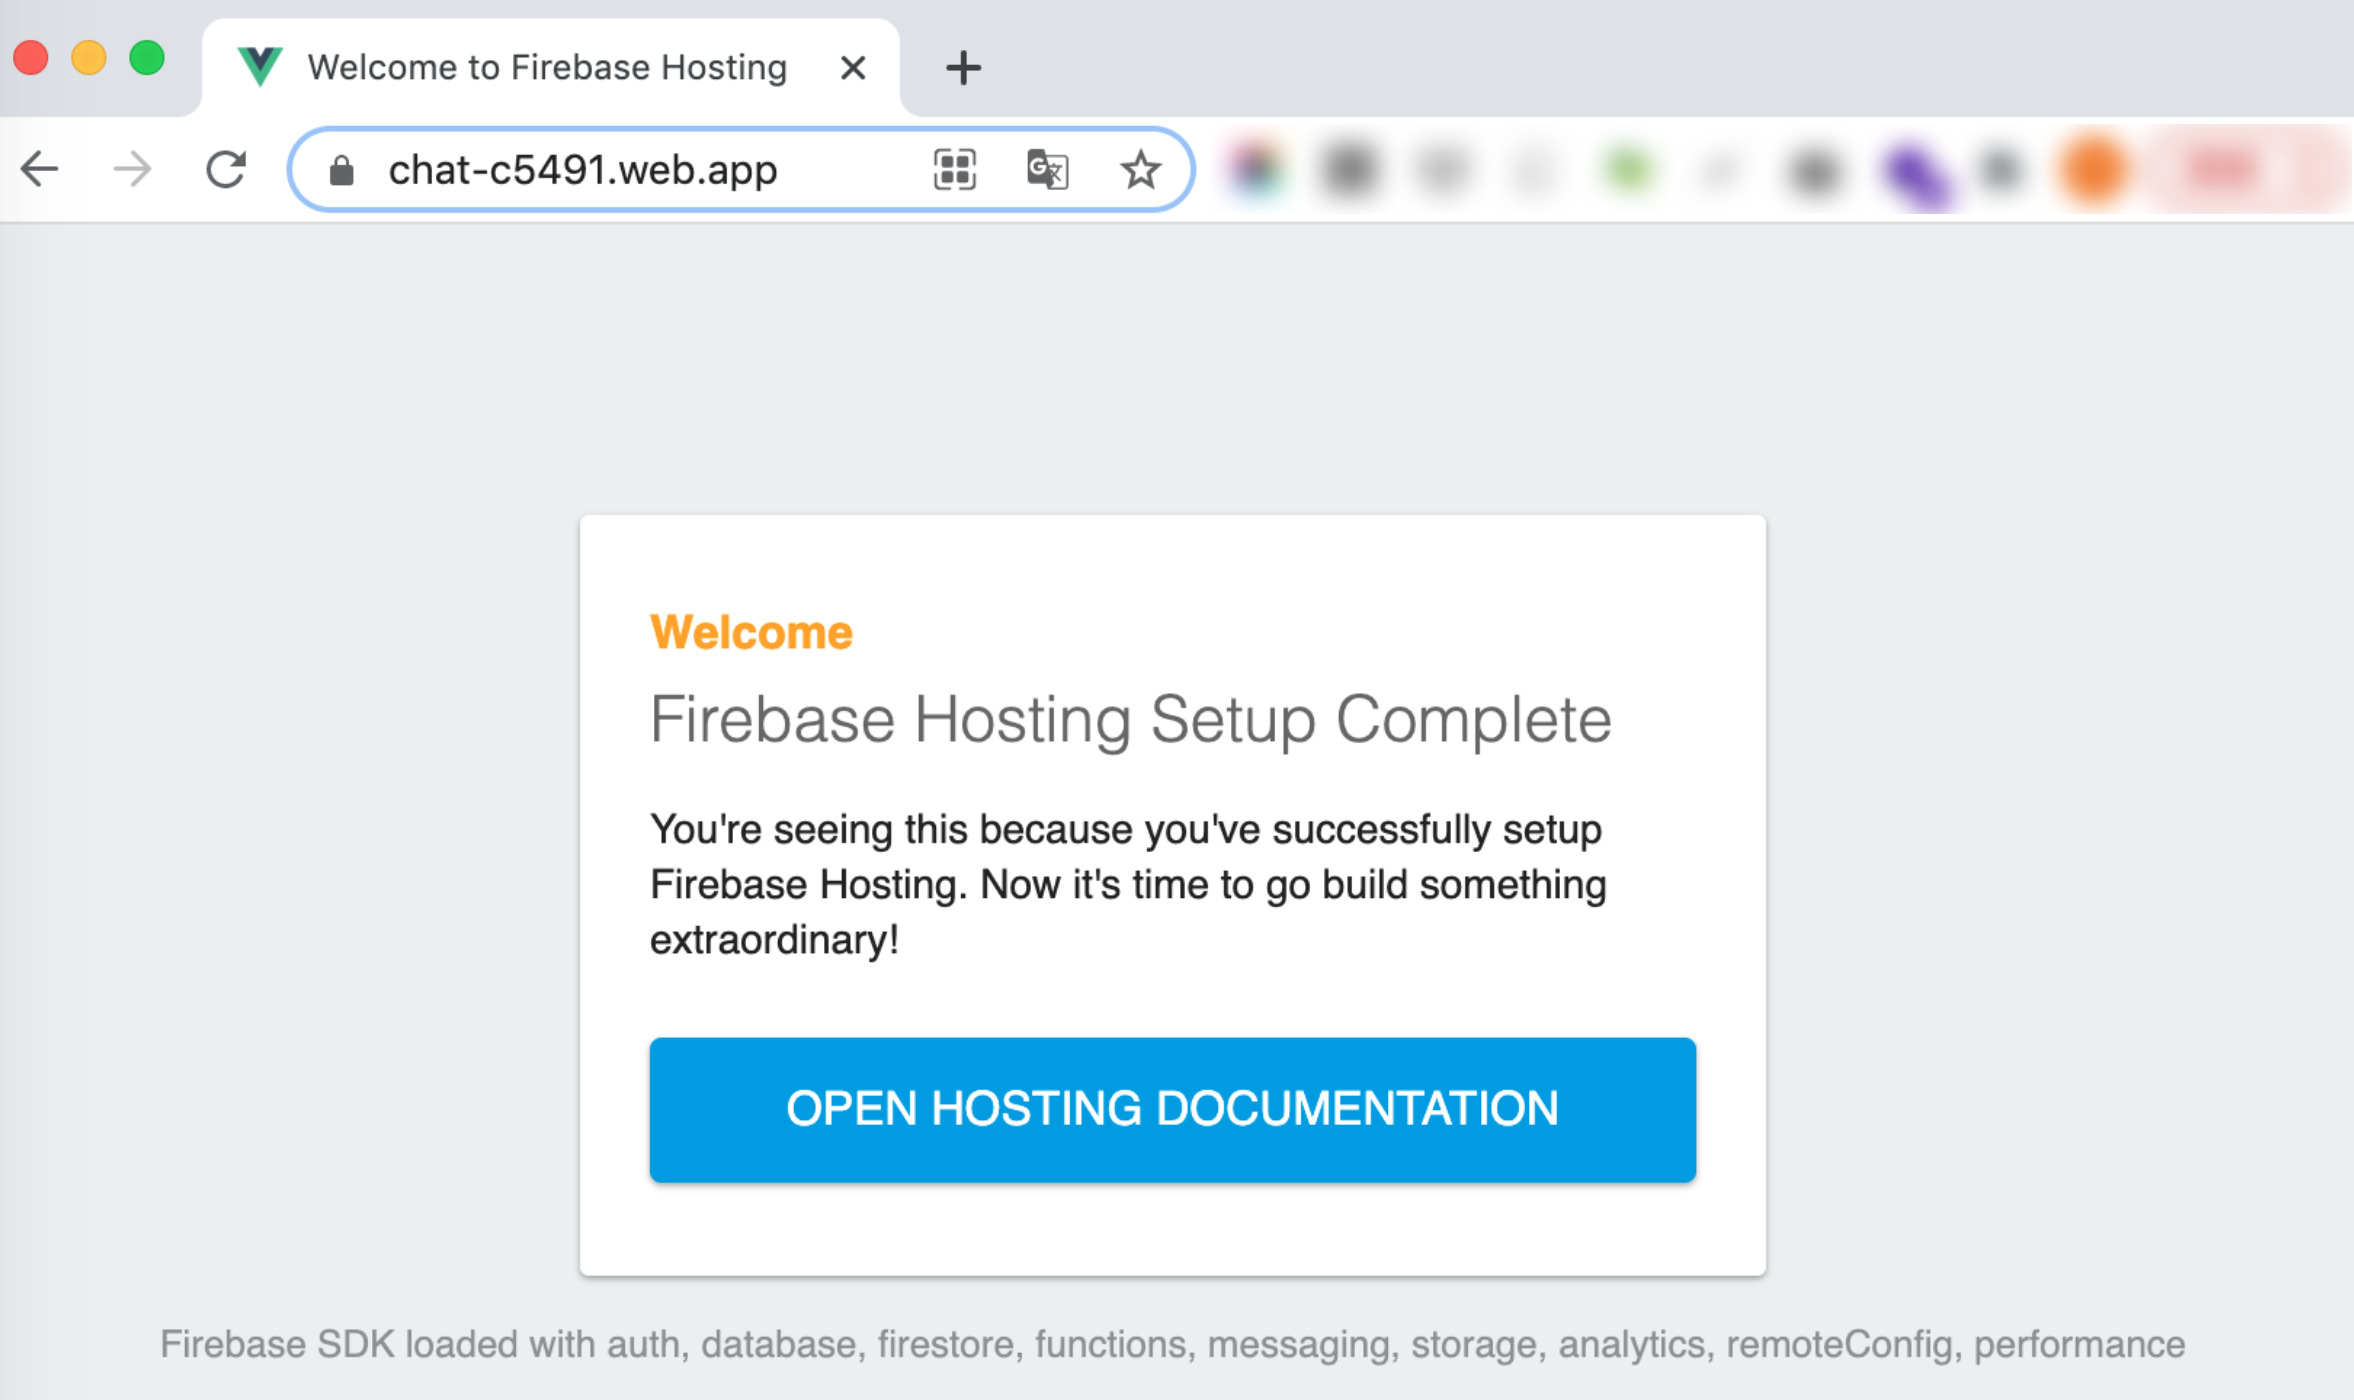
Hosting URL: https://chat-c5491.web.app
表示されたURLにアクセスすると、こんな画面になりました。
Project Consoleはこうでした。
初期設定はできたようです ![]()
アプリケーションをFirebase Hosting用に変更
Github Pages用に変えていた部分を、Firebase Hosting用に変更します。
buildディレクトリをpublicに変更
Github Pagesでは、書き出し先のディレクトリをdocsにしていたのでpublicに変更しました。
具体的には、vue.config.js を以下に変更して、docsディレクトリの中身を消しました。
module.exports = {
  outputDir: 'public'
}
この時のコミットは以下です。
https://github.com/okadamari/chat/commit/208a39f32825439dfb092ad667f1f4e4b7744c0a
ちなみにvue-cliのデフォルトの書き出し先はdistです。
You can deploy the built content in the dist directory to any static file server
https://cli.vuejs.org/guide/deployment.html
Firebase Hostingのディレクトリをdocsにすることも可能だと思います。
Firebase Hosting初期設定時のの以下の質問でdocsと答えればよさそうです(試していません)
? What do you want to use as your public directory? public
base directoryを削除
サブディレクトリ対応のためにcreateWebHistoryに渡していたbase directoryを削除します。
src/router.js
 const router = createRouter({
-  history: createWebHistory('/chat/'),
+  history: createWebHistory('/'),
   routes,
 });
ローカルで表示確認
以上でアプリケーションの変更は完了です。
この設定で、Vue CLIでローカルで表示できることを確認しました。
$ npm run serve
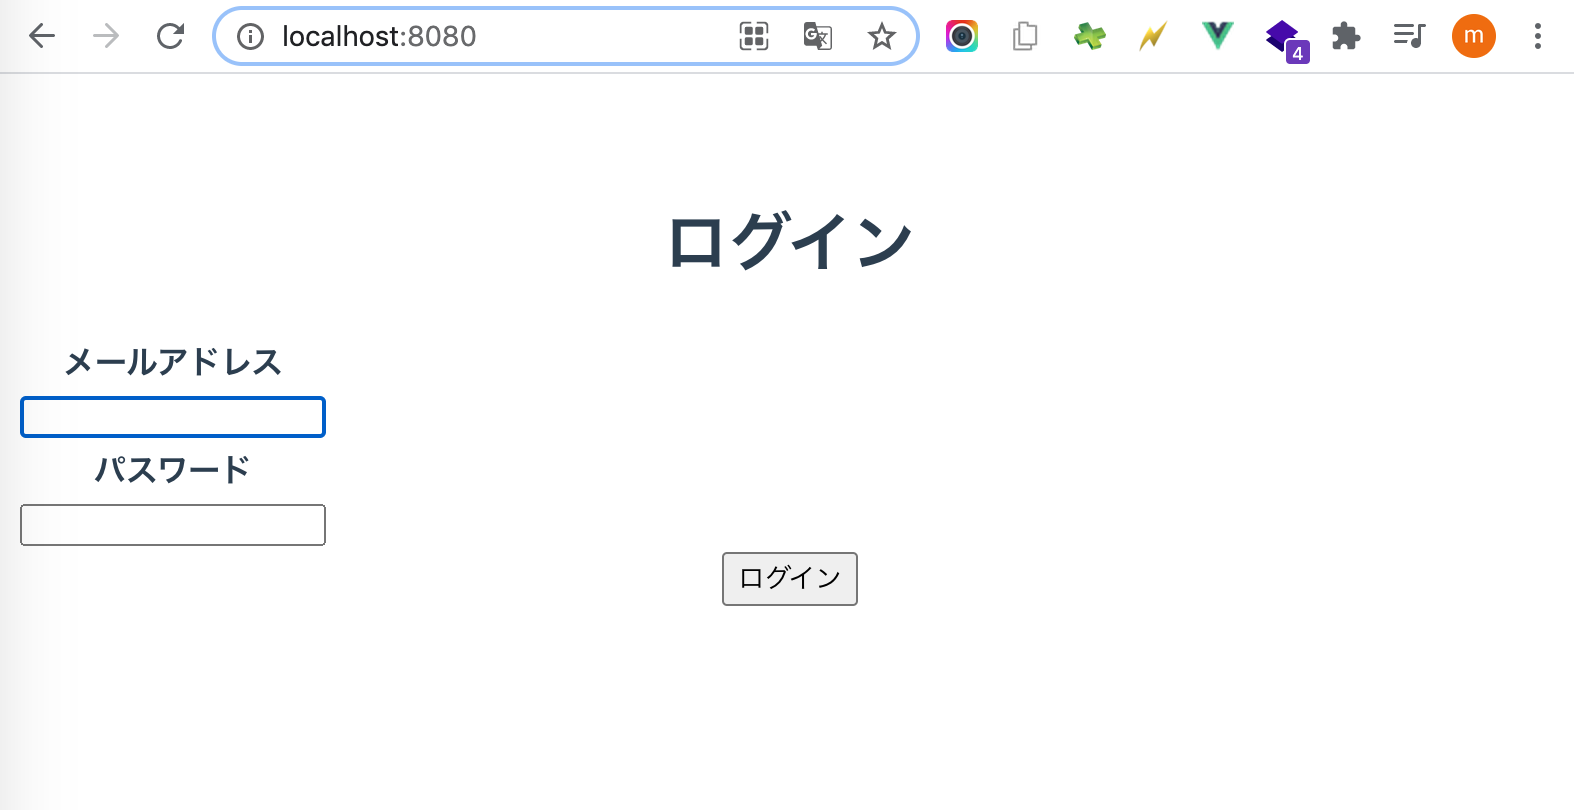
アプリが表示できました。
Firebase Hostingへデプロイする
アプリの準備ができたので、Firebase Hostingにデプロイする手順へ戻ります。
ステップ1:ローカルでテストする
まずはローカルでテストをしてみます。
手順は以下を参照しました。
コンソールに以下のマンドを打ちました。
$ npx firebase emulators:start
i  emulators: Starting emulators: hosting
i  hosting: Serving hosting files from: public
✔  hosting: Local server: http://localhost:5000
⚠  emulators: The Emulator UI requires a project ID to start. Configure your default project with 'firebase use' or pass the --project flag.

┌─────────────────────────────────────────────────────────────┐
│ ✔  All emulators ready! It is now safe to connect your app. │
└─────────────────────────────────────────────────────────────┘

┌──────────┬────────────────┐
│ Emulator │ Host:Port      │
├──────────┼────────────────┤
│ Hosting  │ localhost:5000 │
└──────────┴────────────────┘
  Emulator Hub running at localhost:4400
  Other reserved ports: None

Issues? Report them at https://github.com/firebase/firebase-tools/issues and attach the *-debug.log files.
できたようです。
しかし、http://localhost:5000/ を開くと、404エラーが出ていました ![]()
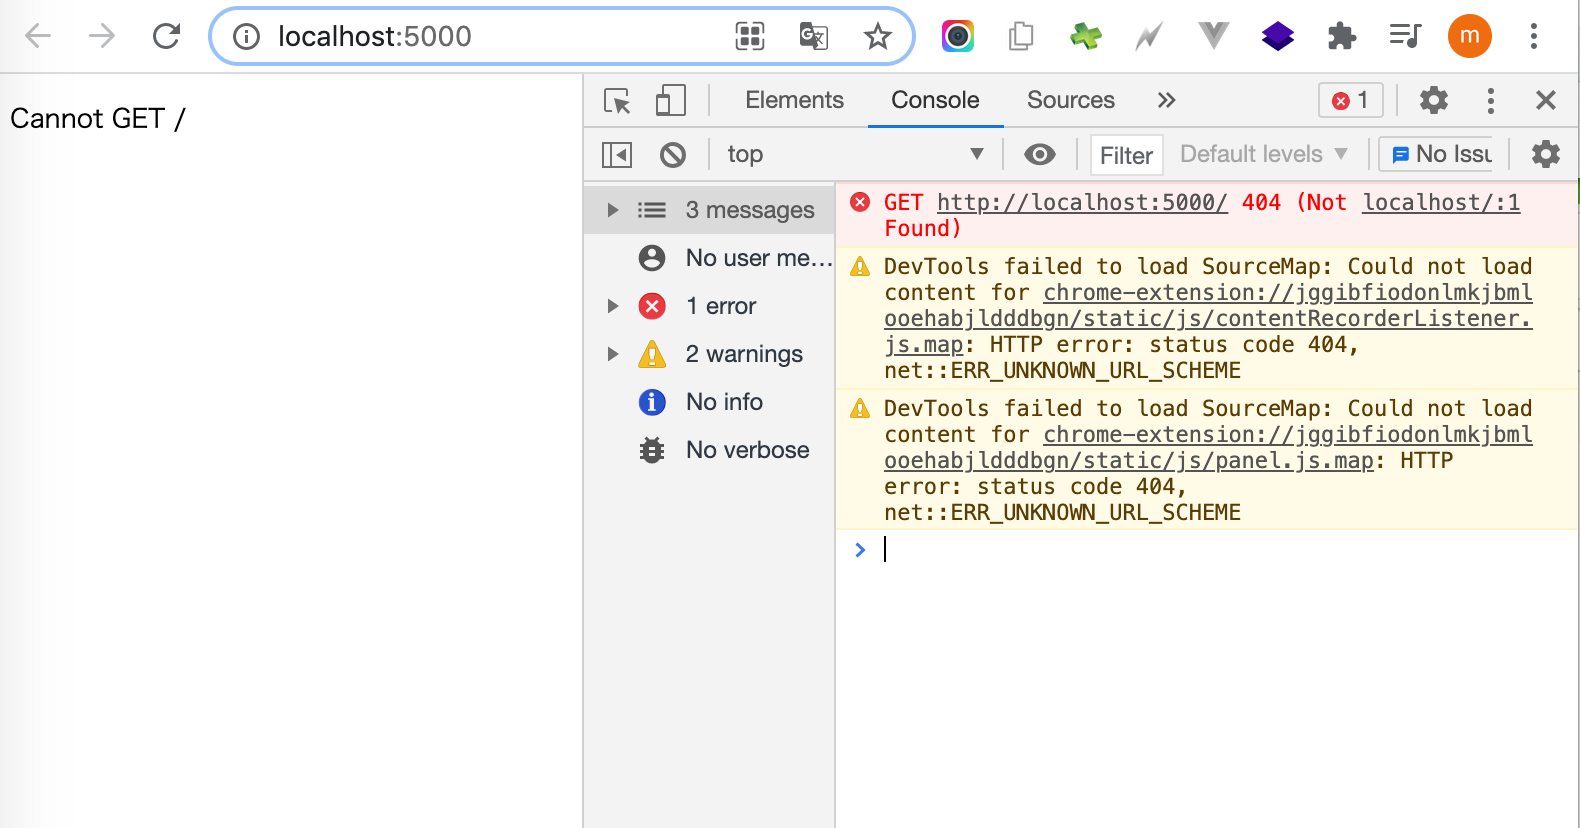
ファイルがないようですね。
そういえばbuildディレクトリをpublicに変更してから、一度もbuildしていませんでした![]()
別のコンソールを開き、buildをしました。
$ npm run build
その後、http://localhost:5000/ をリロードすると、表示されました ![]()
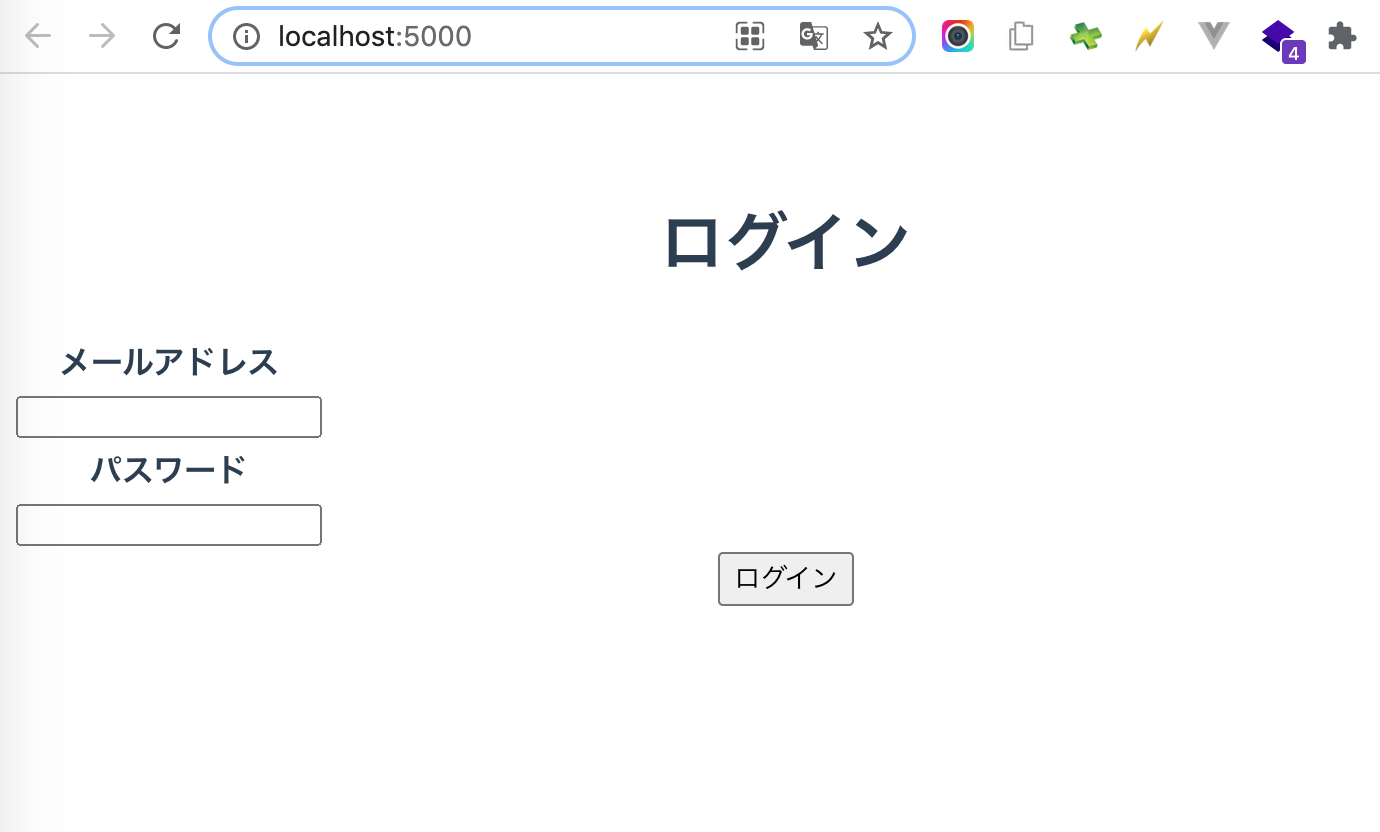
ちなみに、http://localhost:5000/ 環境にはHot Module Replacement (HMR)機能はないので、build後に手動でリロードする必要があります。
ステップ2:プレビューして共有する
Firebase Hostingでは、プレビュー用の環境も簡単に作れます。すごいですね ![]()
以下の公式のとおりに進めます。
今回は、feature_mission1というCHANNEL_IDでデプロイしました。
$ npx firebase hosting:channel:deploy feature_mission1
✔  hosting:channel: Channel feature-mission1 has been created on site chat-c5491.

=== Deploying to 'chat-c5491'...

i  deploying hosting
i  hosting[chat-c5491]: beginning deploy...
i  hosting[chat-c5491]: found 2 files in public
✔  hosting[chat-c5491]: file upload complete
i  hosting[chat-c5491]: finalizing version...
✔  hosting[chat-c5491]: version finalized
i  hosting[chat-c5491]: releasing new version...
✔  hosting[chat-c5491]: release complete

✔  Deploy complete!

Project Console: https://console.firebase.google.com/project/chat-c5491/overview
Hosting URL: https://chat-c5491.web.app

✔  hosting:channel: Channel URL (chat-c5491): https://chat-c5491--feature-mission1-gzs686nw.web.app [expires 2021-05-04 09:08:57]
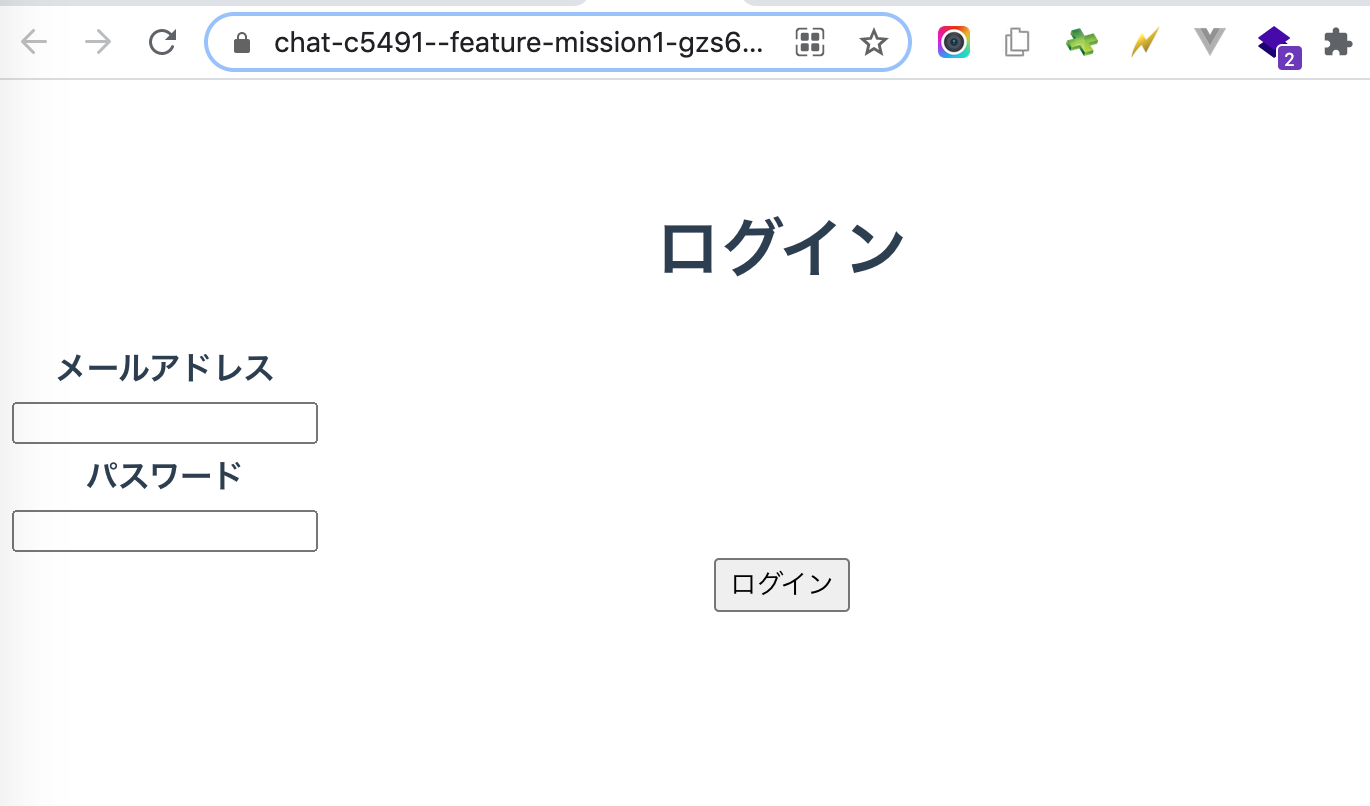
表示できました ![]()
https://chat-c5491--feature-mission1-gzs686nw.web.app
プレビューURLの有効期限はデフォルト7日間で、変更も可能だそうです。
デフォルトでは、プレビューチャネルは作成日から7日で有効期限が切れますが、サイトのライブチャネルが期限切れになることはありません。
https://firebase.google.com/docs/hosting/manage-hosting-resources?authuser=2#preview-channel-expiration
注意点としては、プレビューURLは認証付きではないので、URLを知られてしまうと誰でもアクセスできてしまうことです。
プレビューURLは(ランダムハッシュが含まれているため)推測するのは困難ですが、公開されていることに注意してください。したがって、URLを知っている人なら誰でもアクセスできます。
https://firebase.google.com/docs/hosting/test-preview-deploy?authuser=2#preview-channels
ステップ3:ライブでデプロイする
次は、本番環境へデプロイします。
https://firebase.google.com/docs/hosting/test-preview-deploy?authuser=2#deploy-live
前の章で作ったプレビュー用の環境をデプロイする方法と、ローカル環境をデプロイする方法の2つがあるそうです。
今回は、ローカル環境をデプロイする方を試しました。
オプション2:ローカルプロジェクトディレクトリからライブチャネルにデプロイする
https://firebase.google.com/docs/hosting/test-preview-deploy?authuser=2#deploy-project-directory-to-live
以下のコマンドを打ちました。
$ npx firebase deploy --only hosting

=== Deploying to 'chat-c5491'...

i  deploying hosting
i  hosting[chat-c5491]: beginning deploy...
i  hosting[chat-c5491]: found 6 files in public
⠋  hosting: adding files to version [0/6] (⠙  hosting: adding files to version [0/6] (⠹  hosting: adding files to version [0/6] (⠸  hosting: adding files to version [0/6] (⠼  hosting: adding files to version [0/6] (⠴  hosting: adding files to version [0/6] (✔  hosting[chat-c5491]: file upload complete
i  hosting[chat-c5491]: finalizing version...
✔  hosting[chat-c5491]: version finalized
i  hosting[chat-c5491]: releasing new version...
✔  hosting[chat-c5491]: release complete

✔  Deploy complete!

Project Console: https://console.firebase.google.com/project/chat-c5491/overview
Hosting URL: https://chat-c5491.web.app
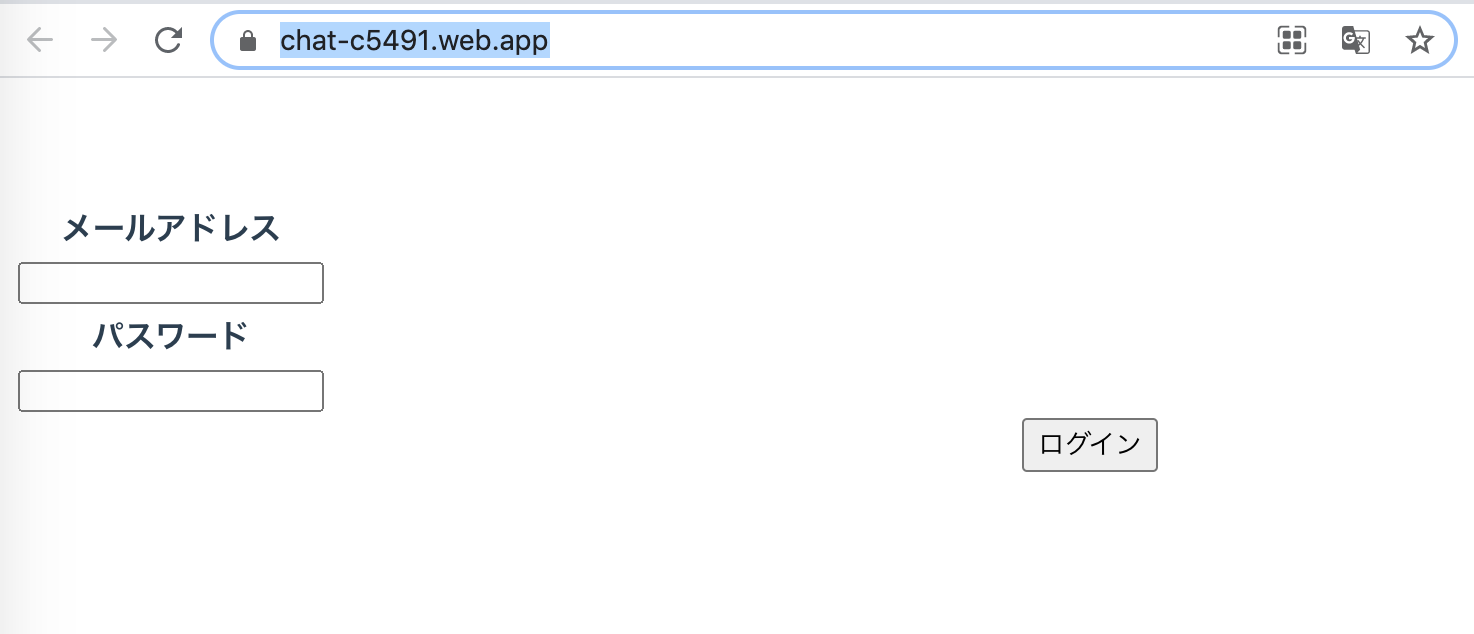
特にエラーなく表示されました ![]()
GCPコンソールでFirebase HostingのURLを許可する
今回のアプリではAPIキーの制限もしているので、発行されたアドレス: https://chat-c5491.web.app を許可するように設定しました。
設定方法は以下の記事にまとめています。
ここまでで、ローカルからFirebase Hostingにデプロイできるようになりました ![]()
GitHubマージ時にデプロイする
初期設定でGithub Actionsを自動生成してくれていました。
ドキュメントは以下の辺りのようです。
自動生成されたファイルは以下の2ファイルです。
通常のマージ時と、PRマージ時で別れているようですね。
.github/workflows/firebase-hosting-merge.yml
.github/workflows/firebase-hosting-pull-request.yml
ですが、自動生成のままの状態では、buildに失敗していました ![]()
Run npm run build
  npm run build
  shell: /usr/bin/bash -e ***0***
sh: 1: vue-cli-service: not found
npm ERR! code ELIFECYCLE
npm ERR! syscall spawn
npm ERR! file sh
npm ERR! errno ENOENT
npm ERR! chat@0.1.0 build: `vue-cli-service build`
npm ERR! spawn ENOENT
npm ERR!
npm ERR! Failed at the chat@0.1.0 build script.
npm ERR! This is probably not a problem with npm. There is likely additional logging output above.
npm WARN Local package.json exists, but node_modules missing, did you mean to install?

npm ERR! A complete log of this run can be found in:
npm ERR!     /home/runner/.npm/_logs/2021-04-28T02_36_02_342Z-debug.log

> chat@0.1.0 build /home/runner/work/chat/chat
> vue-cli-service build

Error: Process completed with exit code 1.
https://github.com/okadamari/chat/runs/2453837420?check_suite_focus=true
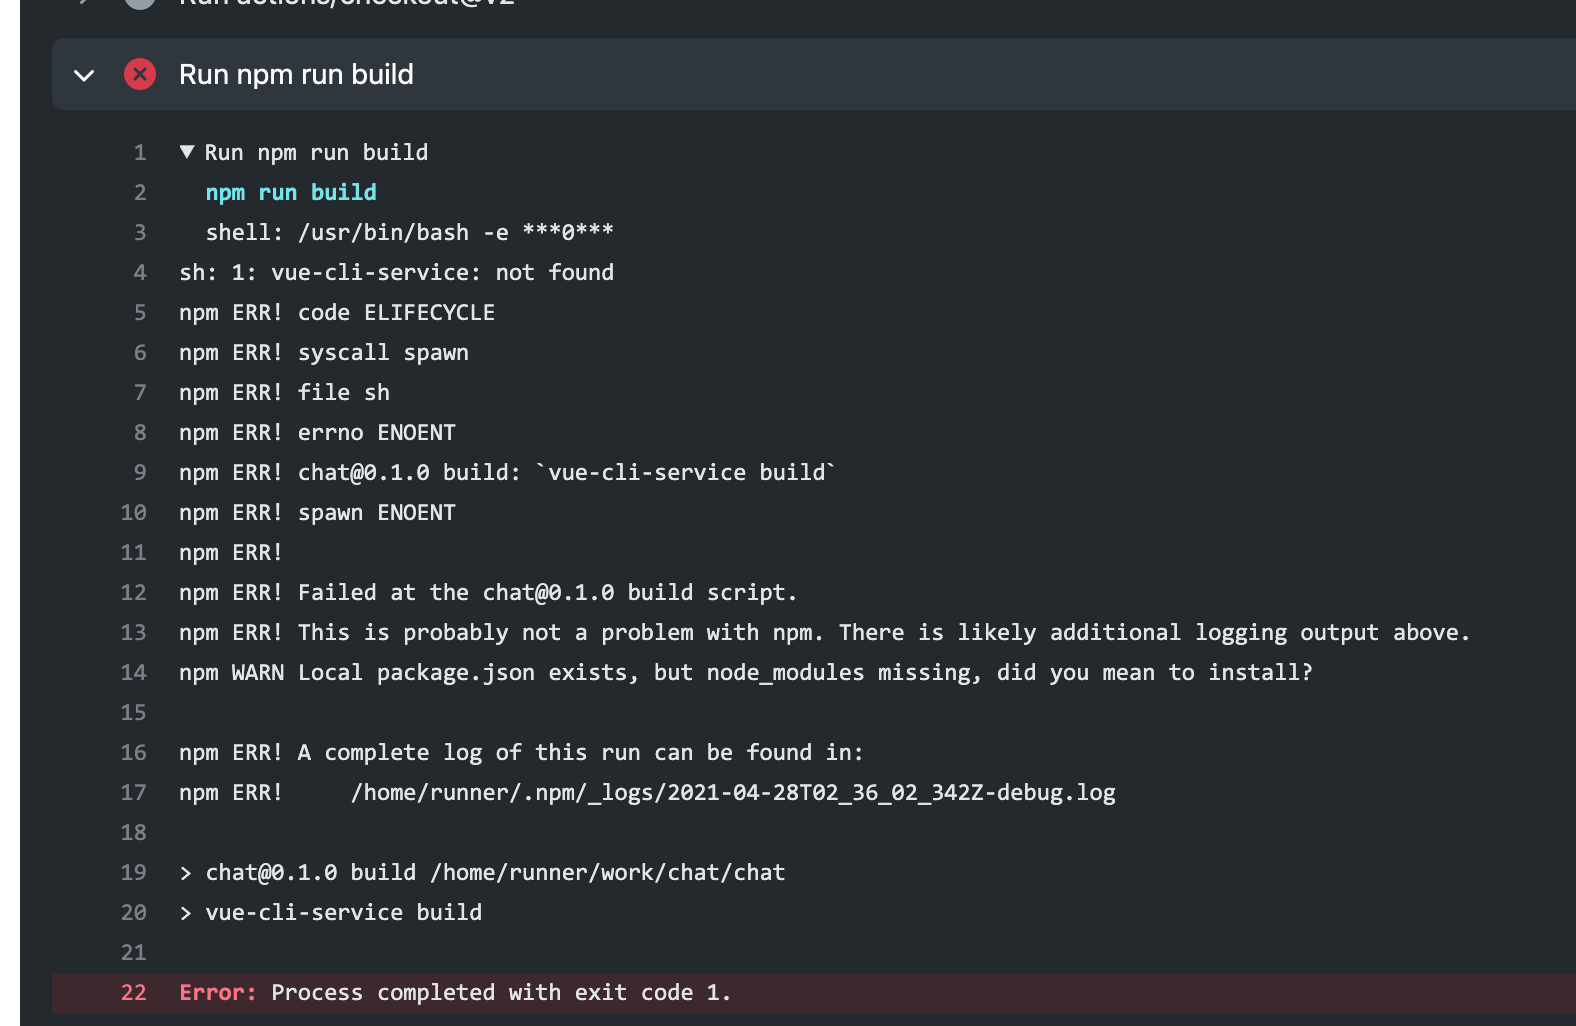
サーバーには、vue-cli-serviceがないためでした。
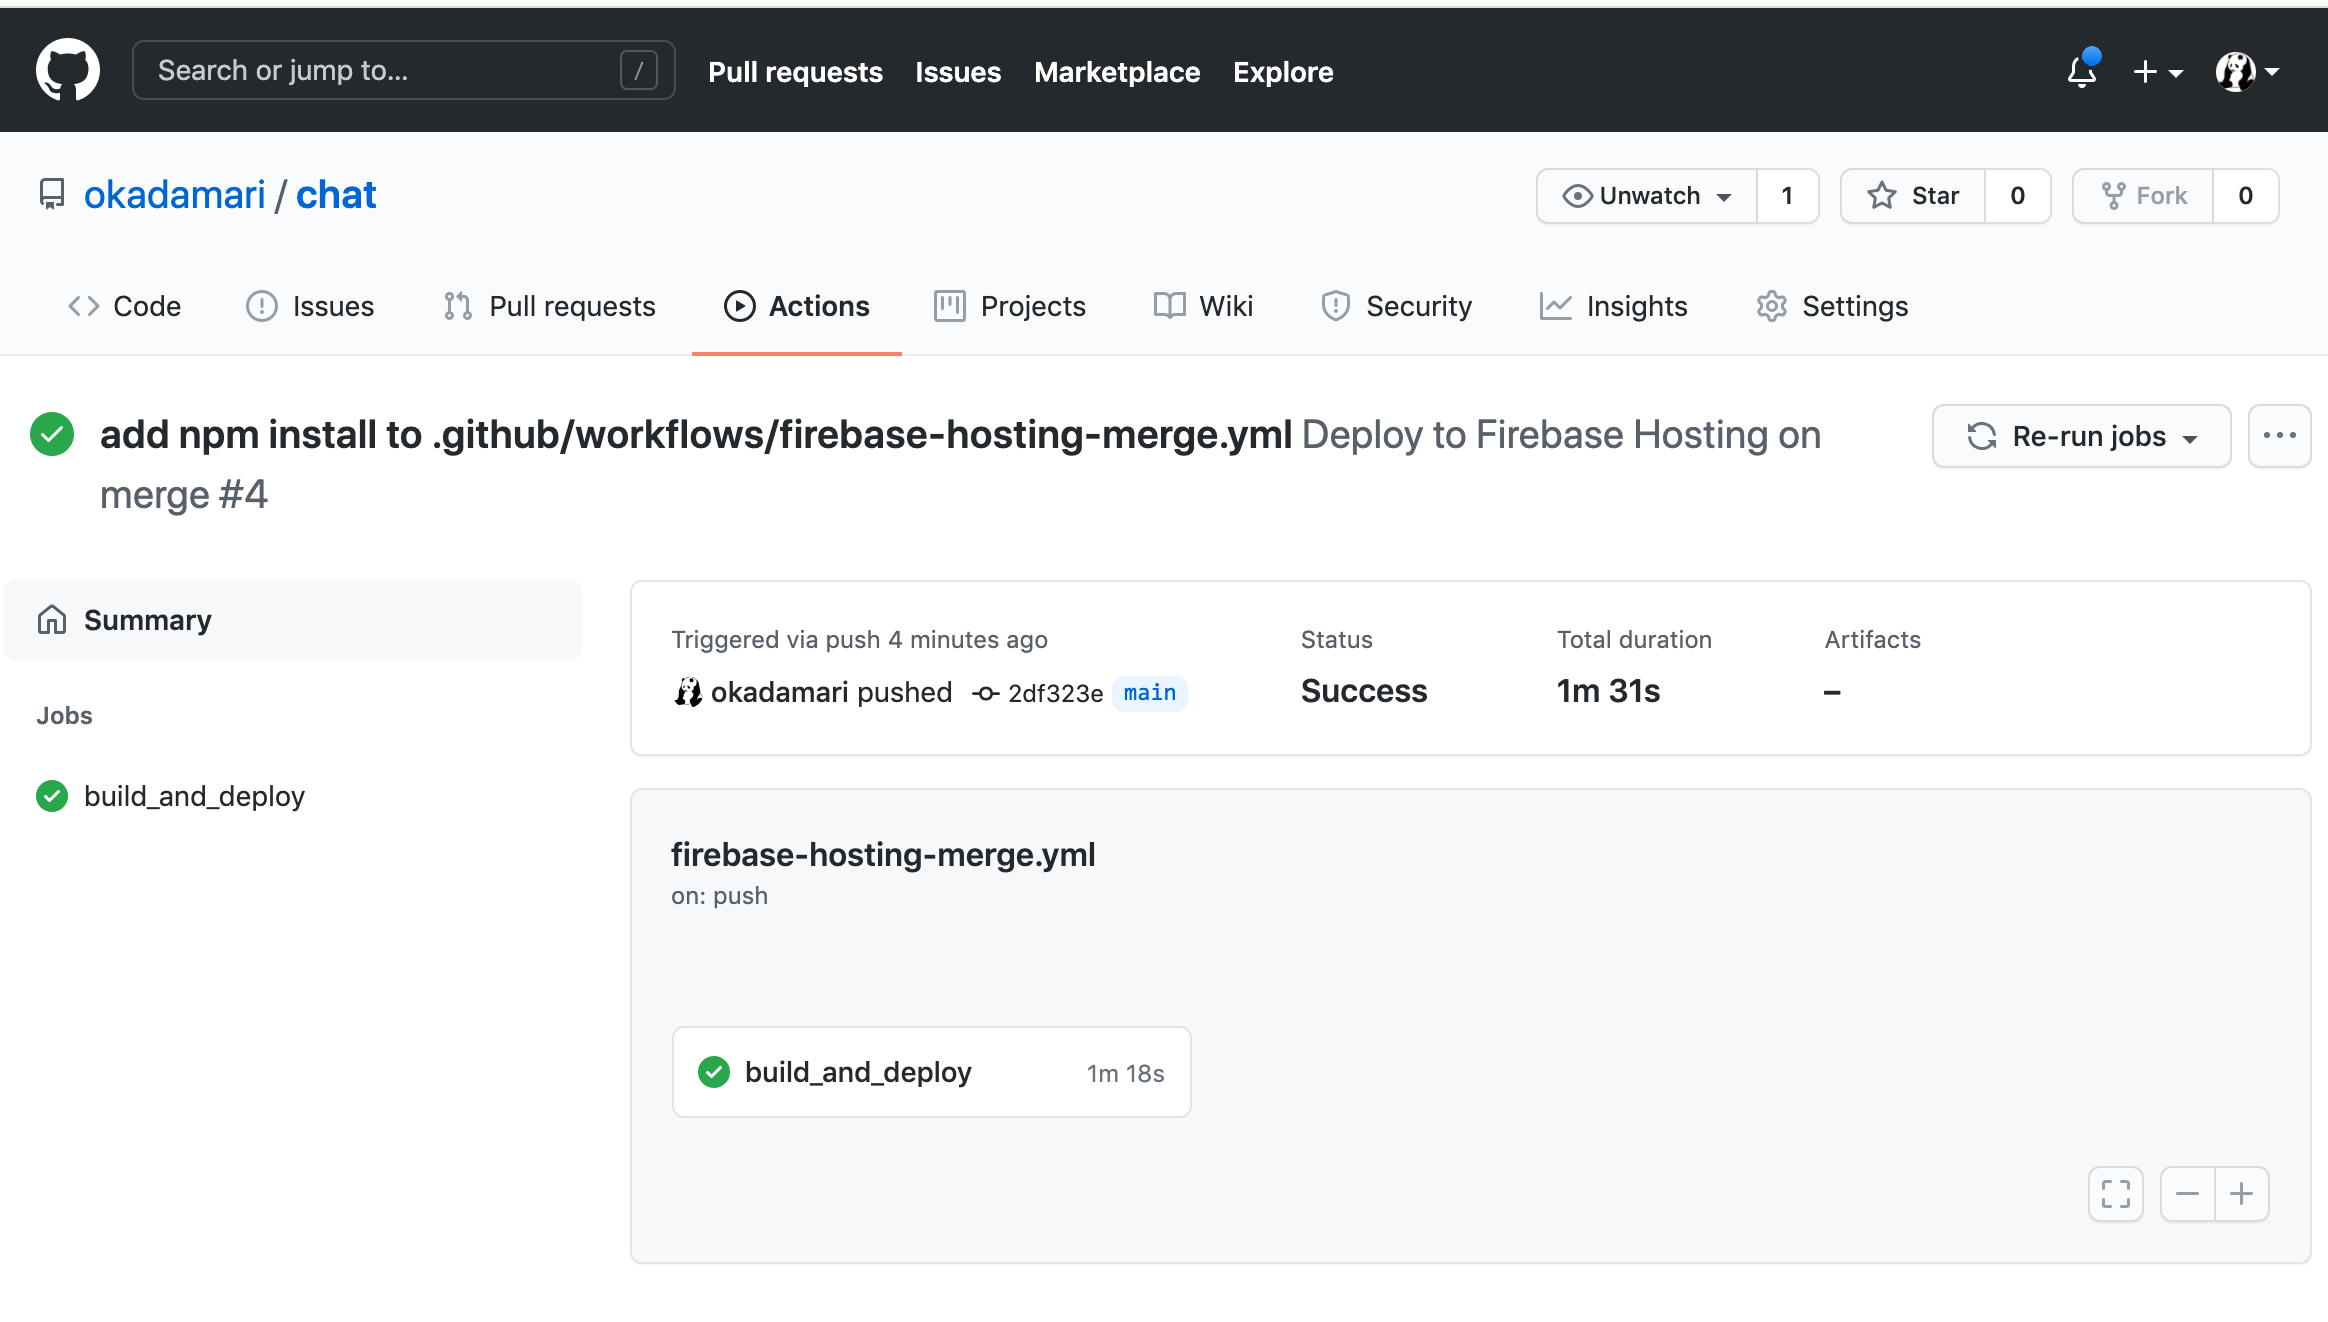
そのため、以下を追加しました。
- run: npm install
今度はデプロイできました ![]()
https://github.com/okadamari/chat/actions/runs/791343662
ちなみに失敗したのは、初期設定時に以下の質問でnpm run buildとしてしまったからでした。
? What script should be run before every deploy? npm run build
確かデフォルトは、npm ci && npm run buildだったので、そのままにしておけばよかったのだと思います…!
あとがき
後で調べたら、Github Pagesで404.htmlを作る方法を見つけました。
その手があったか!