mixiグループ Advent Calendar 2017の10日目の記事です。
XFLAGスタジオでデータ分析基盤の運用を担当している ojima です。
私たちのチームでは分析基盤の一部として、Zeppelin や re:dash、内製のダッシュボードなど、データ可視化ツール・分析ツールをいくつか社内向けに提供しています。こういったツールには必ず認証と権限管理の問題がついて回ってきます。
認証や権限管理などを集中管理する場合は LDAP などを使うのが一般的かと思いますが、 LDAP の運用はなかなか辛いものがあります。そこで、私たちのチームでは Google OAuth 2.0 と Google Group を用いて認証・権限管理を行うことにしました。
この記事では、 Zeppelin を例にして認証の流れや設定例を紹介したいと思います。
(Zeppelinは、ブラウザ上でデータの可視化や分析ができるツールです。Jupyter Notebook によく似ていますが、マルチユーザー向けの機能やプラグインの管理画面などが充実しています。)
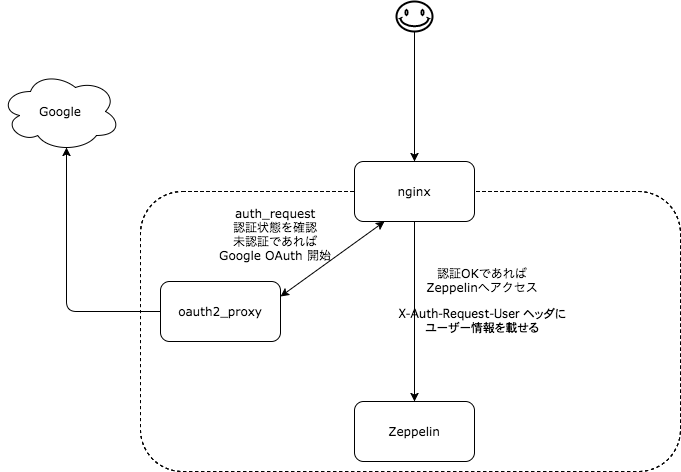
認証の流れ
nginx と oauth2_proxy を組み合わせて認証部分を組み立てます。
-
ユーザーが nginx にアクセス
-
nginx は oauth2_proxy に認証状態を問い合わせる。
- 認証済みであれば oauth2_proxy は 202 を返す。
- 認証済みでなければ Google OAuth の画面にリダイレクト
- 認証に成功すれば 202、そうでばなければ 401 を返す。ここで特定のグループに所属するユーザーだけを許可することも可能。
- 認証に成功した場合、ユーザー名をHTTPヘッダにセットして nginx に返す。
-
認証が成功していれば nginx は zeppelin にアクセスする。その際に X-Remote-User ヘッダにユーザー情報を付加する。
-
Zeppelin は X-Remote-User ヘッダにセットされているユーザーとしてログインした状態でリクエストを処理する。
注意
- 上の構成では、Zeppelin は X-Remote-User がセットされていれば、無条件にログインしているものとして扱います。nginx 以外からはアクセスできないようにしておかないといけません。
- nginx 無しで oauth2_proxy 単体でもプロキシとして使うことができますが、oauth2_proxy は WebSocket に対応していません。Zeppelin では WebSocket が必要なため上のような構成にしています。
oauth2_proxy をちょっと拡張
基本的には以上の流れで認証を行うのですが、本家の bitly/oauth2_proxy では少し機能が足りなかったので、 ojima-h/oauth2_proxy にフォークしてちょっとだけ機能を追加しました。
変更したのは以下の点です:
- 認証に成功した際に、グループ情報もHTTPヘッダに含めるようにしました。これにより、Zeppelin にグループ情報を渡すことができ、Zepplin 側でグループに応じてより細かな権限の制御ができるようになります。
- bitly/oauth2_proxy では、特定のグループにアクセスを制限するために、 Google Directory API を使っており、ドメインの管理者権限が必要でした。そこで、Google Apps Script を用いてグループ情報を取得できるようにし、管理者権限がなくても使えるようにしました。
グループ情報がHTTPヘッダを通して Zeppelin に渡ることで、Google Group ごとに Zeppelin の権限を割り振ることができるわけです。
このあたりの機能が必要であれば ojima-h/oauth2_proxy を試してもらえると良いかもしれません。
設定例
フォーク版の ojima-h/oauth2_proxy を使う場合の設定例を以下で紹介します。
Google Apps Script 作成
function listMyGroups() {
  var groups = GroupsApp.getGroups();

  return groups.map(function (group) {
    var group_name = group.getEmail();
    Logger.log(group_name);
    return group_name;
  });
}
このようなスクリプトを作成し、Execution API で外部から呼び出せるようにします。
Execution API の設定は以下を参考にしてください。
- Using the Execution API | Apps Script | Google Developers
- 【GAS】Execution APIを使ってJavaScriptからGASにアクセスする - Qiita
oauth2_proxy の設定
./oauth2_proxy \
   --email-domain="example.com"  \
   --upstream=http://127.0.0.1:8080/ \
   --cookie-secret="secret"\
   --client-id="CLIENT_ID"\
   --client-secret="CLIENT_SECRET"\
   --redirect-url=http://your-host/oauth2/callback \
   --scope="profile email https://www.googleapis.com/auth/groups" \
   --google-group="your-group@example.com,admin-group@example.com" \
   --google-script-id="SCRIPT_ID" \
   --google-script-function-name="FUNCTION_NAME" \
   --set-xauthrequest
CLIENT_ID や SCRIPT_ID は、 Execution API の設定時に取得したものを使います。
--google-group に2つのグループを指定しています。ユーザーがこれら2つのグループのいずれかに所属していれば、認証は成功し、これら2つのグループのうち実際にユーザーが所属しているグループの名前がHTTPヘッダにセットされます。
--set-xauthrequest を指定することで、nginx とユーザー情報などをやりとりできるようになります。
nginx の設定
server {
    listen       80;
    server_name  localhost;

    location /oauth2/ {
        proxy_pass       OAUTH2_PROXY_URL;
        proxy_set_header Host                    $host;
        proxy_set_header X-Real-IP               $remote_addr;
        proxy_set_header X-Scheme                $scheme;
        proxy_set_header X-Auth-Request-Redirect $request_uri;
    }

    location / {
        auth_request /oauth2/auth;
        error_page 401 = /oauth2/sign_in;

        # pass information via X-Remote-User and X-Remote-Email headers to backend,
        # requires running with --set-xauthrequest flag
        auth_request_set $user           $upstream_http_x_auth_request_user;
        auth_request_set $groups         $upstream_http_x_auth_request_groups; # フォーク版のみ
        proxy_set_header X-Remote-User   $user;
        proxy_set_header X-Remote-Groups $groups; # フォーク版のみ

        # if you enabled --cookie-refresh, this is needed for it to work with auth_request
        auth_request_set $auth_cookie $upstream_http_set_cookie;
        add_header Set-Cookie $auth_cookie;

        proxy_pass ZEPPELIN_URL;
        proxy_set_header X-Real-IP $remote_addr;
        proxy_set_header X-Forwarded-For $proxy_add_x_forwarded_for;
        proxy_set_header Host $http_host;
        proxy_set_header X-NginX-Proxy true;
        proxy_redirect off;
    }

    location /ws {  # For websocket support
        proxy_pass ZEPPELIN_URL;
        proxy_http_version 1.1;
        proxy_set_header Upgrade websocket;
        proxy_set_header Connection upgrade;
        proxy_read_timeout 86400;
    }

    location / {
        root   /usr/share/nginx/html;
        index  index.html index.htm;
    }
}
参考:
- https://github.com/bitly/oauth2_proxy#configuring-for-use-with-the-nginx-auth_request-directive
- https://zeppelin.apache.org/docs/0.6.2/security/authentication.html
Zeppelin の設定 ~ HTTP ヘッダを用いたログインをサポートする
Zeppelin はデフォルトでは X-Remote-User などの HTTP ヘッダを用いたログインをサポートしていません。
しかし、Zeppelin の認証部分には Apache Shiro という認証フレームワークが用いられており、いくつかプラグインが提供されています。
今回は shiro-remote-user というプラグインを使います。
- shiro-remote-user を clone
- ビルド:
mvn package - target/shiro-remote-user-0.0.1-SNAPSHOT.jar を、Zeppelin の lib/ 以下にコピー
Zeppelin の設定 ~ 認証方法とグループごとの権限を設定
conf/shiro.conf
[main]
sessionManager = org.apache.shiro.web.session.mgt.DefaultWebSessionManager

securityManager.sessionManager = $sessionManager
# 86,400,000 milliseconds = 24 hour
securityManager.sessionManager.globalSessionTimeout = 86400000
shiro.loginUrl = /api/login

remoteUserFilter = com.yahoo.shiro.remoteuser.filter.RemoteUserAuthenticationFilter
remoteUserFilter.remoteUserHeaderName = X-Remote-User
remoteUserFilter.remoteRolesHeaderName = X-Remote-Groups
remoteUserFilter.remoteRolesSeparator = ","
remoteUserRealm = com.yahoo.shiro.remoteuser.realm.RemoteUserRealm
securityManager.realms = $remoteUserRealm


[urls]
# This section is used for url-based security.
# You can secure interpreter, configuration and credential information by urls. Comment or uncomment the below urls that you want to hide.
# anon means the access is anonymous.
# authc means Form based Auth Security
# To enfore security, comment the line below and uncomment the next one
/api/version = anon
/api/interpreter/** = authc, roles[admin-group@example.com]
/api/configurations/** = authc, roles[admin-group@example.com]
/api/credential/** = authc, roles[admin-group@example.com]
/** = remoteUserFilter
ここでは
- ユーザー情報を X-Remote-User から取得
- グループ情報を X-Remote-Groups から取得
- interpreter や credential などの API には admin-group のみアクセスを許可
などを設定しています。
まとめ
以上 outh2_proxy を用いて認証と権限管理を行う方法を紹介してみました。
かなり Zeppelin 寄りの説明になりましたが、もちろん幅広いWebアプリケーションに適用できます。
また、 oauth2_proxy は Google 以外の認証もサポートしており、Github などを利用することも可能です。
以上の方法では、アプリケーション側で認証機能を持つ必要がなく、ユーザー情報やグループ情報はHTTPヘッダから取得すれば良いだけなので、認証が必要なツールを自前で作る際もだいぶ手間が省けるのではないでしょうか。
nginx や oauth2_proxy は docker 上で実行してしまうのもおすすめです。
それでは良いお年を![]()