こんにちは。
株式会社クラスアクト インフラストラクチャ事業部の大塚です。
今回はReact環境で、今まで触っていたSign-up画面を出力させるための方法をChatGPTを使いつつ、確認していきたいと思います。
元となるHTML/CSS/JavaScript
HTML
<!DOCTYPE html>
<html lang="ja">

<head>
    <meta charset="utf-8" />
    <meta name="viewport" content="width=device-width" />
    <title>formのテスト</title>
    <link rel="stylesheet" href="style.css">
    <script src="script.js" defer></script>
</head>

<body>
    <form action="" method="post" class="sign-up-group" id="sign-up-form">
        <div id="sign-up-icon">
            <img src="contact_user_add_user_new_user_icon_250756.png">
        </div>
        <h1 id="sign-up-title">Please Sign-up</h1>
        <div class="sign-up-form">
            <input type="text" id="username" autocomplete="on" placeholder="Username" class="sign-up-content">
        </div>
        <div class="sign-up-form">
            <div class="password-container">
                <input type="password" id="password" autocomplete="off" placeholder="Password" class="sign-up-content">
                <img id="show-password-icon" src="C:\Users\ohtsu\Documents\HTML_dev\form-js02\目のアイコン8.jpeg" alt="Show Password" onclick="togglePasswordVisibility()" style="cursor: pointer;">
            </div>
        </div>
        <div id="submit-form">
            <button id="sign-up-button" type="submit">Sign-up</button>
        </div>
    </form>
</body>

</html>
CSS
#sign-up-icon {
    text-align: center;
}

#sign-up-title{
    text-align: center;
    font-family: serif;
}

.sign-up-group {
    width: fit-content;
    margin: auto;
    padding: 3%;
}

.sign-up-form {
    padding-top: 3%;
    width: fit-content;
    margin:auto;
}

.sign-up-content {
    border-radius: 4px;
    font-family: serif;
}

#submit-form{
    text-align: center;
    padding-top: 5%;
}

#sign-up-button {
    color: white;
    background-color: blue;
    width: 77%;
    border-radius: 4px;
    font-family: serif;
}

#sign-up-button:hover {
    background-color: midnightblue;
}

.password-container {
    position: relative;
}

#show-password-icon {
    position: absolute;
    right: 10px;
    top: 50%;
    transform: translateY(-50%);
}
JavaScript
document.addEventListener('DOMContentLoaded', function () {
    document.getElementById('sign-up-form').addEventListener('submit', function (event) {
        var username = document.getElementById('username').value.trim();
        var password = document.getElementById('password').value.trim();

        if (username === '' || password === '') {
            alert('すべての必須フィールドに入力してください。');
            event.preventDefault();
        } else if (!/^[a-zA-Z]+$/.test(username) || !/^[a-zA-Z]+$/.test(password)) {
            alert('全ての項目は英字のみを含む必要があります。');
            event.preventDefault();
        }
    });
});

function togglePasswordVisibility() {
    var passwordInput = document.getElementById('password');

    if (passwordInput.type === 'password') {
        passwordInput.type = 'text';
    } else {
        passwordInput.type = 'password';
    }
}
手順
ローカルで開発をするためにはNode.jsをインストールする必要がある、ということがReactの公式サイトに記載されていた為、Node.jsをNVSを使って呼び出していきます。
C:\Users\ohtsu\Documents\HTML_dev>nvs use lts
PATH += %LOCALAPPDATA%\nvs\node\20.10.0\x64

C:\Users\ohtsu\Documents\HTML_dev>node --version
v20.10.0
次に、npxコマンドを使ってReact Webアプリに必要なデータセットを用意します。
今回は"sign-up-app"という名前で用意しました。
C:\Users\ohtsu\Documents\HTML_dev>npx create-react-app sign-up-app

Creating a new React app in C:\Users\ohtsu\Documents\HTML_dev\sign-up-app.

Installing packages. This might take a couple of minutes.
Installing react, react-dom, and react-scripts with cra-template...


added 1486 packages in 2m

250 packages are looking for funding
  run `npm fund` for details

Installing template dependencies using npm...

added 69 packages, and changed 1 package in 40s

254 packages are looking for funding
  run `npm fund` for details
Removing template package using npm...


removed 1 package, and audited 1555 packages in 2s

254 packages are looking for funding
  run `npm fund` for details

8 vulnerabilities (2 moderate, 6 high)

To address all issues (including breaking changes), run:
  npm audit fix --force

Run `npm audit` for details.

Success! Created sign-up-app at C:\Users\ohtsu\Documents\HTML_dev\sign-up-app
Inside that directory, you can run several commands:

  npm start
    Starts the development server.

  npm run build
    Bundles the app into static files for production.

  npm test
    Starts the test runner.

  npm run eject
    Removes this tool and copies build dependencies, configuration files
    and scripts into the app directory. If you do this, you can’t go back!

We suggest that you begin by typing:

  cd sign-up-app
  npm start
作成されたファイル・ディレクトリは以下のようになっていました。
今回はsrcディレクトリ上に画像ファイルを置いたり、HTML/CSS/JavaScriptを準備していきます。

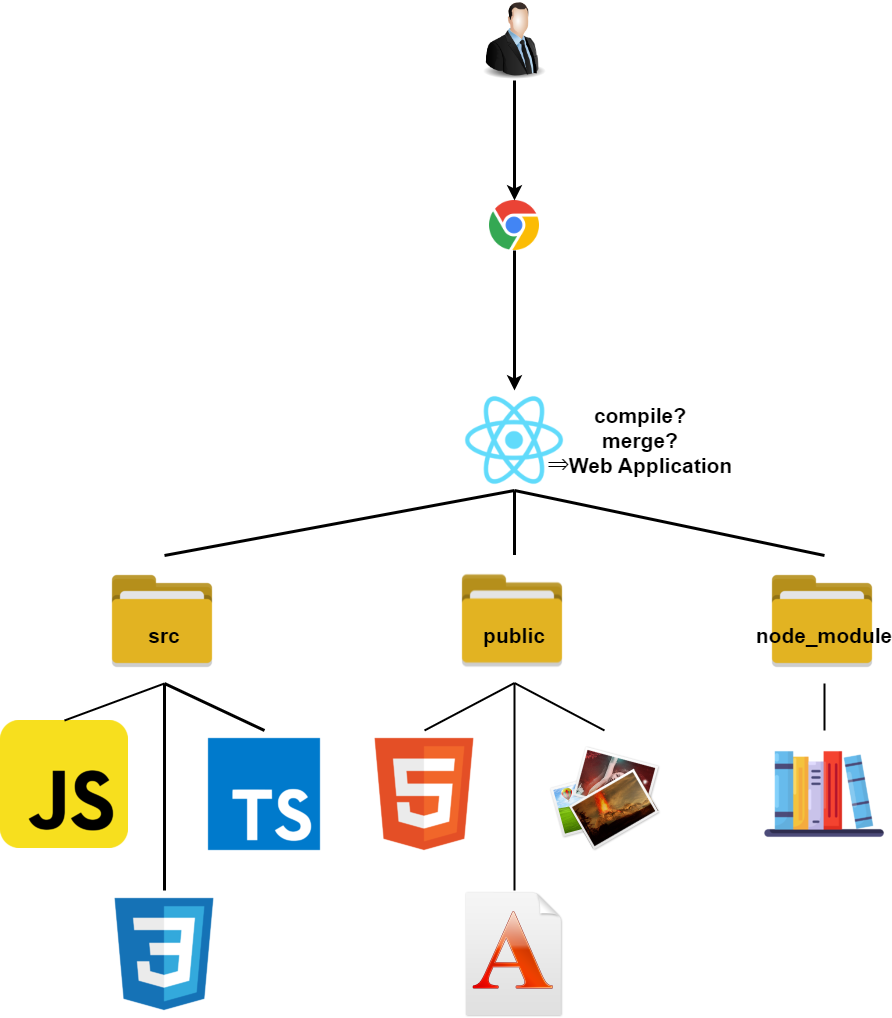
フォルダの意味をちょっと調べてみました。node_moduleはわかりやすいのですが、srcとpublicの違いが判らない。。。srcはJS/TSとCSS、publicがHTMLや画像等という使い分けなのか?後述しますが今回はApp.jsというJavaScriptファイルにHTMLの要素を埋め込んでます(≒これをバンドルっていうんですかね?)。これはあくまでJavaScriptだからsrcに格納しており、別にJSとHTMLをバンドルしなくてもReactで使えるっぽいですね。。。あまりやらないみたいですが。
この辺りは今後要調査です。。。んーわからない。
- srcフォルダ:
Reactアプリケーションのソースコードが格納される場所。
主にJavaScript(またはTypeScript)やCSS、画像等のコード等をこのディレクトリに配置する。 - public フォルダ:
public フォルダはアプリケーションで直接アクセス可能な静的なリソース(HTMLや画像、フォントなど)を配置するための場所。これらのファイルはビルド時にコピーされ、アプリケーションが公開されたときに使用される。 - node_moduleフォルダ:
このフォルダは手動で管理する必要はなく、npm(Node Package Manager)やYarnなどのツールを使用してパッケージをインストールすると、それに関連する依存関係が node_modules フォルダ内に自動的にダウンロードされる。
Reactの動きとして、これらの3つのフォルダ上にあるファイルをいい感じにマージ(≒バンドル?)とかコンパイルとかしてWebアプリケーションを提供するっぽいです。上記のフォルダについて色々調べていたらそんなイメージを得ました。
次にsrcディレクトリ配下にあるApp.jsを以下のように編集します。
ChatGPTにHTMLとCSS、JavaScriptのコードを提供し、それで出力された内容を少しだけチューニングしています。コードに関する詳細は別の記事に起こしています。
import React from 'react';
import './App.css';
import eyeIcon from './目のアイコン8.jpeg';
import addUserIcon from './contact_user_add_user_new_user_icon_250756.png';

class App extends React.Component {
  constructor(props) {
    super(props);
    this.state = {
      showPassword: false,
    };
  }

  handleSubmit = (event) => {
    event.preventDefault();

    const username = this.usernameInput.value.trim();
    const password = this.passwordInput.value.trim();

    if (username === '' || password === '') {
      alert('すべての必須フィールドに入力してください。');
    } else if (!/^[a-zA-Z]+$/.test(username) || !/^[a-zA-Z]+$/.test(password)) {
      alert('全ての項目は英字のみを含む必要があります。');
    }
  };

  togglePasswordVisibility = () => {
    this.setState((prevState) => ({
      showPassword: !prevState.showPassword,
    }));
  };

  render() {
    return (
      <form action="" method="post" className="sign-up-group" id="sign-up-form" onSubmit={this.handleSubmit}>
        <div id="sign-up-icon">
          <img src={addUserIcon} alt="Add User Icon" />
        </div>
        <h1 id="sign-up-title">Please Sign-up</h1>
        <div className="sign-up-form">
          <input
            type="text"
            id="username"
            autoComplete="on"
            placeholder="ユーザー名"
            className="sign-up-content"
            ref={(input) => (this.usernameInput = input)}
          />
        </div>
        <div className="sign-up-form">
          <div className="password-container">
            <input
              type={this.state.showPassword ? 'text' : 'password'}
              id="password"
              autoComplete="off"
              placeholder="パスワード"
              className="sign-up-content"
              ref={(input) => (this.passwordInput = input)}
            />
            <img
              id="show-password-icon"
              src={eyeIcon}
              alt="Show Password"
              onClick={this.togglePasswordVisibility}
              style={{ cursor: 'pointer' }}
            />
          </div>
        </div>
        <div id="submit-form">
          <button id="sign-up-button" type="submit">
            サインアップ
          </button>
        </div>
      </form>
    );
  }
}

export default App;
App.jsのCSS的な要素であるApp.cssを以下のように編集します。
こちらは既存(style.cssのこと)と全く同じ内容でOKでした。
#sign-up-icon {
  text-align: center;
}

#sign-up-title{
  text-align: center;
  font-family: serif;
}

.sign-up-group {
  width: fit-content;
  margin: auto;
  padding: 3%;
}

.sign-up-form {
  padding-top: 3%;
  width: fit-content;
  margin:auto;
}

.sign-up-content {
  border-radius: 4px;
  font-family: serif;
}

#submit-form{
  text-align: center;
  padding-top: 5%;
}

#sign-up-button {
  color: white;
  background-color: blue;
  width: 77%;
  border-radius: 4px;
  font-family: serif;
}

#sign-up-button:hover {
  background-color: midnightblue;
}

.password-container {
  position: relative;
}

#show-password-icon {
  position: absolute;
  right: 10px;
  top: 50%;
  transform: translateY(-50%);
}
この後、srcディレクトリに使用する画像を格納します。
最後に動作確認を行ってみます。
npm stratコマンドを実行します。Djangoのように確認するためのURLが出力されていることがわかります。
C:\Users\ohtsu\Documents\HTML_dev\sign-up-app>npm start
Compiled successfully!

You can now view sign-up-app in the browser.

  Local:            http://localhost:3000
  On Your Network:  http://192.168.179.12:3000

Note that the development build is not optimized.
To create a production build, use npm run build.

webpack compiled successfully
Reactのサーバ立ち上げが上手くいくと、Webブラウザが勝手に立ち上がり、例の画面が表示されました。
スクショでエビデンスは残していませんが、user/passwordが記載されていること、英字で入力していること、パスワードをブラウザで確認できることは確認しています。
