こんにちは。
株式会社クラスアクト インフラストラクチャ事業部の大塚です。
以前、Harborに保管したDjangoのコンテナイメージをベースにk8sクラスタにDaemonSetとしてデプロイしました。
ただ、これはまだデータの永続化かできていません。
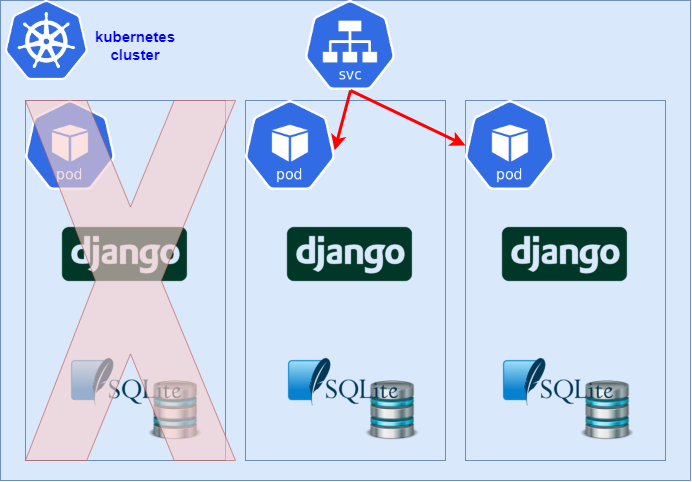
Djangoはデフォルトでは自分自身の中で動かしているsqlite3というPythonベースのDBにデータを保管するのですが、このままではpodが消えてしまうとDBの中身も消えてしまいます。また、それぞれのpodで持っているデータに差が発生してしまうため、それも問題になってしまうでしょう。以下のイメージがそれを簡単に示しているものです。
そこで今回は、DjangoのDBとしてMySQLを使うように設定を行い、データの永続化ができているか簡単に検証をしてみたいと思います。
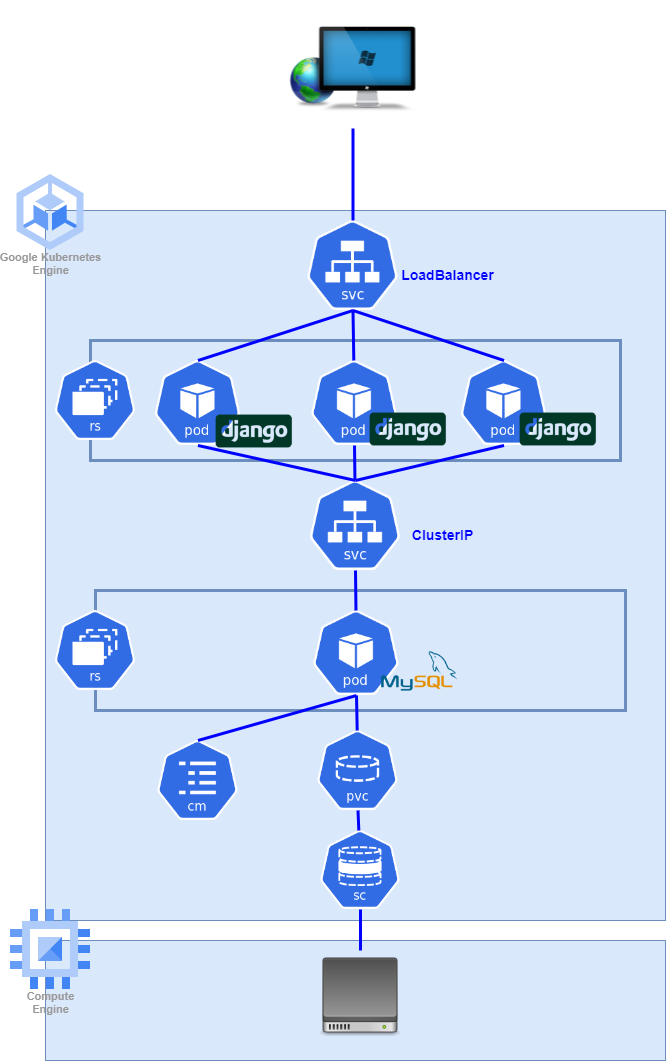
構築イメージ
本当はHarborにコンテナイメージを格納し、MySQLのデータ保存にRook-Cephを使用したかったのですが、使っている環境の調子が悪そうで。。。なので久しぶりにGCP上に構築していきたいと思います。構築イメージは以下となります。
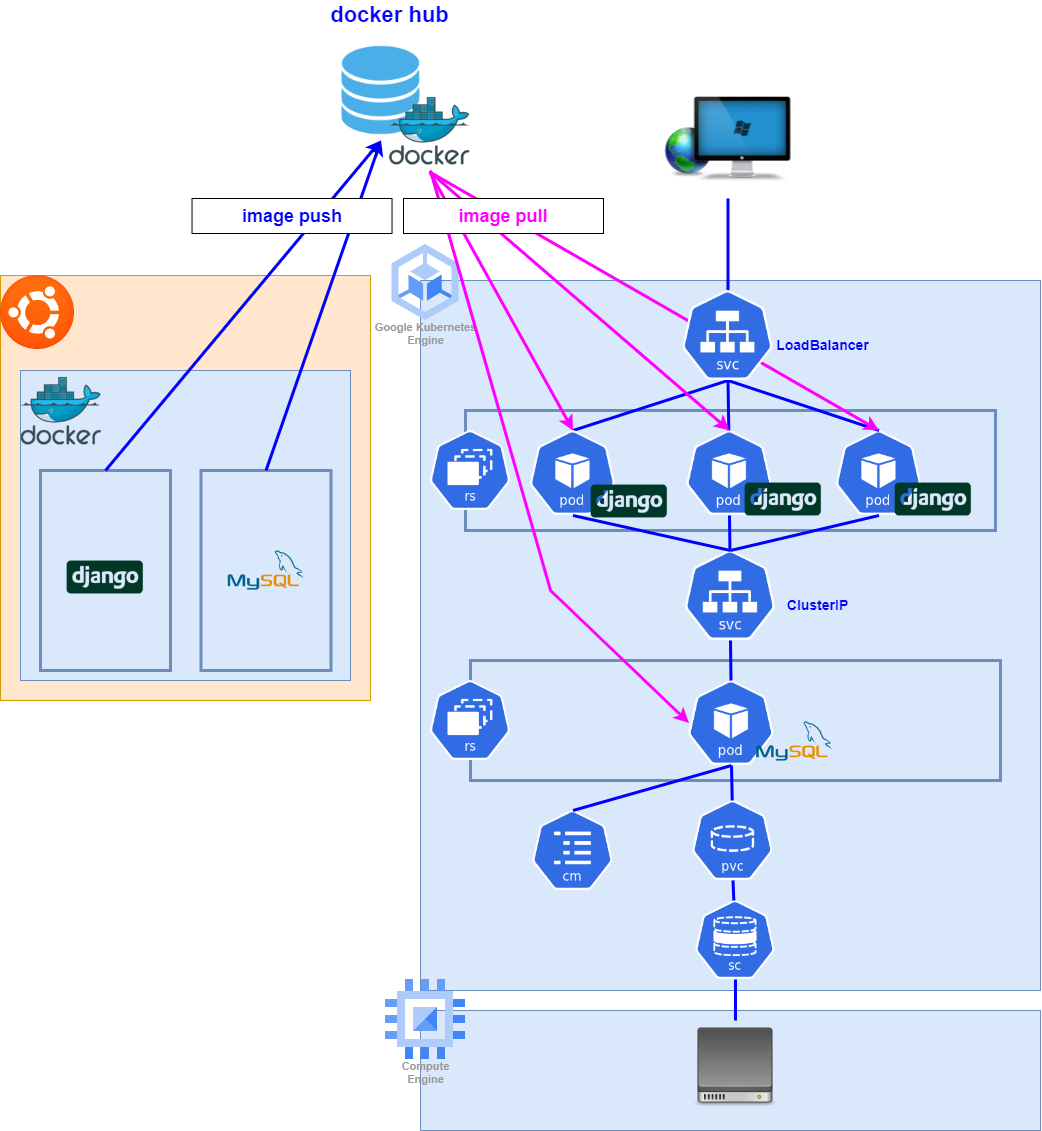
手順としては、まずdockerの環境を使い、DjangoコンテナとMySQLコンテナを連携する方法を確認します。その後k8sクラスタにデプロイできるようにカスタムしていきます。カスタム後それらのコンテナをイメージ化してdocker hubにpush。k8s側でpull。podとしてデプロイします。
参考サイト
構築
docker環境でDjango+MySQL環境を作る
MySQLコンテナの設定
以下のコマンドを実行し、MySQLコンテナをデプロイします。
root@k8s-master:~# docker run --name mysql -e MYSQL_USER=admin -e MYSQL_PASSWORD=password -e MYSQL_ROOT_PASSWORD=password -d -p 3306:3306 mysql:latest
次にデプロイしたMySQLコンテナにアクセスして"django_db"という名前のDBを作成します。
root@k8s-master:~# docker exec -it mysql /bin/bash
bash-4.4# mysql -u root -p
Enter password:
Welcome to the MySQL monitor.  Commands end with ; or \g.
Your MySQL connection id is 9
Server version: 8.0.33 MySQL Community Server - GPL
Copyright (c) 2000, 2023, Oracle and/or its affiliates.
Oracle is a registered trademark of Oracle Corporation and/or its
affiliates. Other names may be trademarks of their respective
owners.
Type 'help;' or '\h' for help. Type '\c' to clear the current input statement.
mysql> create database django_db;
Query OK, 1 row affected (0.01 sec)
mysql> show databases;
+--------------------+
| Database           |
+--------------------+
| django_db          |
| information_schema |
| mysql              |
| performance_schema |
| sys                |
+--------------------+
5 rows in set (0.01 sec)
Djangoコンテナの設定
まず、以前作成したDjangoのイメージ1.1からDjangoコンテナをデプロイ。
デプロイしたコンテナに対して以下のコマンドを実行してmysqlclientをインストールしていきます。
root@843b59a4d154:/# apt-get install python3-dev default-libmysqlclient-dev
root@843b59a4d154:/# pip install mysqlclient

root@843b59a4d154:/# pip list installed
Package             Version
------------------- -------------
asgiref             3.7.2
blinker             1.4
cryptography        3.4.8
dbus-python         1.2.18
distro              1.7.0
distro-info         1.1build1
Django              4.2.3
httplib2            0.20.2
importlib-metadata  4.6.4
jeepney             0.7.1
keyring             23.5.0
launchpadlib        1.10.16
lazr.restfulclient  0.14.4
lazr.uri            1.0.6
more-itertools      8.10.0
mysqlclient         2.1.1
oauthlib            3.2.0
pip                 22.0.2
PyGObject           3.42.1
PyJWT               2.3.0
pyparsing           2.4.7
python-apt          2.4.0+ubuntu1
SecretStorage       3.3.1
setuptools          59.6.0
six                 1.16.0
sqlparse            0.4.4
typing_extensions   4.7.1
unattended-upgrades 0.1
wadllib             1.3.6
wheel               0.37.1
zipp                1.0.0
次にDjangoのsettings.pyを修正していきます。
ENGINEの部分をsqlite3からmysqlとすることでMySQLをDBとして使用すると宣言しています。HOST部分はMySQLのコンテナに割り振られたIPアドレスを設定すればOKです。
root@3a1c5e7cd2a3:/home/testProject/testProject# cp -p settings.py settings.py.2023071401
root@3a1c5e7cd2a3:/home/testProject/testProject# vi settings.py
root@3a1c5e7cd2a3:/home/testProject/testProject# diff settings.py settings.py.2023071401
78,83c78,79
<         'ENGINE': 'django.db.backends.mysql',
<         'NAME': 'django_db',
<         'USER': 'root',
<         'PASSWORD ': 'password',
<         'HOST': '172.17.0.3',
<         'PORT': '3306',
---
>         'ENGINE': 'django.db.backends.sqlite3',
>         'NAME': BASE_DIR / 'db.sqlite3',
DjangoとMySQLが連携されているか確認する
Djangoコンテナで以下のコマンドを実行してmigrateを実行します。以下のようにOKと出れば連携できています。
root@843b59a4d154:/home# cd /home/testProject/
root@843b59a4d154:/home/testProject# python3 manage.py migrate
Operations to perform:
  Apply all migrations: admin, auth, contenttypes, sessions
Running migrations:
  Applying contenttypes.0001_initial... OK
  Applying auth.0001_initial... OK
  Applying admin.0001_initial... OK
  Applying admin.0002_logentry_remove_auto_add... OK
  Applying admin.0003_logentry_add_action_flag_choices... OK
  Applying contenttypes.0002_remove_content_type_name... OK
  Applying auth.0002_alter_permission_name_max_length... OK
  Applying auth.0003_alter_user_email_max_length... OK
  Applying auth.0004_alter_user_username_opts... OK
  Applying auth.0005_alter_user_last_login_null... OK
  Applying auth.0006_require_contenttypes_0002... OK
  Applying auth.0007_alter_validators_add_error_messages... OK
  Applying auth.0008_alter_user_username_max_length... OK
  Applying auth.0009_alter_user_last_name_max_length... OK
  Applying auth.0010_alter_group_name_max_length... OK
  Applying auth.0011_update_proxy_permissions... OK
  Applying auth.0012_alter_user_first_name_max_length... OK
  Applying sessions.0001_initial... OK
Djangoの管理画面にアクセスするためのユーザを作成します。今回はadmin:passwordとして登録しました。
root@843b59a4d154:/home/testProject# python3 manage.py createsuperuser
Username (leave blank to use 'root'): admin
Email address: admin@example.com
Password:
Password (again):
This password is too common.
Bypass password validation and create user anyway? [y/N]: y
Superuser created successfully.
runserverを行います。
root@843b59a4d154:/home/testProject# python3 manage.py runserver 0.0.0.0:8000
Watching for file changes with StatReloader
Performing system checks...
System check identified no issues (0 silenced).
July 14, 2023 - 08:02:05
Django version 4.2.3, using settings 'testProject.settings'
Starting development server at http://0.0.0.0:8000/
Quit the server with CONTROL-C.
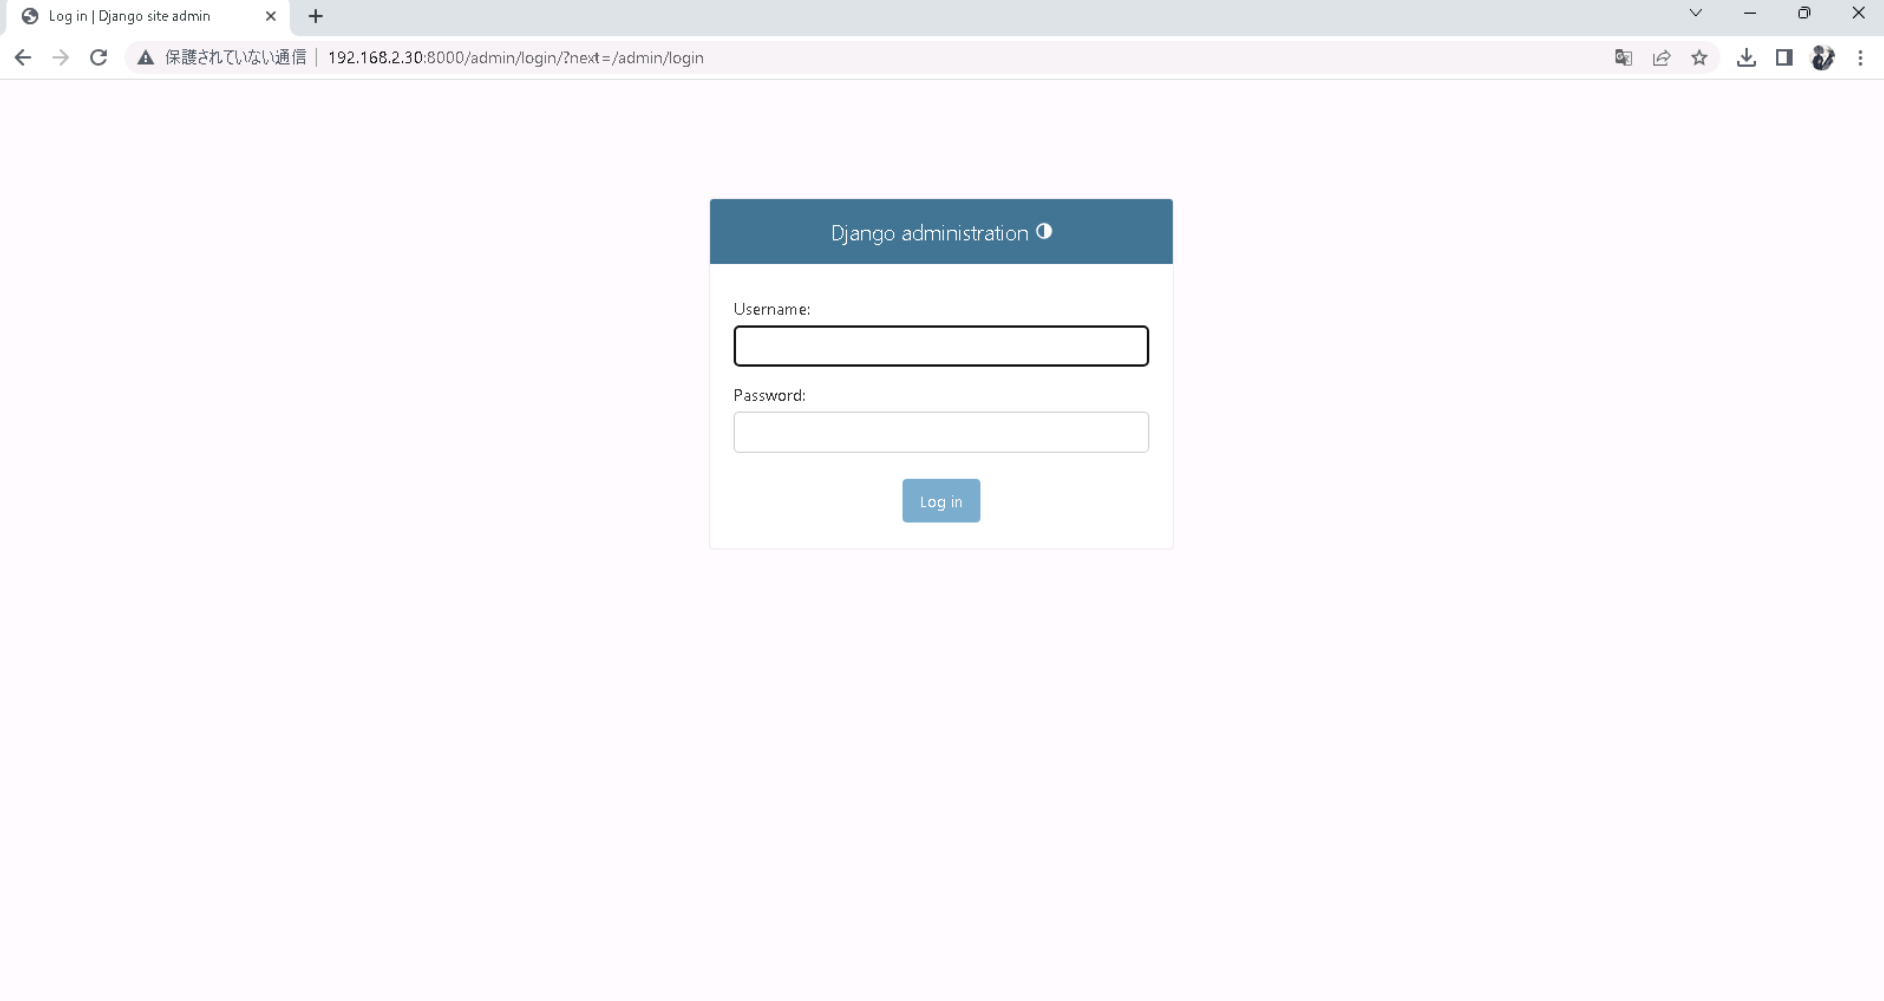
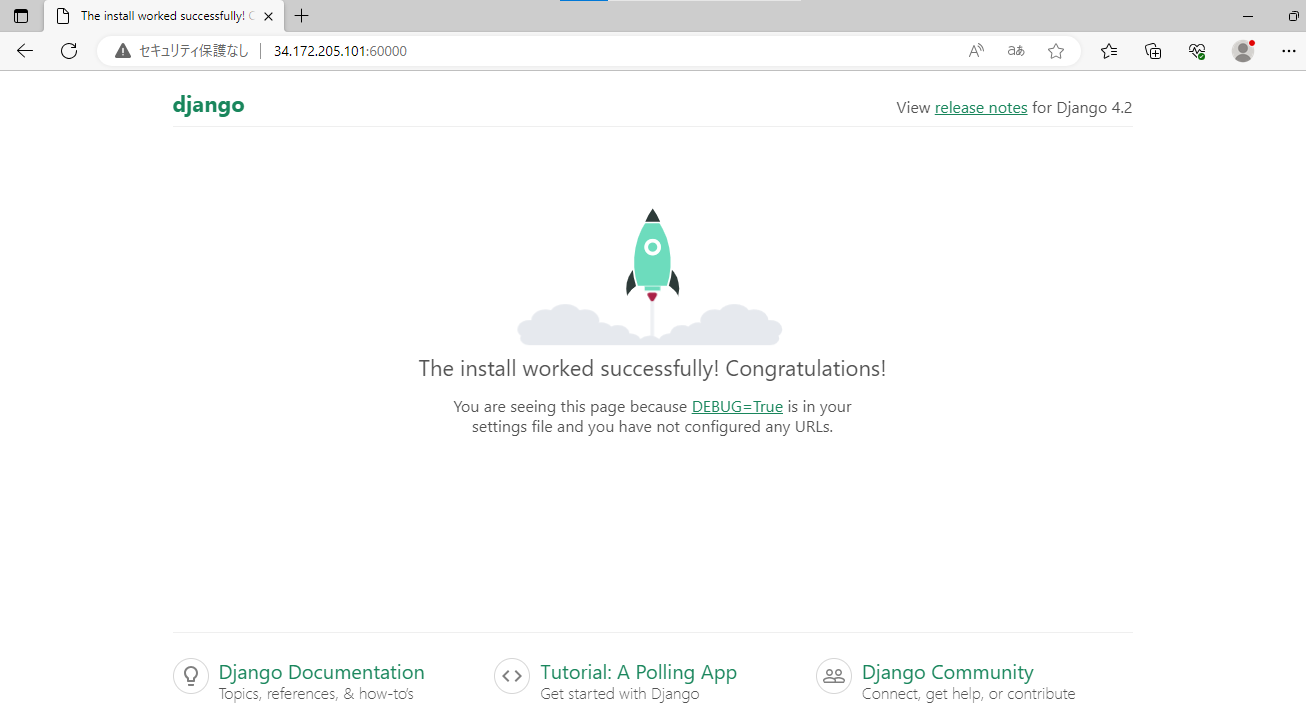
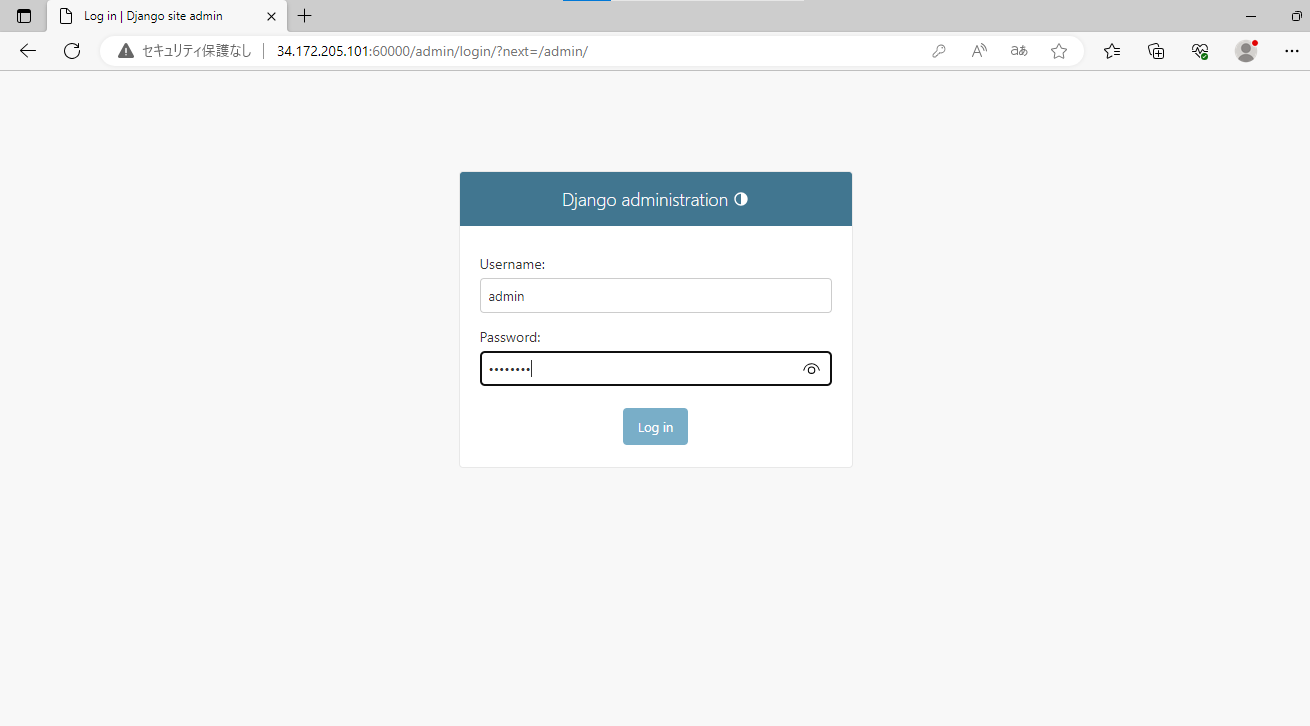
実際の画面にアクセスします。http://(dockerが稼働しているサーバのIPアドレス):8000/admin/login/でアクセスできる以下のような画面で登録したユーザ:パスを入力してください。ログインができれば問題ありません。
コンテナをイメージ化する
ここまでの設定でコンテナイメージを作成して、それをコンテナリポジトリにpushします。
と、その前にsettings.pyのHOSTをk8sのClusterIPに使用する予定の文字列に変更しておきます。
root@843b59a4d154:/home/testProject/testProject# diff settings.py settings.py.2023071401
78,83c78,79
<         'ENGINE': 'django.db.backends.mysql',
<         'NAME': 'django_db',
<         'USER': 'root',
<         'PASSWORD': 'password',
<         'HOST': 'mysql-clusterip',
<         'PORT': '3306',
---
>         'ENGINE': 'django.db.backends.sqlite3',
>         'NAME': BASE_DIR / 'db.sqlite3',
今回イメージはdocker hubにpushしていきますが、手順は省略します。
GKE環境でDjango-MySQL環境をデプロイする
用意したyamlとデプロイ
ins-envという名前のnamespaceを作成するためのyamlファイルです。
kind: Namespace
apiVersion: v1
metadata:
  name: ins-env
  labels:
    name: ins-env
StorageClassとそれに連携するPVCを作成するyamlです。
apiVersion: storage.k8s.io/v1
kind: StorageClass
metadata:
  name: mysql-storage-class
provisioner: kubernetes.io/gce-pd
parameters:
  type: pd-standard
  fstype: ext4
  replication-type: none
reclaimPolicy: Retain

---
apiVersion: v1
kind: PersistentVolumeClaim
metadata:
  name: mysql-vol-pvc
  namespace: ins-env
spec:
  accessModes:
    - ReadWriteOnce
  storageClassName: mysql-storage-class
  resources:
    requests:
      storage: 50Gi
MySQLのReplicaSet及びそのReplicaSetに必要となる環境変数を渡すConfigMap、ReplicaSetにアクセスするためのClusterIPを定義しています。
apiVersion: v1
kind: ConfigMap
metadata:
  name: mysql-cm
  namespace: ins-env
data:
  MYSQL_USER : admin
  MYSQL_PASSWORD : password
  MYSQL_ROOT_PASSWORD : password
  MYSQL_DATABASE : django_db

---
apiVersion: apps/v1
kind: ReplicaSet
metadata:
  name: mysq-rs
  namespace: ins-env
  labels:
    app: db
spec:
  replicas: 1
  selector:
    matchLabels:
      app: django-db
  template:
    metadata:
      labels:
         app: django-db
    spec:
      containers:
      - name: django-mysql
        image: shotaohtsuka/mysql:1.0.0
        ports:
        - containerPort: 3306
        envFrom:
        - configMapRef:
            name: mysql-cm
        volumeMounts:
          - mountPath: /var/lib/mysql
            name: mysql-vol-pvc
      volumes:
      - name: mysql-vol-pvc
        persistentVolumeClaim:
          claimName: mysql-vol-pvc
---
apiVersion: v1
kind: Service
metadata:
  name: mysql-clusterip
  namespace: ins-env
spec:
  selector:
    app: django-db
  type: ClusterIP
  ports:
  - name: django-mysql-port
    port: 3306
    protocol: TCP
    targetPort: 3306
DjangoのDaemonSetとそのDjangoにKubernetesクラスタ外部から接続するためのLoadBalancerをデプロイするためのyamlです。
apiVersion: apps/v1
kind: DaemonSet
metadata:
  name: django-rs
  namespace: ins-env
  labels:
    app: django-web
spec:
  selector:
    matchLabels:
      name: django
  template:
    metadata:
      labels:
        name: django
    spec:
      containers:
        - name: django-pod
          image: shotaohtsuka/django:1.1.1
          ports:
          - containerPort: 8000
          command: ["python3", "/home/testProject/manage.py", "runserver", "0.0.0.0:8000"]

---
apiVersion: v1
kind: Service
metadata:
  name: django-loadbalancer
  namespace: ins-env
spec:
  type: LoadBalancer
  selector:
    name: django
  ports:
  - protocol: TCP
    port: 60000
    targetPort: 8000
デプロイしていきます。
ohtsuka_honban@cloudshell:~/yaml/ins-env (western-antonym-386513)$ kubectl apply -f ns.yaml
ohtsuka_honban@cloudshell:~/yaml/ins-env (western-antonym-386513)$ kubectl apply -f sc-pvc.yaml
ohtsuka_honban@cloudshell:~/yaml/ins-env (western-antonym-386513)$ kubectl apply -f mysql.yaml

ohtsuka_honban@cloudshell:~/yaml/ins-env (western-antonym-386513)$ kubectl get cm -n ins-env
NAME               DATA   AGE
kube-root-ca.crt   1      34m
mysql-cm           4      42s

ohtsuka_honban@cloudshell:~/yaml/ins-env (western-antonym-386513)$ kubectl apply -f django.yaml

ohtsuka_honban@cloudshell:~/yaml/ins-env (western-antonym-386513)$ kubectl get all -n ins-env
NAME                  READY   STATUS    RESTARTS   AGE
pod/django-rs-2j5vs   1/1     Running   0          42s
pod/django-rs-5qzhz   1/1     Running   0          42s
pod/django-rs-x5sxk   1/1     Running   0          42s
pod/mysq-rs-ndhxw     1/1     Running   0          77m
NAME                          TYPE           CLUSTER-IP    EXTERNAL-IP      PORT(S)           AGE
service/django-loadbalancer   LoadBalancer   10.62.3.58    34.172.205.101   60000:31797/TCP   42s
service/mysql-clusterip       ClusterIP      10.62.0.195   <none>           3306/TCP          77m
NAME                       DESIRED   CURRENT   READY   UP-TO-DATE   AVAILABLE   NODE SELECTOR   AGE
daemonset.apps/django-rs   3         3         3       3            3           <none>          42s
NAME                      DESIRED   CURRENT   READY   AGE
replicaset.apps/mysq-rs   1         1         1       77m
LoadbalancerのEXTERNAL-IPを使ってDjangoにアクセスできることを確認します。
DjangoとMySQLで通信できることを確認する
私の環境ではDjangoのPodが3つデプロイされていますが、適当なPodに接続して改めてmigrateとcreatesuperuserをしていきます。実行できればMySQLと通信できるということになります。
※Docker環境下でも行いましたが、あのタイミングではデータの永続化は考慮していなかったので再度行う必要があります。
ohtsuka_honban@cloudshell:~/yaml/ins-env (western-antonym-386513)$ kubectl get pod -n ins-env
NAME              READY   STATUS    RESTARTS   AGE
django-rs-2j5vs   1/1     Running   0          8m29s
django-rs-5qzhz   1/1     Running   0          8m29s
django-rs-x5sxk   1/1     Running   0          8m29s
mysq-rs-ndhxw     1/1     Running   0          84m
ohtsuka_honban@cloudshell:~/yaml/ins-env (western-antonym-386513)$ kubectl exec -it django-rs-2j5vs -n ins-env -- /bin/bash

root@django-rs-2j5vs:/# cd /home/testProject/
root@django-rs-2j5vs:/home/testProject# python3 manage.py migrate
Operations to perform:
  Apply all migrations: admin, auth, contenttypes, sessions
Running migrations:
  Applying contenttypes.0001_initial... OK
  Applying auth.0001_initial... OK
  Applying admin.0001_initial... OK
  Applying admin.0002_logentry_remove_auto_add... OK
  Applying admin.0003_logentry_add_action_flag_choices... OK
  Applying contenttypes.0002_remove_content_type_name... OK
  Applying auth.0002_alter_permission_name_max_length... OK
  Applying auth.0003_alter_user_email_max_length... OK
  Applying auth.0004_alter_user_username_opts... OK
  Applying auth.0005_alter_user_last_login_null... OK
  Applying auth.0006_require_contenttypes_0002... OK
  Applying auth.0007_alter_validators_add_error_messages... OK
  Applying auth.0008_alter_user_username_max_length... OK
  Applying auth.0009_alter_user_last_name_max_length... OK
  Applying auth.0010_alter_group_name_max_length... OK
  Applying auth.0011_update_proxy_permissions... OK
  Applying auth.0012_alter_user_first_name_max_length... OK
  Applying sessions.0001_initial... OK

root@django-rs-2j5vs:/home/testProject# python3 manage.py createsuperuser
Username (leave blank to use 'root'): admin
Email address: admin@example.com
Password:
Password (again):
This password is too common.
Bypass password validation and create user anyway? [y/N]: y
Superuser created successfully.
http://"LoadBalancerのEXTERNAL-IP":60000/admin/loginでログイン画面が表示されることと、ログインが成功することを確認します。
データが永続化されているか確認する。
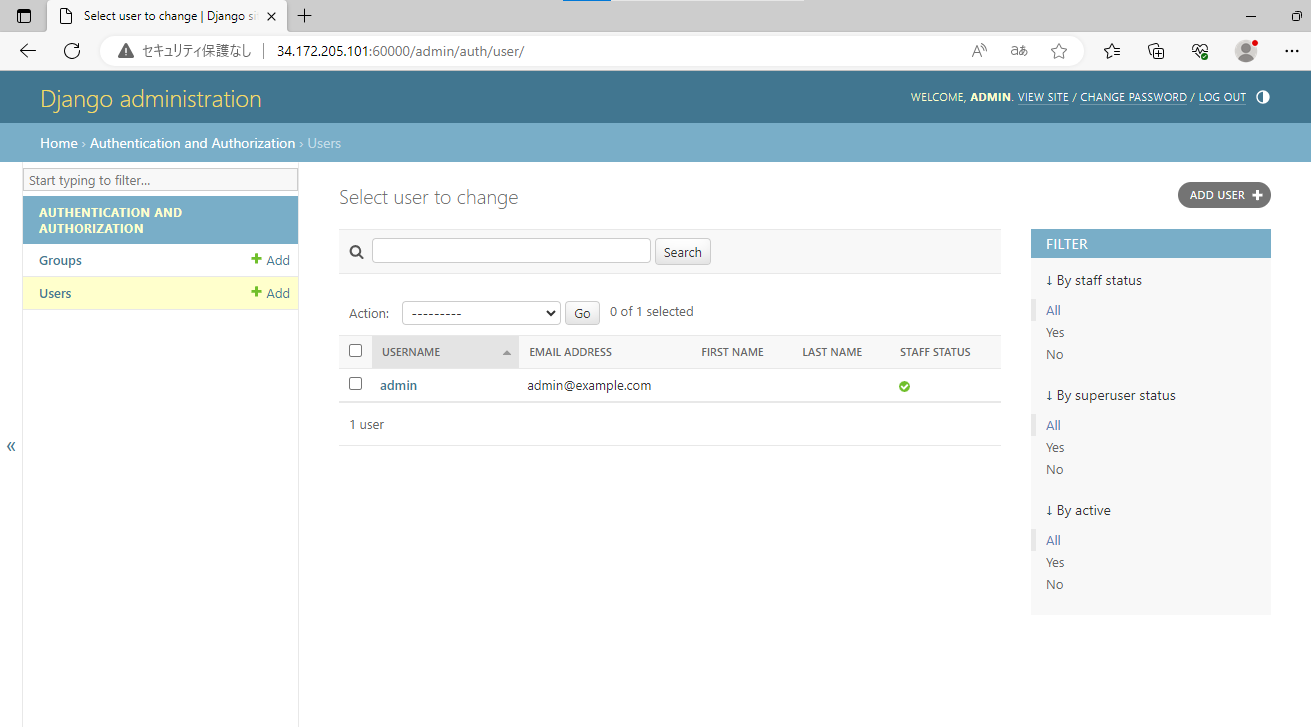
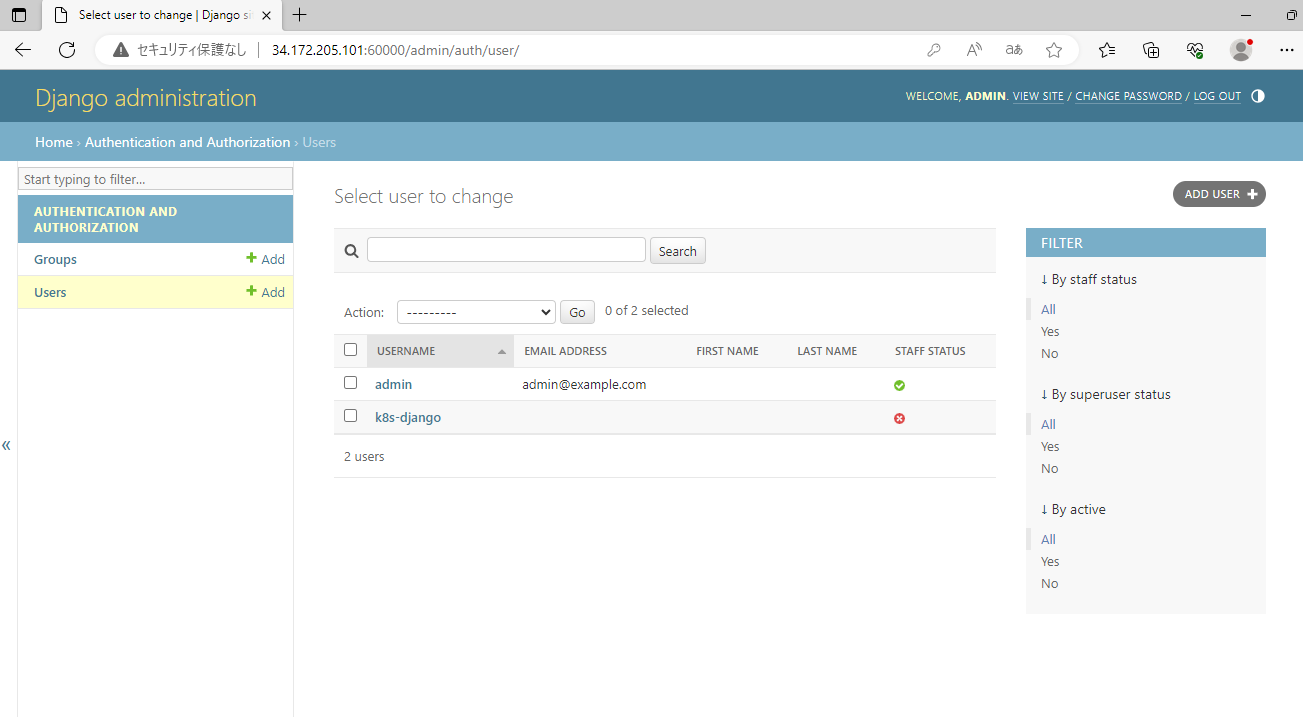
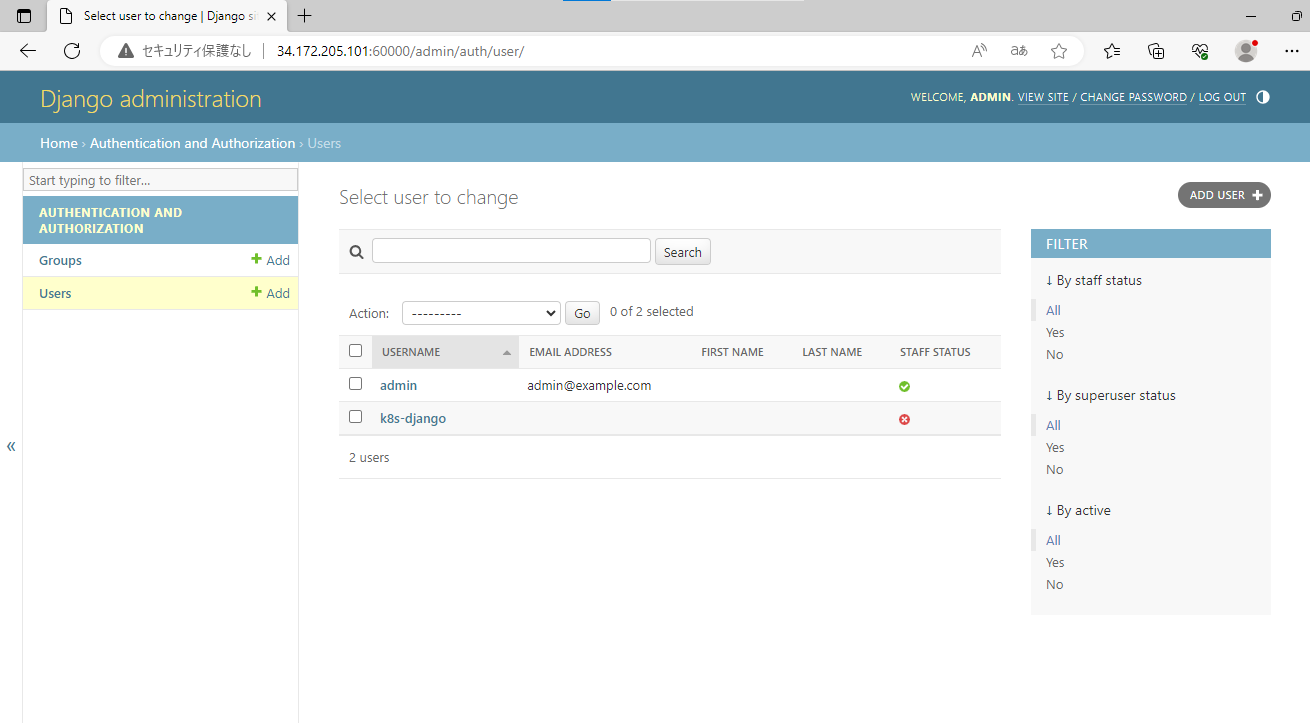
Djangoの管理画面でユーザを作成してみます。
今回はk8s-djangoユーザを新規作成しました。
MySQLのpodを削除します。今回はReplicaSetでデプロイしているので、podが削除されると新しいpodが勝手にデプロイされます。
ohtsuka_honban@cloudshell:~/yaml/ins-env (western-antonym-386513)$ kubectl get pod -n ins-env | grep -i my
mysq-rs-ndhxw     1/1     Running   0          97m
ohtsuka_honban@cloudshell:~/yaml/ins-env (western-antonym-386513)$ kubectl delete pod mysq-rs-ndhxw -n ins-env
pod "mysq-rs-ndhxw" deleted
ohtsuka_honban@cloudshell:~/yaml/ins-env (western-antonym-386513)$ kubectl get pod -n ins-env | grep -i my
mysq-rs-xtjfc     1/1     Running   0          10s
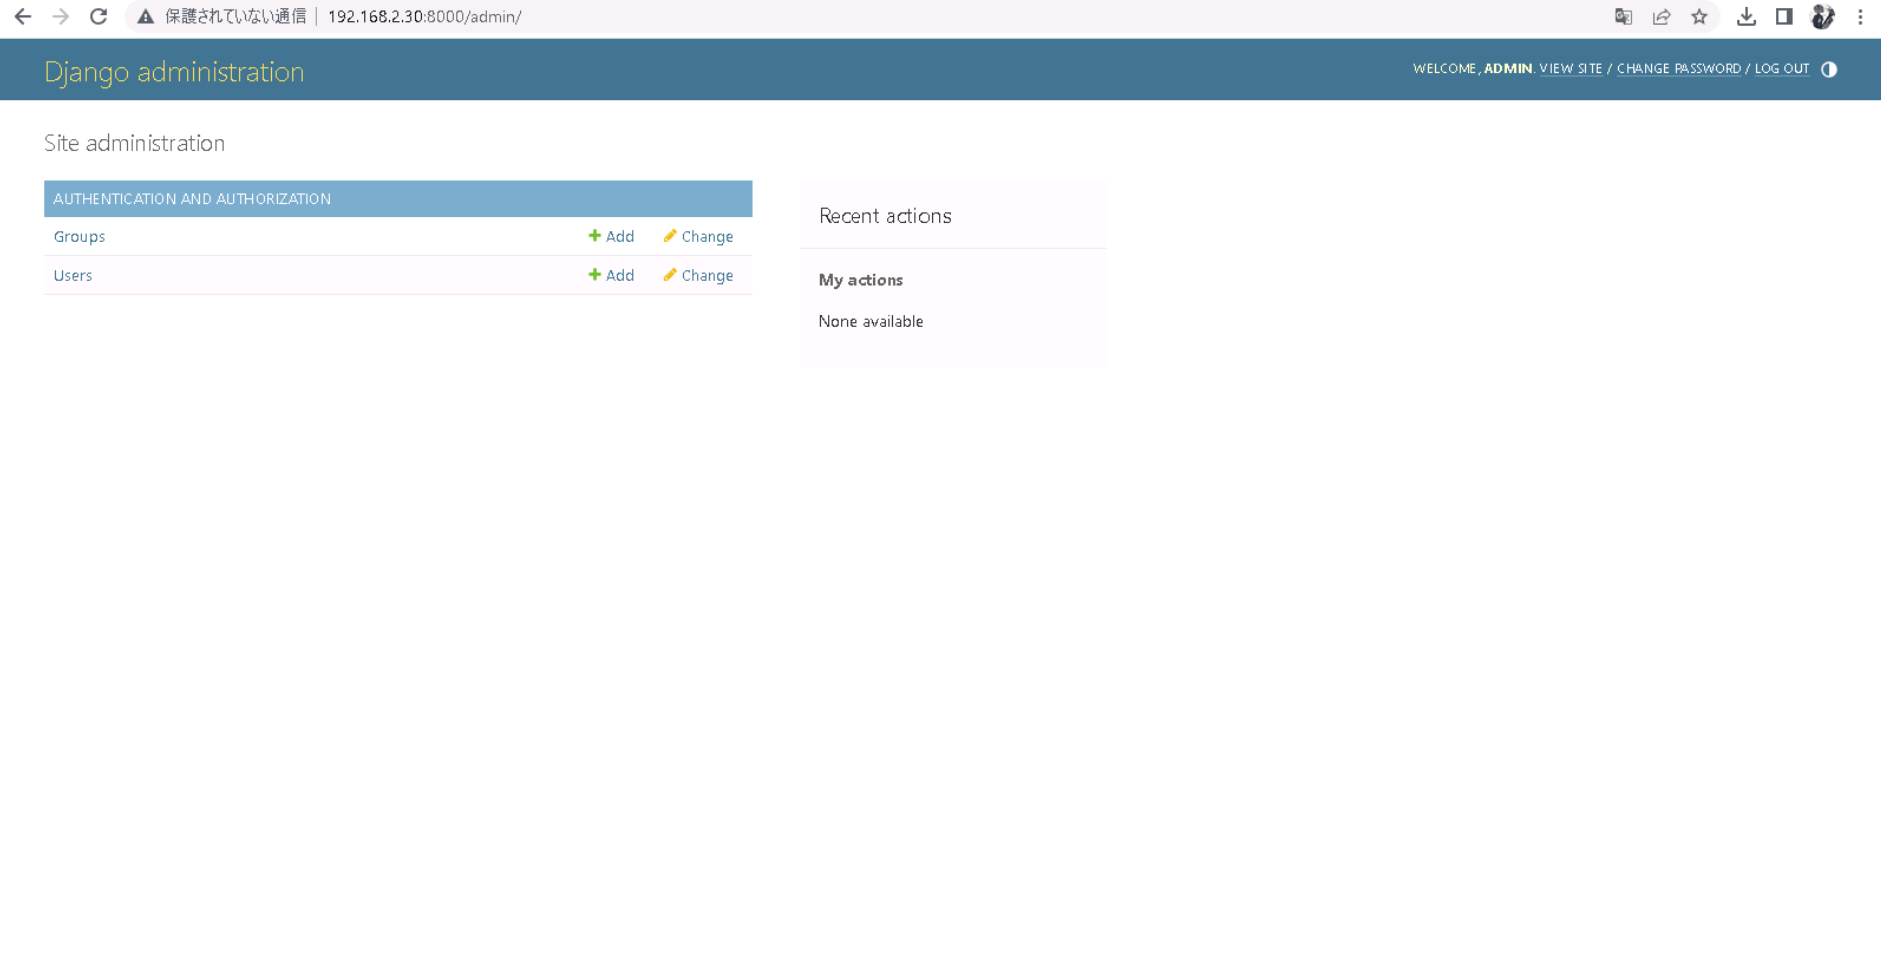
改めてDjangoの管理画面にアクセスします。ログイン出来てユーザが削除されていなければ永続化は成功です。
念のため、MySQL podからもデータがあることを確認します。
ohtsuka_honban@cloudshell:~ (western-antonym-386513)$ kubectl get pod -n ins-env | grep -i my
mysql-rs-nkp2j    1/1     Running   0          179m
ohtsuka_honban@cloudshell:~ (western-antonym-386513)$ kubectl exec -it mysql-rs-nkp2j -n ins-env -- /bin/bash
bash-4.4# mysql -u root -p
Enter password:
Welcome to the MySQL monitor.  Commands end with ; or \g.
Your MySQL connection id is 13
Server version: 8.0.33 MySQL Community Server - GPL

Copyright (c) 2000, 2023, Oracle and/or its affiliates.

Oracle is a registered trademark of Oracle Corporation and/or its
affiliates. Other names may be trademarks of their respective
owners.

Type 'help;' or '\h' for help. Type '\c' to clear the current input statement.

mysql> show databases;
+--------------------+
| Database           |
+--------------------+
| django_db          |
| information_schema |
| mysql              |
| performance_schema |
| sys                |
+--------------------+
5 rows in set (0.01 sec)

mysql> use django_db;
Reading table information for completion of table and column names
You can turn off this feature to get a quicker startup with -A

Database changed

mysql> show tables;
+----------------------------+
| Tables_in_django_db        |
+----------------------------+
| auth_group                 |
| auth_group_permissions     |
| auth_permission            |
| auth_user                  |
| auth_user_groups           |
| auth_user_user_permissions |
| django_admin_log           |
| django_content_type        |
| django_migrations          |
| django_session             |
+----------------------------+
10 rows in set (0.00 sec)

mysql> SELECT * FROM auth_user;
+----+------------------------------------------------------------------------------------------+----------------------------+--------------+------------+------------+-----------+-------------------+----------+-----------+----------------------------+
| id | password                                                                                 | last_login                 | is_superuser | username   | first_name | last_name | email             | is_staff | is_active | date_joined                |
+----+------------------------------------------------------------------------------------------+----------------------------+--------------+------------+------------+-----------+-------------------+----------+-----------+----------------------------+
|  1 | pbkdf2_sha256$600000$y4k9BAyTCjVjmZIMGILIOg$qG9T19bf4deVANCXaNji13AGDhbmzRIDwj+IERcTL14= | 2023-07-15 01:43:01.667938 |            1 | admin      |            |           | admin@example.com |        1 |         1 | 2023-07-15 01:41:02.644627 |
|  2 | pbkdf2_sha256$600000$OQ93zEhnCvE4th0oLhuWpM$DfRyLu1EoaBaMo2D0AXRn+51djN9UUuxFHHHG/LXlmQ= | NULL                       |            0 | k8s-django |            |           |                   |        0 |         1 | 2023-07-15 01:45:32.531639 |
+----+------------------------------------------------------------------------------------------+----------------------------+--------------+------------+------------+-----------+-------------------+----------+-----------+----------------------------+
2 rows in set (0.00 sec)