こんにちは。
株式会社クラスアクト インフラストラクチャ事業部の大塚です。
今回は、前回作成したanacondaベースのDjango環境にトップページやログイン画面を作成していきたいと思います。
前回の記事は以下となります。
ディレクトリ・ファイル構成
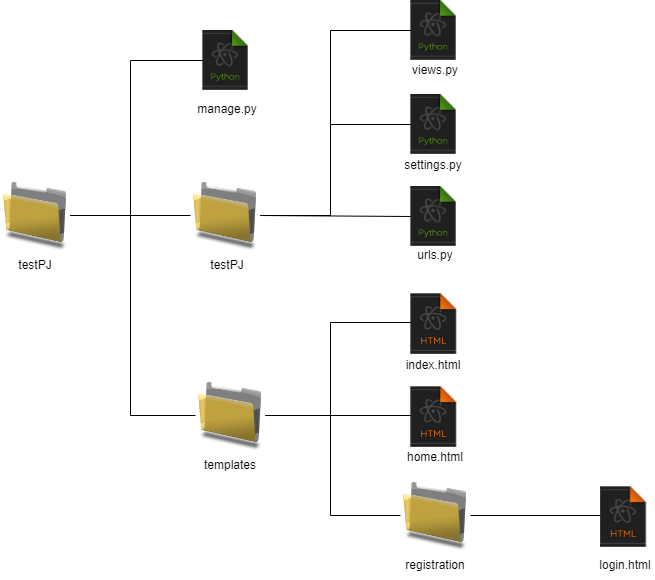
今回作成した環境の構成を以下に示します。qiitaフォルダ配下にDjango環境を作っていきました。
最もこの他にもファイルはあるのですが、特段編集等していないため図からは省いています。

環境構築
トップページを作成する
まずqiitaフォルダ上でdjango-adminコマンドによりprojectを作成します。
今回はtestPJという名前のプロジェクトを作成しました。
PS C:\Users\ohtsu\Documents\DjangoEnv\qiita> django-admin startproject testPJ
PS C:\Users\ohtsu\Documents\DjangoEnv\qiita> cd .\testPJ\
PS C:\Users\ohtsu\Documents\DjangoEnv\qiita\testPJ> ls
    ディレクトリ: C:\Users\ohtsu\Documents\DjangoEnv\qiita\testPJ
Mode                 LastWriteTime         Length Name
----                 -------------         ------ ----
d-----        2023/11/04     18:17                testPJ
-a----        2023/11/04     18:17            684 manage.py
testPJ上でtemplatesフォルダを作成し、さらにその中でregistrationフォルダを作成します。
今回の様に、Djangoが用意しているログインのテンプレートを使用する場合、HTMLファイルはデフォルトでregisrationに探しに行くようです。
PS C:\Users\ohtsu\Documents\DjangoEnv\qiita\testPJ> mkdir templates
PS C:\Users\ohtsu\Documents\DjangoEnv\qiita\testPJ> cd .\templates\
PS C:\Users\ohtsu\Documents\DjangoEnv\qiita\testPJ\templates> mkdir registration
このタイミングでいったんmigrateを実行したいと思います。
PS C:\Users\ohtsu\Documents\DjangoEnv\qiita\testPJ\templates> cd ..
PS C:\Users\ohtsu\Documents\DjangoEnv\qiita\testPJ> python manage.py migrate
Operations to perform:
  Apply all migrations: admin, auth, contenttypes, sessions
Running migrations:
  Applying contenttypes.0001_initial... OK
  Applying auth.0001_initial... OK
  Applying admin.0001_initial... OK
  Applying admin.0002_logentry_remove_auto_add... OK
  Applying admin.0003_logentry_add_action_flag_choices... OK
  Applying contenttypes.0002_remove_content_type_name... OK
  Applying auth.0002_alter_permission_name_max_length... OK
  Applying auth.0003_alter_user_email_max_length... OK
  Applying auth.0004_alter_user_username_opts... OK
  Applying auth.0005_alter_user_last_login_null... OK
  Applying auth.0006_require_contenttypes_0002... OK
  Applying auth.0007_alter_validators_add_error_messages... OK
  Applying auth.0008_alter_user_username_max_length... OK
  Applying auth.0009_alter_user_last_name_max_length... OK
  Applying auth.0010_alter_group_name_max_length... OK
  Applying auth.0011_update_proxy_permissions... OK
  Applying auth.0012_alter_user_first_name_max_length... OK
  Applying sessions.0001_initial... OK
さらにadminユーザを作成します。
PS C:\Users\ohtsu\Documents\DjangoEnv\qiita\testPJ> python manage.py createsuperuser
Username (leave blank to use 'ohtsu'): admin
Email address: admin@example.com
Password:
Password (again):
This password is too common.
Bypass password validation and create user anyway? [y/N]: y
Superuser created successfully.
testPJフォルダにあるurls.pyを編集していきます。
- from .views import homeView
urls.pyと同じフォルダ上にあるviews.pyからhomeViewという処理を読み込む、みたいなイメージです。このviews.pyはこれから作成します。 - path("admin/", admin.site.urls),
http://localhost:8000/admin
にアクセスすることでDjangoの管理画面にアクセスできるようにする設定です。 - path("", homeView.as_view(), name="home"),
URLを指定しないでDjangoにアクセスしてくるとhomeViewの処理を行う。homeViewの処理はこれから記載します。
# this is project urls.py

from django.contrib import admin
from django.urls import path
from .views import homeView

urlpatterns = [
    path("admin/", admin.site.urls),
    path("", homeView.as_view(), name="home"),
]
views.pyを作成します。
PS C:\Users\ohtsu\Documents\DjangoEnv\qiita\testPJ> New-Item views.py
中身は以下としました。
TemplateViewをhomeViewクラスに継承させて、home.htmlをtemplate_name変数に読み込ませています。
難しく見えるのですが、アクセスしてきた際に表示させたいHTMLファイルを指定するというイメージで良いのかなと思っています。
home.htmlはこれから作成します。
- from django.views.generic import TemplateView
djangoのライブラリからTemplateViewを呼び出しています。
# This is Project views.py

from django.views.generic import TemplateView

class homeView(TemplateView):
    template_name = "home.html"
templatesフォルダ配下にhome.htmlを作成します。今回は以下としました。
a hrefの設定の仕方がDjango仕様になっていますが、"{% url "アプリ名" "urlsで指定したname" %}"と記載するようです。
この辺りは後からまた出てきます。
<h1>Hello devProject</h1>

<a href="{% url 'admin:index' %}">ADMIN</a>
最後にsettings.pyのBASE_DIRに以下の設定をします。
LANGUAGE_CODE = "ja"
TIME_ZONE = "Asia/Tokyo"
TEMPLATES = [
    {
        "DIRS": [BASE_DIR, "templates"],
この状態でrunserverをしていきます。
PS C:\Users\ohtsu\Documents\DjangoEnv\qiita\testPJ> python manage.py runserver
Watching for file changes with StatReloader
Performing system checks...
System check identified no issues (0 silenced).
November 04, 2023 - 20:05:41
Django version 4.1, using settings 'testPJ.settings'
Starting development server at http://127.0.0.1:8000/
Quit the server with CTRL-BREAK.
http://localhost:8000
でアクセスするとurls.pyで指定したhome.htmlにアクセスしていることが確認できます。

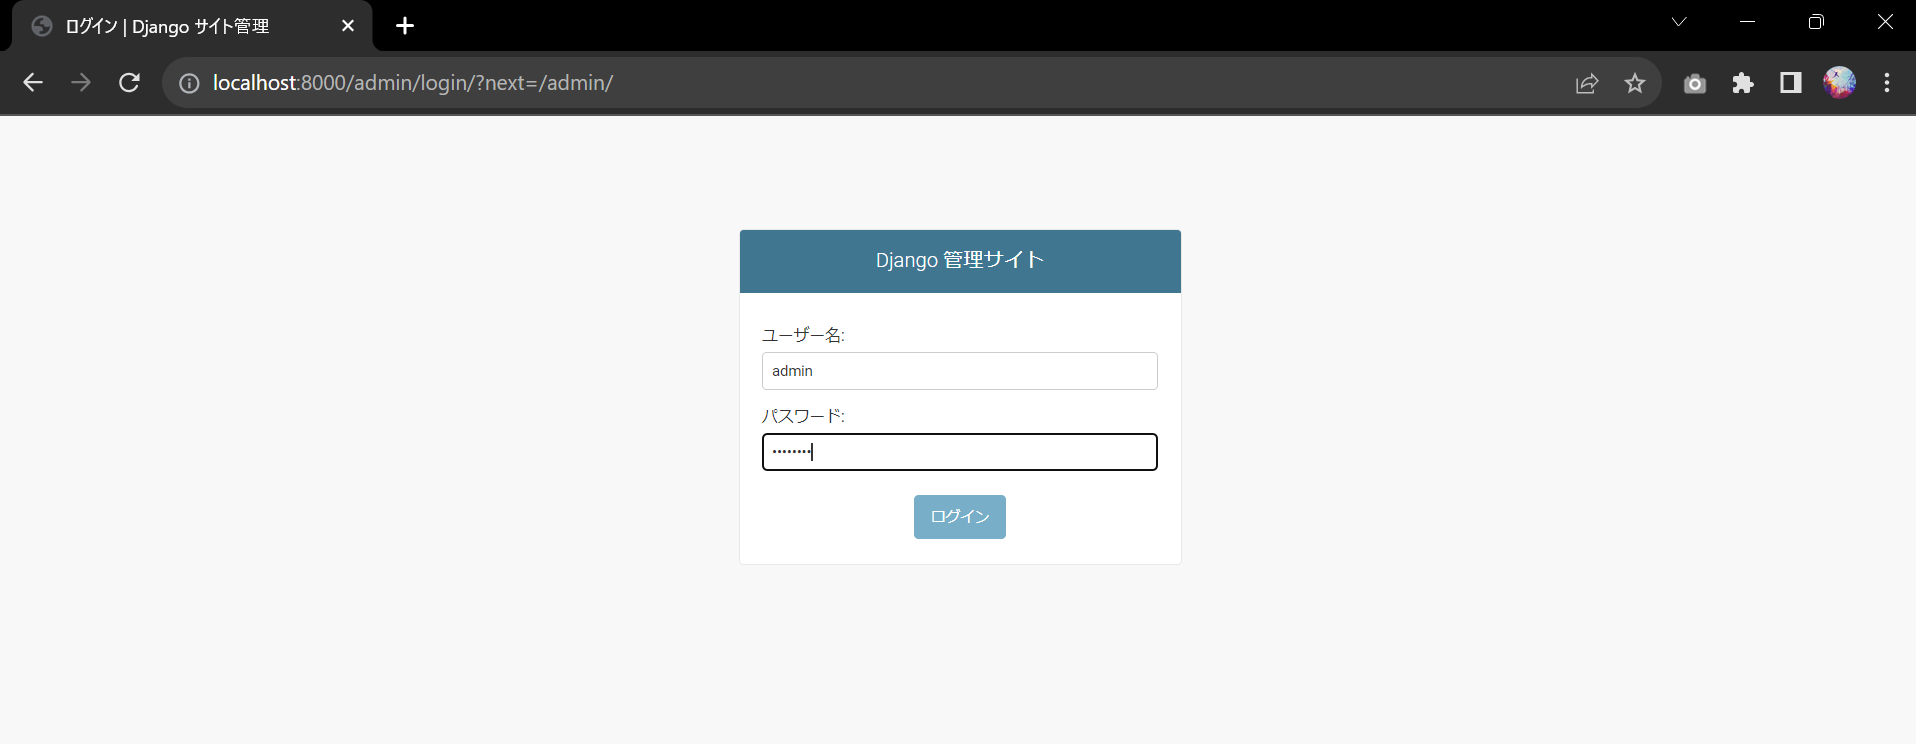
adminのリンクを踏むと、Djangoが用意している管理コンソールのためのログイン画面が表示されます。

管理者用の画面にアクセスできます。

ログイン画面を作成する
さらに、管理者用のログイン画面ではなく管理者以外が使用するログイン画面を作成していきたいと思います。
まず、urls.pyを以下のように修正します。
-
index_view = TemplateView.as_view(template_name="index.html")
path("index/", login_required(index_view), name="index"),
http://localhost:8000/index
にアクセスしようとすると先にログインするように求めるようにしています。index.htmlはこれから作成していきます。 -
path("auth/", include("django.contrib.auth.urls"), name="login"),
http://localhost:8000/auth/login
にアクセスすると管理者以外のログイン画面が表示されます。
include("django.contrib.auth.urls")と書くことでDjangoが事前に用意しているログイン関連のライブラリを使用して簡単にログイン画面を作成できるようになるようです。なお、URLにはauth/loginと記載しており、一方でpathにはauth/としか記載しておりませんが、これはこのライブラリを使用する際の仕様のようです。
# This is Project urls.py

from django.contrib import admin
from django.urls import path, include
from django.contrib.auth.decorators import login_required
from django.views.generic import TemplateView
from .views import homeView

index_view = TemplateView.as_view(template_name="index.html")

urlpatterns = [
    path('admin/', admin.site.urls),
    path("index/", login_required(index_view), name="index"),
    path("auth/", include("django.contrib.auth.urls"), name="login"),
    path('', homeView.as_view(), name="home"),
]
次にtemplates配下に作成したregistrationフォルダにlogin.htmlを作成します。
Djangoが用意しているログイン関連のライブラリはtemplates>registrationにtemplatesファイルを探しに行くようにデフォルトで設定されているようです。
PS C:\Users\ohtsu\Documents\DjangoEnv\qiita\testPJ> cd .\templates\
PS C:\Users\ohtsu\Documents\DjangoEnv\qiita\testPJ\templates> cd .\registration\
PS C:\Users\ohtsu\Documents\DjangoEnv\qiita\testPJ\templates\registration> New-Item login.html
PS C:\Users\ohtsu\Documents\DjangoEnv\qiita\testPJ\templates\registration> ls
    ディレクトリ: C:\Users\ohtsu\Documents\DjangoEnv\qiita\testPJ\templates\registration
Mode                 LastWriteTime         Length Name
----                 -------------         ------ ----
-a----        2023/11/04     20:25              0 login.html
login.htmlの中身は以下です。
<form method="post">
    {% csrf_token %}
    {{ form.as_p }}
    <button type="submit">ログイン</button>
ついでにtemplatesフォルダにindex.htmlを作成します。
PS C:\Users\ohtsu\Documents\DjangoEnv\qiita\testPJ\templates> New-Item index.html
PS C:\Users\ohtsu\Documents\DjangoEnv\qiita\testPJ\templates> ls
    ディレクトリ: C:\Users\ohtsu\Documents\DjangoEnv\qiita\testPJ\templates
Mode                 LastWriteTime         Length Name
----                 -------------         ------ ----
d-----        2023/11/04     20:25                registration
-a----        2023/11/04     20:13             72 home.html
-a----        2023/11/04     20:27              0 index.html
index.htmlの中身は以下としました。
{% if user.is_authenticated %}
{{ user.username }}さん、こんにちは。
<a href="{% url 'logout' %}">ログアウト</a>
{% else %}
<p>ログインしていません</p>
{% endif %}
続いて、settings.pyの最後に以下のような設定を追記します。
それぞれurls.pyで設定したnameで指定します。
-
LOGIN_URL:
LOGIN_URL は、ログインが必要なページにアクセスしようとした際にリダイレクトされるログインページのURLを指定します。通常、この値はログインページのURLパターンの名前と一致する必要があります。たとえば、LOGIN_URL = "login" の場合、urls.py内で name="login" という名前のログインページのURLパターンが定義されている必要があります。 -
LOGIN_REDIRECT_URL:
LOGIN_REDIRECT_URL は、ユーザーがログインに成功した場合にリダイレクトされるURLを指定します。ユーザーがログインした後、このURLにリダイレクトされます。たとえば、LOGIN_REDIRECT_URL = "index" の場合、ユーザーがログインした後に urls.py内で name="index" という名前のページにリダイレクトされます。 -
LOGOUT_REDIRECT_URL:
LOGOUT_REDIRECT_URL は、ユーザーがログアウトした後にリダイレクトされるURLを指定します。ユーザーがログアウトした後、このURLにリダイレクトされます。たとえば、LOGOUT_REDIRECT_URL = "home" の場合、ユーザーがログアウトした後に urls.py内で name="home" という名前のページにリダイレクトされます。
LOGIN_URL = "login"
LOGIN_REDIRECT_URL = "index"
LOGOUT_REDIRECT_URL = "home"
home.htmlも以下のように修正します。
<h1>Hello devProject</h1>
<a href="{% url 'login' %}">ログイン</a>
<a href="{% url 'admin:index' %}">ADMIN</a>
runserverします。
PS C:\Users\ohtsu\Documents\DjangoEnv\qiita\testPJ> python manage.py runserver
Watching for file changes with StatReloader
Performing system checks...
System check identified no issues (0 silenced).
November 04, 2023 - 20:37:49
Django version 4.1, using settings 'testPJ.settings'
Starting development server at http://127.0.0.1:8000/
Quit the server with CTRL-BREAK.
http://localhost:8000
にアクセスすると以前から指定しているホーム画面が表示されます。新しく設定したログインリンクを踏んでみます。

ログインユーザとパスワードを求められます。入力後ログインを押してみます。

ログイン後の画面(http://localhost:8000/index)
に遷移したことが確認できます。ログアウトを押してみます。

戻ってきました。URLでダイレクトにindexに飛べるかを確認してみます。

ログインをしていないため、ログイン画面にリダイレクトされました。
