こんにちは。
株式会社クラスアクト インフラストラクチャ事業部の大塚です。
今回は、OpenSSLを使用してプライベートCA環境を構築し、サーバ証明書を発行する手順について解説します。プライベートCAは、社内ネットワークや開発環境など、限定された範囲で安全な通信を実現するために非常に有用です。
この記事では、Ubuntu 22.04環境を使用し、以下の流れで作業を進めていきます:
プライベートCAの秘密鍵と証明書の作成
サーバの秘密鍵とCSR(証明書署名要求)の作成
サーバCSRに署名してサーバ証明書を発行
また、次回の記事では、今回作成したサーバ証明書を使用して、Apache2の通信をHTTPS化する手順について解説する予定です。
それでは、早速始めていきましょう!
環境イメージ
今回作成した環境配下となります。
OSはubuntu22.04となります。opensslを使って設定を入れ込んでいくのですが、基本的なディレクトリは/etc/sslとなります。
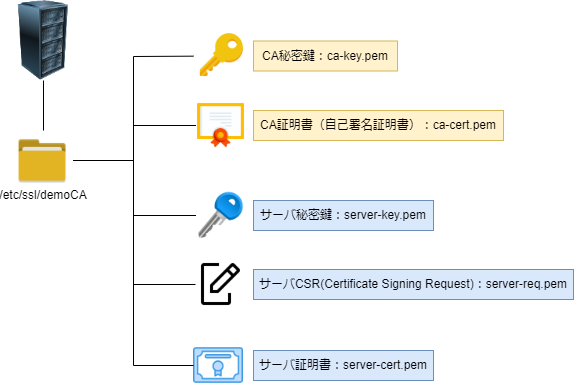
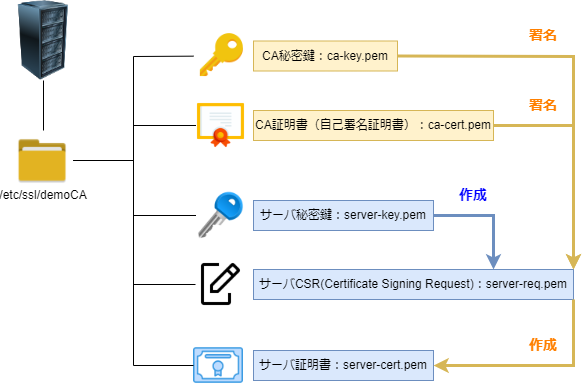
鍵作成やCSR作成、署名の流れは以下になると思います。
環境構築
CA秘密鍵と証明書の作成
まず、現状を確認します。/etc/ssl/配下で色々作業を行います。
※opensslはデフォルトでインストールされておりました。
root@ca-server:/etc/ssl# openssl version
OpenSSL 3.0.2 15 Mar 2022 (Library: OpenSSL 3.0.2 15 Mar 2022)
root@ca-server:~# cd /etc/ssl/
root@ca-server:/etc/ssl# ls
certs  openssl.cnf  private
次にopenssl.cnfファイルを確認します。
"dir = ./demoCA"との記載があるため、/etc/ssl/にdemoCAを作っていきます。
ここを編集していくことでオリジナルのディレクトリでも作業が出来ると思います。今回は確認までしておりません。
root@ca-server:/etc/ssl# cat openssl.cnf
~中略~
####################################################################
[ ca ]
default_ca      = CA_default            # The default ca section

####################################################################
[ CA_default ]

dir             = ./demoCA              # Where everything is kept
certs           = $dir/certs            # Where the issued certs are kept
crl_dir         = $dir/crl              # Where the issued crl are kept
database        = $dir/index.txt        # database index file.
#unique_subject = no                    # Set to 'no' to allow creation of
                                        # several certs with same subject.
new_certs_dir   = $dir/newcerts         # default place for new certs.

certificate     = $dir/cacert.pem       # The CA certificate
serial          = $dir/serial           # The current serial number
crlnumber       = $dir/crlnumber        # the current crl number
                                        # must be commented out to leave a V1 CRL
crl             = $dir/crl.pem          # The current CRL
private_key     = $dir/private/cakey.pem# The private key

x509_extensions = usr_cert              # The extensions to add to the cert
~中略~
demoCAディレクトリを作成し、そこでCA秘密鍵とCA証明書を作成します。
まずは秘密鍵を作成します。
- genrsa:RSA秘密鍵を作成
- aes256:作成する秘密鍵をAES256ビットで暗号化
- -out ca-key.pem:秘密鍵をca-key.pemという名前で書き出す
root@ca-server:/etc/ssl/demoCA# openssl genrsa -aes256 -out ca-key.pem 2048
Enter PEM pass phrase:
Verifying - Enter PEM pass phrase:(password)
次にこの秘密鍵を使ってCA証明書を作成します。CSRを作りながらそれに署名をして作成しているイメージだと思います。
- req:CSR(Certificate Signing Request)を生成
- new:新しいCSRを作成する時に指定
- x509:x509形式の自己署名証明書を作成
- -key ca-key.pem: CSRに使用する秘密鍵を指定。自分で作成した鍵を指定しています。だから自己署名…
- -out ca-cert.pem: 生成された自己署名証明書をca-cert.pemという名前のファイルに書き出す
- -days 365: 証明書の有効期間を365日に設定
最後にlsコマンドを叩くことでCAの秘密鍵と証明書があることが確認できます。
root@ca-server:/etc/ssl/demoCA# openssl req -new -x509 -key ca-key.pem -out ca-cert.pem -days 365
Enter pass phrase for ca-key.pem:
You are about to be asked to enter information that will be incorporated
into your certificate request.
What you are about to enter is what is called a Distinguished Name or a DN.
There are quite a few fields but you can leave some blank
For some fields there will be a default value,
If you enter '.', the field will be left blank.
-----
Country Name (2 letter code) [AU]:JP
State or Province Name (full name) [Some-State]:Tokyo
Locality Name (eg, city) []:Chuo
Organization Name (eg, company) [Internet Widgits Pty Ltd]:Classact
Organizational Unit Name (eg, section) []:Infrastructure
Common Name (e.g. server FQDN or YOUR name) []:shota ohtsuka
Email Address []:shota@example.com
root@ca-server:/etc/ssl/demoCA# ls
ca-cert.pem  ca-key.pem
これで、プライベートCA環境の基盤となるCA秘密鍵とCA証明書の作成が完了しました!
このプライベートCAを使用することで、社内ネットワークや開発環境で利用するサーバ証明書を発行できるようになります。
サーバ秘密鍵とCSRの作成
サーバの秘密鍵とCSRを作成していきます。
以下のコマンドで同時に作成をしていきます。最後にlsコマンドを実行し実際に作成されていることを確認します。
- -newkey rsa:2048: 新しいRSA鍵ペア(公開鍵と秘密鍵)を生成します。2048ビットの鍵長を指定
- -nodes: 秘密鍵をパスフレーズで暗号化しないように設定
- -keyout server-key.pem: 生成された秘密鍵をserver-key.pemという名前のファイルに書き出す
- -out server-req.pem: 生成されたCSRをserver-req.pemという名前のファイルに書き出す
root@ca-server:/etc/ssl/demoCA# openssl req -newkey rsa:2048 -nodes -keyout server-key.pem -out server-req.pem
...+.+.....+...+....+++++++++++++++++++++++++++++++++++++++++++++++++++++++++++++++++*.+.+......+..+.+......+++++++++++++++++++++++++++++++++++++++++++++++++++++++++++++++++*..+....+...+..+++++++++++++++++++++++++++++++++++++++++++++++++++++++++++++++++
.+...+.....+++++++++++++++++++++++++++++++++++++++++++++++++++++++++++++++++*.......+.....+++++++++++++++++++++++++++++++++++++++++++++++++++++++++++++++++*...+......+.....+.........+...+...+....+.........+.........+......+....................+.+...+.....+..........+...+..+......+...................+..+.........+.......+...+.........+..+...+................+......+......+...+..+.........+.+++++++++++++++++++++++++++++++++++++++++++++++++++++++++++++++++
-----
You are about to be asked to enter information that will be incorporated
into your certificate request.
What you are about to enter is what is called a Distinguished Name or a DN.
There are quite a few fields but you can leave some blank
For some fields there will be a default value,
If you enter '.', the field will be left blank.
-----
Country Name (2 letter code) [AU]:JP
State or Province Name (full name) [Some-State]:Tokyo
Locality Name (eg, city) []:Chuo
Organization Name (eg, company) [Internet Widgits Pty Ltd]:Classact
Organizational Unit Name (eg, section) []:Infrastructure
Common Name (e.g. server FQDN or YOUR name) []:Shota Ohtsuka
Email Address []:shota@example.com

Please enter the following 'extra' attributes
to be sent with your certificate request
A challenge password []:
An optional company name []:

root@ca-server:/etc/ssl/demoCA# ls
ca-cert.pem  ca-key.pem  server-key.pem  server-req.pem
サーバのCSRに署名を行いサーバ証明書作成
以下のコマンドを実行し、CSRに対してCA秘密鍵/CA証明書で署名を行いサーバ証明書を作成します。
- openssl x509: CSRを署名して証明書を生成するためのコマンド
- -req -in server-req.pem: 署名するCSRファイルを指定
- -out server-cert.pem: 生成された証明書をserver-cert.pemという名前のファイルに書き出す
- -CA ca-cert.pem -CAkey ca-key.pem: CSRを署名するためのCA証明書と秘密鍵を指定
- -CAcreateserial: シリアル番号ファイルが存在しない場合に、自動的に作成
-days 365: 証明書の有効期間を365日に設定
root@ca-server:/etc/ssl/demoCA# openssl x509 -req -in server-req.pem -out server-cert.pem -CA ca-cert.pem -CAkey ca-key.pem -CAcreateserial -days 365
Certificate request self-signature ok
subject=C = JP, ST = Tokyo, L = Chuo, O = Classact, OU = Infrastructure, CN = Shota Ohtsuka, emailAddress = shota@example.com
Enter pass phrase for ca-key.pem:
root@ca-server:/etc/ssl/demoCA# ls
ca-cert.pem  ca-key.pem  server-cert.pem  server-key.pem  server-req.pem
以上です!