こんにちは。
株式会社クラスアクト インフラストラクチャ事業部の大塚です。
前回AWS上にVPC/subnet及びEC2をデプロイしました。
今回はこの続きです。EC2にDjango環境を作り、またDjangoで使うDBをRDSを使って整備していきます。
他の記事は以下の記事で別途管理しております為、適宜ご覧ください。
環境イメージ
今回構築する環境は以下となります。
RDS用のsubnetを3つ、VPC上に作成します。
そのVPCをsubnetグループとして取りまとめ、RDSデプロイ時に指定してあげます。
イメージ図では3つのRDSをそれぞれのsubnetに記載しておりますが、これはマルチAZでデプロイしている場合自動でフェールオーバしたり、読み取り可能なスタンバイDBがあることを示しています。
EC2にDjangoの環境セットアップを行い、RDSデプロイ時に自動で生成されるEndpointを使ってDBと連携します。

予定では今後この環境にALBを導入します。
環境構築
RDS用のサブネット/サブネットグループを作成する
VPC管理画面にてサブネットの新規作成を実行します。
今回はclassct-subnet01,02,03-rdsという3つのsubnetを作成し、
それぞれAZを1a,1c,1dとし、IPアドレスを192.168.10.0/24,192.168.20.0/24,192.168.30.0/24としました。
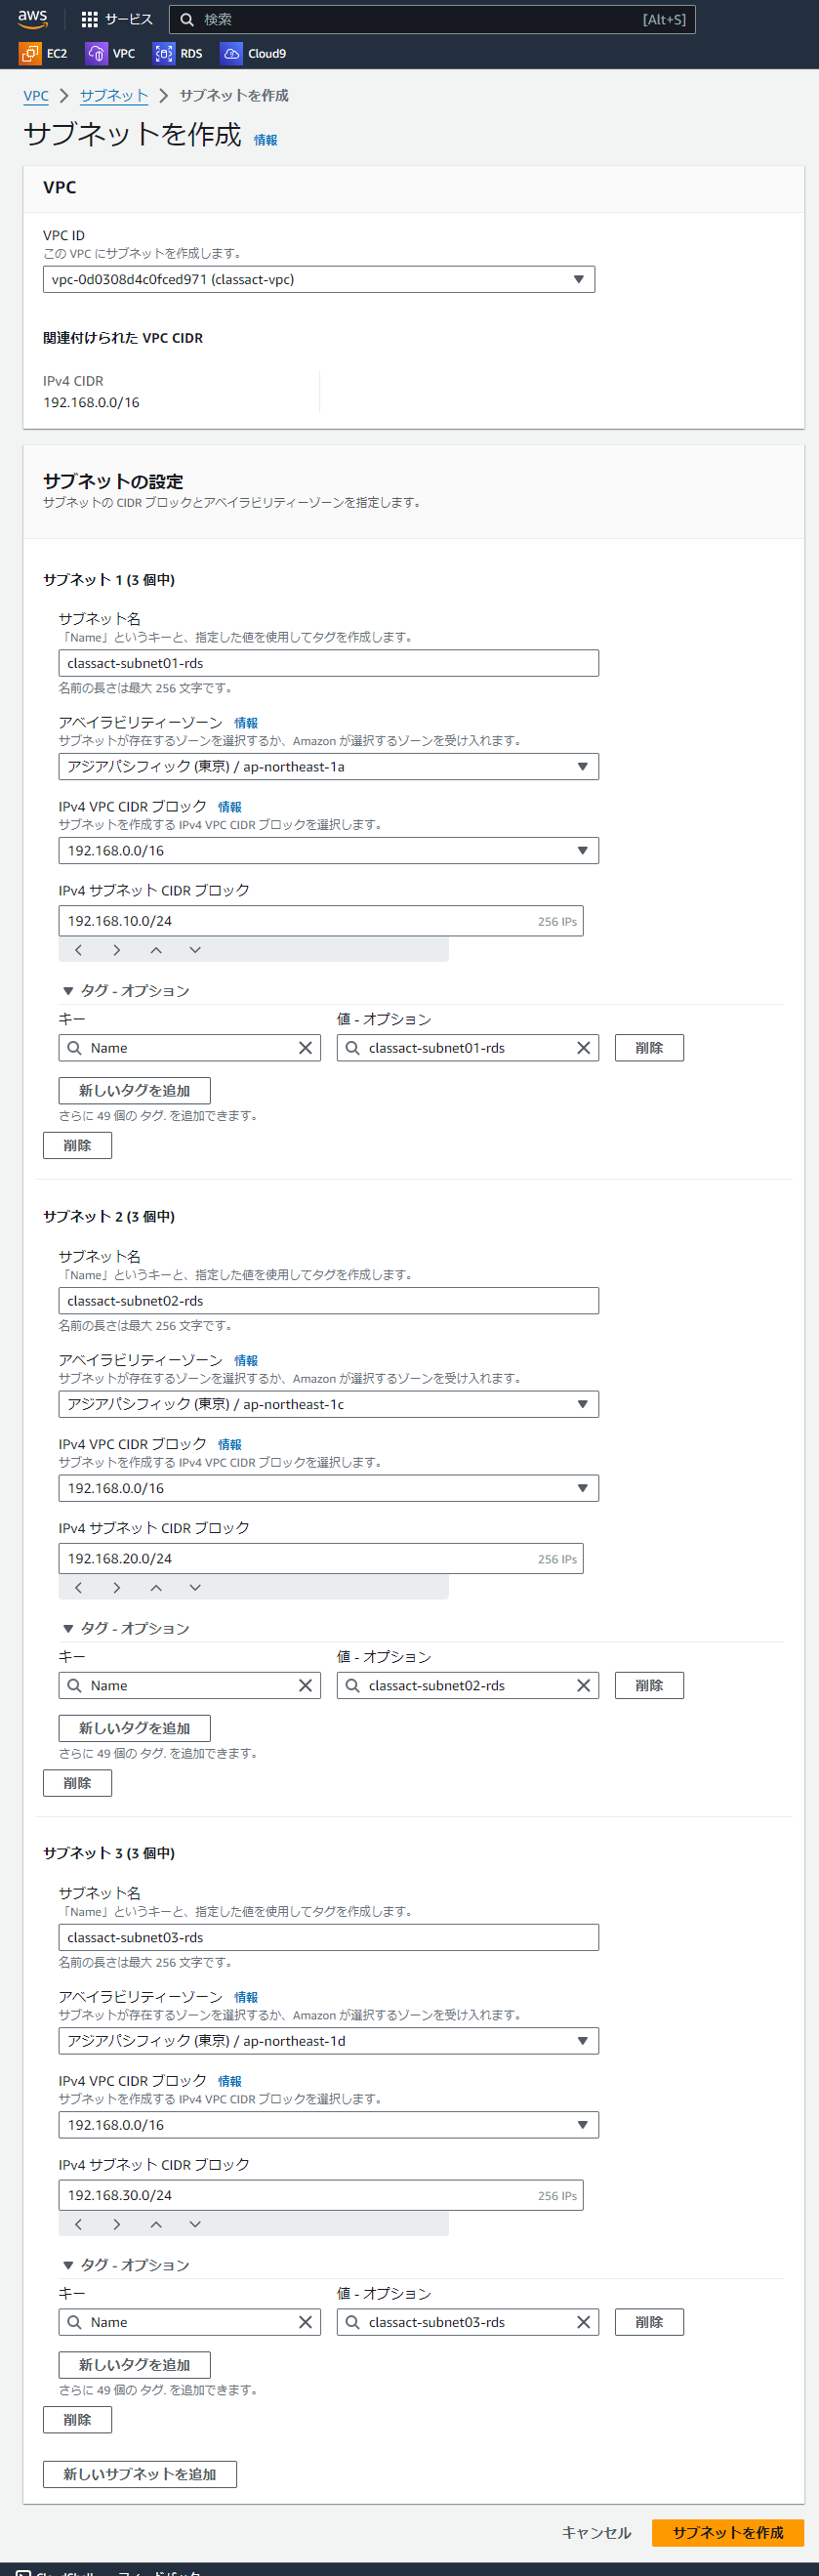
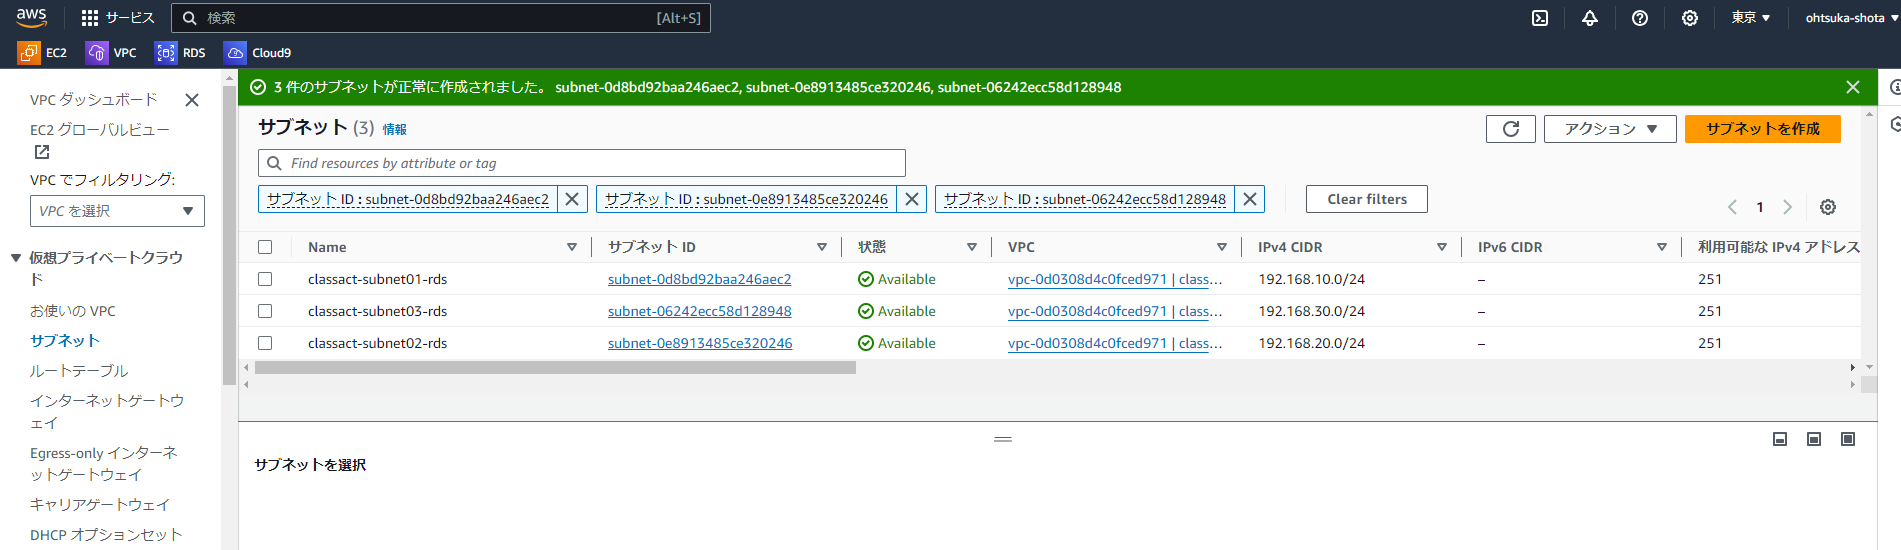
作成されたことを確認します。
次にRDS管理画面に遷移しサブネットグループを作成していきます。
今回はclassact-subnetgroup-rdsという名前のサブネットグループを作成しました。

作成されていることを確認します。

RDSをデプロイする
RDSをデプロイしていきます。だいぶ長いのですが以下のように設定をしていきました。
- 作成方法:標準作成
- エンジンのオプション
- エンジン:MySQL
- マルチAZ:ON
- テンプレート:無料利用枠
- 設定
- インスタンス識別子:classact-rds-django
- マスターユーザ:admin
- 認証情報管理:セルフマネージド
- 接続
- コンピューティングリソース:EC2コンピューティングリソースに接続しない
- VPC:classct-vpc
- DBサブネットグループ:classact-subnetgroup-rds
- パブリックアクセス:なし
- VPCセキュリティグループ:新規作成
- VPC名:classact-sg-rds
- データベース認証:パスワード認証

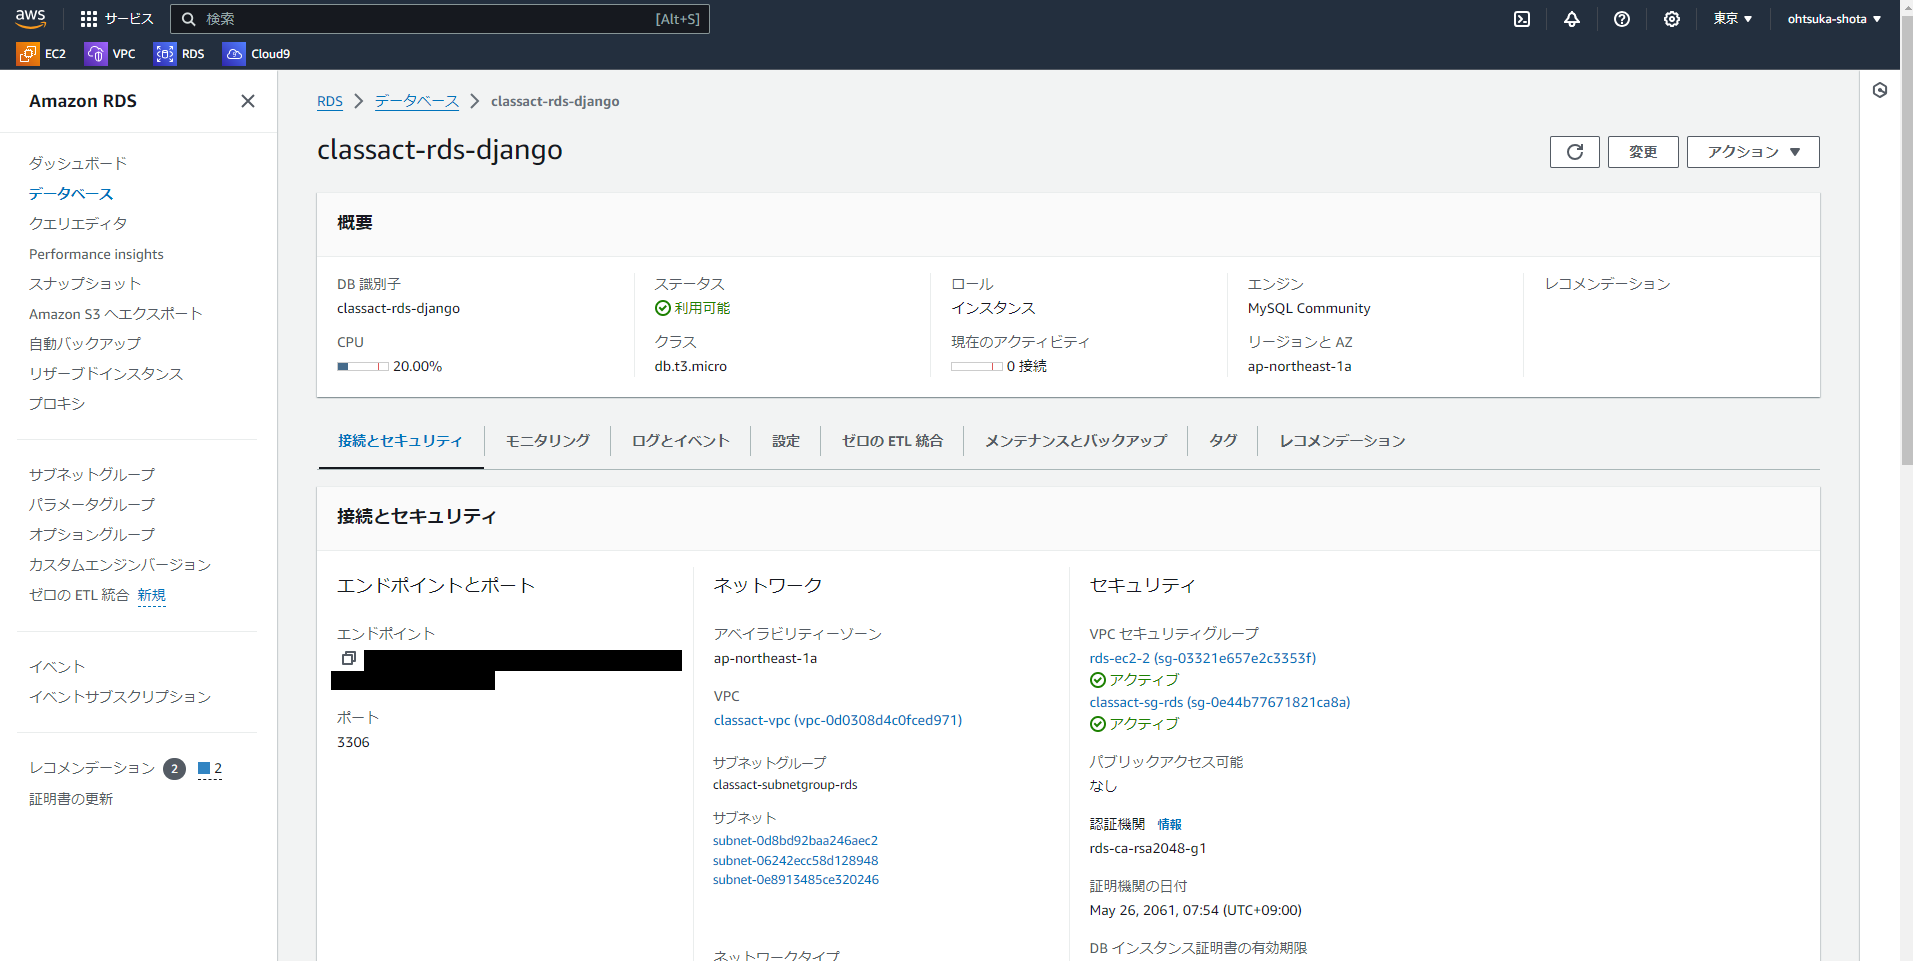
作成されることを確認します。
RDSエンドポイントはDjangoの設定で使いますので控えます。
EC2との接続を許可します。アクションタブの中にあるEC2接続のセットアップを選択します。

Djangoを入れるEC2を選択します。
※EC2が起動していないとここに表示されませんのでご注意を。
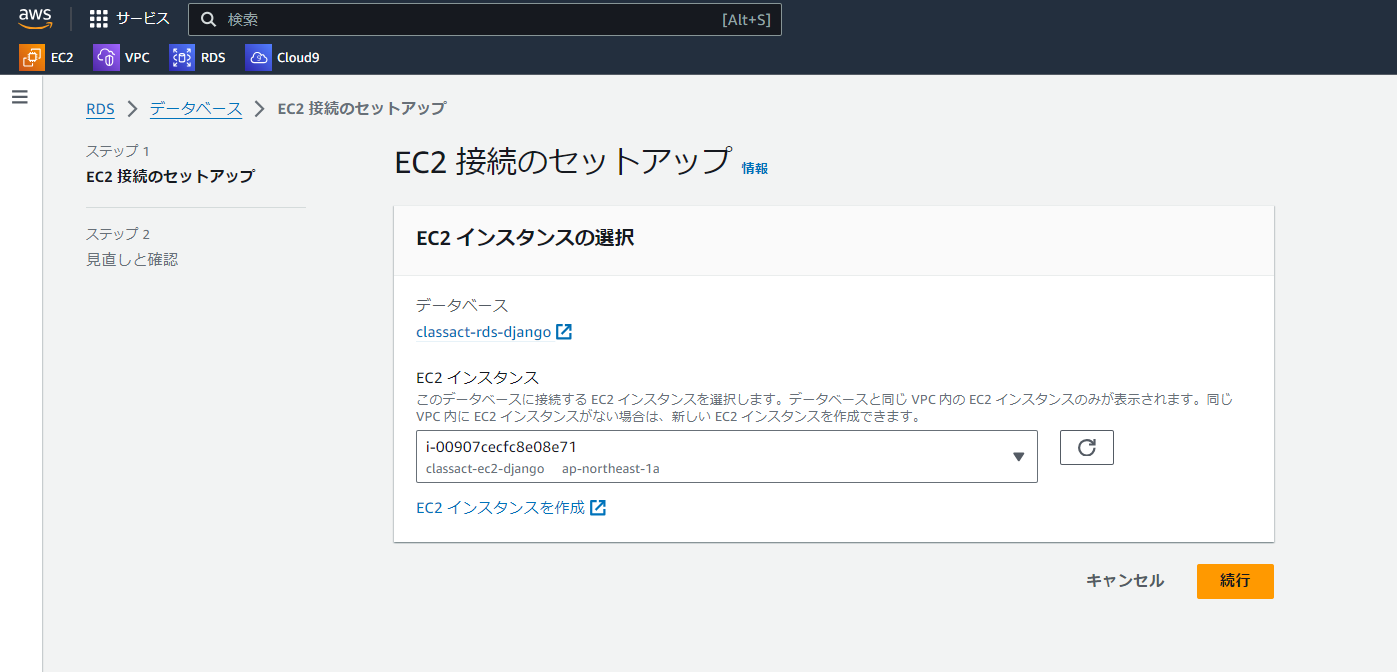
こんな感じの画面が出てきますので次に進みます。
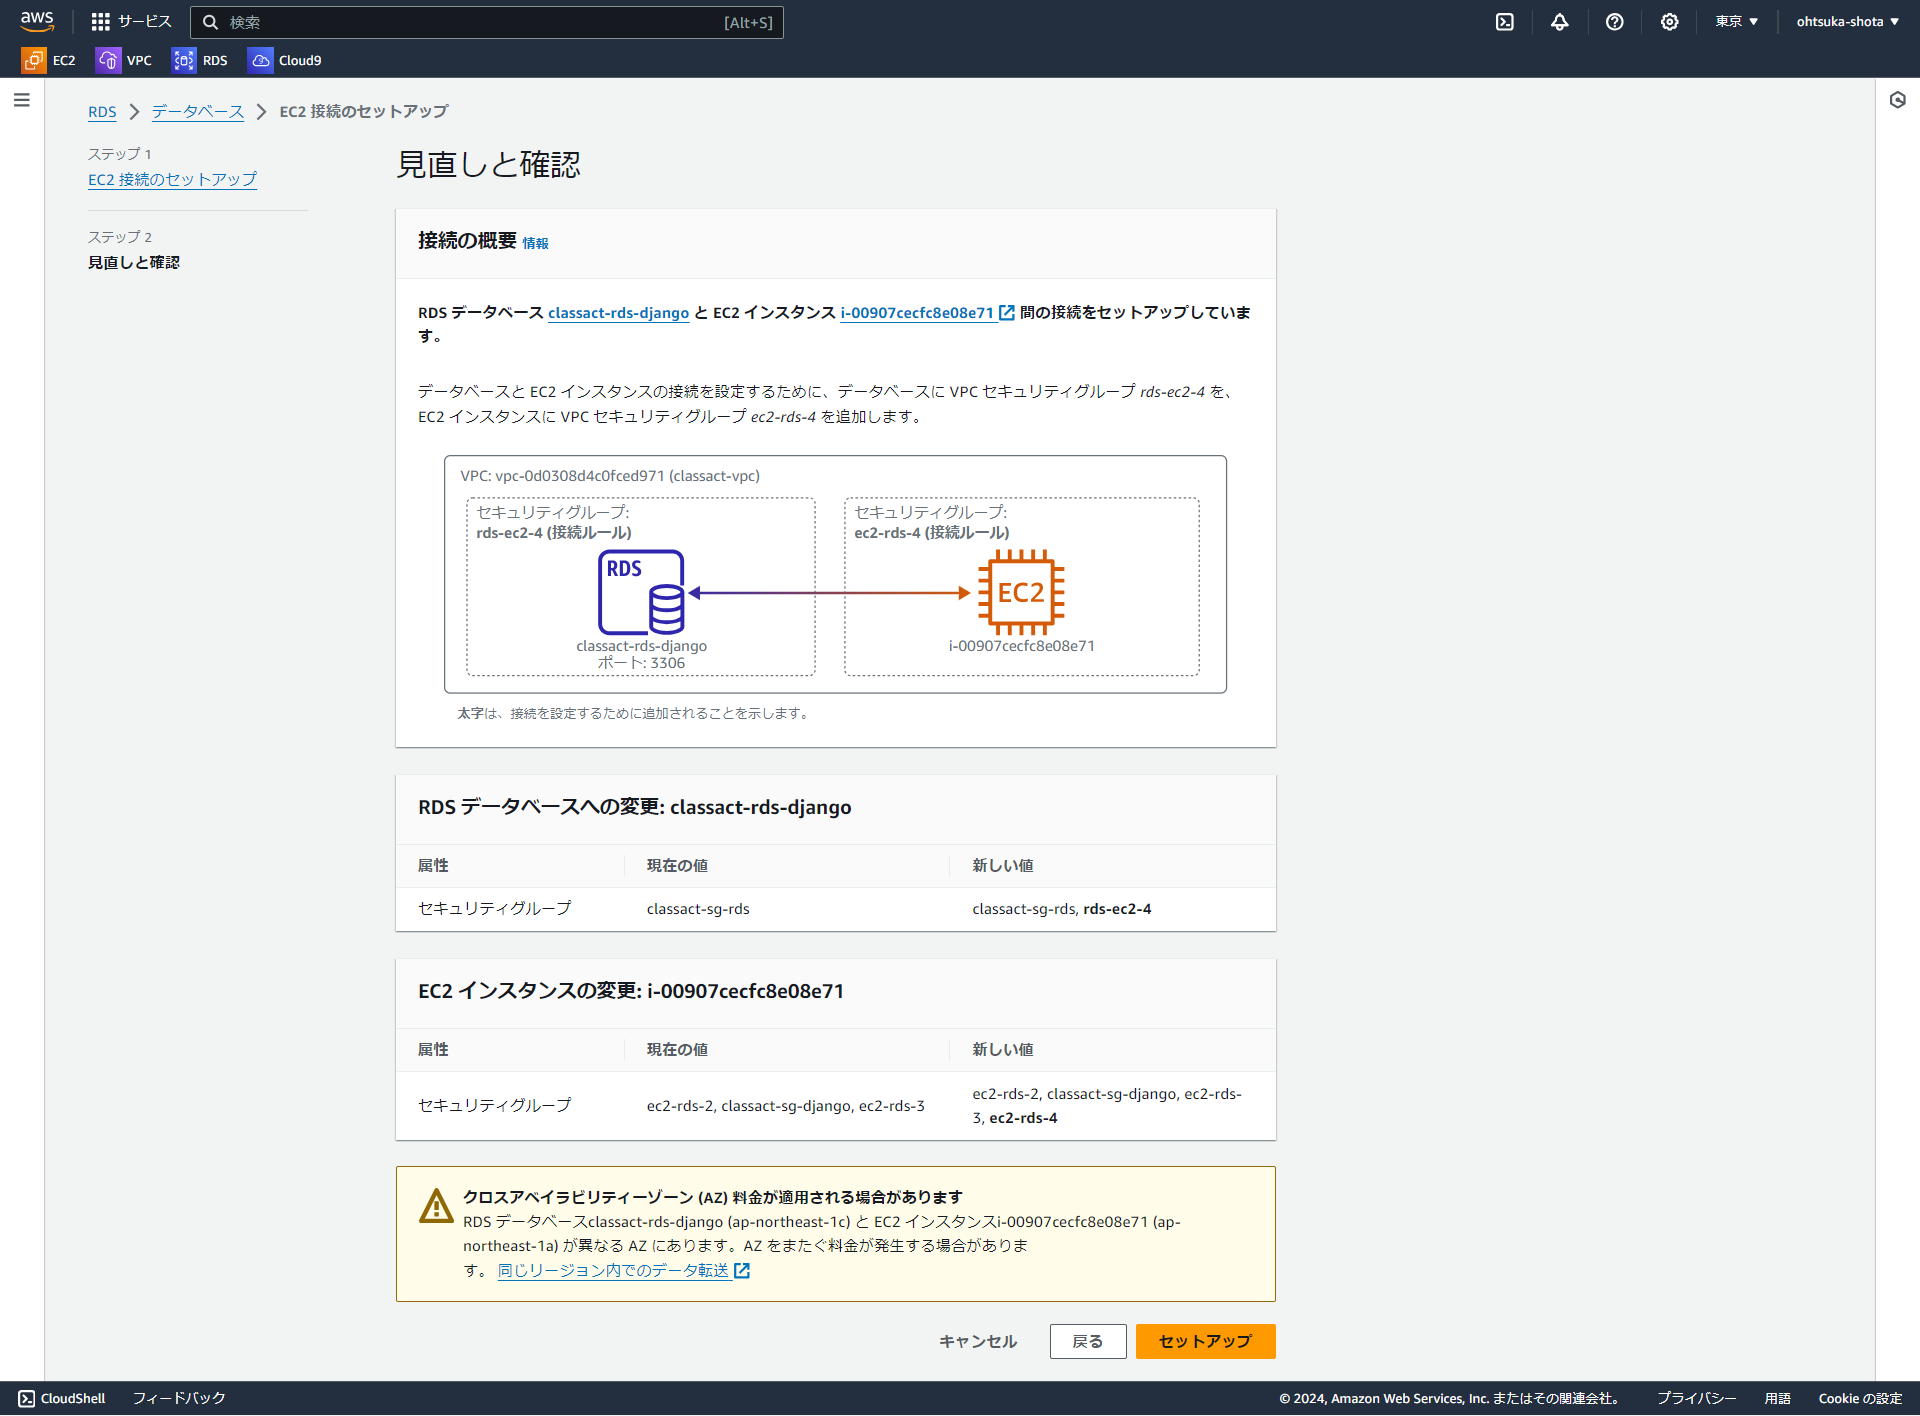
作成したRDSの画面に戻り少し下の方に戻ると接続されたコンピューティングリソースという欄があります。ここに表示されていることを確認します。

EC2のセットアップ
pipやDjango、MySQLクライアントのインストールを行います。
root@ip-192-168-1-84:~# apt update && apt upgrade -y
root@ip-192-168-1-84:~# python3 -V
Python 3.10.12
root@ip-192-168-1-84:~# pip -V
Command 'pip' not found, but can be installed with:
apt install python3-pip
root@ip-192-168-1-84:~# apt install python3-pip -y
root@ip-192-168-1-84:~# pip3 -V
pip 22.0.2 from /usr/lib/python3/dist-packages/pip (python 3.10)
root@ip-192-168-1-84:~# apt install python3-dev default-libmysqlclient-dev pkg-config mysql-client -y
root@ip-192-168-1-84:~# pip3 install django mysqlclient
RDSのエンドポイントを使って、RDSに接続します。
ユーザ/パスワードでアクセス出来たら、Django用のDBを作成します。今回はclassactDjangoとしました。
root@ip-192-168-1-84:~# mysql -h RDSのエンドポイント -u admin -p
Enter password:
Welcome to the MySQL monitor.  Commands end with ; or \g.
Your MySQL connection id is 29
Server version: 8.0.35 Source distribution

Copyright (c) 2000, 2024, Oracle and/or its affiliates.

Oracle is a registered trademark of Oracle Corporation and/or its
affiliates. Other names may be trademarks of their respective
owners.

Type 'help;' or '\h' for help. Type '\c' to clear the current input statement.

mysql> CREATE DATABASE classactDjango;
Query OK, 1 row affected (0.01 sec)

mysql> GRANT ALL ON classactDjango.* TO admin;
Query OK, 0 rows affected (0.00 sec)

mysql> exit;
Bye
Djangoのプロジェクトを作成したりsettings.pyの編集を行います。
説明は省きます。
root@ip-192-168-1-84:~# django-admin startproject classactPJ
root@ip-192-168-1-84:~# ls
classactPJ  snap
root@ip-192-168-1-84:~# cd classactPJ/
root@ip-192-168-1-84:~/classactPJ# ls
classactPJ  manage.py
root@ip-192-168-1-84:~/classactPJ# cd classactPJ/
root@ip-192-168-1-84:~/classactPJ/classactPJ# ls
__init__.py  asgi.py  settings.py  urls.py  wsgi.py
root@ip-192-168-1-84:~/classactPJ/classactPJ# vi settings.py
root@ip-192-168-1-84:~/classactPJ/classactPJ# cat settings.py
---変更箇所---
ALLOWED_HOSTS = ["*"]
DATABASES = {
    'default': {
        'ENGINE': 'django.db.backends.mysql',
        'NAME': 'classactDjango',
        'USER': 'admin',
        'PASSWORD': 'password',
        'HOST': 'RDSのendpoint',
        'PORT': '3306',
    }
}
LANGUAGE_CODE = 'ja'
TIME_ZONE = 'Asia/Tokyo'
---変更箇所---

root@ip-192-168-1-84:~/classactPJ# python3 manage.py migrate
System check identified some issues:
WARNINGS:
?: (mysql.W002) MySQL Strict Mode is not set for database connection 'default'
        HINT: MySQL's Strict Mode fixes many data integrity problems in MySQL, such as data truncation upon insertion, by escalating warnings into errors. It is strongly recommended you activate it. See: https://docs.djangoproject.com/en/5.0/ref/databases/#mysql-sql-mode
Operations to perform:
  Apply all migrations: admin, auth, contenttypes, sessions
Running migrations:
  Applying contenttypes.0001_initial... OK
  Applying auth.0001_initial... OK
  Applying admin.0001_initial... OK
  Applying admin.0002_logentry_remove_auto_add... OK
  Applying admin.0003_logentry_add_action_flag_choices... OK
  Applying contenttypes.0002_remove_content_type_name... OK
  Applying auth.0002_alter_permission_name_max_length... OK
  Applying auth.0003_alter_user_email_max_length... OK
  Applying auth.0004_alter_user_username_opts... OK
  Applying auth.0005_alter_user_last_login_null... OK
  Applying auth.0006_require_contenttypes_0002... OK
  Applying auth.0007_alter_validators_add_error_messages... OK
  Applying auth.0008_alter_user_username_max_length... OK
  Applying auth.0009_alter_user_last_name_max_length... OK
  Applying auth.0010_alter_group_name_max_length... OK
  Applying auth.0011_update_proxy_permissions... OK
  Applying auth.0012_alter_user_first_name_max_length... OK
  Applying sessions.0001_initial... OK
root@ip-192-168-1-84:~/classactPJ# python3 manage.py createsuperuser
ユーザー名 (leave blank to use 'root'): admin
メールアドレス: admin@example.com
Password:
Password (again):
このパスワードは一般的すぎます。
Bypass password validation and create user anyway? [y/N]: y
Superuser created successfully.
接続試験
runserverを行い、Webブラウザから接続できるようにします。
root@ip-192-168-1-84:~/classactPJ# python3 manage.py runserver 0.0.0.0:80
Watching for file changes with StatReloader
Performing system checks...

System check identified no issues (0 silenced).
April 16, 2024 - 19:58:22
Django version 5.0.4, using settings 'classactPJ.settings'
Starting development server at http://0.0.0.0:80/
Quit the server with CONTROL-C.
EC2のパブリックIPに対してhttp接続が出来ると以下のような画面が表示されます。
問題なさそうですね。
