こんにちは
株式会社クラスアクト インフラストラクチャ事業部の大塚です。
今回はタイトルにもあるようにk8sのネットワーク周りを不完全ながらも図に落とし込んでみて、自分の中でk8sのネットワーク周りの解像度をあげていければと思っています。『k8sのネットワークはおおよそタイトルにある4つが分かればイメージ出来るんじゃないかなぁ』と思う今日この頃。本当はVXLANの手前というか裏にLinuxBridgeみたいなのがいるんだろうなぁとは思いますが、確認しきれませんでした汗
※勉強途中の人間がそれっぽく図式化しているので精度はイマイチだと思われます。
※ClusterIPやNodePort,LoadBalancer辺りは図に落とし込まれているのを見るのですが、それより前のPod周りのネットワークを図に書いているのが印象になく、そのあたりを図に落とし込みたいなと思ったのが発端です。
環境
master nodeが1台、worker nodeが3台の計4台でk8sクラスタを構成しています。
nodeのOSはubuntu22.04。microk8sをインストールしているのですがmicrok8sのversionはv1.26.4になります。
root@k8s-master:~/yaml# kubectl get node -o wide
NAME           STATUS   ROLES    AGE   VERSION   INTERNAL-IP    EXTERNAL-IP   OS-IMAGE             KERNEL-VERSION      CONTAINER-RUNTIME
k8s-worker01   Ready    <none>   83m   v1.26.4   192.168.2.31   <none>        Ubuntu 22.04.2 LTS   5.15.0-71-generic   containerd://1.6.15
k8s-master     Ready    <none>   91m   v1.26.4   192.168.2.30   <none>        Ubuntu 22.04.2 LTS   5.15.0-71-generic   containerd://1.6.15
k8s-worker02   Ready    <none>   73m   v1.26.4   192.168.2.32   <none>        Ubuntu 22.04.2 LTS   5.15.0-71-generic   containerd://1.6.15
k8s-worker03   Ready    <none>   83m   v1.26.4   192.168.2.33   <none>        Ubuntu 22.04.2 LTS   5.15.0-71-generic   containerd://1.6.15
用語
ClusterIP
クラスター内部のIPでServiceを公開する。このタイプではServiceはクラスター内部からのみ疎通性があります。このタイプはデフォルトのServiceTypeです。
NodePort
各NodeのIPにて、静的なポート(NodePort)上でServiceを公開します。そのNodePort のServiceが転送する先のClusterIP Serviceが自動的に作成されます。"NodeIP:NodePort"にアクセスすることによってNodePort Serviceにアクセスできるようになります。
LoadBalancer
クラウドプロバイダーのロードバランサーを使用して、Serviceを外部に公開します。クラスター外部にあるロードバランサーが転送する先のNodePortとClusterIP Serviceは自動的に作成されます。
Calico
Calico は MicroK8 のデフォルトの CNI であり、VXLAN オーバーレイ ネットワークはポッド ネットワークの構成に使用されます。
Calico は、コンテナー、仮想マシン、およびネイティブ ホスト ベースのワークロード向けのオープン ソース ネットワーキングおよびネットワーク セキュリティ ソリューションです。Calico は、Kubernetes、OpenShift、Mirantis Kubernetes Engine (MKE)、OpenStack、ベアメタル サービスなど、幅広いプラットフォームをサポートしています。
IPAMやVXLAN環境をk8s(microk8s)に提供しているものみたいですね。
DeamonSet
DaemonSetは、すべての(または一部の)ノードがPodのコピーを実行することを保証します。ノードがクラスタに追加されると、Podが追加されます。ノードがクラスタから削除されると、これらのPodはガベージコレクションされます。DaemonSetを削除すると、それが作成したPodがクリーンアップされます。
DeamonSetをデプロイしてpod周りのネットワークを確認する
今回は3つのdsを用意しました。nginx用、apache2用、redis用になります。yamlファイルはそれぞれ以下となります。tolerationの設定は気にしないでください。
apiVersion: apps/v1
kind: DaemonSet
metadata:
  name: nginx-ds
spec:
  selector:
    matchLabels:
      name: nginx
  template:
    metadata:
      labels:
        name: nginx
    spec:
      tolerations:
      - key: "env"
        operator: "Equal"
        value: "master"
        effect: NoSchedule
      containers:
      - name: nginx-container
        image: nginx:latest
apiVersion: apps/v1
kind: DaemonSet
metadata:
  name: apache-ds
spec:
  selector:
    matchLabels:
      name: apache
  template:
    metadata:
      labels:
        name: apache
    spec:
      tolerations:
      - key: "env"
        operator: "Equal"
        value: "master"
        effect: NoSchedule
      containers:
      - name: apache-container
        image: shotaohtsuka/my-httpd-image
apiVersion: apps/v1
kind: DaemonSet
metadata:
  name: redis-ds
spec:
  selector:
    matchLabels:
      name: redis
  template:
    metadata:
      labels:
        name: redis
    spec:
      tolerations:
      - key: "env"
        operator: "Equal"
        value: "master"
        effect: NoSchedule
      containers:
      - name: redis-container
        image: redis
これをデプロイしていきます。
IPアドレスが各node毎に概ね連番となっていることが分かります。連番になっていないところがあるのはデプロイに失敗して2,3回やり直したことによるものだと思われます。
root@k8s-master:~/yaml# kubectl get pod -o wide | grep -i k8s-master
nginx-ds-tkhgg    1/1     Running   0          23m   10.1.235.211   k8s-master     <none>           <none>
apache-ds-t6th6   1/1     Running   0          23m   10.1.235.212   k8s-master     <none>           <none>
redis-ds-zw869    1/1     Running   0          10m   10.1.235.215   k8s-master     <none>           <none>

root@k8s-master:~/yaml# kubectl get pod -o wide | grep -i k8s-worker01
nginx-ds-6nw9w    1/1     Running   0          23m   10.1.79.75     k8s-worker01   <none>           <none>
apache-ds-xv25j   1/1     Running   0          23m   10.1.79.76     k8s-worker01   <none>           <none>
redis-ds-bv2t9    1/1     Running   0          11m   10.1.79.79     k8s-worker01   <none>           <none>

root@k8s-master:~/yaml# kubectl get pod -o wide | grep -i k8s-worker02
nginx-ds-k4ndq    1/1     Running   0          24m   10.1.69.201    k8s-worker02   <none>           <none>
apache-ds-bmtwp   1/1     Running   0          24m   10.1.69.202    k8s-worker02   <none>           <none>
redis-ds-d2ps6    1/1     Running   0          11m   10.1.69.205    k8s-worker02   <none>           <none>

root@k8s-master:~/yaml# kubectl get pod -o wide | grep -i k8s-worker03
nginx-ds-gvx8m    1/1     Running   0          24m   10.1.39.199    k8s-worker03   <none>           <none>
apache-ds-kzpns   1/1     Running   0          24m   10.1.39.200    k8s-worker03   <none>           <none>
redis-ds-pfrpl    1/1     Running   0          11m   10.1.39.203    k8s-worker03   <none>           <none>
k8sのpodに割り当てられるIPアドレスのレンジについては"/var/snap/microk8s/current/args/cni-network/cni.yaml"の以下の部分だと思われる。node毎に均等にレンジが割り当てられている様子。。。
# The default IPv4 pool to create on startup if none exists. Pod IPs will be
# chosen from this range. Changing this value after installation will have
# no effect. This should fall within `--cluster-cidr`.
- name: CALICO_IPV4POOL_CIDR
  value: "10.1.0.0/16"
また、それぞれのnodeのvxlanのinterfaceを確認してみます。
root@k8s-master:~# ip a
11: vxlan.calico: <BROADCAST,MULTICAST,UP,LOWER_UP> mtu 1450 qdisc noqueue state UNKNOWN group default
    link/ether 66:d5:cf:d3:6b:7e brd ff:ff:ff:ff:ff:ff
    inet 10.1.235.192/32 scope global vxlan.calico
       valid_lft forever preferred_lft forever
    inet6 fe80::64d5:cfff:fed3:6b7e/64 scope link
       valid_lft forever preferred_lft forever
root@k8s-worker01:~# ip a
5: vxlan.calico: <BROADCAST,MULTICAST,UP,LOWER_UP> mtu 1450 qdisc noqueue state UNKNOWN group default
    link/ether 66:c1:17:77:92:d1 brd ff:ff:ff:ff:ff:ff
    inet 10.1.79.64/32 scope global vxlan.calico
       valid_lft forever preferred_lft forever
    inet6 fe80::64c1:17ff:fe77:92d1/64 scope link
       valid_lft forever preferred_lft forever
root@k8s-worker02:~# ip a
25: vxlan.calico: <BROADCAST,MULTICAST,UP,LOWER_UP> mtu 1450 qdisc noqueue state UNKNOWN group default
    link/ether 66:ff:2b:bc:03:a3 brd ff:ff:ff:ff:ff:ff
    inet 10.1.69.192/32 scope global vxlan.calico
       valid_lft forever preferred_lft forever
    inet6 fe80::64ff:2bff:febc:3a3/64 scope link
       valid_lft forever preferred_lft forever
root@k8s-worker03:~# ip a
5: vxlan.calico: <BROADCAST,MULTICAST,UP,LOWER_UP> mtu 1450 qdisc noqueue state UNKNOWN group default
    link/ether 66:fc:06:ba:9d:0e brd ff:ff:ff:ff:ff:ff
    inet 10.1.39.192/32 scope global vxlan.calico
       valid_lft forever preferred_lft forever
    inet6 fe80::64fc:6ff:feba:9d0e/64 scope link
       valid_lft forever preferred_lft forever
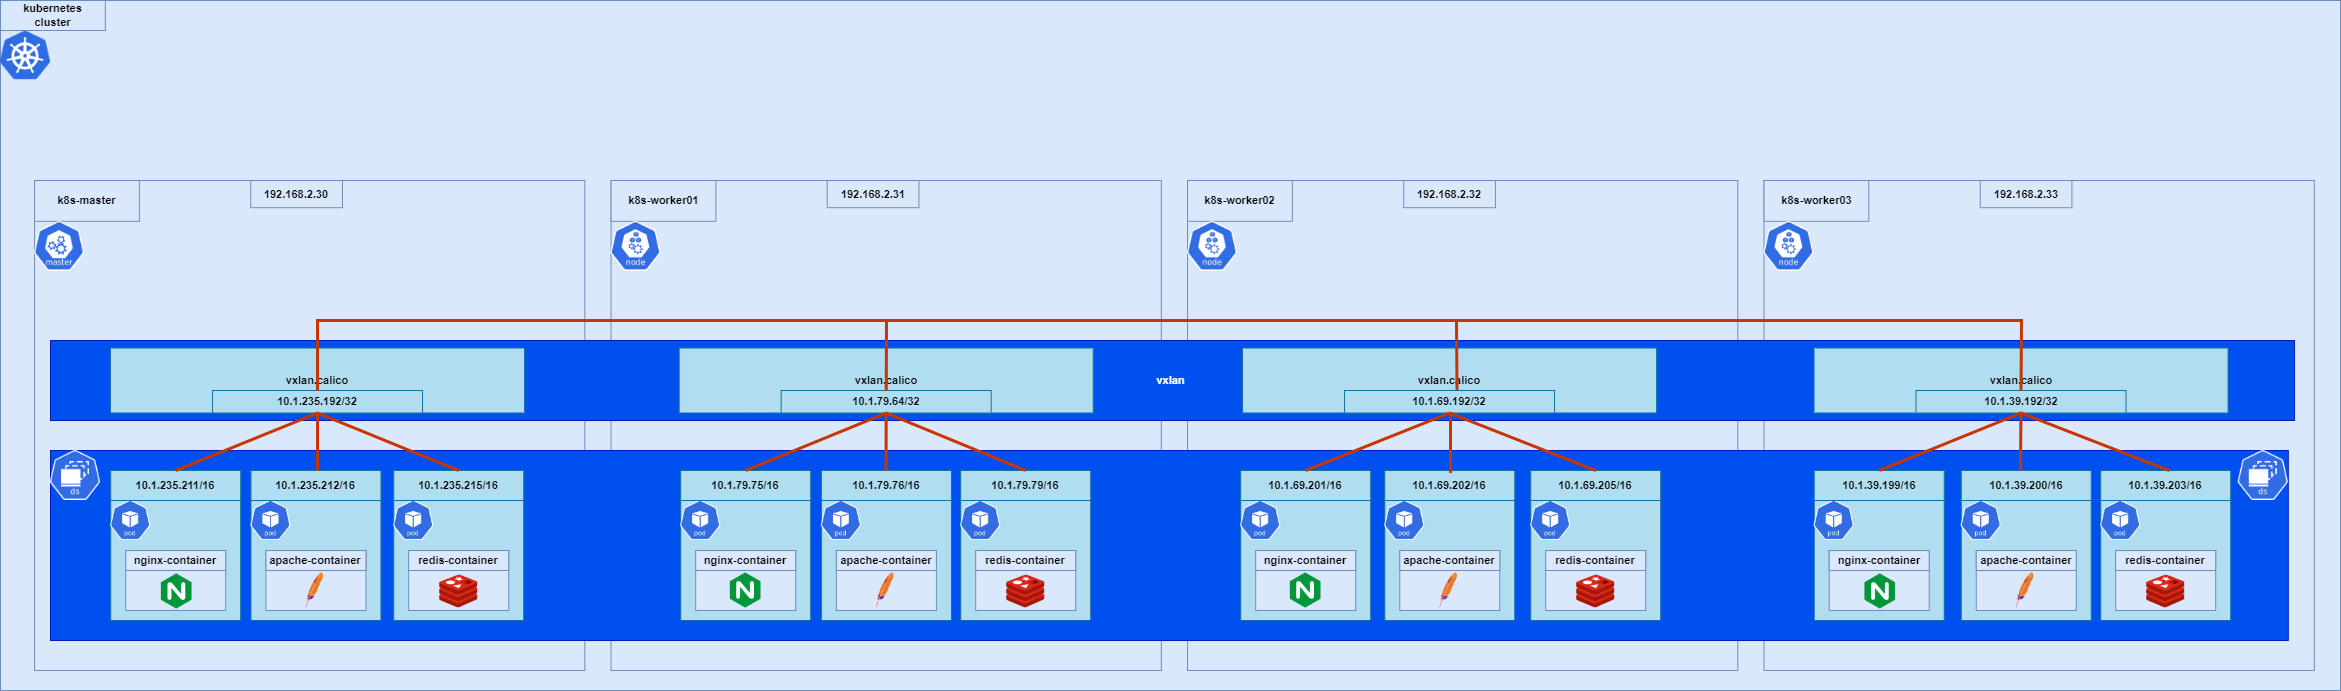
この辺りを図に落とし込むと以下の様になるかと思います。
赤い線がpod間通信に使われる経路になります。podにはvxlanのIPが振られてるのでnodeを跨いだ通信が既に出来るということですね。なんとなくClusterIPとかをデプロイして初めてnode間での通信が出来るのかと思ったのですがそうではないようです。
ClusterIPをデプロイする
用意したyamlファイルは以下となります。
portがClusterIPでListenするポート、targetPortがpodでListenするポートになりますね。
apiVersion: v1
kind: Service
metadata:
  name: clusterip-nginx-ds
spec:
  selector:
    name: nginx
  type: ClusterIP
  ports:
  - name: nginx
    port: 80
    protocol: TCP
    targetPort: 80
apiVersion: v1
kind: Service
metadata:
  name: clusterip-apache2-ds
spec:
  selector:
    name: apache
  type: ClusterIP
  ports:
  - name: apache
    port: 90
    protocol: TCP
    targetPort: 90
apiVersion: v1
kind: Service
metadata:
  name: clusterip-redis-ds
spec:
  selector:
    name: redis
  type: ClusterIP
  ports:
  - name: redis
    port: 6379
    protocol: TCP
    targetPort: 6379
デプロイしていきます。
kubectl get svc -o wideのCLUSTER-IPに振られているIPアドレスがClusterIP serviceに実際に割り当てられているIPアドレスになります。
root@k8s-master:~/yaml# kubectl create -f clusterip-nginx-ds.yaml
service/clusterip-nginx-ds created
root@k8s-master:~/yaml# kubectl create -f clusterip-apache2-ds.yaml
service/clusterip-apache2-ds created
root@k8s-master:~/yaml# kubectl create -f clusterip-redis-ds.yaml
service/clusterip-redis-ds created

root@k8s-master:~/yaml# kubectl get svc -o wide
NAME                   TYPE        CLUSTER-IP       EXTERNAL-IP   PORT(S)    AGE     SELECTOR
kubernetes             ClusterIP   10.152.183.1     <none>        443/TCP    3d2h    <none>
clusterip-nginx-ds     ClusterIP   10.152.183.123   <none>        80/TCP     84m     name=nginx
clusterip-apache2-ds   ClusterIP   10.152.183.109   <none>        90/TCP     4m51s   name=apache
clusterip-redis-ds     ClusterIP   10.152.183.179   <none>        6379/TCP   8s      name=redis
これを図に落とし込むと以下となります。
緑の線がnginx関連の通信経路、ピンクの線がapache関連の通信経路、黄色の線がredis関連の通信経路の認識です。
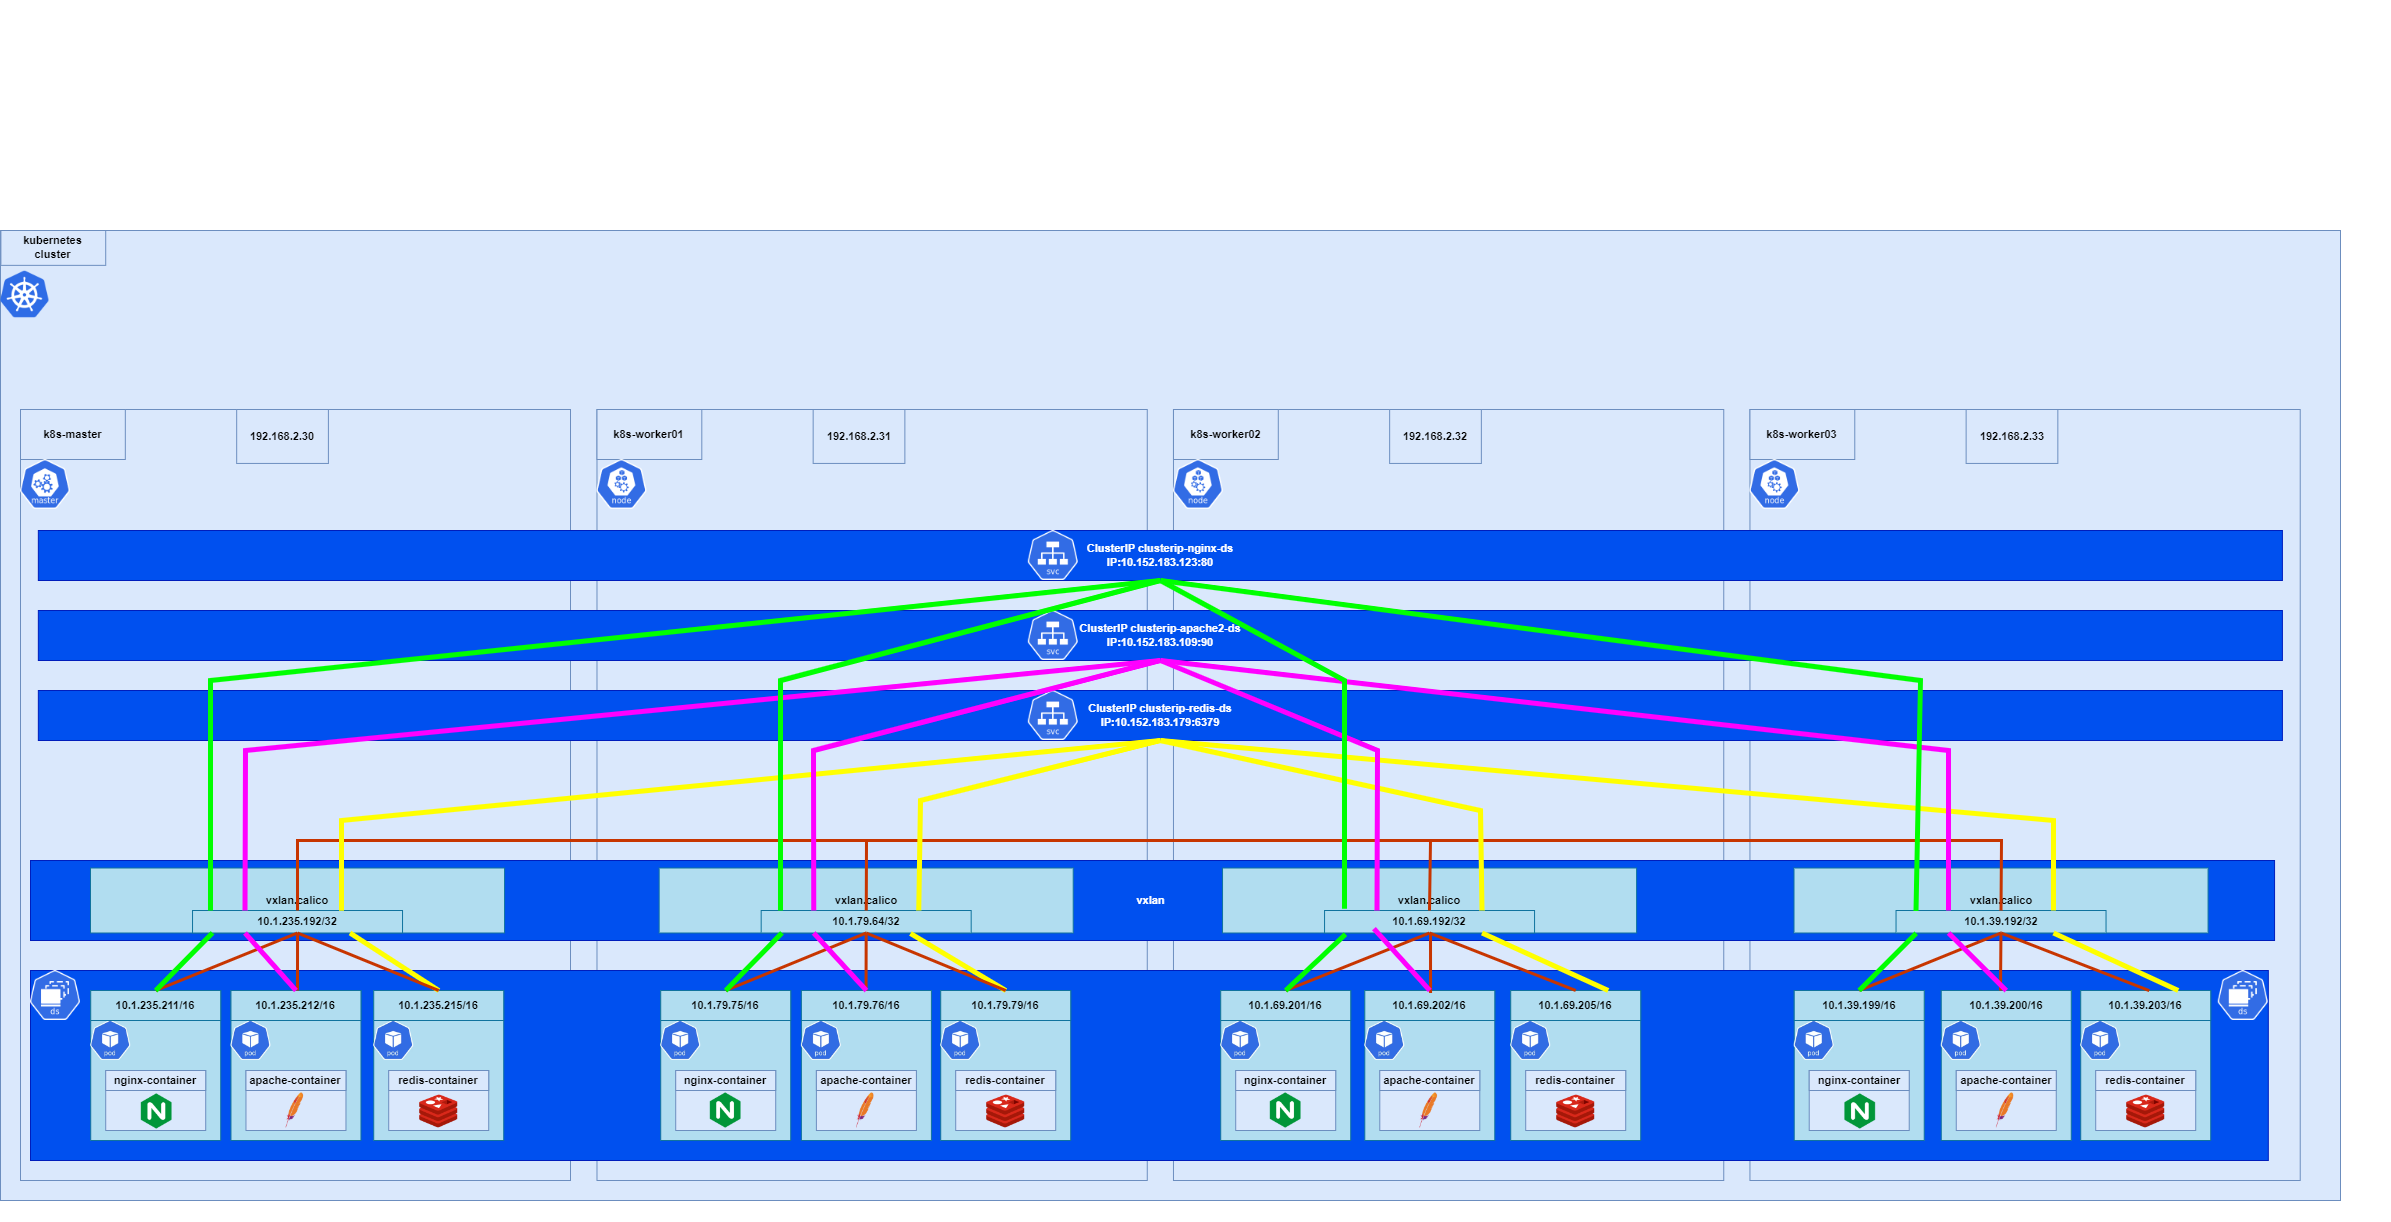
例えばnginxのClusterIPのIPアドレスにポートを紐づけてcurlをすることで以下の様に負荷分散しつつpodに接続をします。ただClusterIPはあくまで内部用のものになりますので、k8sクラスタ外から同様のことは出来ません。
root@k8s-master:~/yaml# curl 10.152.183.123:80
<!DOCTYPE html>
<html>
<head>
<title>Welcome to nginx!</title>
<style>
html { color-scheme: light dark; }
body { width: 35em; margin: 0 auto;
font-family: Tahoma, Verdana, Arial, sans-serif; }
</style>
</head>
<body>
<h1>Welcome to nginx!</h1>
<p>If you see this page, the nginx web server is successfully installed and
working. Further configuration is required.</p>
<p>For online documentation and support please refer to
<a href="http://nginx.org/">nginx.org</a>.<br/>
Commercial support is available at
<a href="http://nginx.com/">nginx.com</a>.</p>
<p><em>Thank you for using nginx.</em></p>
</body>
</html>
NodePortをデプロイする
用意したyamlファイルは以下となります。
portがClusterIPでListenするポート、targetPortがpodでListenするポート。nodePortがそれぞれのnodeでListenするポートとなります。NodePort Serviceをデプロイすると関連して内部でClusterIPもデプロイされるっぽいですね。
apiVersion: v1
kind: Service
metadata:
  name: nodeport-nginx-ds
spec:
  type: NodePort
  selector:
    name: nginx
  ports:
    - port: 80
      targetPort: 80
      nodePort: 30080
apiVersion: v1
kind: Service
metadata:
  name: nodeport-apache2-ds
spec:
  type: NodePort
  selector:
    name: apache
  ports:
    - port: 90
      targetPort: 90
      nodePort: 30090
apiVersion: v1
kind: Service
metadata:
  name: nodeport-redis-ds
spec:
  type: NodePort
  selector:
    name: redis
  ports:
    - port: 6379
      targetPort: 6379
      nodePort: 30379
デプロイしていきます。
kubectl get svc -o wideのCLUSTER-IPに振られているIPアドレスがClusterIP serviceに実際に割り当てられているIPアドレスになります。NodePort serviceデプロイ時に付与されているCLUSTER-IPとClusterIP serviceデプロイ時に付与されているCLUSTER-IPが違いますが、これがNodePortデプロイ時に関連するClusterIPもデプロイされることを示しているのかなと思います。
root@k8s-master:~/yaml# kubectl create -f nodeport-nginx-ds.yaml
service/nodeport-nginx-ds created
root@k8s-master:~/yaml# kubectl create -f nodeport-apache2-ds.yaml
service/nodeport-apache2-ds created
root@k8s-master:~/yaml# kubectl create -f nodeport-redis-ds.yaml
service/nodeport-redis-ds created

root@k8s-master:~/yaml# kubectl get svc -o wide
NAME                   TYPE        CLUSTER-IP       EXTERNAL-IP   PORT(S)          AGE     SELECTOR
kubernetes             ClusterIP   10.152.183.1     <none>        443/TCP          3d3h    <none>
clusterip-nginx-ds     ClusterIP   10.152.183.123   <none>        80/TCP           166m    name=nginx
clusterip-apache2-ds   ClusterIP   10.152.183.109   <none>        90/TCP           86m     name=apache
clusterip-redis-ds     ClusterIP   10.152.183.179   <none>        6379/TCP         81m     name=redis
nodeport-nginx-ds      NodePort    10.152.183.23    <none>        80:30080/TCP     17m     name=nginx
nodeport-apache2-ds    NodePort    10.152.183.61    <none>        90:30090/TCP     3m45s   name=apache
nodeport-redis-ds      NodePort    10.152.183.165   <none>        6379:30379/TCP   8s      name=redis
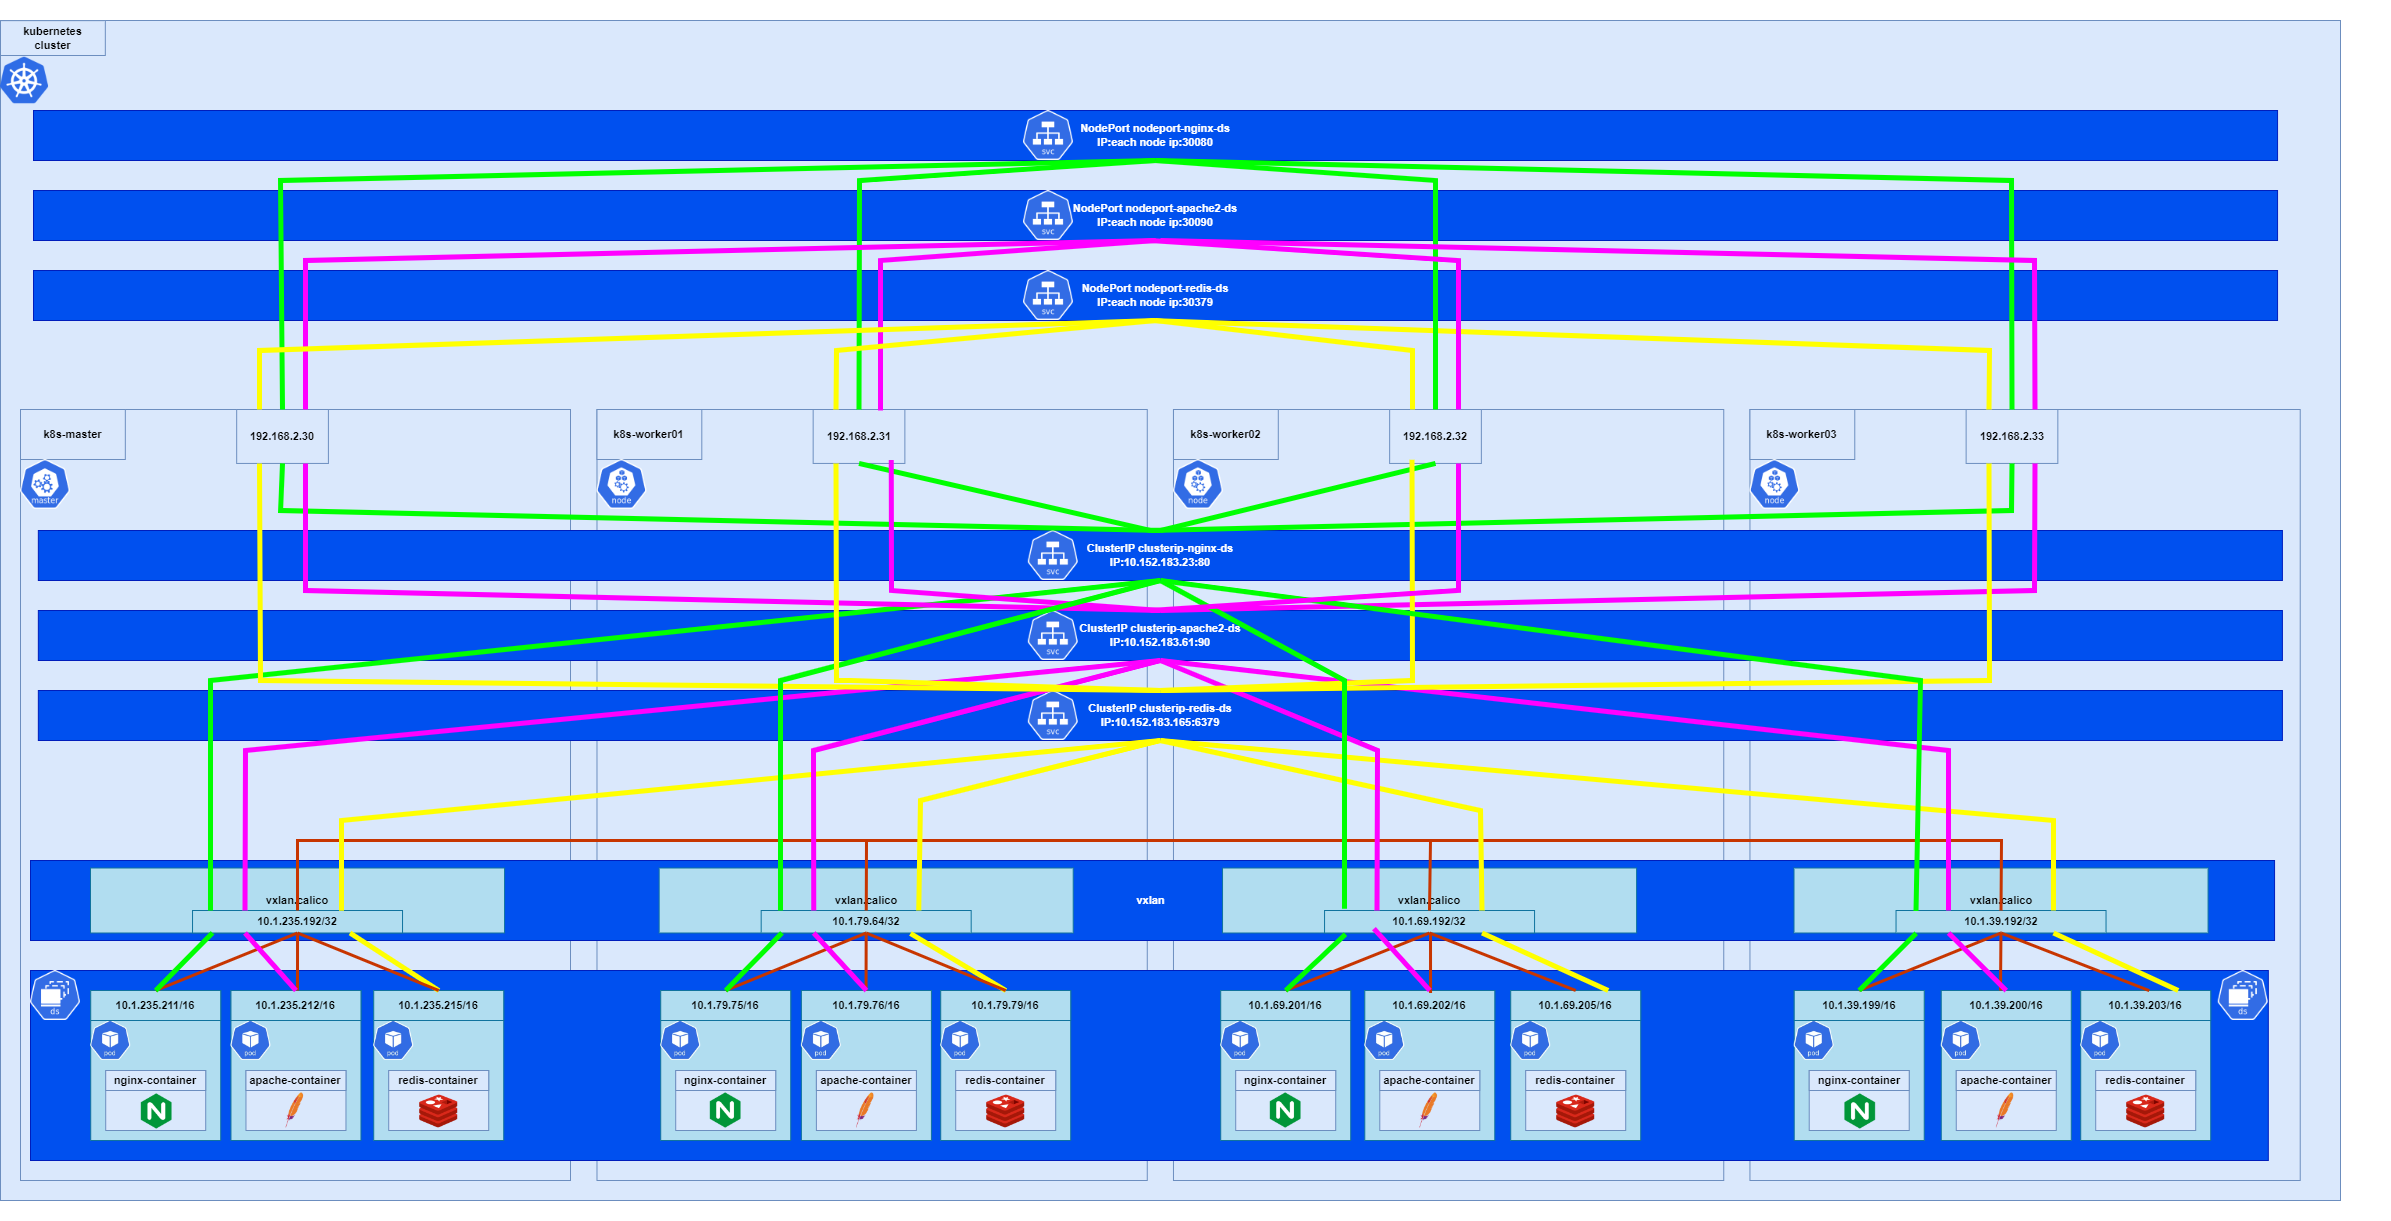
図に落とすと以下となる認識です。
ここで少し気を付けないといけない点としてはClusterIPのIPは一個上で図式化した時のIPと違うということです。この図に落とし込めていませんが一個上で図式化したClusterIPもクラスタ上に存在しています。
LoadBalancerをデプロイする
lbをデプロイする前に検証環境のメモリが限界っぽかったので上記でデプロイしてきたsvcをdeleteします。
root@k8s-master:~/yaml# kubectl delete svc clusterip-nginx-ds clusterip-apache2-ds clusterip-redis-ds nodeport-nginx-ds nodeport-apache2-ds nodeport-redis-ds
service "clusterip-nginx-ds" deleted
service "clusterip-apache2-ds" deleted
service "clusterip-redis-ds" deleted
service "nodeport-nginx-ds" deleted
service "nodeport-apache2-ds" deleted
service "nodeport-redis-ds" deleted

root@k8s-master:~/yaml# kubectl get svc
NAME         TYPE        CLUSTER-IP     EXTERNAL-IP   PORT(S)   AGE
kubernetes   ClusterIP   10.152.183.1   <none>        443/TCP   3d4h
lbデプロイ用に用意したyamlファイルは以下です。
portがLoadBalancer及びClusterIPでListenするポート、targetPortがpodでListenするポート。nodePortがそれぞれのnodeでListenするポートとなります。LoadBalancer Serviceをデプロイすると関連して内部でNodePort,ClusterIPもデプロイされるっぽいですね。
apiVersion: v1
kind: Service
metadata:
  name: lb-nginx-ds
spec:
  type: LoadBalancer
  selector:
    name: nginx
  ports:
    - name: nginx
      port: 8080
      targetPort: 80
      nodePort: 30800
apiVersion: v1
kind: Service
metadata:
  name: lb-apache-ds
spec:
  type: LoadBalancer
  selector:
    name: apache
  ports:
    - name: apache
      port: 9090
      targetPort: 90
      nodePort: 30900
apiVersion: v1
kind: Service
metadata:
  name: lb-redis-ds
spec:
  type: LoadBalancer
  selector:
    name: redis
  ports:
    - name: redis
      port: 6379
      targetPort: 6379
      nodePort: 30379
デプロイしていきます。
kubectl get svc -o wideのCLUSTER-IPに振られているIPアドレスがClusterIP serviceに実際に割り当てられているIPアドレスになります。NodePortのIPはそれぞれのnodeのIPになります。EXTERNAL-IPがLoadBalancerに振られるはずのIPになりますがpendingとなっています。これはMetalLBがdisableとなっている為です。このあと有効化します。
root@k8s-master:~/yaml# kubectl create -f lb-nginx-ds.yaml
service/lb-apache-ds created
root@k8s-master:~/yaml# kubectl create -f lb-apache2-ds.yaml
service/lb-apache-ds created
root@k8s-master:~/yaml# kubectl create -f lb-redis-ds.yaml
service/lb-redis-ds created

root@k8s-master:~/yaml# kubectl get svc -o wide
NAME           TYPE           CLUSTER-IP       EXTERNAL-IP   PORT(S)          AGE    SELECTOR
kubernetes     ClusterIP      10.152.183.1     <none>        443/TCP          41m    <none>
lb-nginx-ds    LoadBalancer   10.152.183.130   <pending>     8080:30800/TCP   6m3s   name=nginx
lb-apache-ds   LoadBalancer   10.152.183.172   <pending>     9090:30900/TCP   88s    name=apache
lb-redis-ds    LoadBalancer   10.152.183.250   <pending>     6379:30379/TCP   7s     name=redis
MetalLBを有効化します。
今回は192.168.2.36-40までをMetalLB用に確保しました。
root@k8s-master:~/yaml# microk8s enable metallb
Infer repository core for addon metallb
Enabling MetalLB
Enter each IP address range delimited by comma (e.g. '10.64.140.43-10.64.140.49,192.168.0.105-192.168.0.111'): 192.168.2.36-192.168.2.40
Applying Metallb manifest
customresourcedefinition.apiextensions.k8s.io/addresspools.metallb.io created
customresourcedefinition.apiextensions.k8s.io/bfdprofiles.metallb.io created
customresourcedefinition.apiextensions.k8s.io/bgpadvertisements.metallb.io created
customresourcedefinition.apiextensions.k8s.io/bgppeers.metallb.io created
customresourcedefinition.apiextensions.k8s.io/communities.metallb.io created
customresourcedefinition.apiextensions.k8s.io/ipaddresspools.metallb.io created
customresourcedefinition.apiextensions.k8s.io/l2advertisements.metallb.io created
namespace/metallb-system created
serviceaccount/controller created
serviceaccount/speaker created
clusterrole.rbac.authorization.k8s.io/metallb-system:controller created
clusterrole.rbac.authorization.k8s.io/metallb-system:speaker created
role.rbac.authorization.k8s.io/controller created
role.rbac.authorization.k8s.io/pod-lister created
clusterrolebinding.rbac.authorization.k8s.io/metallb-system:controller created
clusterrolebinding.rbac.authorization.k8s.io/metallb-system:speaker created
rolebinding.rbac.authorization.k8s.io/controller created
secret/webhook-server-cert created
service/webhook-service created
rolebinding.rbac.authorization.k8s.io/pod-lister created
daemonset.apps/speaker created
deployment.apps/controller created
validatingwebhookconfiguration.admissionregistration.k8s.io/validating-webhook-configuration created
Waiting for Metallb controller to be ready.
error: timed out waiting for the condition on deployments/controller
MetalLB controller is still not ready
deployment.apps/controller condition met
ipaddresspool.metallb.io/default-addresspool created
l2advertisement.metallb.io/default-advertise-all-pools created
MetalLB is enabled
MetalLB有効化後、再度kubectl get svc -o wideを実行するとpendingステートだったものが変わり、IPアドレスが振られていますね。
root@k8s-master:~/yaml# kubectl get svc -o wide
NAME           TYPE           CLUSTER-IP       EXTERNAL-IP    PORT(S)          AGE     SELECTOR
kubernetes     ClusterIP      10.152.183.1     <none>         443/TCP          44m     <none>
lb-apache-ds   LoadBalancer   10.152.183.172   192.168.2.36   9090:30900/TCP   3m58s   name=apache
lb-redis-ds    LoadBalancer   10.152.183.250   192.168.2.37   6379:30379/TCP   2m37s   name=redis
lb-nginx-ds    LoadBalancer   10.152.183.130   192.168.2.38   8080:30800/TCP   8m33s   name=nginx
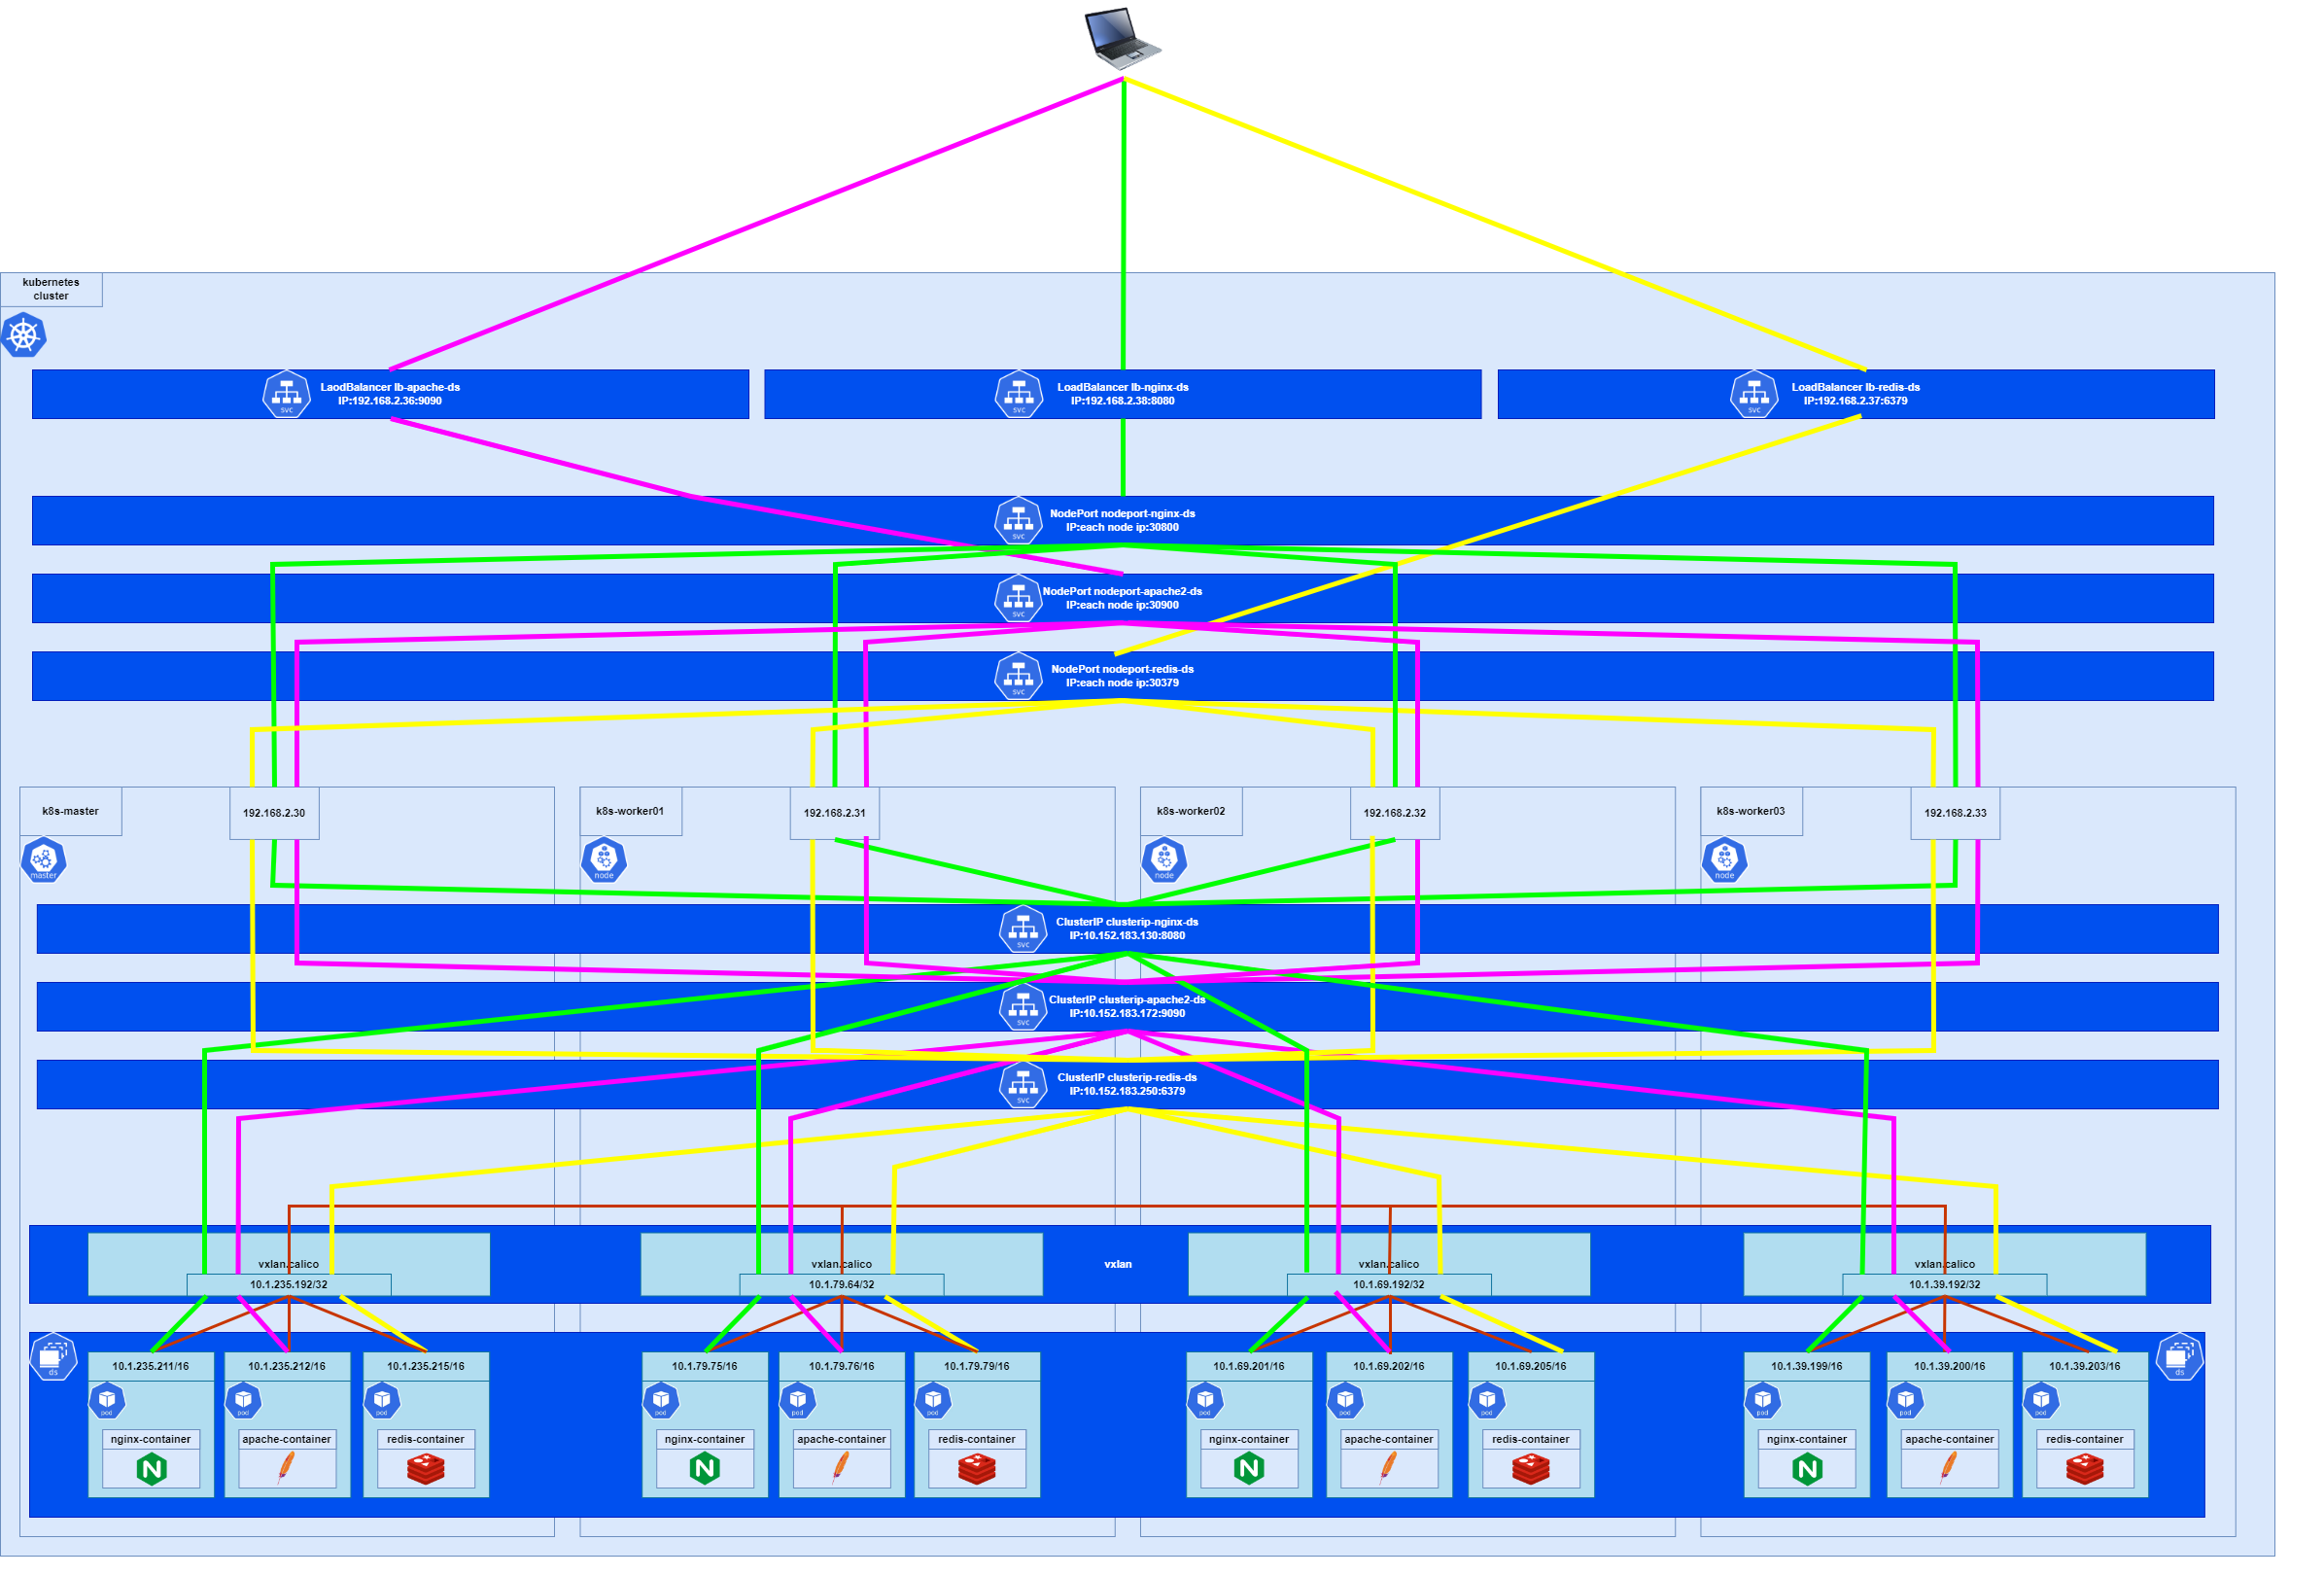
この時の通信経路イメージです。
クラスタ上にはLoadBalancerしかなさそうに見えますが、実際はNodePort,ClusterIPがありPC→LB→NodePort→ClusterIP→podという順で通信をしているようです。