こんにちは。
株式会社クラスアクト インフラストラクチャ事業部の大塚です。
前回作成したGCPの環境にCloud SQLを使ってマネージドなDBサーバをデプロイ。
Django環境を作っていきたいと思います。
前回の記事は以下となります。
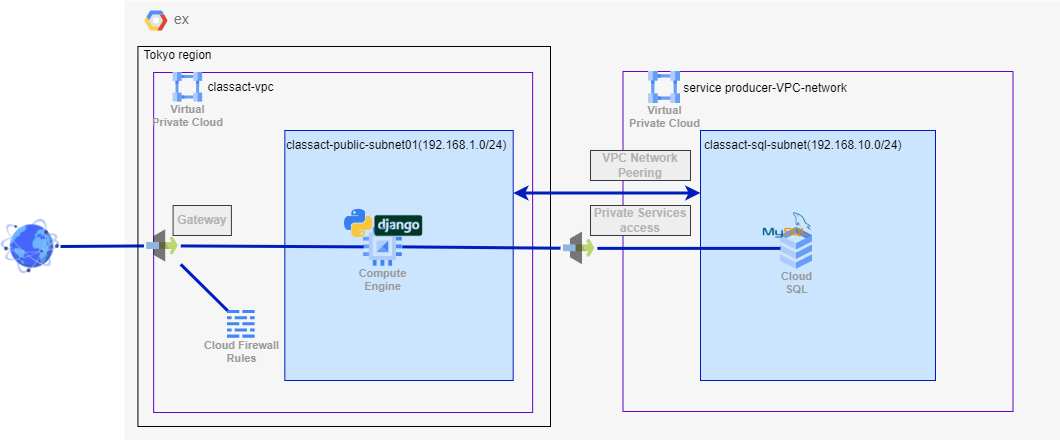
環境イメージ
こんな感じの環境になると思います。
恐らくですが、プライベートIPのみを持つSQLサーバをデプロイしようとするとGCPが用意しているVPC(≒GoogleサービスプロデューサーのVPC?GCPが用意しているVPC?)にデプロイされて、そこに対してVPCピアリング等を行って環境を確立する必要があるのかなと思います。AWSのRDSとは少し勝手が違うような・・・
上記のイメージ、特にCloud SQL側の構成は以下のサイトを参考としております。
以下はChatGPTの用語解説です。
-
VPCピアリング:
Cloud SQLとVMが異なるVPCにある場合、VPCピアリングを使用してそれらのVPCを接続する必要があります。これにより、VMからCloud SQLにプライベートIPを使用してアクセスできるようになります。 -
Private Service Access:
Cloud SQLにプライベートIPを使用する場合、VPCネットワークの特定のサブネットでPrivate Service Accessを有効にする必要があります。これにより、そのサブネット内のリソースからCloud SQLにプライベートIPを使用してアクセスできるようになります。
構築手順
Cloud SQLを使ってDBサーバのデプロイ
Cloud SQLの管理画面にアクセスします。何もデプロイしていないと以下のような画面が表示されていると思います。
インスタンスを作成を押下します。

以下の設定を入れていきます。
なお設定を入れた後「プライベートサービスアクセス接続は必須です」の欄の「接続を設定」ボタンを押下してAPIを有効化していきます。有効化の後、SQLをデプロイします。
- インスタンスID:classact-sql-django
- パスワード:任意のパスワード
- エディション:Enterprise
- プリセット:本番
- リージョン:asia-northeast1(東京)
- ゾーンの可用性:複数のゾーン
- マシンシェイプ:専用コア、1vCPU,3.75GB
- ストレージ容量:10GB
- インスタンスIPの割り当て:プライベートIP
- 関連付けられたネットワーキング:classact-vpc

「接続を設定」ボタンを押下すると以下のような画面に変わります。APIを有効にするボタンを押下します。

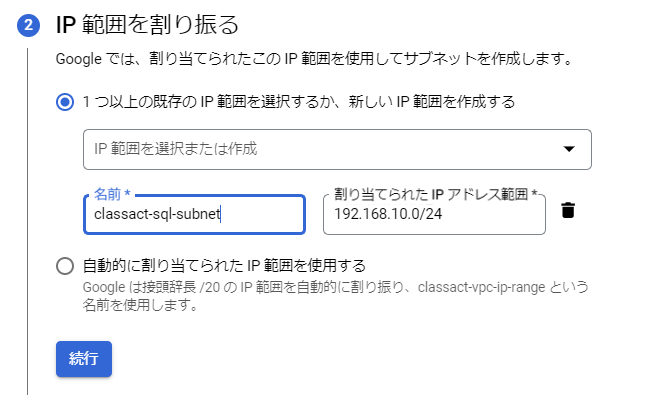
Cloud SQL用のサブネットを作成します。
今回はclassact-sql-subnetとし、ネットワークを192.168.10.0/24としました。

接続を作成を押下します。

ここまで出来るとSQL作成画面の「プライベートサービスアクセス接続は必須です」の部分に出ていた警告が消えます。これでインスタンスの作成が可能です。

インスタンスがデプロイされたことを確認します。
内部IPアドレスは後程使いますので確認をしておきましょう。

VMの構築
VMにDjangoの設定を入れていきます。
まず前回インスト―ルしており、今回邪魔になるapache2をアンインストールしていきます。
root@classact-vm-django:~# systemctl stop apache2
root@classact-vm-django:~# systemctl status apache2
○ apache2.service - The Apache HTTP Server
     Loaded: loaded (/lib/systemd/system/apache2.service; enabled; preset: enabled)
     Active: inactive (dead) since Sat 2024-04-20 23:58:31 UTC; 5s ago
   Duration: 5min 24.803s
       Docs: https://httpd.apache.org/docs/2.4/
    Process: 363 ExecStart=/usr/sbin/apachectl start (code=exited, status=0/SUCCESS)
    Process: 1432 ExecStop=/usr/sbin/apachectl graceful-stop (code=exited, status=0/SUCCESS)
   Main PID: 399 (code=exited, status=0/SUCCESS)
        CPU: 150ms

Apr 20 23:53:06 localhost systemd[1]: Starting apache2.service - The Apache HTTP Server...
Apr 20 23:53:06 localhost apachectl[382]: AH00558: apache2: Could not reliably determine the >
Apr 20 23:53:06 localhost systemd[1]: Started apache2.service - The Apache HTTP Server.
Apr 20 23:58:31 classact-vm-django.asia-northeast1-a.c.classact-420821.internal systemd[1]: S>
Apr 20 23:58:31 classact-vm-django.asia-northeast1-a.c.classact-420821.internal systemd[1]: a>
Apr 20 23:58:31 classact-vm-django.asia-northeast1-a.c.classact-420821.internal systemd[1]: S>

root@classact-vm-django:~# apt purge apache2
Django周りのインストールを行っていきます。
root@classact-vm-django:~# apt update && apt upgrade -y
root@classact-vm-django:~# python3 -V
Python 3.11.2
root@classact-vm-django:~# pip -V
-bash: pip: command not found
root@classact-vm-django:~# apt install python3-pip -y
root@classact-vm-django:~# pip3 -V
pip 23.0.1 from /usr/lib/python3/dist-packages/pip (python 3.11)
root@classact-vm-django:~# apt install python3-dev default-libmysqlclient-dev pkg-config default-mysql-client -y
root@classact-vm-django:~# pip3 install django mysqlclient
root@classact-vm-django:~# pip3 install --break-system-packages django mysqlclient
VMからSQLの内部IPアドレスを使って接続していきます。
(ドメインを使う場合は別途Cloud DNSの設定をしないといけない気がします。)
デフォルトではrootユーザを使います。
SQLに接続出来たらDjango用のデータベースを作成したりします。
root@classact-vm-django:~# mysql -h 192.168.10.2 -u root -p
Enter password:
Welcome to the MariaDB monitor.  Commands end with ; or \g.
Your MySQL connection id is 33
Server version: 8.0.31-google (Google)

Copyright (c) 2000, 2018, Oracle, MariaDB Corporation Ab and others.

Type 'help;' or '\h' for help. Type '\c' to clear the current input statement.

MySQL [(none)]> CREATE DATABASE classactDjango;
Query OK, 1 row affected (0.017 sec)

MySQL [(none)]> GRANT ALL ON classactDjango.* TO root;
Query OK, 0 rows affected (0.011 sec)

MySQL [(none)]> exit;
Bye
DjangoのProjectを作成したり設定をしていきます。
コマンドの意味はここでは記載しません。
root@classact-vm-django:~# django-admin startproject classactPJ
root@classact-vm-django:~# ls
classactPJ
root@classact-vm-django:~# cd classactPJ/
root@classact-vm-django:~/classactPJ# ls
classactPJ  manage.py
root@classact-vm-django:~/classactPJ# cd classactPJ/
root@classact-vm-django:~/classactPJ/classactPJ# ls
__init__.py  asgi.py  settings.py  urls.py  wsgi.py
root@classact-vm-django:~/classactPJ/classactPJ# vi settings.py
root@classact-vm-django:~/classactPJ/classactPJ# cat settings.py
---変更箇所---
ALLOWED_HOSTS = ["*"]
DATABASES = {
    'default': {
        'ENGINE': 'django.db.backends.mysql',
        'NAME': 'classactDjango',
        'USER': 'root',
        'PASSWORD': 'password',
        'HOST': '192.168.10.2',
        'PORT': '3306',
    }
}
LANGUAGE_CODE = 'ja'
TIME_ZONE = 'Asia/Tokyo'
---変更箇所---
root@classact-vm-django:~/classactPJ# python3 manage.py migrate
Operations to perform:
  Apply all migrations: admin, auth, contenttypes, sessions
Running migrations:
  Applying contenttypes.0001_initial... OK
  Applying auth.0001_initial... OK
  Applying admin.0001_initial... OK
  Applying admin.0002_logentry_remove_auto_add... OK
  Applying admin.0003_logentry_add_action_flag_choices... OK
  Applying contenttypes.0002_remove_content_type_name... OK
  Applying auth.0002_alter_permission_name_max_length... OK
  Applying auth.0003_alter_user_email_max_length... OK
  Applying auth.0004_alter_user_username_opts... OK
  Applying auth.0005_alter_user_last_login_null... OK
  Applying auth.0006_require_contenttypes_0002... OK
  Applying auth.0007_alter_validators_add_error_messages... OK
  Applying auth.0008_alter_user_username_max_length... OK
  Applying auth.0009_alter_user_last_name_max_length... OK
  Applying auth.0010_alter_group_name_max_length... OK
  Applying auth.0011_update_proxy_permissions... OK
  Applying auth.0012_alter_user_first_name_max_length... OK
  Applying sessions.0001_initial... OK
root@classact-vm-django:~/classactPJ# python3 manage.py createsuperuser
ユーザー名 (leave blank to use 'root'): admin
メールアドレス: admin@example.com
Password:
Password (again):
このパスワードは一般的すぎます。
Bypass password validation and create user anyway? [y/N]: y
Superuser created successfully.
接続テスト
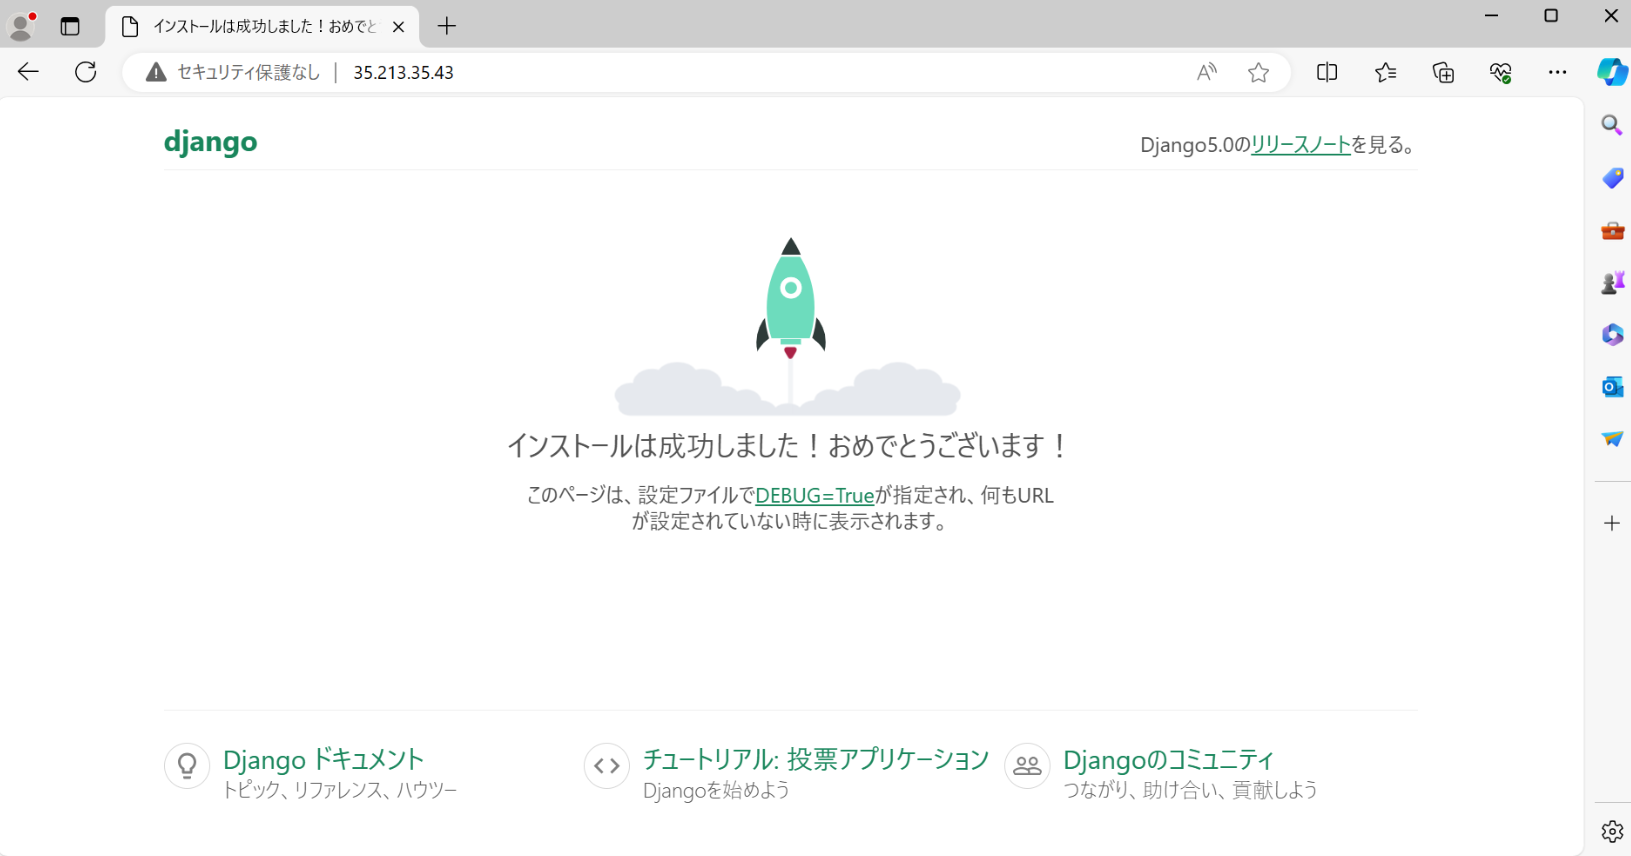
以下のコマンドを実行します。
root@classact-vm-django:~/classactPJ# python3 manage.py runserver 0.0.0.0:80
Watching for file changes with StatReloader
Performing system checks...

System check identified no issues (0 silenced).
April 21, 2024 - 13:39:00
Django version 5.0.4, using settings 'classactPJ.settings'
Starting development server at http://0.0.0.0:80/
Quit the server with CONTROL-C.

