C# .net 5に対応した、フリーのグラフ描画ライブラリScottPlotの使い方 覚書です。
公式サイトで、プレリリース版を推奨されているので、Pre-release版 Ver4.1系の紹介です。
開発環境
Visual Studio 2019
C#
.net 5
ScottPlot Ver 4.1.13-beta
本家と解説記事
Pre-release版のインストール
描画したPlotの取得
WpfPlot1.Plot.GetPlottables()
オートスケール
WpfPlot1.Plot.AxisAuto();
Y2軸目に描画
var Signal = WpfPlot1.Plot.AddSignal(values);
Signal.YAxisIndex = 1;
描画制限(主軸のみ)
WpfPlot1.Plot.SetViewLimits(Xmin,Xmax,YMin,YMax);
描画制限(任意の追加軸)
var Axis = WpfPlot1.Plot.AddAxis(ScottPlot.Renderable.Edge.Left, YAxisIndex));
Axis.Dims.SetBounds(Min, Max);
サンプルWPFプログラム
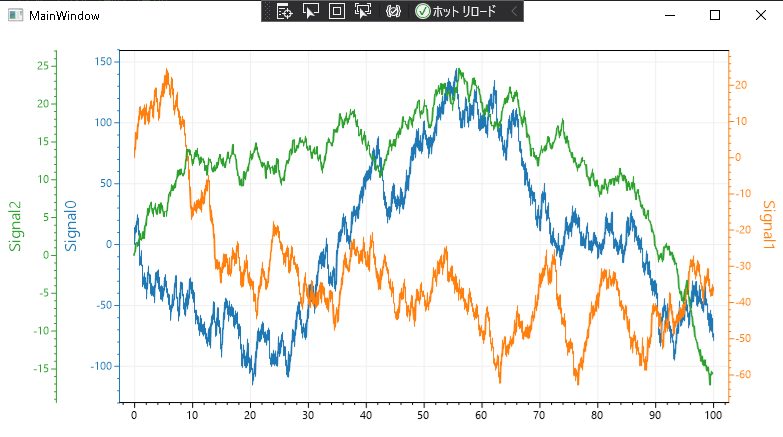
ソースコード
MainWindows.xml
<Window x:Class="ScottPlotSample1.MainWindow"
        xmlns="http://schemas.microsoft.com/winfx/2006/xaml/presentation"
        xmlns:x="http://schemas.microsoft.com/winfx/2006/xaml"
        xmlns:d="http://schemas.microsoft.com/expression/blend/2008"
        xmlns:mc="http://schemas.openxmlformats.org/markup-compatibility/2006"
        xmlns:local="clr-namespace:ScottPlotSample1"
        mc:Ignorable="d"
        Title="MainWindow" Height="450" Width="800">
    <Grid>
        <WpfPlot x:Name="WpfPlot1"/>
    </Grid>
</Window>
MainWindows.xml.cs
using ScottPlot;
namespace ScottPlotSample1
{
    /// <summary>
    /// Interaction logic for MainWindow.xaml
    /// </summary>
    public partial class MainWindow : Window
    {
        public MainWindow()
        {
            InitializeComponent();
            double[] values1 = DataGen.RandomWalk(100_000);
            double[] values2 = DataGen.RandomWalk(10_000);
            double[] values3 = DataGen.RandomWalk(1_000);
            WpfPlot1.Plot.AddSignal(values1, sampleRate: 1000);
            WpfPlot1.Plot.AddSignal(values2, sampleRate: 100);
            WpfPlot1.Plot.AddSignal(values3, sampleRate: 10);

            //描画されているSignalPlotをリスト化
            var Signals = GetPlotableList<ScottPlot.Plottable.SignalPlot>(WpfPlot1);

            //現在のY軸をリスト化
            var YAxes = WpfPlot1.Plot.GetSettings().Axes.Where(x => x.IsVertical == true).ToList();
            //足りないY軸を追加
            for (int YAxisIndex = YAxes.Count; YAxisIndex < Signals.Count; YAxisIndex++) //軸インデックスがない場合は追加する
            {
                YAxes.Add(WpfPlot1.Plot.AddAxis(ScottPlot.Renderable.Edge.Left, YAxisIndex));
            }

            //各軸に描画
            for (int No = 0; No < Signals.Count; No++)
            {
                Signals[No].YAxisIndex = No;
            }

            //オートスケール
            WpfPlot1.Plot.AxisAuto();

            //X軸を表示制限
            var AxisLimits = WpfPlot1.Plot.GetAxisLimits();
            WpfPlot1.Plot.SetViewLimits(AxisLimits.XMin, AxisLimits.XMax);

            //各Y軸の設定(色指定、ラベル、表示制限)
            for(int No = 0; No <YAxes.Count; No++)
            {
                YAxes[No].Ticks(true);
                YAxes[No].Color(Signals[No].Color);
                YAxes[No].Label($"Signal{No}");
                AxisLimits = WpfPlot1.Plot.GetAxisLimits(yAxisIndex: YAxes[No].AxisIndex);
                YAxes[No].Dims.SetBounds(AxisLimits.YMin, AxisLimits.YMax);
            }

        }

        /// <summary>
        /// WpfPlotの中にあるすべてのTのリストを返す
        /// </summary>
        /// <typeparam name="T">ScottPlot.Plottable Type</typeparam>
        /// <param name="fp"> WpfPlot</param>
        /// <returns></returns>
        private List<T> GetPlotableList<T>(WpfPlot fp)
        {
            List<T> Plotables = new List<T>();
            var AllPlottables = fp.Plot.GetPlottables();
            foreach (var Plottable in AllPlottables)
            {
                switch (Plottable)
                {
                    case T Plotable:
                        Plotables.Add(Plotable);
                        break;
                }
            }
            return Plotables;
        }
    }
}