目的
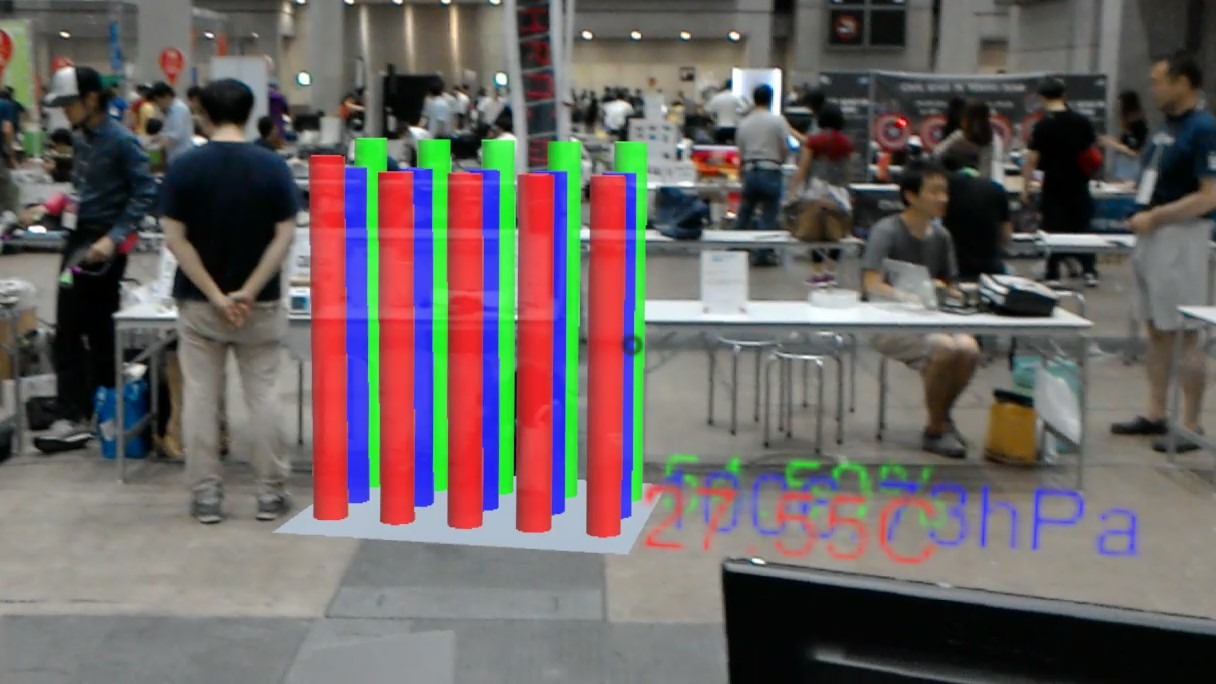
ちょっと実用的な例として、WifiにつながるArduino系マイコンボードから、温度湿度などの環境情報をARで空間に提示する仕組みを作ってみます。
道具立て
使うマイコンボードは、ESPr® One。
Wifiがついているので、こういう時に、使いやすくて便利な奴です。
APモードで動かし、Hololensからつなぎにいきます。
センサーには、BME280を使います。これは、Amazonで安く買いました。
適当にブレッドボードを使うなどして、SPIでつないで動くようにします。
仕組み
マイコンで取得した温度湿度気圧を、マークアップにしてHTTPサーバーとして出力。Wifi経由でHoloLensからアクセスしてレンダリングします。
プログラム
以下のプログラムを、ArduinoIDEで書き込みました。直近5個の値を保存してグラフにします。HoloLensの方は、5秒間隔で再アクセスするようにUnity側のプログラムを作っています。
# include <Wire.h>
# include <SPI.h>
# include <Adafruit_Sensor.h>
# include <Adafruit_BME280.h>

# include <ESP8266WiFi.h>
# include <ESP8266WebServer.h>
# define WIFI_SSID "orthoverseAP"
# define WIFI_PW "test"

# define BME_SCK 14
# define BME_MISO 12
# define BME_MOSI 13
# define BME_CS 16

# define SEALEVELPRESSURE_HPA (1013.25)

Adafruit_BME280 bme(BME_CS); // hardware SPI

unsigned long delaytimeBegin;

ESP8266WebServer server(80);
IPAddress ip(192, 168, 1, 1);
IPAddress subnet(255, 255, 255, 0);

float temp[5] = {0, 0, 0, 0, 0};
float press[5] = {0, 0, 0, 0, 0};
float hum[5] = {0, 0, 0, 0, 0};
unsigned long timeBegin = 0;

void setup() {
  Serial.begin(9600);
  Serial.println("BME280 test");

  bool status;

  status = bme.begin();
  if (!status) {
    Serial.println("Could not find a valid BME280 sensor, check wiring!");
    while (1);
  } else {
    Serial.println("BME280 found");
  }

  Serial.println("-- Default Test --");
  Serial.println("WiFi initializing");
  WiFi.mode(WIFI_AP);
  WiFi.softAPConfig(ip, ip, subnet);
  bool apst = WiFi.softAP(WIFI_SSID, WIFI_PW);

  if (apst) {
    Serial.println("Ready WiFi");
  } else {
    Serial.println("Something wrong WiFi");
  }

  server.on("/", []() {
    Serial.println("Access");
    String html = "<homl><head><title>3D Graph of Environment Sensor</title></head><body><a-scene wx=0.5 wy=0.001 wz=0.4>";

    for (int i = 0; i < 5; i++) {
      html += "<a-cylinder height=" + String((temp[i] - 20) / 30) + " r=0.05 x=" + String((i - 2.0) / 10.0) + " y=" + String((temp[i] - 20) / 30) + " z=-0.1 color=red />";
      html += "<a-cylinder height=" + String((press[i] - 1000) / 400000) + " r=0.05 x=" + String((i - 2.0) / 10.0) + " y=" + String((press[i] - 1000) / 400000) + " z=0 color=blue />";
      html += "<a-cylinder height=" + String((hum[i]) / 200) + " r=0.05 x=" + String((i - 2.0) / 10.0) + " y=" + String((hum[i]) / 200) + " z=0.1 color=green />";
    }
    html += "<a-text size=0.1 x=0.25 y=0.1 z=-0.1 color=red>"+ String(temp[4]) +"C</a-text>";
    html += "<a-text size=0.1 x=0.25 y=0.1 z=0    color=blue>"+ String(press[4]/100.0F) +"hPa</a-text>";
    html += "<a-text size=0.1 x=0.25 y=0.1 z=0.1  color=green>"+ String(hum[4]) +"%</a-text>";
    html += "</a-scene></body></homl>";

    server.send(
      200,
      "text/html",
      html);
  });
  Serial.println("WebServer setup done");
  server.begin();
  Serial.println("webserver begin");

  timeBegin = millis();
}


void loop() {
  server.handleClient();

  if (timeBegin < millis() - 5000) {
    for (int i = 0; i < 4; i++) {
      temp[i] = temp[i + 1];
      press[i] = press[i + 1];
      hum[i] = hum[i + 1];
    }
    temp[4] = bme.readTemperature();
    press[4] = bme.readPressure();
    hum[4] = bme.readHumidity();

    timeBegin = millis();
  }
}


void printValues() {
  Serial.print("Temperature = ");
  Serial.print(bme.readTemperature());
  Serial.println(" *C");

  Serial.print("Pressure = ");

  Serial.print(bme.readPressure() / 100.0F);
  Serial.println(" hPa");

  Serial.print("Approx. Altitude = ");
  Serial.print(bme.readAltitude(SEALEVELPRESSURE_HPA));
  Serial.println(" m");

  Serial.print("Humidity = ");
  Serial.print(bme.readHumidity());
  Serial.println(" %");

  Serial.println();
}
結果
ちょっと値の振れ幅が少なくて、面白みのないグラフになっていますが、IoT機器の情報をHoloLensで表示することができました。
あともっと表示のかっこよさを考えないといけないですね。ちなみに、写真は2018年のMakerFaireTokyoで会社のブースで展示していた時のものです。
