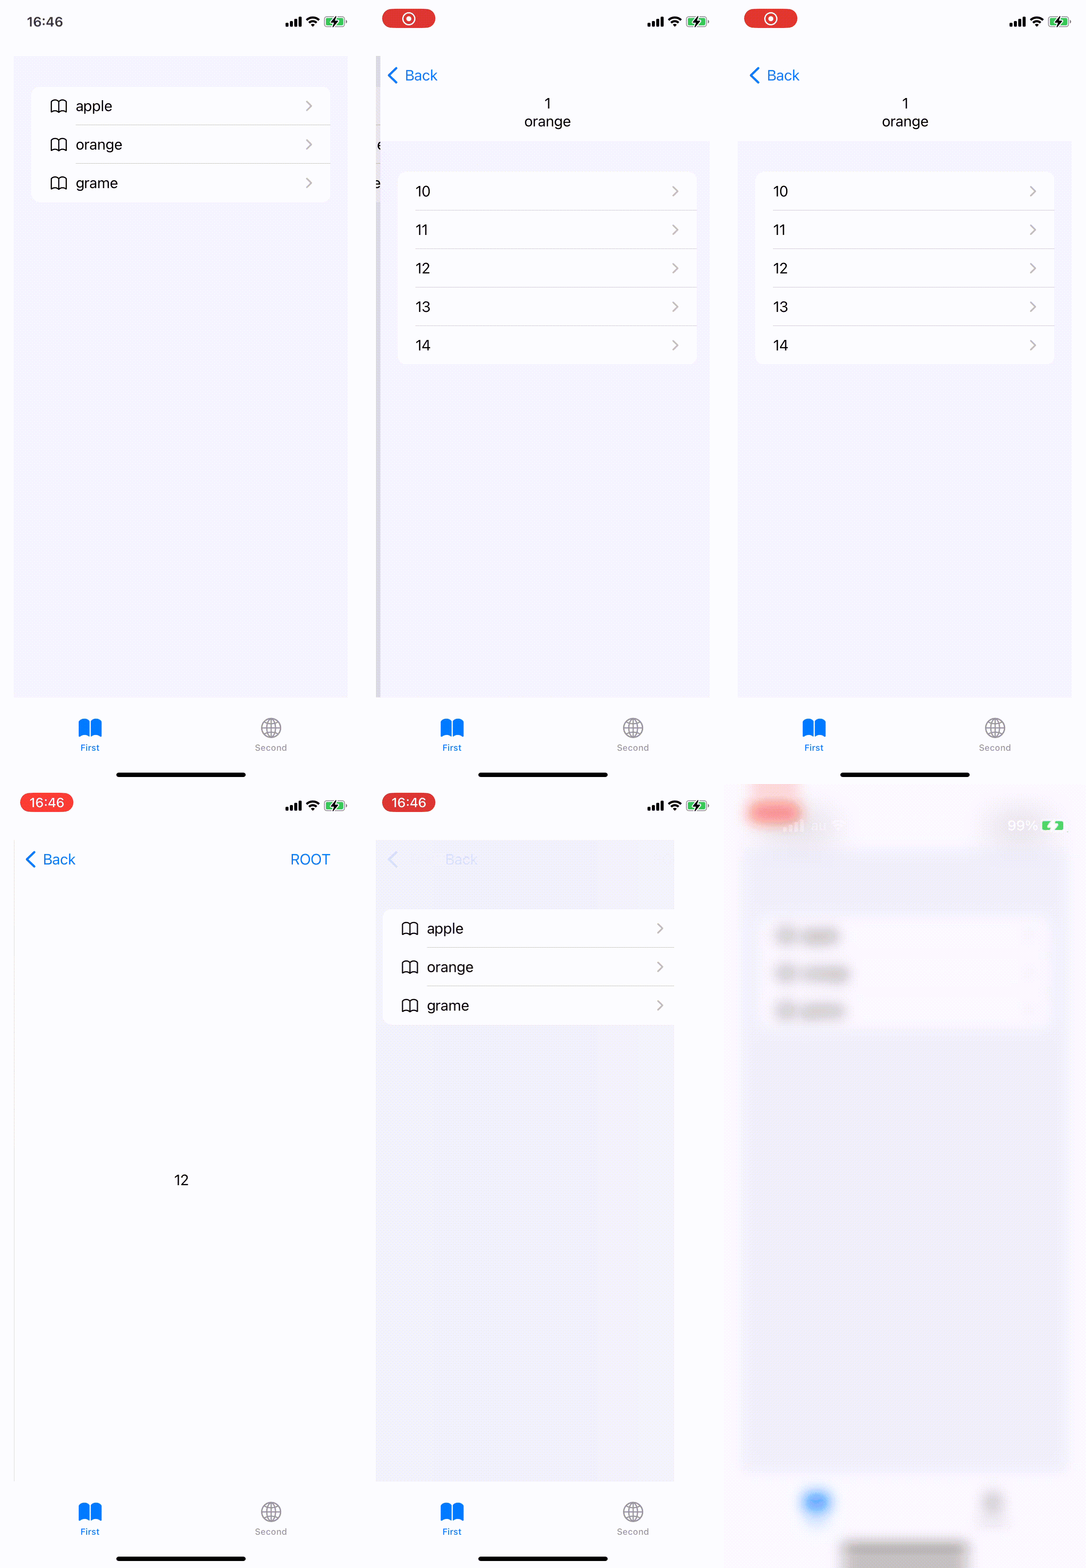
NavigationStackで、Homeに戻るナビゲーションの実装
NavigationStack
WWDC2022にて、次期iOS(iOS16)における新しいNavigation手法としてNavigationStackが公開されました。
これまでのNavigationViewでは、基本的に以下のページ遷移しか出来ませんでした。
- NavigationLinkで指定のViewへ遷移する
- 遷移先から遷移元へ一つだけ戻る
NavigationStackを用いることで、もう少し自由度の高いページ遷移が行えるようです。
個人的に導入を待ち望んでいた機能なので、開発者向けベータ版を導入して試してみました。
動作イメージ
今回は以下のように、Navigationで孫ページまで遷移したのち、一足飛びにROOTのページまで戻る実装を試してみました。
NavigationPath情報の確保
Navigation情報であるNavigationPathを確保/操作するオブジェクトを定義します。
gotoHomePageは、Navigatinのホーム(Root)に戻る操作です。
class NavigationCoordinator: ObservableObject {

    @Published var path = NavigationPath()

    func gotoHomePage() {
        path.removeLast(path.count)
    }
}
NavigationViewからNavigationStackへ置き換え
従来NavigationViewとしていた箇所をNavigationStackへ置き換え、上記で定義したpath:を渡します。
従来のNavigationLinkでは表示対象と遷移先のViewを指定していましたが、ここではvalue:として必要な情報のみ渡します。
遷移先のView情報は、.navigationDestinationにて指定します。
この際、for:には上記のvalue:で渡した情報の型を指定します。
import SwiftUI

struct FirstTabView: View {

    @StateObject var coordinator = NavigationCoordinator()

    @StateObject var viewModel = FirstTabViewMode()

    var body: some View {

        NavigationStack(path: $coordinator.path) {

            VStack {
                List( viewModel.childs) { child in

                    NavigationLink(value: child) {
                        HStack {
                            Image(systemName: "book")
                            Text(child.name)
                        }
                    }
                }
                .navigationDestination(for: ChildModel.self) { child in
                    ChildView(coordinator: coordinator,child: child)
                }
            }
        }
        .navigationViewStyle(StackNavigationViewStyle()).padding()
        .navigationTitle("First")
    }
}
また、指定できる型はHashable, Identifiableである必要があります。
import Swift

struct ChildModel : Hashable, Identifiable {
    let id : Int
    let name : String
    let grandchildren : [GrandchildModel]
}
子供/孫のNavigationLink
上記と同様に.navigationDestinationを利用します。
任意の箇所でNavigationCoordinator.gotoHomePage()を呼び出すことで、NavigationStackを定義したビューへ戻ることが出来ます。
import SwiftUI

struct ChildView: View {

    @ObservedObject var coordinator : NavigationCoordinator

    let child : ChildModel

    var body: some View {
        VStack {
            Text(child.id.description)
            Text(child.name)

            List(child.grandchildren) { grandchild in
                NavigationLink(grandchild.id.description, value: grandchild)
            }
            .navigationDestination(for: GrandchildModel.self) { grandchild in
                GrandchildView(coordinator: coordinator, grandchild: grandchild)
            }
        }
    }
}
struct GrandchildView: View {

    @ObservedObject var coordinator : NavigationCoordinator

    let grandchild : GrandchildModel

    var body: some View {
        VStack {
            Text(grandchild.id.description)
        }
        .navigationBarItems(
            trailing: HStack {
                Button(action: {
                    coordinator.gotoHomePage()
                }) {
                    Text("ROOT")
                }
            }
        )
    }
}
import Swift

struct GrandchildModel : Hashable, Identifiable {
    let id : Int
}
【追記】遷移情報の保存と復元
NavigationPathはcodableなので、以下のようにすれば遷移情報を保存/復元してブックマークのように扱うことも可能なようです。
(配列操作にswift-algorighmsを使っています。)
    func savePath() {
        let data = path.codable
        do {
            let encoder = JSONEncoder()
            encoder.outputFormatting = .prettyPrinted
            let encodedData = try encoder.encode(data)
            UserDefaults.standard.set(encodedData, forKey: "bookmark")
            let jsonstr = String(data: encodedData, encoding: .utf8)!
            print(jsonstr)
        } catch let error {
            print(error)
        }
    }

    func loadPath() {
        guard let data = UserDefaults.standard.data(forKey: "bookmark") else {return}
        do {
            let decoder = JSONDecoder()
            let decodedData = try decoder.decode([String].self, from: data)
            let pairingData = decodedData.chunks(ofCount: 2)

            path.removeLast(path.count)

            pairingData.reversed().forEach({ onePair in
                do {
                    if (onePair.first!.contains("ChildModel")) {

                        let model = try decoder.decode(ChildModel.self, from: onePair.last!.data(using: .utf8)!)
                        print("ChildModel : \(model)")

                        path.append(model)

                    } else if (onePair.first!.contains("GrandchildModel")) {

                        let model = try decoder.decode(GrandchildModel.self, from: onePair.last!.data(using: .utf8)!)
                        print("GrandchildModel : \(model)")

                        path.append(model)

                    } else {

                        print("unrecoginize model : \(onePair.first ?? "")")
                    }
                } catch let error {
                    print(error)
                }
            })

            tabSelection = 0

        } catch let error {
            print(error)
        }
