はじめに
SSL/TLS の勉強として、自己署名証明書を用意して SSL 通信をやってみたのでまとめる。
やること
今回やることは以下。
- 自己署名証明書の用意
- 秘密鍵の作成
- CSR の作成
- 証明書に自己署名
- 実際に SSL 通信する
-
nginx.confの設定
-
環境の用意
今回は、Nginx の Docker イメージを使って証明書の用意から SSL 通信をするところまでやる。
また、以下のdocker-compose.ymlを用意し、すべて Docker コンテナ内で行う。
version: '3'
services:
  nginx:
    image: nginx:latest
    ports:
      - "80:80"
      - "443:443"
$ docker compose up -d
$ docker compose exec nginx /bin/bash
自己署名証明書の用意
流れとしては、
- 秘密鍵を作成して、
- 証明書署名要求(CSR)を作成し、
- CSR をもとに、自分の秘密鍵で署名した証明書を発行する
秘密鍵の作成
まずはopensslコマンドを使い、サーバーの秘密鍵を生成する。
$ openssl genpkey -algorithm RSA -pkeyopt rsa_keygen_bits:2048 -aes-256-cbc -out privkey.pem

.......................................................................+++++
.................................................+++++
Enter PEM pass phrase: (パスフレーズを入力)
Verifying - Enter PEM pass phrase: (パスフレーズを再度入力)
現在のディレクトリにprivkey.pemが生成されていれば秘密鍵の作成は完了。
$ ls -l privkey.pem

-rw------- 1 root root 1874 Mar  1 00:23 privkey.pem
参考: https://www.openssl.org/docs/man1.1.1/man1/genpkey.html
秘密鍵の暗号化方式の種類は、openssl helpのCipher commandsから確認できた。
$ openssl help

...略

Cipher commands (see the `enc' command for more details)
aes-128-cbc       aes-128-ecb       aes-192-cbc       aes-192-ecb
aes-256-cbc       aes-256-ecb       aria-128-cbc      aria-128-cfb
aria-128-cfb1     aria-128-cfb8     aria-128-ctr      aria-128-ecb
aria-128-ofb      aria-192-cbc      aria-192-cfb      aria-192-cfb1
aria-192-cfb8     aria-192-ctr      aria-192-ecb      aria-192-ofb
aria-256-cbc      aria-256-cfb      aria-256-cfb1     aria-256-cfb8
aria-256-ctr      aria-256-ecb      aria-256-ofb      base64
bf                bf-cbc            bf-cfb            bf-ecb
bf-ofb            camellia-128-cbc  camellia-128-ecb  camellia-192-cbc
camellia-192-ecb  camellia-256-cbc  camellia-256-ecb  cast
cast-cbc          cast5-cbc         cast5-cfb         cast5-ecb
cast5-ofb         des               des-cbc           des-cfb
des-ecb           des-ede           des-ede-cbc       des-ede-cfb
des-ede-ofb       des-ede3          des-ede3-cbc      des-ede3-cfb
des-ede3-ofb      des-ofb           des3              desx
rc2               rc2-40-cbc        rc2-64-cbc        rc2-cbc
rc2-cfb           rc2-ecb           rc2-ofb           rc4
rc4-40            seed              seed-cbc          seed-cfb
seed-ecb          seed-ofb          sm4-cbc           sm4-cfb
sm4-ctr           sm4-ecb           sm4-ofb
証明書署名要求(CSR)の作成
証明書を発行するにあたり、証明書署名要求(CSR)を作成する必要がある。
CSR もopensslコマンドで作成する。
今回は、myssl.testというドメインで試すため、Common Name(CN)はmyssl.testにしている。
$ openssl req -new -key privkey.pem -out csr.pem

Enter pass phrase for privkey.pem:
You are about to be asked to enter information that will be incorporated
into your certificate request.
What you are about to enter is what is called a Distinguished Name or a DN.
There are quite a few fields but you can leave some blank
For some fields there will be a default value,
If you enter '.', the field will be left blank.
-----
Country Name (2 letter code) [AU]:JP <-入力
State or Province Name (full name) [Some-State]:Tokyo <-入力
Locality Name (eg, city) []:Shibuya-ku <-入力
Organization Name (eg, company) [Internet Widgits Pty Ltd]:ohakutsu <-入力
Organizational Unit Name (eg, section) []:
Common Name (e.g. server FQDN or YOUR name) []:myssl.test <-入力
Email Address []:

Please enter the following 'extra' attributes
to be sent with your certificate request
A challenge password []:
An optional company name []:
参考: https://www.openssl.org/docs/man1.1.1/man1/req.html
csr.pemが生成されていれば完了。
$ ls -l csr.pem

-rw-r--r-- 1 root root 985 Mar  1 00:44 csr.pem
CSR をもとに証明書を発行する
自分の秘密鍵を使って、自己署名した証明書を発行します。(自己署名した証明書は別名オレオレ証明書と呼ばれている)
opensslコマンドを使って行います。
$ openssl x509 -req -in csr.pem -signkey privkey.pem -days 90 -out crt.pem

Signature ok
subject=C = JP, ST = Tokyo, L = Shibuya-ku, O = ohakutsu, CN = myssl.test
Getting Private key
Enter pass phrase for privkey.pem: (パスフレーズを入力)
参考: https://www.openssl.org/docs/man1.1.1/man1/x509.html
これで自己署名証明書ができた。
証明書の情報は以下のように確認できる。
$ openssl x509 -in crt.pem -noout -text

Certificate:
    Data:
        Version: 1 (0x0)
        Serial Number:
            57:e9:cf:01:72:e8:c5:0c:4c:37:c4:2e:5d:50:55:be:d3:62:39:83
        Signature Algorithm: sha256WithRSAEncryption
        Issuer: C = JP, ST = Tokyo, L = Shibuya-ku, O = ohakutsu, CN = myssl.test
        Validity
            Not Before: Mar  3 11:08:30 2022 GMT
            Not After : Jun  1 11:08:30 2022 GMT
        Subject: C = JP, ST = Tokyo, L = Shibuya-ku, O = ohakutsu, CN = myssl.test
        Subject Public Key Info:
            Public Key Algorithm: rsaEncryption
                RSA Public-Key: (2048 bit)
                Modulus:
                    00:c3:18:9e:d2:9a:88:ae:5c:60:76:e4:8f:a1:31:
                    f6:02:98:0d:f1:22:4f:22:7d:b0:d3:60:e2:47:97:
                    4e:00:0f:33:5b:3e:4b:8f:c4:81:14:1c:44:c8:1b:
                    bc:19:fb:d7:fb:18:5f:f8:61:9c:f6:ff:af:4b:86:
                    21:7c:74:d9:84:01:be:15:66:e5:c3:4c:ca:d7:50:
                    13:20:81:c2:56:92:58:93:ce:32:e0:c7:f6:be:17:
                    37:9f:bb:86:09:56:34:0e:af:96:07:cf:72:19:d8:
                    be:04:c9:b2:c5:36:84:97:05:36:33:7c:f0:a2:74:
                    cb:9e:f6:87:94:66:15:c4:09:42:b6:f5:ce:6e:9f:
                    cf:6f:ec:f1:56:dd:9c:5f:79:b2:19:82:47:c3:a2:
                    5d:04:9d:a6:25:32:e5:e2:99:a9:76:64:10:b1:e3:
                    bf:49:80:60:64:a2:9a:c7:1c:e9:74:4f:c5:f9:3a:
                    42:bc:c6:d7:8c:7f:9e:4f:52:75:90:d5:ed:ec:8f:
                    5f:f3:bd:22:36:e1:56:ee:e5:8d:8f:97:da:90:cf:
                    7d:9c:ba:5e:f1:01:33:86:ba:72:ef:61:ca:ef:1b:
                    b6:89:96:79:52:1c:f4:8d:92:61:24:15:55:28:e0:
                    c1:f1:4b:09:8a:23:c7:de:98:3c:11:3d:63:c8:95:
                    3f:2d
                Exponent: 65537 (0x10001)
    Signature Algorithm: sha256WithRSAEncryption
         b6:88:19:65:62:18:b0:47:b3:27:01:e5:d0:84:c2:29:49:59:
         e9:79:63:e7:85:bf:27:a3:5c:25:c6:b3:7b:98:02:6b:ee:a4:
         69:a8:f2:f1:fb:36:91:e6:ef:17:85:96:e6:f9:81:23:b3:c5:
         69:59:6a:bb:29:fe:aa:d8:d1:b6:41:d6:b2:92:86:be:6b:c1:
         4b:41:f5:5a:d1:93:20:29:f3:70:c0:f4:0a:fd:b5:90:64:5f:
         0d:a0:4c:f3:29:d8:c8:7f:8b:cf:20:fc:d9:e0:12:70:5d:73:
         c4:ba:6c:28:2b:61:89:88:9d:a3:dd:37:60:ad:82:7a:a0:5c:
         5c:ca:b3:61:fe:48:35:c3:2e:a6:07:10:6f:93:54:b9:18:ec:
         86:6d:f0:bc:aa:f7:b8:e6:2f:aa:cd:7c:dc:a1:5f:c7:14:38:
         6b:f6:da:9d:1a:c5:f5:58:b6:6e:3e:20:70:c6:d3:f7:8d:a9:
         71:65:0e:9a:13:97:31:c4:8c:fe:30:fa:f3:89:86:e3:26:75:
         e4:9e:49:4b:c8:04:fc:7e:be:0c:f0:f7:a7:7b:a5:3d:68:81:
         cf:73:66:b3:d0:42:19:ab:c0:0b:02:51:a7:13:29:36:f0:5f:
         c9:88:b8:49:0b:75:f3:97:ad:4c:34:2f:36:fc:d7:da:12:e0:
         95:c2:3c:fa
Nginx で SSL 通信をしてみる
Nginx で SSL の設定を行い、SSL 通信ができるかを試す。
nginx -Vをしてみると、Nginx の Docker イメージではビルドオプションに
--conf-path=/etc/nginx/nginx.conf--with-http_ssl_module
があることがわかる。
$ nginx -V

nginx version: nginx/1.21.6
built by gcc 10.2.1 20210110 (Debian 10.2.1-6)
built with OpenSSL 1.1.1k  25 Mar 2021
TLS SNI support enabled
configure arguments: --prefix=/etc/nginx --sbin-path=/usr/sbin/nginx --modules-path=/usr/lib/nginx/modules --conf-path=/etc/nginx/nginx.conf --error-log-path=/var/log/nginx/error.log --http-log-path=/var/log/nginx/access.log --pid-path=/var/run/nginx.pid --lock-path=/var/run/nginx.lock --http-client-body-temp-path=/var/cache/nginx/client_temp --http-proxy-temp-path=/var/cache/nginx/proxy_temp --http-fastcgi-temp-path=/var/cache/nginx/fastcgi_temp --http-uwsgi-temp-path=/var/cache/nginx/uwsgi_temp --http-scgi-temp-path=/var/cache/nginx/scgi_temp --user=nginx --group=nginx --with-compat --with-file-aio --with-threads --with-http_addition_module --with-http_auth_request_module --with-http_dav_module --with-http_flv_module --with-http_gunzip_module --with-http_gzip_static_module --with-http_mp4_module --with-http_random_index_module --with-http_realip_module --with-http_secure_link_module --with-http_slice_module --with-http_ssl_module --with-http_stub_status_module --with-http_sub_module --with-http_v2_module --with-mail --with-mail_ssl_module --with-stream --with-stream_realip_module --with-stream_ssl_module --with-stream_ssl_preread_module --with-cc-opt='-g -O2 -ffile-prefix-map=/data/builder/debuild/nginx-1.21.6/debian/debuild-base/nginx-1.21.6=. -fstack-protector-strong -Wformat -Werror=format-security -Wp,-D_FORTIFY_SOURCE=2 -fPIC' --with-ld-opt='-Wl,-z,relro -Wl,-z,now -Wl,--as-needed -pie'
そのため今回は、nginx.confを触るだけで良さそう。
(ソースからビルドする場合は、http_ssl_moduleはデフォルトで有効でないため、ビルド時に--with-http_ssl_moduleをつけてあげる必要がある)
nginx.confを修正する
/etc/nginx/nginx.confを見てみると、serverディレクティブがないが、
include /etc/nginx/conf.d/*.conf;とあるため、/etc/nginx/conf.d/default.confに記述があることがわかる。
$ cat /etc/nginx/nginx.conf

user  nginx;
worker_processes  auto;

略...

http {
    略...

    include /etc/nginx/conf.d/*.conf;
}

$ cat /etc/nginx/conf.d/default.conf
server {
    listen       80;
    listen  [::]:80;
    server_name  localhost;

    #access_log  /var/log/nginx/host.access.log  main;

    location / {
        root   /usr/share/nginx/html;
        index  index.html index.htm;
    }

    略...
}
今回は検証するだけなので/etc/nginx/conf.d/default.confを以下の様に書き換える。
また、/etc/nginx/ssl配下に秘密鍵(privkey.pem)と証明書(crt.pem)、秘密鍵のパスフレーズを書いたpasswdを配置しておく。
$ mkdir -p /etc/nginx/ssl

$ mv crt.pem /etc/nginx/ssl/crt.pem
$ mv privkey.pem /etc/nginx/ssl/privkey.pem

$ touch /etc/nginx/ssl/passwd
$ chmod 600 /etc/nginx/ssl/passwd
$ echo 'パスフレーズ' > /etc/nginx/ssl/passwd

$ ls -l /etc/nginx/ssl
-rw-r--r-- 1 root root 1180 Mar  3 11:28 crt.pem
-rw------- 1 root root    9 Mar  3 11:37 passwd
-rw------- 1 root root 1874 Mar  3 11:27 privkey.pem
server {
-   listen       80;
+   listen       443 ssl;
-   listen  [::]:80;
+   listen  [::]:443 ssl;
-   server_name  localhost;
+   server_name  myssl.test;
+
+   ssl_certificate /etc/nginx/ssl/crt.pem;
+   ssl_certificate_key /etc/nginx/ssl/privkey.pem;
+   ssl_password_file /etc/nginx/ssl/passwd;

    #access_log  /var/log/nginx/host.access.log  main;

    location / {
        root   /usr/share/nginx/html;
        index  index.html index.htm;
    }

    #error_page  404              /404.html;

    # redirect server error pages to the static page /50x.html
    #
    error_page   500 502 503 504  /50x.html;
    location = /50x.html {
        root   /usr/share/nginx/html;
    }

    # proxy the PHP scripts to Apache listening on 127.0.0.1:80
    #
    #location ~ \.php$ {
    #    proxy_pass   http://127.0.0.1;
    #}

    # pass the PHP scripts to FastCGI server listening on 127.0.0.1:9000
    #
    #location ~ \.php$ {
    #    root           html;
    #    fastcgi_pass   127.0.0.1:9000;
    #    fastcgi_index  index.php;
    #    fastcgi_param  SCRIPT_FILENAME  /scripts$fastcgi_script_name;
    #    include        fastcgi_params;
    #}

    # deny access to .htaccess files, if Apache's document root
    # concurs with nginx's one
    #
    #location ~ /\.ht {
    #    deny  all;
    #}
}
あとは、Nginx の設定を再読み込みすれば完了。
$ nginx -s reload
アクセスしてみる
ホストマシンからcurlコマンドでアクセスしてみると、SSL 通信できていることがわかる。
$ curl --verbose --insecure --header 'Host: myssl.test' https://localhost

*   Trying ::1...
* TCP_NODELAY set
* Connected to localhost (::1) port 443 (#0)
* ALPN, offering h2
* ALPN, offering http/1.1
* successfully set certificate verify locations:
*   CAfile: /etc/ssl/cert.pem
  CApath: none
* TLSv1.2 (OUT), TLS handshake, Client hello (1):
* TLSv1.2 (IN), TLS handshake, Server hello (2):
* TLSv1.2 (IN), TLS handshake, Certificate (11):
* TLSv1.2 (IN), TLS handshake, Server key exchange (12):
* TLSv1.2 (IN), TLS handshake, Server finished (14):
* TLSv1.2 (OUT), TLS handshake, Client key exchange (16):
* TLSv1.2 (OUT), TLS change cipher, Change cipher spec (1):
* TLSv1.2 (OUT), TLS handshake, Finished (20):
* TLSv1.2 (IN), TLS change cipher, Change cipher spec (1):
* TLSv1.2 (IN), TLS handshake, Finished (20):
* SSL connection using TLSv1.2 / ECDHE-RSA-AES256-GCM-SHA384
* ALPN, server accepted to use http/1.1
* Server certificate:
*  subject: C=JP; ST=Tokyo; L=Shibuya-ku; O=ohakutsu; CN=myssl.test
*  start date: Mar  3 11:28:32 2022 GMT
*  expire date: Jun  1 11:28:32 2022 GMT
*  issuer: C=JP; ST=Tokyo; L=Shibuya-ku; O=ohakutsu; CN=myssl.test
*  SSL certificate verify result: self signed certificate (18), continuing anyway.
> GET / HTTP/1.1
> Host: myssl.test
> User-Agent: curl/7.64.1
> Accept: */*
>
< HTTP/1.1 200 OK
< Server: nginx/1.21.6
< Date: Thu, 03 Mar 2022 11:51:12 GMT
< Content-Type: text/html
< Content-Length: 615
< Last-Modified: Tue, 25 Jan 2022 15:03:52 GMT
< Connection: keep-alive
< ETag: "61f01158-267"
< Accept-Ranges: bytes
<
<!DOCTYPE html>
<html>
<head>
<title>Welcome to nginx!</title>
<style>
html { color-scheme: light dark; }
body { width: 35em; margin: 0 auto;
font-family: Tahoma, Verdana, Arial, sans-serif; }
</style>
</head>
<body>
<h1>Welcome to nginx!</h1>
<p>If you see this page, the nginx web server is successfully installed and
working. Further configuration is required.</p>

<p>For online documentation and support please refer to
<a href="http://nginx.org/">nginx.org</a>.<br/>
Commercial support is available at
<a href="http://nginx.com/">nginx.com</a>.</p>

<p><em>Thank you for using nginx.</em></p>
</body>
</html>
* Connection #0 to host localhost left intact
* Closing connection 0
ブラウザでも試してみる。
ホストマシンの/etc/hostsに127.0.0.1 myssl.testを追加し、https://myssl.testにアクセスする。(検証が終わったら削除しましょう)
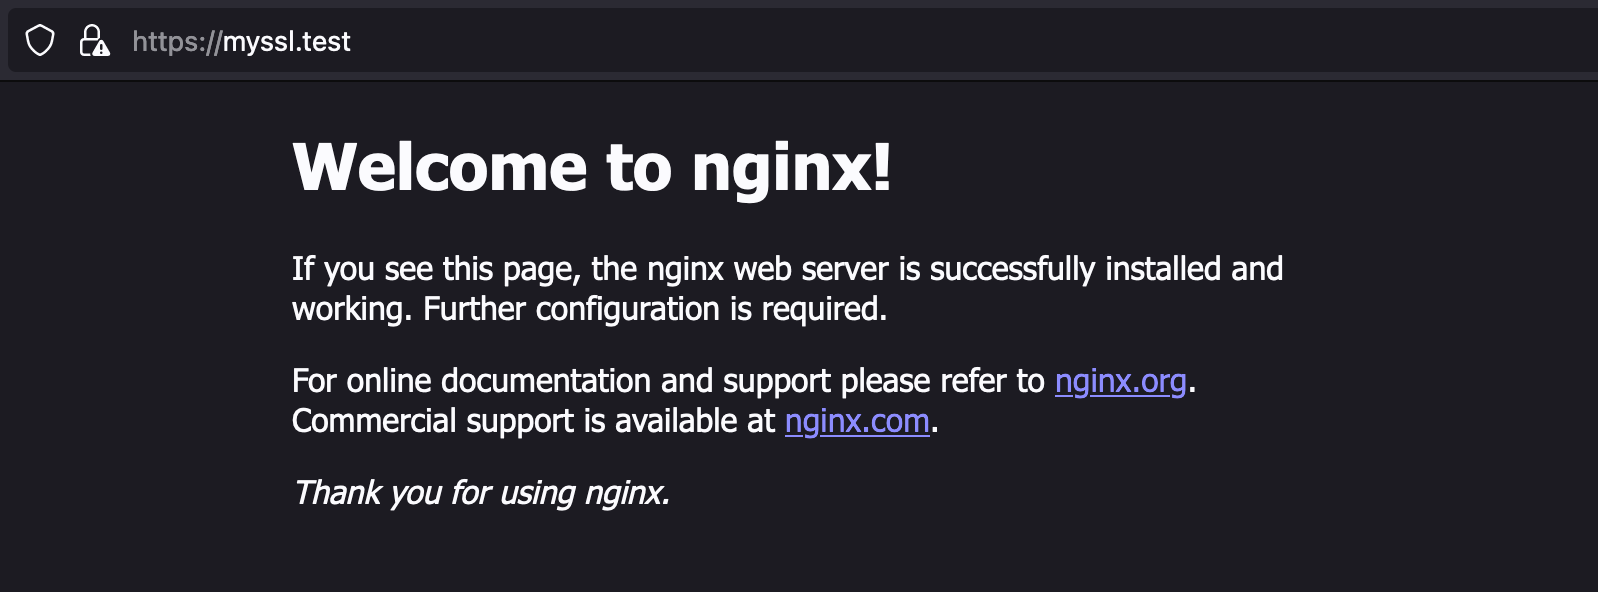
SSL 通信できていることが確認できる。
最後に
自己署名証明書の発行から Nginx での設定、検証までやった。
今度は、自己ルート CA、中間 CA を立ててやってみたい。