はじめに
Selenium4の新機能の1つにRelative Locatorというものがあります。
この記事では、その機能の説明と使い方をRuby + Selenium WebDriverで作成したサンプルコードをもとに解説していきます。
※ Seleniumのバージョンは2021/03/23時点で最新の4.0.0.beta2を使用しています
Relative Locatorとは
- Relative LocatorとはSelenium4で追加された機能です
- Selenium Conf 2019 でも紹介されており、当時はFriendly Locatorと呼ばれていました
- 指定した要素を起点としてその位置からの情報を指定することでターゲットとする要素を特定することができる スゴイ機能 です
実際に使ってみる!
Selenium4に新しく追加された5つのロケーター
指定した要素に対してターゲットとする要素がどのような位置関係にあるかを以下の5つのロケーターを使って指定できます。
複数のロケーターを一緒に指定することもできます。(詳しくは後述)
- above : 指定した要素の 上 側にある要素を取得します
- below : 指定した要素の 下 側にある要素を取得します
- left : 指定した要素の 左 側にある要素を取得します
- right : 指定した要素の 右 側にある要素を取得します
- near : 指定した要素から 最大 50px 離れた要素を取得します
サンプルコード
サンプルコードの解説で使用するWebサイト
Relative Locatorの解説するために以下のサンプルサイトを利用します。
Gemfile
Gemfileは以下のように使用するselenium-webdriverのバージョンを指定します。
$ bundle install を実行してください。
source 'https://rubygems.org'

gem 'selenium-webdriver', '4.0.0.beta2'
サンプルコード1(基準要素の左側の要素を取得)
まずは、シンプルに条件を1つで要素を取得してみます。
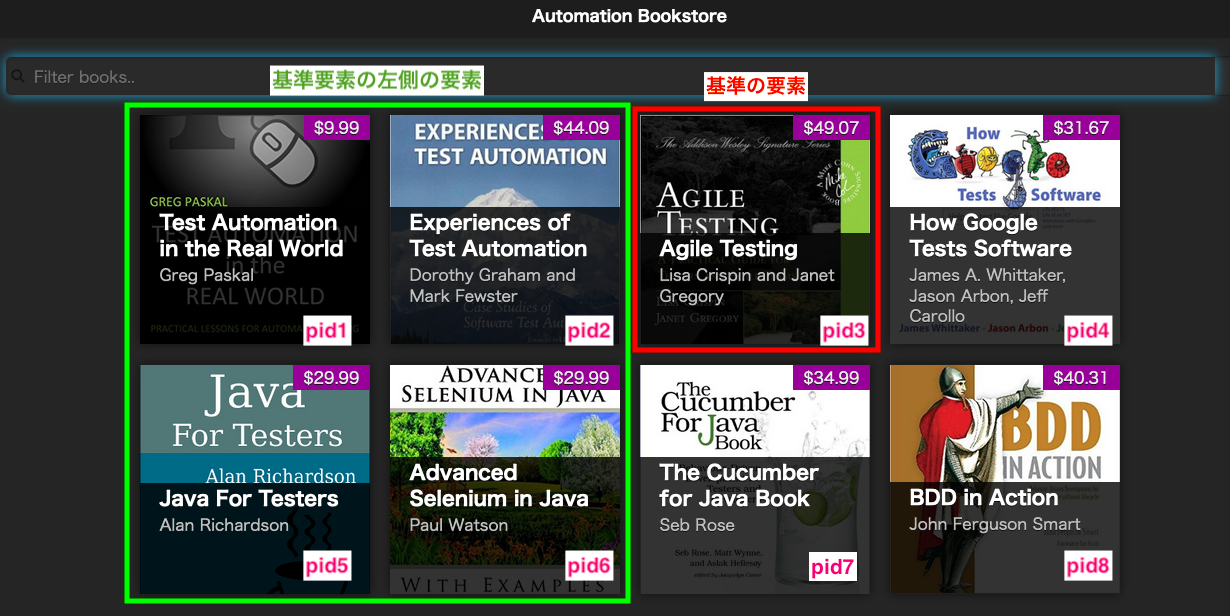
基準として指定した要素(pid3)の左側にある pid1 , pid2 ,pid5 , pid6 の要素が取得できます。
サンプルコードは $ bundle exec ruby relative_locator_left.rb で実行できます。
require 'selenium-webdriver'

driver = Selenium::WebDriver.for :chrome

begin
  driver.get 'https://automationbookstore.dev/' # サンプルWebサイトに移動

  start_element = driver.find_element(css: '#pid3')
  puts '== 基準とする要素 =='
  puts "[#{start_element.attribute('id')}]"
  puts start_element.text

  target_elements = driver.find_elements(relative: { css: 'li', left: start_element })
  puts "\n== 基準要素の左側にある要素 =="
  target_elements.each do |e|
    puts "[#{e.attribute('id')}]"
    puts e.text
  end
ensure
  driver.quit
end
== 基準とする要素 ==
[pid3]
Agile Testing
Lisa Crispin and Janet Gregory
$49.07

== 基準要素の左側にある要素 ==
[pid2]
Experiences of Test Automation
Dorothy Graham and Mark Fewster
$44.09
[pid6]
Advanced Selenium in Java
Paul Watson
$29.99
[pid1]
Test Automation in the Real World
Greg Paskal
$9.99
[pid5]
Java For Testers
Alan Richardson
$29.99
サンプルコード2(基準要素の右下の要素を取得)
次に、条件を2つにして要素を絞り込んでみます。
基準として指定した要素(pid3)の右下にある pid8 の要素が取得できます。
require 'selenium-webdriver'

driver = Selenium::WebDriver.for :chrome

begin
  driver.get 'https://automationbookstore.dev/'

  start_element = driver.find_element(css: '#pid3')
  target_elements = driver.find_elements(relative: { css: 'li', right: start_element, below: start_element })
  puts '== 基準要素の右下にある要素 =='
  target_elements.each do |e|
    puts "[#{e.attribute('id')}]"
    puts e.text
  end
ensure
  driver.quit
end
== 基準要素の右下にある要素 ==
[pid8]
BDD in Action
John Ferguson Smart
$40.31
サンプルコード3(複数の条件を指定して絞り込んだ要素を取得)
さらに条件を増やしてはさみうちのように指定して絞り込んでみます!
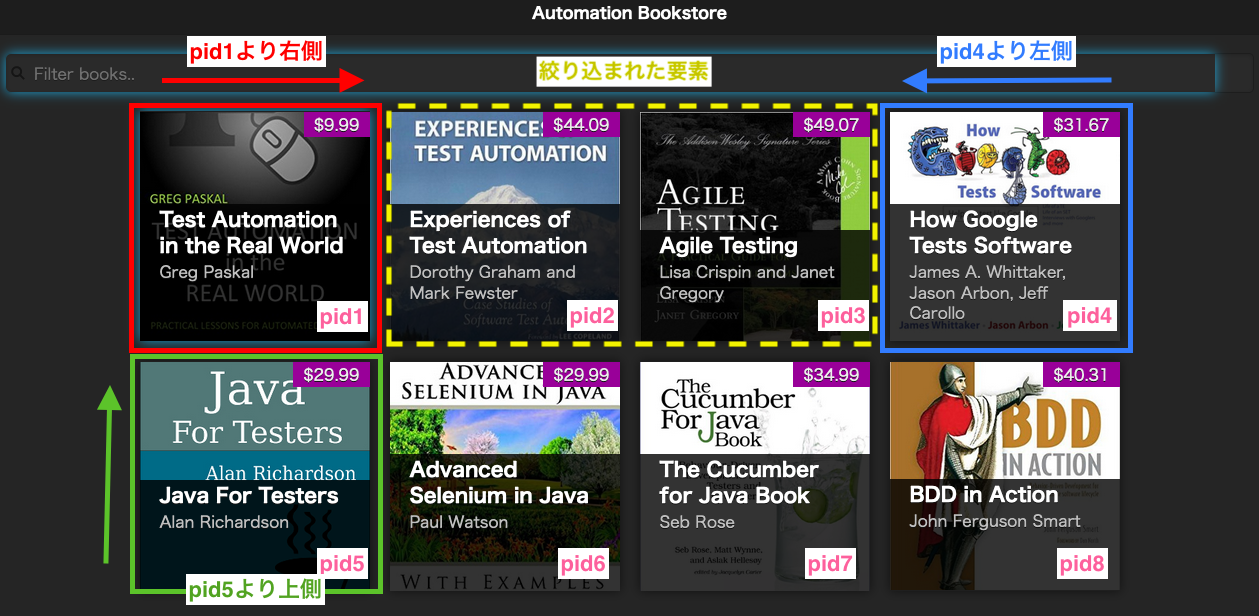
指定した要素(pid1)の右側で指定した要素(pid4)の左側にあり、 指定した要素(pid5)の上にある pid2 , pid3 の要素が取得できます。
require 'selenium-webdriver'

driver = Selenium::WebDriver.for :chrome

begin
  driver.get 'https://automationbookstore.dev/'

  pid1 = driver.find_element(css: '#pid1')
  pid4 = driver.find_element(css: '#pid4')
  pid5 = driver.find_element(css: '#pid5')
  target_elements = driver.find_elements(relative: { css: 'li', right: pid1, left: pid4, above: pid5 })
  puts '== 指定した要素(pid1)の右側で指定した要素(pid4)の左側にあり、 指定した要素(pid5)の上にある要素 =='
  target_elements.each do |e|
    puts "[#{e.attribute('id')}]"
    puts e.text
  end
ensure
  driver.quit
end
== 指定した要素(pid1)の右側で指定した要素(pid4)の左側にあり、 指定した要素(pid5)の上にある要素 ==
[pid2]
Experiences of Test Automation
Dorothy Graham and Mark Fewster
$44.09
[pid3]
Agile Testing
Lisa Crispin and Janet Gregory
$49.07
サンプルコード4(指定した要素の近くにある要素を取得)
idやclassが割り当てられていない要素でも、指定した要素の近くにあるという情報のもとで要素を取得することもできます。
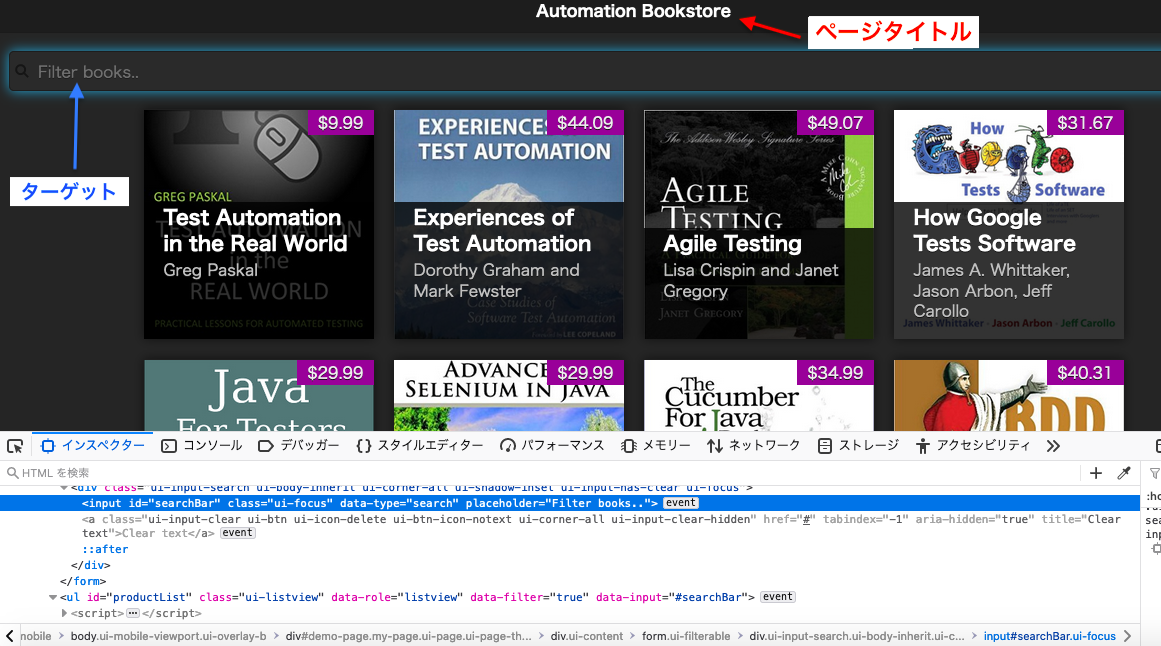
以下の例では、ヘッダー部分にあるページタイトルの近くにある「Filter books..」と表示されている要素を取得しています。
require 'selenium-webdriver'

driver = Selenium::WebDriver.for :chrome

begin
  driver.get 'https://automationbookstore.dev/'

  page_title = driver.find_element(css: '#page-title')
  target_elements = driver.find_elements(relative: { css: '[placeholder="Filter books.."]', near: page_title })
  puts '== 指定した要素(page_title)の近くにあり、「Filter books..」と表示されている要素 =='
  target_elements.each do |e|
    puts e.attribute('outerHTML')
  end
ensure
  driver.quit
end
== 指定した要素(page_title)の近くにあり、「Filter books..」と表示されている要素 ==
<input id="searchBar" data-type="search" placeholder="Filter books.." class="ui-focus">


