はじめに
Ethereumを利用する場合、EthereumのP2Pネットワークに参加することで、
採掘をはじめ、送金やスマートコントラクトの作成などが可能になります。
Ethereumクライアントはいくつかの選択肢がありますが、
「Geth」というGoによって実装されたCUIクライアントが推奨されており、
今回は手元のMacにGethのインストールと実行を試してみました。
Gethインストール
インストール
(VERSION:1.6.7-stable-ab5646c5)
MacのHomebrewを使うことで簡単にインストールすることができます。
(ソースから異なるversionをインストールする場合は、このページの「ソースからインストール」を参照)
$ brew tap ethereum/ethereum
$ brew install ethereum
genesis.jsonの作成
eth_privateディレクトリを任意の場所に作成し、
その下にgenesis.jsonという名前のファイルを作成します。
mkdir /Users/hoge/eth_private
vim /Users/hoge/eth_private/genesis.json
{
"config": {
        "chainId": 42,
        "homesteadBlock": 0,
        "eip155Block": 0,
        "eip158Block": 0
},
"nonce": "0x0000000000000042",
"mixhash": "0x0000000000000000000000000000000000000000000000000000000000000000",
"difficulty": "0x400",
"alloc": {},
"coinbase": "0x3333333333333333333333333333333333333333",
"timestamp": "0x0",
"parentHash": "0x0000000000000000000000000000000000000000000000000000000000000000",
"extraData": "0x",
"gasLimit": "0x8000000",
}
ジェネシスブロック生成
genesisファイルを作成したら、ブロックチェーンの情報を初期化します。
geth --datadir /Users/hoge/eth_private/ init /Users/hoge/eth_private/genesis.json
実行時に下記のようなエラーが起こる場合は、genesis.jsonが間違っている場合があるようです。
Fatal: invalid genesis file: json: cannot unmarshal hex string of odd length into Go struct field Genesis.extraData of type hexutil.Bytes
Fatal: invalid genesis file: json: cannot unmarshal hex string without 0x prefix into Go struct field Genesis.extraData of type hexutil.Bytes
アカウントの作成
コンソールに入る
geth --networkid "42" --nodiscover --datadir "/Users/hoge/eth_private" console 2>> /Users/hoge/eth_private/geth_err.log
Welcome to the Geth JavaScript console!
ブロック情報を表示する
GenesisブロックがmyGenesis.jsonに記載されたものになっているのを確認。
> eth.getBlock(0)
  difficulty: 1024,
  extraData: "0x",
  gasLimit: 134217728,
  gasUsed: 0,
  hash: "0x6231b02ac967dff9b0c799e956094408959de862d720d08776302ffefba0300b",
  logsBloom: "0x0000000000000000000000000000000000000000000000000000000000000000000000000000000000000000
> eth.accounts
[] <--空っぽ
アカウントの作成
personal.newAccount(“password”)という形式のコマンドで
アカウントを作成することができます。ここでは送金用と入金用に2つ作成します。
# アドレス1の作成
> personal.newAccount("hoge1")
"0xc6f8195a58e3c10ca3aa852571acea14347b8f37"

# アドレス2の作成
> personal.newAccount("hoge2")
"0x1a6da2f1d1588794174ab8ce0e3be6f6eb9c715b"

# アカウントの確認(2個できた!)
> eth.accounts
["0xc6f8195a58e3c10ca3aa852571acea14347b8f37", "0x1a6da2f1d1588794174ab8ce0e3be6f6eb9c715b"]
>
残高確認とマイニング
# マイニングに使うアドレスを確認する
eth.coinbase

# 1個目のアドレスの残高を確認する
> eth.getBalance(eth.accounts[0])
0

# 採掘を開始する
> miner.start()
null

# ハッシュレートを確認する(0でなければ、採掘が進んでいる)
> miner.getHashrate()

# 採掘を停止する
> miner.stop()
true
送金
口座をアンロックする
> personal.unlockAccount("0xc6f8195a58e3c10ca3aa852571acea14347b8f37", "hoge1")
true
> personal.unlockAccount("0x1a6da2f1d1588794174ab8ce0e3be6f6eb9c715b", "hoge2")
true
残高を確認(account[1]には残高がない状態)
> eth.getBalance(eth.accounts[0])
8.85e+21
> eth.getBalance(eth.accounts[1])
0
送金する
> eth.sendTransaction({from: "0xc6f8195a58e3c10ca3aa852571acea14347b8f37", to: "0x1a6da2f1d1588794174ab8ce0e3be6f6eb9c715b", value: web3.toWei(1, "ether")})
>0x6725961673895d75e566a045289448cf1a471465a8009a7bbea0acfe277e75f0
ペンディングトランザクションを確認する
> eth.pendingTransactions
[{
    blockHash: null,
    blockNumber: null,
    from: "0xc6f8195a58e3c10ca3aa852571acea14347b8f37",
    gas: 90000,
    gasPrice: 18000000000,
    hash: "0x6725961673895d75e566a045289448cf1a471465a8009a7bbea0acfe277e75f0",
    input: "0x",
    nonce: 0,
    r: "0x1c5bf8c004e48577fdc31ceda17eeabdd5531986a14836256558a70dd687f9d6",
    s: "0x49152ec6d901a8fae381f33410b1c091a080de3dce0dfe2fe1ebd4845297c0f8",
    to: "0x1a6da2f1d1588794174ab8ce0e3be6f6eb9c715b",
    transactionIndex: 0,
    v: "0x1c",
    value: 1000000000000000000
}]
gas:トランザクション処理時のgasの最大値
gasPrice:トランザクション処理時に支払う1gas当たりの手数料(wei)
採掘スタート
> miner.start()
null
ハッシュレートが0でなければ、採掘が開始されている
> eth.hashrate
6945
残高を見ると送金が完了している
> eth.getBalance(eth.accounts[0])
8.879e+21
> eth.getBalance(eth.accounts[1])
1000000000000000000
単位
デフォルトでは単位はwei。
> web3.fromWei(eth.getBalance(eth.accounts[1]),"ether")
> web3.fromWei(eth.getBalance(eth.accounts[1]),"finney")
> web3.fromWei(eth.getBalance(eth.accounts[1]),"szabo")
RPC接続
一旦コンソールを抜ける
> exit
再度rpcportなどを指定した上で、コンソールを再度起動する
> geth --networkid 42 --mine --minerthreads 2 --identity "sampleNode" --rpc --rpcport 8575 --rpcapi "web3,eth,net,personal" --rpccorsdomain "*" --rpcaddr "0.0.0.0" --datadir "/Users/hoge/eth_private" --nodiscover --networkid 10 console 2>> /Users/hoge/eth_private/geth.log
開発時にはアカウントをアンロックしておくために--unlock 0,1をつけると便利(上で作成した0番目と1番目のアカウントをアンロックするという意味)
> geth --networkid 42 --mine --unlock 0,1 --minerthreads 2 --identity "sampleNode" --rpc --rpcport 8575 --rpcapi "web3,eth,net,personal" --rpccorsdomain "*" --rpcaddr "0.0.0.0" --datadir "/Users/hoge/eth_private" --nodiscover --networkid 10 console 2>> /Users/hoge/eth_private/geth.log
他のコンソールからlocalhostにcurlしてみる
curl -X POST http://127.0.0.1:8575/  --data '{"jsonrpc":"2.0","method":"web3_clientVersion","params":[],"id":1}'

> {"jsonrpc":"2.0","id":1,"result":"Geth/sampleNode/v1.6.7-stable-ab5646c5/darwin-amd64/go1.8.3"}
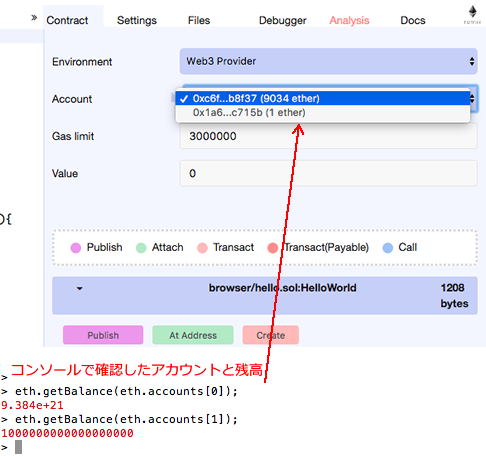
Browser-Solidityから接続してみる
上でツールを開いて、EnvironmentをWeb3Providerに設定 => http://127.0.0.1:8575 を入力すると接続
livenetに接続する
mkdir /Users/hoge/livenet_data
geth --datadir "/Users/hoge/livenet_data" 2>> /Users/hoge/livenet_data/e01.log
接続数をみる
net.peerCount
そのほか
ソースからインストール
「eth_compilers, eth_compileSolidity are gone in go-ethereum 1.6.0」
https://github.com/ethereum/go-ethereum/issues/3793
1.6.0以降から挙動が変わっている。
1.5.5を使用する場合は、ソースからインストールする。
# アンインストール
brew uninstall ethereum

# go-ethereumには gmpとgoが必要
brew install gmp go

# cloneする
git clone https://github.com/ethereum/go-ethereum
git checkout refs/tags/v1.5.5

# コンパイル
make geth
./build/bin/geth version
sudo cp build/bin/geth /usr/local/bin/
which geth

# バージョン確認
geth --version
VERSION:
   1.5.5-stable-ff07d548

# solidityをインストールする
brew install solidity
brew linkapps solidity

# gethの中で下記を実行するとSolidityが返ってくる
> eth.getCompilers()
["Solidity"]
ノード間通信
EthereumExplorer
取引履歴を確認するためのツール
git clone https://github.com/etherparty/explorer
npm start
デフォルトは下記設定になっているので、gethのIPやportを編集したい場合はここを編集する
explorer/app/app.js -> eth_node_url = 'http://localhost:8545'
参考