3日ほど前から初めてKotlinとAndroidStudioを使ってみて、なんとなく初歩的な部分がわかってきたかなと思うのでメモ代わりに記事書きます。
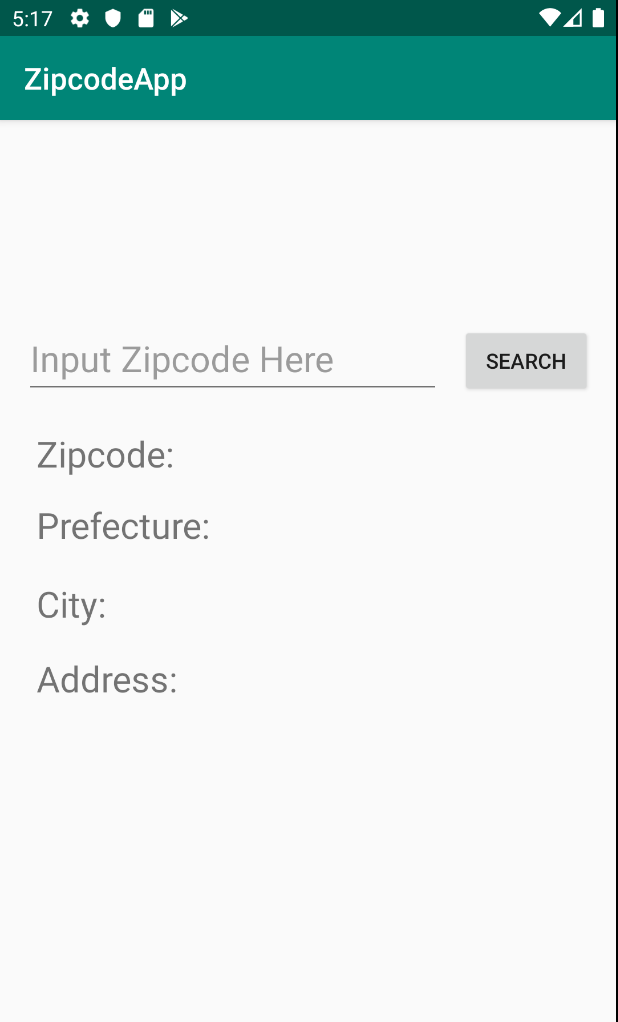
今回作ってみたのは郵便番号から住所を取得するアプリです。
郵便番号をテキストボックスに入力してSEARCHボタンを押下すると住所情報が取得できるというものです。
画面のレイアウトを整えてみる
画面のレイアウトはapp/res/layoutフォルダ内にあるactivity_main.xmlで整えます。
今回作りたいアプリケーションに必要な部品は
1.郵便番号を入力するためのEditText
2.入力された郵便番号を表示するためのTextView
3.郵便番号から住所を検索するためのButton
4.検索結果を表示するためのTextViewが3つ
です。
ごちゃごちゃいじってみてこんな感じになりました
<?xml version="1.0" encoding="utf-8"?>
<androidx.constraintlayout.widget.ConstraintLayout
        xmlns:android="http://schemas.android.com/apk/res/android"
        xmlns:tools="http://schemas.android.com/tools"
        xmlns:app="http://schemas.android.com/apk/res-auto"
        android:layout_width="match_parent"
        android:layout_height="match_parent"
        tools:context=".MainActivity">

    <EditText
            android:layout_width="wrap_content"
            android:layout_height="wrap_content"
            android:inputType="textPersonName"
            android:ems="10"
            android:id="@+id/editText"
            app:layout_constraintStart_toStartOf="parent" android:layout_marginLeft="8dp"
            android:layout_marginStart="8dp" app:layout_constraintEnd_toStartOf="@+id/button"
            android:layout_marginEnd="8dp" android:layout_marginRight="8dp"
            android:layout_marginBottom="8dp"
            android:hint="Input Zipcode Here"
            app:layout_constraintBottom_toBottomOf="parent" android:textSize="24sp" android:layout_marginTop="8dp"
            app:layout_constraintTop_toTopOf="parent" app:layout_constraintHorizontal_bias="0.615"
            app:layout_constraintVertical_bias="0.234"/>

    <Button
            android:text="Search"
            android:layout_width="wrap_content"
            android:layout_height="wrap_content"
            android:id="@+id/button"
            app:layout_constraintEnd_toEndOf="parent" android:layout_marginEnd="16dp" android:layout_marginRight="16dp"
            android:layout_marginTop="8dp" app:layout_constraintTop_toTopOf="parent" android:layout_marginBottom="8dp"
            app:layout_constraintBottom_toBottomOf="parent" app:layout_constraintVertical_bias="0.239"/>

    <TextView
            android:text="Zipcode: "
            android:layout_width="wrap_content"
            android:layout_height="wrap_content"
            android:id="@+id/zipText" android:layout_marginTop="20dp"
            app:layout_constraintTop_toBottomOf="@+id/editText" app:layout_constraintStart_toStartOf="@+id/editText"
            android:layout_marginLeft="8dp" android:layout_marginStart="8dp" android:textSize="24sp"/>

    <TextView
            android:layout_width="wrap_content"
            android:layout_height="wrap_content"
            android:text="Prefecture:"
            app:layout_constraintBottom_toBottomOf="parent"
            app:layout_constraintLeft_toLeftOf="parent"
            app:layout_constraintRight_toRightOf="parent"
            android:id="@+id/Prefecture"
            app:layout_constraintHorizontal_bias="0.056" app:layout_constraintVertical_bias="0.022"
            android:layout_marginTop="8dp" app:layout_constraintTop_toBottomOf="@+id/zipText"
            app:layout_constraintStart_toStartOf="@+id/zipText"
            android:textSize="24sp"/>

    <TextView
            android:text="City:"
            android:layout_width="wrap_content"
            android:layout_height="wrap_content"
            android:id="@+id/City"
            app:layout_constraintStart_toStartOf="@+id/Prefecture"
            android:layout_marginTop="20dp"
            app:layout_constraintTop_toBottomOf="@+id/Prefecture" android:textSize="24sp"/>
    <TextView
            android:text="Address:"
            android:layout_width="wrap_content"
            android:layout_height="wrap_content"
            android:id="@+id/Address"
            app:layout_constraintBottom_toBottomOf="parent" android:layout_marginTop="8dp"
            app:layout_constraintTop_toBottomOf="@+id/City" app:layout_constraintStart_toStartOf="@+id/City"
            app:layout_constraintVertical_bias="0.043"
            android:textSize="24sp"/>

</androidx.constraintlayout.widget.ConstraintLayout>
これでとりあえず見た目はできました。
この段階でもテキストボックスに文字を書くことはできます。
画面のレイアウトが整ったので次はロジックの方を書いていきます。
coroutinesを使ってHTTP通信をしてみる
KotlinでのHTTP通信の方法はこの記事を参考にさせていただきました。
Android + Kotlin 1.3のcoroutines(Async, Await)でHTTP通信を非同期処理
今回は郵便番号から住所を取得したいのでこちらのAPIを使います。
郵便番号検索API
http://zipcloud.ibsnet.co.jp/api/search
このURLにzipcodeというパラメータを渡してあげれば住所を取得できるようです。
上の記事を参考にコードを書いていきます。
このままだと通信できず、HTTP通信を許可しなければならないようです。
Android 9(Pie)でHTTP通信を有効にする
上の記事を参考にnetwork_security_config.xmlを書きます。
今回は郵便番号検索APIを使用するのでドメインはzipcloud.ibsnet.co.jpとなります。
app/manifests/androidManifest.xmlに
<uses-permission android:name="android.permission.INTERNET" />
    <application
            :
            android:networkSecurityConfig="@xml/network_security_config">
と書けば通信ができるようになります。
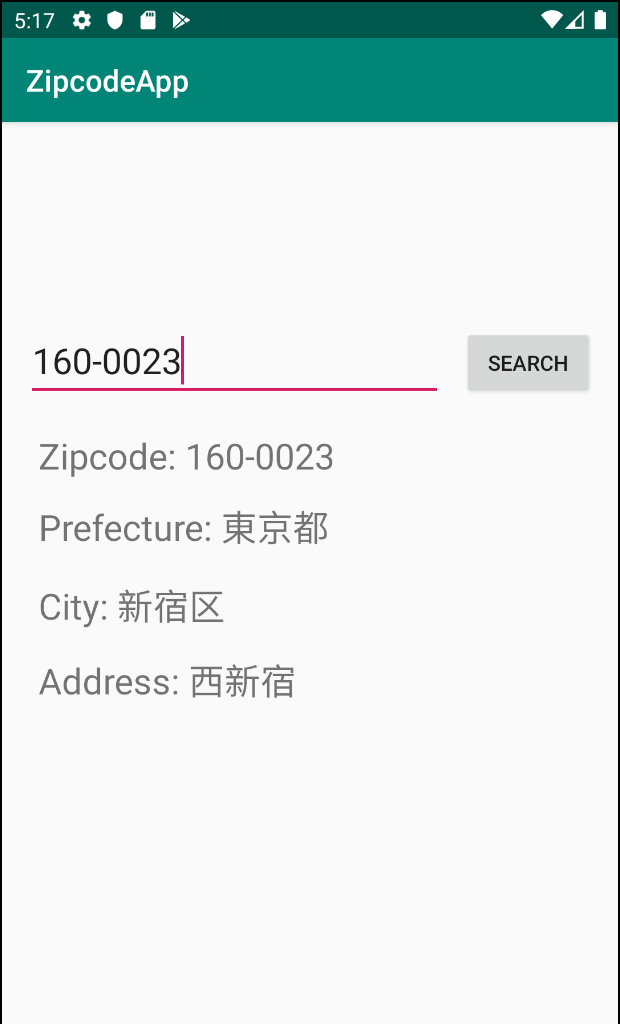
ここまでで値がちゃんと取れているか確認してみます。
class MainActivity : AppCompatActivity() {

    val URL = "http://zipcloud.ibsnet.co.jp/api/search?zipcode=1600023"

    override fun onCreate(savedInstanceState: Bundle?) {
        super.onCreate(savedInstanceState)
        setContentView(R.layout.activity_main)
        val getButton = findViewById(R.id.button) as Button
        getButton.setOnClickListener(object : View.OnClickListener {
            override
            fun onClick(view: View) {
                getAddress()
            }
        })
    }

    fun getAddress() = GlobalScope.launch(Dispatchers.Main) {
        val http = Http()
        async(Dispatchers.Default) { http.httpGetAddress(URL) }.await().let {
            val result = Json.parse(it).asObject()
            Log.d("TAG", "${result}")
        }
    }
}
とりあえずzipcodeはベタ書きで、resultをログに出力してみます。
エミュレーターを起動してSEARCHボタンを押してみましょう。
D/TAG: {"message":null,"results":[{"address1":"東京都","address2":"新宿区","address3":"西新宿","kana1":"トウキョウト","kana2":"シンジュクク","kana3":"ニシシンジュク","prefcode":"13","zipcode":"1600023"}],"status":200}
問題なく値が取得できているようです。
EditTextに入力された郵便番号から住所を取得する
先程のgetAddress()を少し書き換えてTextViewにSetTextしていきます。
    fun getAddress() = GlobalScope.launch(Dispatchers.Main) {
        val http = Http()
        async(Dispatchers.Default) { http.httpGetAddress(URL) }.await().let {
            val result = Json.parse(it).asObject()
            val Prefecture = findViewById(R.id.Prefecture) as TextView
            val City = findViewById(R.id.City) as TextView
            val Address = findViewById(R.id.Address) as TextView
            Prefecture.setText("Prefecture: " + result.get("results").asArray()[0].asObject().get("address1").asString())
            City.setText("City: " + result.get("results").asArray()[0].asObject().get("address2").asString())
            Address.setText("Address: " + result.get("results").asArray()[0].asObject().get("address3").asString())
        }
    }
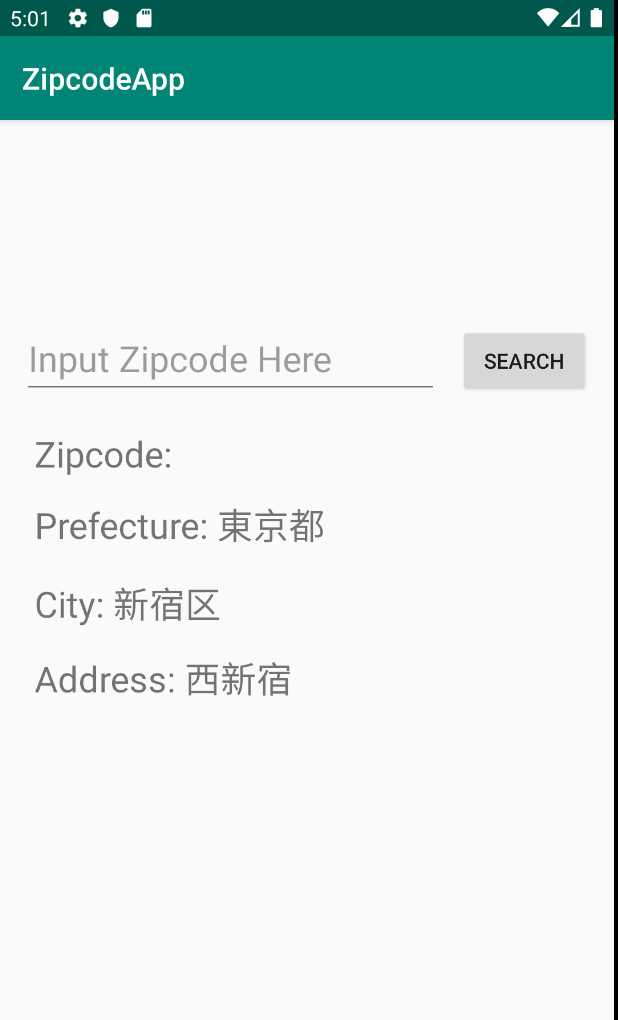
これで郵便番号から取得した値がそれぞれのTextViewに代入されました。
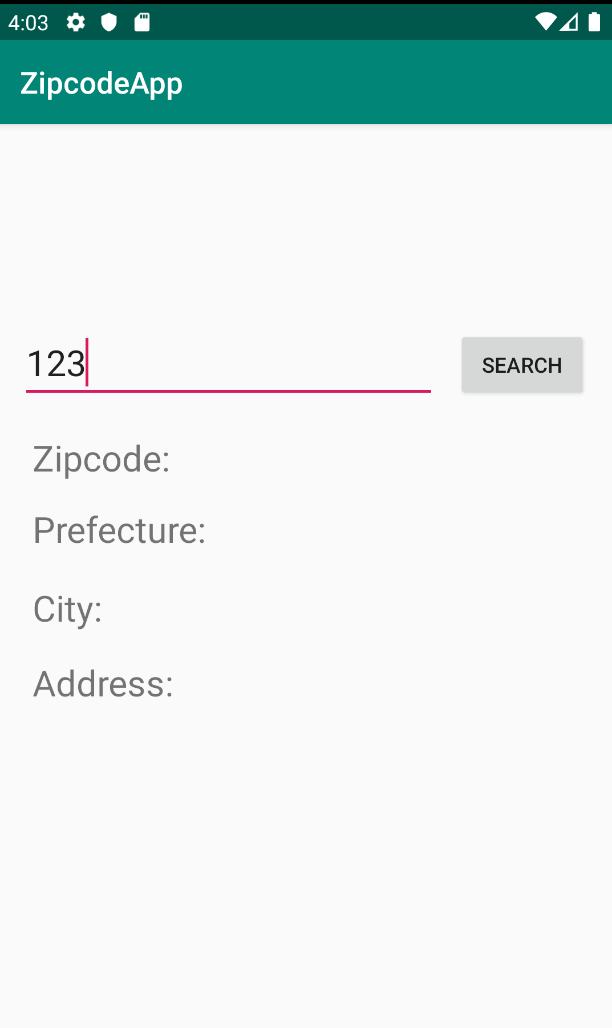
次にEditTextに入力された値をリアルタイムでTextViewに出力します。
やり方はこちらの記事を参考にしました。
android EditTextの入力内容をリアルタイムで取得する TextWatcher
    fun EditTextChange() {
        val getZipcode = findViewById(R.id.editText) as EditText
        getZipcode.addTextChangedListener(object : TextWatcher {
            override fun beforeTextChanged(s: CharSequence, start: Int, count: Int, after: Int) {
                //テキスト変更前の処理
            }

            override fun onTextChanged(s: CharSequence, start: Int, before: Int, count: Int) {
                //テキスト変更中の処理
            }

            override fun afterTextChanged(s: Editable) {
                //テキスト変更後の処理
                val zipText = findViewById(R.id.zipText) as TextView
                zipText.setText("Zipcode: " + s.toString())
            }
        })
    }
afterTextChangedでEditTextに入力された値をsetTextしています。
あとはベタ書きしていたzipcodeのところにEditTextで入力された値を入れるように書き換えれば完成です。
最終的なコードはこんな感じになりました。
import androidx.appcompat.app.AppCompatActivity
import android.os.Bundle
import android.text.Editable
import android.text.TextWatcher
import android.util.Log
import android.view.View
import android.widget.Button
import android.widget.EditText
import android.widget.TextView
import com.eclipsesource.json.Json
import kotlinx.coroutines.Dispatchers
import kotlinx.coroutines.GlobalScope
import kotlinx.coroutines.async
import kotlinx.coroutines.launch

class MainActivity : AppCompatActivity() {

    override fun onCreate(savedInstanceState: Bundle?) {
        super.onCreate(savedInstanceState)
        setContentView(R.layout.activity_main)

        //テキストに入力した文字がリアルタイムで表示される
        EditTextChange()

        val getButton = findViewById(R.id.button) as Button
        getButton.setOnClickListener(object : View.OnClickListener {
            override
            fun onClick(view: View) {
                val zipcode = findViewById(R.id.editText) as EditText
                val URL = "http://zipcloud.ibsnet.co.jp/api/search?zipcode=${zipcode.getText()}"
                getAddress(URL)
            }
        })

    }

    fun EditTextChange() {
        val getZipcode = findViewById(R.id.editText) as EditText
        getZipcode.addTextChangedListener(object : TextWatcher {
            override fun beforeTextChanged(s: CharSequence, start: Int, count: Int, after: Int) {
                //テキスト変更前の処理
            }

            override fun onTextChanged(s: CharSequence, start: Int, before: Int, count: Int) {
                //テキスト変更中の処理
            }

            override fun afterTextChanged(s: Editable) {
                //テキスト変更後の処理
                val zipText = findViewById(R.id.zipText) as TextView
                zipText.setText("Zipcode: " + s.toString())
            }
        })
    }

    fun getAddress(URL: String) = GlobalScope.launch(Dispatchers.Main) {
        val http = Http()
        try {
            async(Dispatchers.Default) {
                http.httpGetAddress(URL)
            }.await().let {
                val result = Json.parse(it).asObject()
                val Prefecture = findViewById(R.id.Prefecture) as TextView
                val City = findViewById(R.id.City) as TextView
                val Address = findViewById(R.id.Address) as TextView
                Prefecture.setText("Prefecture: " + result.get("results").asArray()[0].asObject().get("address1").asString())
                City.setText("City: " + result.get("results").asArray()[0].asObject().get("address2").asString())
                Address.setText("Address: " + result.get("results").asArray()[0].asObject().get("address3").asString())
            }
        } catch (e: UnsupportedOperationException) {
            //存在しない郵便番号のとき
            Log.d("[ERROR]", e.toString())
        }
    }
}
とりあえず動けばいいやって感じで作ったのでリファクタリングできる場所いっぱいありそうですね。
参考
Android + Kotlin 1.3のcoroutines(Async, Await)でHTTP通信を非同期処理
Android 9(Pie)でHTTP通信を有効にする
android EditTextの入力内容をリアルタイムで取得する TextWatcher