サーバー編からの続きです。https://qiita.com/ochiochi/items/dbf5040fd665326e8fb5
利用するパッケージの利用
今回、利用するZodとjotaiをインストールします。
>npm install zod
>npm install jotai
Zod はTypeScriptと親和性の高いスキーマ定義/バリデーションライブラリです。今回はバリデーションは行わずに、アプリケーション内でやり取りするデータの形を設定するために利用しています。
jotaiはReactと一緒に利用する状態管理ライブラリです。似たようなライブラリは沢山ありますが、jotaiはシンプルに利用できるので人気があります。(人気度的にはRecoilと二分する感じですが、そっちは最近、更新が無いです...。)
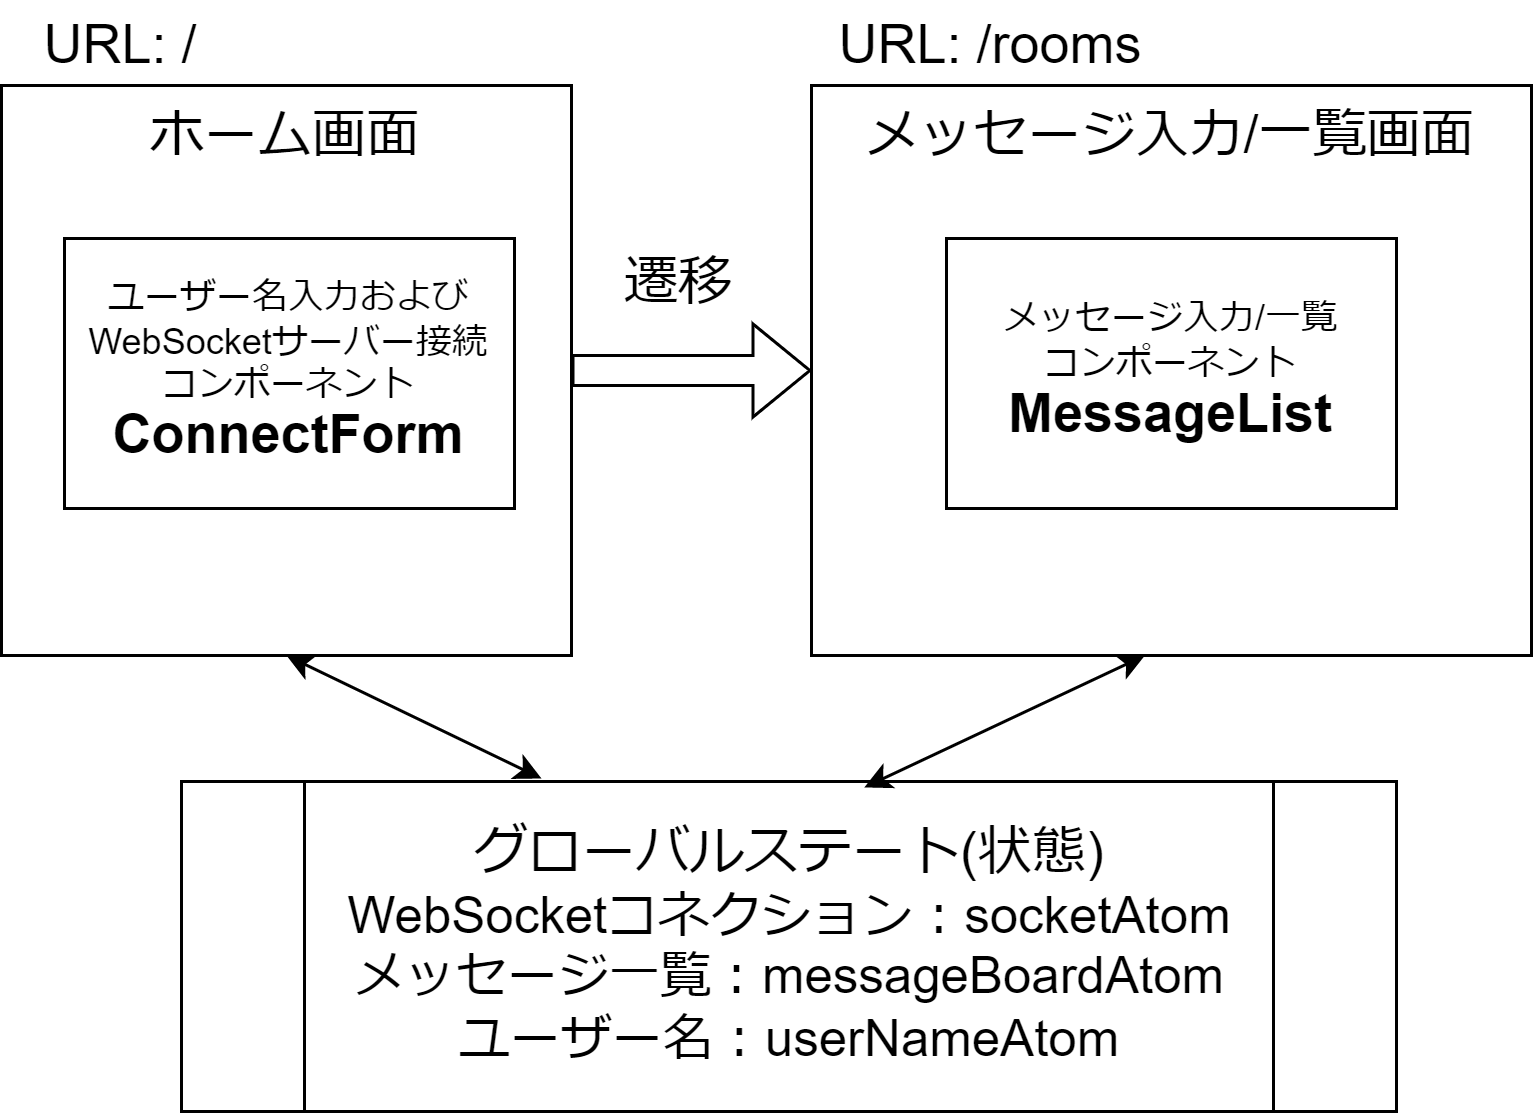
画面遷移とコンポーネント構造
ソースコード
クライアント側のコードを掲載します。この記事を読んで同じように作成したい場合は、コードブロック内の左肩にあるフォルダ名とファイル名に注目して作成してください。
import { atom } from 'jotai';
import { Socket } from 'socket.io-client';
import Message from '@/app/models/message';

// グローバルな状態を管理するためのatomを定義
//  atomはjotaiの機能で、状態を管理するためのもの

// 状態:WebSocketコネクション
export const socketAtom = atom(null as unknown as Socket);
// 状態:メッセージ一覧
export const messageBoardAtom = atom<Array<Message>>([]);
// 状態:ユーザー名
export const userNameAtom = atom('');
import {z} from 'zod';

// とりあえずZodを使ってアプリケーション内で
// やり取りするデータモデルを定義
// ※バリデーションルールは未定義です
const MessageSchemaDef = z.object({
  id: z.string(),
  room: z.number(),
  author: z.string(),
  body: z.string()
});

// Zodのデータモデルから型定義を生成
type Message = z.infer<typeof MessageSchemaDef>;
export default Message;
// コメントが記してある箇所だけ追加
import type { Metadata } from "next";
import { Inter } from "next/font/google";
import "./globals.css";
//jotaiからProviderコンポーネントをインポート
import { Provider } from "jotai";

const inter = Inter({ subsets: ["latin"] });

export const metadata: Metadata = {
  title: "Create Next App",
  description: "Generated by create next app",
};

export default function RootLayout({
  children,
}: {
  children: React.ReactNode;
}) {
  return (
    <html lang="ja">
      <body className={inter.className}>
        {/* jotaiのAtomを利用するためのProvider */}
        <Provider>{children}</Provider>
      </body>
    </html>
  );
}
@tailwind base;
@tailwind components;
@tailwind utilities;

/* 残りはすべて削除 */
'use client';
import { Suspense } from 'react';
import ConnectionForm from '@/app/components/ConnectForm';

// 最初に表示されるページコンポーネント
export default function Home() {
  return (
    <>
      <Suspense fallback="loading...">
        <ConnectionForm />
      </Suspense>
    </>
  );
}
'use client';
import { Suspense } from 'react';
import MessageList from '@/app/components/MessageList';

// メッセージの入力と一覧を行うページコンポーネント
export default function Rooms() {
  return (
    <Suspense fallback="loading...">
      <MessageList />
    </Suspense>
  );
}
'use client';

import { ChangeEventHandler, FormEventHandler } from 'react';
import { useRouter } from 'next/navigation';
import { useAtom } from 'jotai';
import { io } from 'socket.io-client';
import Message from '@/app/models/message';
import { messageBoardAtom, socketAtom, userNameAtom } from '@/app/globalStates/atoms';

// ユーザー名の入力とサーバーへの接続を行うコンポーネント
export default function ConnectionForm() {
  const [userName, setUserName] = useAtom(userNameAtom);
  const [, setMessageBoard] = useAtom(messageBoardAtom);
  const [, setSocket] = useAtom(socketAtom);
  const router = useRouter();

  // フォームの送信
  const handleSubmit: FormEventHandler<HTMLFormElement> = async (event) => {
    event.preventDefault();
    // WebSocketサーバーに接続するにはまずHTTPサーバーに接続してWebSocketのエンドポイントを取得する必要がある
    await fetch('http://localhost:3000/api/sockets', { method: 'POST' });
    // WebSocketサーバーに接続
    const socket = io({ autoConnect: false });
    socket.connect();
    // WebSocketの各イベントに対する処理を定義
    socketInitializer(socket);
    // グローバル状態にソケットを保存
    setSocket(socket);
    // メッセージ一覧ページに遷移
    router.push('/rooms');
  };
  const socketInitializer = (socket: any) => {
    // サーバーとの接続が確立したときの処理
    socket.on('connect', () => {
      console.log('Connected to the server');
    });
    // サーバーとの接続が切断されたときの処理
    socket.on('disconnect', () => {
      console.log('Disconnected from the server');
    });
    // サーバーからメッセージを受信したときの処理
    socket.on('message', (newMessage: Message) => {
      // グローバル状態のメッセージ一覧を更新
      setMessageBoard((messageBoard) => {
        // idが重複するメッセージを削除(一応の処理)
        const newMessageBoard = Array.from(new Map(messageBoard.map((message) => [message.id, message])).values());
        // 新しいメッセージを追加
        newMessageBoard.push(newMessage);
        return newMessageBoard;
      });
    });
  };
  // ユーザー名の入力
  const handleChange: ChangeEventHandler<HTMLInputElement> = (event) => {
    event.preventDefault();
    setUserName(event.target.value);
  };
  return (
    <>
      <form onSubmit={handleSubmit}>
        <input
          className="border border-gray-400 p-2"
          name="name"
          placeholder="enter your name"
          value={userName}
          onChange={handleChange}
          autoComplete={'off'}
        />
        <button className="bg-gray-500 hover:bg-gray-700 text-white font-bold py-2 px-4 rounded">Connect</button>
      </form>
    </>
  );
}
'use client';

import React, { FormEventHandler, useState } from 'react';
import Message from '@/app/models/message';
import { useAtom } from 'jotai';
import { messageBoardAtom, socketAtom, userNameAtom } from '@/app/globalStates/atoms';

// メッセージの入力と一覧を行うコンポーネント
export default function MessageList() {
  const [message, setMessage] = useState<string>('');
  // 各グローバル状態のAtomを用意
  const [messageBoard] = useAtom(messageBoardAtom);
  const [userName] = useAtom(userNameAtom);
  const [socket] = useAtom(socketAtom);

  // メッセージの送信
  const handleSubmit: FormEventHandler<HTMLFormElement> = (event) => {
    event.preventDefault();
    // 送信するメッセージを作成
    const sendMessage: Message = {
      id: crypto.randomUUID(),    // UUIDを生成して各メッセージに固有のIDを付与
      room: 1,
      author: userName,
      body: message,
    };
    // サーバーにメッセージを送信
    socket.emit('message', sendMessage);
    // メッセージ入力欄を空にする
    setMessage('');
  };

  return (
    <>
      <section>
        <form onSubmit={handleSubmit}>
          {/* メッセージ本文の入力欄 */}
          <input
            className="border border-gray-400 p-2"
            name="message"
            placeholder="enter your message"
            value={message}
            onChange={(e) => setMessage(e.target.value)}
            autoComplete={'off'}
          />
          {/* メッセージ送信ボタン */}
          <button className="bg-blue-500 hover:bg-blue-700 text-white font-bold py-2 px-4 rounded">Send</button>
        </form>
      </section>
      <section>
        <ul>
          {/* メッセージ一覧を表示 */}
          {messageBoard.map((message: Message) => (
            <li key={message.id}>{message.author}:{message.body}</li>
          ))}
        </ul>
      </section>
    </>
  );
}
コードのポイント
作成するすべてのコンポーネントはuse clientを使って、クライアント側のコンポーネントとして作成しています。WebSocketはクライアント同士の相互通信を行うためのものですので、今回作成するコードは、サーバー側ではなくクライアント側で動作させる必要があります。
WebSocketサーバーへの接続は、ConnectionFormコンポーネント内でConnectボタンを押下した際に行うようにしています。接続する際にはまずHTTPで接続をしてから、WebSocketサーバーへの接続を確立するように書く必要があります。これはWebSocketは、HTTP接続からスライドする形で接続するプロトコルだからです。
// まずはサーバーサイドにHTTPで接続
await fetch('http://localhost:3000/api/sockets', { method: 'POST' });
// そしてWebSocketサーバーに接続
const socket = io({ autoConnect: false });
socket.connect();
状態管理ライブラリのjotaiは、簡単に書くと次のように使います。
//atom関数に皆で共有したい値を渡しatom(皆で共有できる状態)にする
const counterAtom = atom(0);
//useAtom関数にatomを渡し、状態(とそれを変更する関数)を取り出す
const [count, setCounter] = useAtom(counterAtom);
// あとは普通に使うだけ
const onClick = () => setCounter(count => count + 1);
return (
  <div>
    <h1>{count}</h1>
    <button onClick={onClick}>カウントアップ</button>
  </div>
)
jotaiのatomを利用したいコンポーネントは、Provider コンポーネントの子孫要素にします。Providerはjotaiにおいては必須ではありませんが、こういうのもあるよという紹介代わりに使っておきます。
<Provider>
  {children} {/* ←子孫コンポーネント */}
</Provider>
このjotaiを使って、今回はWebSocketとの接続情報(socketAtom)や、メッセージ一覧(messageBoardAtom)、ユーザー名(userNameAtom)を、各コンポーネントで共有するグローバルな状態として用意しています。
WebSocketクライアント(自分自身および他のクライアント)から送信されたメッセージは、すべてmessageイベントで処理しています。このイベントが発生すると、新しく届けられたメッセージをグローバル状態であるメッセージ一覧に追加しています。
// サーバーからメッセージを受信したときの処理
socket.on('message', (newMessage: Message) => {
  // グローバル状態のメッセージ一覧を更新
  setMessageBoard((messageBoard) => {
    // idが重複するメッセージを削除(一応の処理)
    const newMessageBoard = Array.from(new Map(messageBoard.map((message) => [message.id, message])).values());
    // 新しいメッセージを追加
    newMessageBoard.push(newMessage);
    return newMessageBoard;
  });
});
上記のコード内では、idが重複するメッセージをまとめてしまう処理をMap(データの集合を扱うオブジェクトの一つ)を使って行っています。基本的に必要ないはずですが、念のためにいれています。(単なるロジックを書く練習だと思ってください。)
原理としては、Mapは同じキーのデータを重複して持つ事はできない事を利用しています。
messageBoard.map((message) => [message.id, message])で、メッセージ一覧内の個々のデータを、map関数を使って{id:'idの値', 残りのプロパティ}から['idの値',元々の個々のデータ]といった形式に変形しています。そしてこの形式のデータが入った配列をnew Map()に渡すと、['idの値',元々の個々のデータ]の最初の要素('idの値')がMapに登録する際のキーとなり、次の要素(元々の個々のデータ)がそのキーに紐づく値となります。idをキーとしてデータをMapに登録しているので、同じIDを持つデータが存在できないという寸法です。
送信するメッセージには、個別の識別子としてUUIDで生成した文字列を付与しています。UUIDは最近のブラウザでは他のライブラリを利用せずとも組み込みのメソッドであるcrypto.randomUUID()と記述するだけで生成できるようです。
// 送信するメッセージを作成
const sendMessage: Message = {
  id: crypto.randomUUID(),    // UUIDを生成して各メッセージに固有のIDを付与
  room: 1,
  author: userName,
  body: message,
};
コードの説明は以上です。
アプリケーションの起動
下記のコマンドでWebSocketサーバーとWebSocketクライアントの双方を起動できます。
npm run dev
ブラウザのタブを複数枚開き、それぞれでhttp://localhost:3000にアクセスすると一人チャットが堪能できます。(寂しいクリスマスにうってつけです!)
それではまた!