はじめに
- Asciidocでドキュメントを作成することになり、自分の端末上でVSCodeの環境を整えた際のメモ
- 参考にした情報(どれも丁寧な説明で以下を参照すれば基本的に対応できる)
-
Asciidoctor Docs --Install Using Ruby Packaging
※asciidoctor(gem)のインストールまでの手順として参照 -
Windows上のVisual Studio Codeで、AsciiDocのプレビュー環境の構築
※その他のツールの導入や設定、プレビューの確認の手順として参照 -
Windows上のVisual Studio Codeで、AsciiDocからPDF出力
※PDF出力のための設定手順を参照 -
Asciidoctor Docs --Custom Fonts
※PDF出力のための設定手順を参照 -
asciidoctor-pdfでかっこいいPDFを作る(1)
※PDF出力する際のフォント指定の手順として参照 -
AsciiDoc を PDF 化する時の日本語フォントを指定する
※PDF出力する際のフォント指定の手順として参照
-
Asciidoctor Docs --Install Using Ruby Packaging
- 環境
- Windows 10(そろそろ11に上げる予定)
概要
手順
- Chocolateyのインストール
- rubyのインストール
- asciidoctor (gem)のインストール
- 各種アプリのインストール
- rubyのモジュールインストール
- VSCode拡張機能のインストール
- Visual Studio Codeの設定
- フォントの設定(PDF生成用)
導入したもの
- 各種アプリ
- vscode
- graphviz
- correttojdk
- rubyモジュール *[asciidoctor (gem)のインストール]で一括で導入してもよかったかも
- asciidoctor-diagram
- asciidoctor-pdf
-
asciidoctor-pdf-cjkメンテナンス終了のため利用しないほうがいい - coderay
- VSCode拡張機能
- joaompinto.asciidoctor-vscode
- ms-ceintl.vscode-language-pack-ja
ログ・メモ
基本的には[はじめに]に記載した情報を参照すればできる。以下は自分が作業内容を記録・再利用できるようにメモに起こしたもの。
Chocolateyのインストール
- 以下のサイトにアクセスし、[Install Chocolatey for Individual Use:]セクションに記載されているコマンドをコピー
- 自分の端末のPowerShellを管理者権限で起動し、コピーしたコマンドをペーストして実行
PS C:\WINDOWS\system32> Set-ExecutionPolicy Bypass -Scope Process -Force; [System.Net.ServicePointManager]::SecurityProtocol = [System.Net.ServicePointManager]::SecurityProtocol -bor 3072; iex ((New-Object System.Net.WebClient).DownloadString('https://community.chocolatey.org/install.ps1'))                                                                     Forcing web requests to allow TLS v1.2 (Required for requests to Chocolatey.org)
Getting latest version of the Chocolatey package for download.
Not using proxy.
Getting Chocolatey from https://community.chocolatey.org/api/v2/package/chocolatey/1.1.0.
Downloading https://community.chocolatey.org/api/v2/package/chocolatey/1.1.0 to C:\Users\HANAKO~1\AppData\Local\Temp\chocolatey\chocoInstall\chocolatey.zip
Not using proxy.
Extracting C:\Users\HANAKO~1\AppData\Local\Temp\chocolatey\chocoInstall\chocolatey.zip to C:\Users\HANAKO~1\AppData\Local\Temp\chocolatey\chocoInstall
Installing Chocolatey on the local machine
Creating ChocolateyInstall as an environment variable (targeting 'Machine')
  Setting ChocolateyInstall to 'C:\ProgramData\chocolatey'
WARNING: It's very likely you will need to close and reopen your shell
  before you can use choco.
Restricting write permissions to Administrators
We are setting up the Chocolatey package repository.
The packages themselves go to 'C:\ProgramData\chocolatey\lib'
  (i.e. C:\ProgramData\chocolatey\lib\yourPackageName).
A shim file for the command line goes to 'C:\ProgramData\chocolatey\bin'
  and points to an executable in 'C:\ProgramData\chocolatey\lib\yourPackageName'.

Creating Chocolatey folders if they do not already exist.

WARNING: You can safely ignore errors related to missing log files when
  upgrading from a version of Chocolatey less than 0.9.9.
  'Batch file could not be found' is also safe to ignore.
  'The system cannot find the file specified' - also safe.
chocolatey.nupkg file not installed in lib.
 Attempting to locate it from bootstrapper.
PATH environment variable does not have C:\ProgramData\chocolatey\bin in it. Adding...
警告: Not setting tab completion: Profile file does not exist at
'C:\Users\HANAKOYAMADA\Documents\WindowsPowerShell\Microsoft.PowerShell_profile.ps1'.
Chocolatey (choco.exe) is now ready.
You can call choco from anywhere, command line or powershell by typing choco.
Run choco /? for a list of functions.
You may need to shut down and restart powershell and/or consoles
 first prior to using choco.
Ensuring Chocolatey commands are on the path
Ensuring chocolatey.nupkg is in the lib folder
PS C:\WINDOWS\system32>
必要なモジュールのインストール
- コマンドプロンプトを管理者権限で起動
ruby
- rubyをインストールする
choco install rubyrefreshenvruby -v
c:\>choco install ruby
Chocolatey v1.1.0
Installing the following packages:
ruby
By installing, you accept licenses for the packages.
Progress: Downloading ruby.install 3.1.2.1... 100%
Progress: Downloading ruby 3.1.2.1... 100%

ruby.install v3.1.2.1 [Approved]
ruby.install package files install completed. Performing other installation steps.
The package ruby.install wants to run 'chocolateyInstall.ps1'.
Note: If you don't run this script, the installation will fail.
Note: To confirm automatically next time, use '-y' or consider:
choco feature enable -n allowGlobalConfirmation
Do you want to run the script?([Y]es/[A]ll - yes to all/[N]o/[P]rint): Y

Ruby is going to be installed in 'C:\tools\ruby31'
Installing 64-bit ruby.install...
ruby.install has been installed.
  ruby.install can be automatically uninstalled.
Environment Vars (like PATH) have changed. Close/reopen your shell to
 see the changes (or in powershell/cmd.exe just type `refreshenv`).
 The install of ruby.install was successful.
  Software installed to 'C:\tools\ruby31\'

ruby v3.1.2.1 [Approved]
ruby package files install completed. Performing other installation steps.
 The install of ruby was successful.
  Software installed to 'C:\ProgramData\chocolatey\lib\ruby'

Chocolatey installed 2/2 packages.
 See the log for details (C:\ProgramData\chocolatey\logs\chocolatey.log).

c:\>
c:\>refreshenv
Refreshing environment variables from registry for cmd.exe. Please wait...Finished..

c:\>
c:\>ruby -v
ruby 3.1.2p20 (2022-04-12 revision 4491bb740a) [x64-mingw-ucrt]

c:\>
asciidoctor (gem)のインストール
-
Gemfileを用意し、適切なディレクトリに配置
-
Gemfileを配置したディレクトリに移動し、bundleコマンドを実行
c:\>cd mywork
c:\mywork>bundle
Fetching gem metadata from https://rubygems.org/........
Resolving dependencies...
Using bundler 2.3.7
Fetching asciidoctor 2.0.17
Installing asciidoctor 2.0.17
Bundle complete! 1 Gemfile dependency, 2 gems now installed.
Use `bundle info [gemname]` to see where a bundled gem is installed.

c:\mywork>
各種アプリのインストール
- 以下のブログで紹介されていたツールは入れておくことに
- 各種アプリケーションのインストール(管理者権限で起動したコマンドプロンプト)
choco install vscode -ychoco install graphviz -ychoco install correttojdk -y
rubyのモジュールインストール
- 以下のブログで紹介されていたモジュールは入れておくことに(最初のGemfileでまとめてしまってもよかったかも)
- gemインストール(管理者権限で起動したコマンドプロンプト)
gem install asciidoctor-diagramgem install --pre asciidoctor-pdfgem install asciidoctor-pdf-cjkgem install coderay
VSCode拡張機能のインストール
- 以下のブログで紹介されていたモジュールは入れておくことに
- インストール(管理者権限で起動したコマンドプロンプト)
code --install-extension joaompinto.asciidoctor-vscodecode --install-extension ms-ceintl.vscode-language-pack-ja
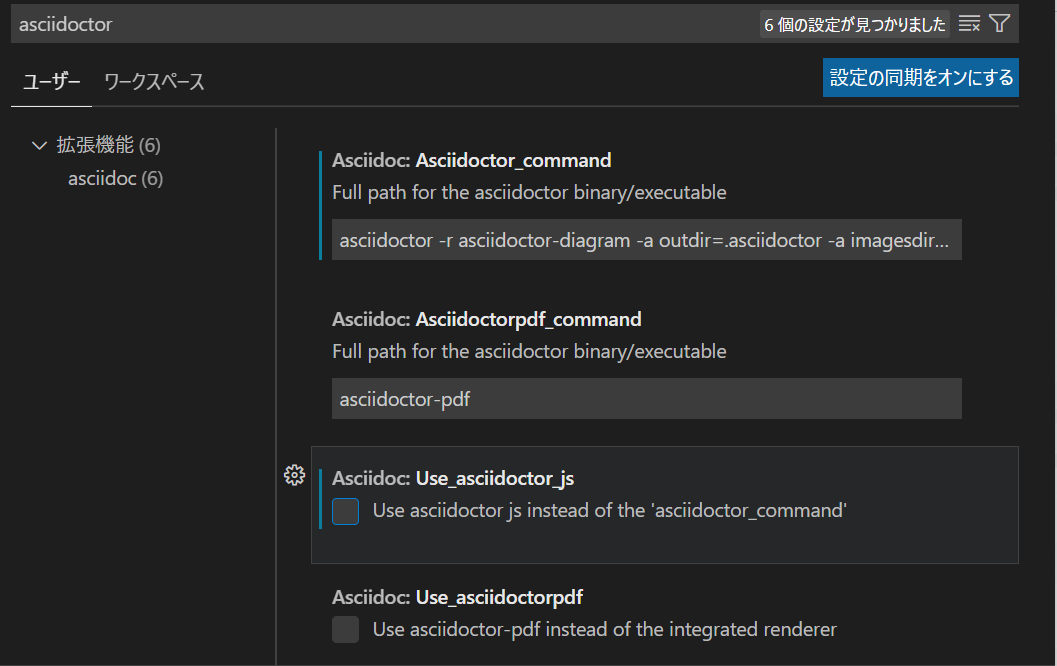
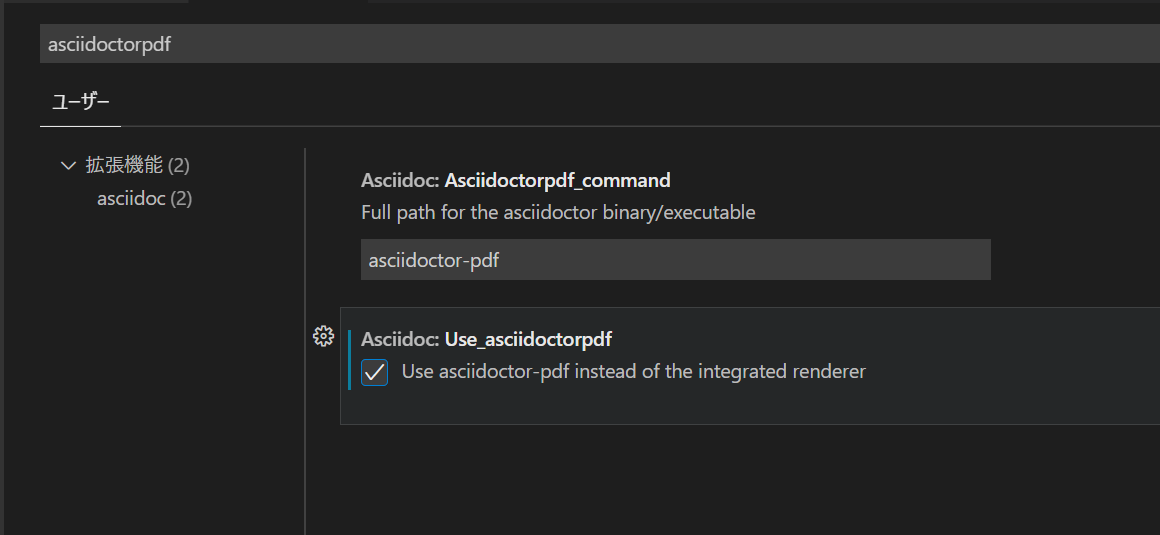
Visual Studio Codeの設定
Asciidoc - Use_asciidoctor_jsのオフ、および、Use_asciidoctorpdfのオン
- 以下のブログの「Visual Studio Codeの設定」の対応を踏襲
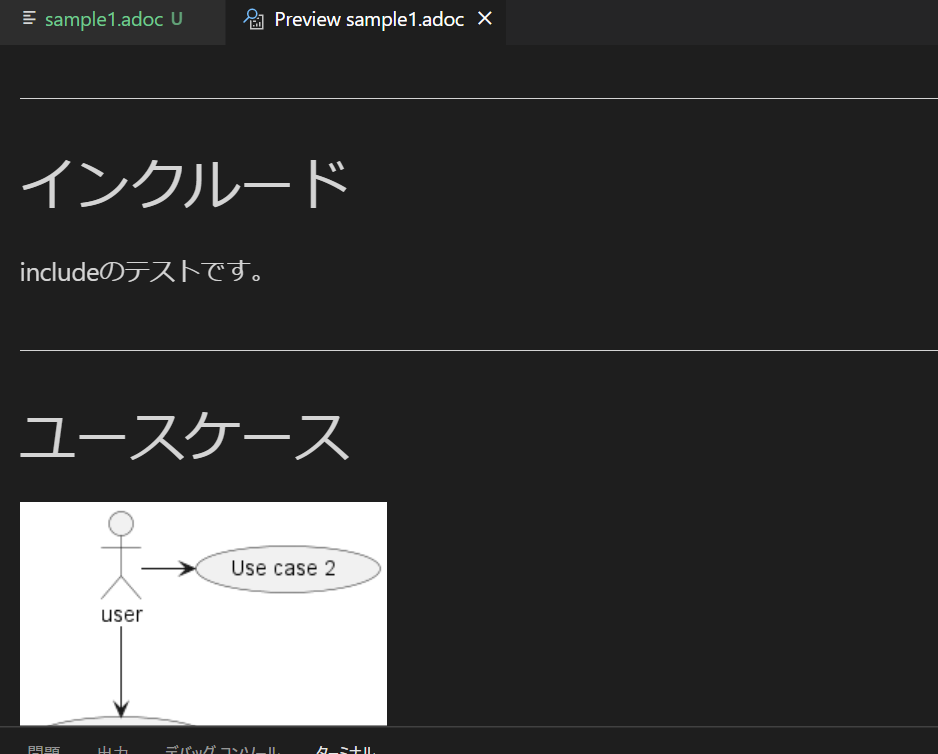
Visual Studio Codeの動作確認
プレビュー機能
- 以下のブログの「プレビュー」の対応を踏襲
フォントの設定(PDF用)
カスタムフォントとして、今回はIBM Plexを利用します
フォントの設定手順は以下が必要
- ttf のフォントを入手
- theme.ymlでフォントを指定
- asciidoctor-pdf の引数でスタイルファイルとフォントのディレクトリを指定しPDF生成
ttfフォントの入手と配置
- 以下の「TrueType.zip」をダウンロードし、zipを展開
- 展開した「IBM-Plex-Sans-JP\hinted」フォルダーの中身を以下(2箇所)にコピー
- C:\tools\ruby31\lib\ruby\gems\3.1.0\gems\asciidoctor-pdf-2.1.2\data\fonts
- 作業ディレクトリのサブディレクトリ(
./IBMPlexSansJPなど)
スタイルフォントでのフォント指定
- 下記の「default-theme.yml」ダウンロードしと作業ディレクトリへの配置
- 名前を「my-theme.yml」に編集
- ymlファイルを編集
- [font]->[catalog]に追加のフォントを指定
- [base]->[font_family]にcustom fontを指定
- [font]->[catalog]に追加のフォントを指定
※[font]->[catalog]に追加のフォントを指定
font:
  catalog:
    # Noto Serif supports Latin, Latin-1 Supplement, Latin Extended-A, Greek, Cyrillic, Vietnamese & an assortment of symbols
    Noto Serif:
      normal: GEM_FONTS_DIR/notoserif-regular-subset.ttf
      bold: GEM_FONTS_DIR/notoserif-bold-subset.ttf
      italic: GEM_FONTS_DIR/notoserif-italic-subset.ttf
      bold_italic: GEM_FONTS_DIR/notoserif-bold_italic-subset.ttf
    # M+ 1mn supports ASCII and the circled numbers used for conums
    M+ 1mn:
      normal: GEM_FONTS_DIR/mplus1mn-regular-subset.ttf
      bold: GEM_FONTS_DIR/mplus1mn-bold-subset.ttf
      italic: GEM_FONTS_DIR/mplus1mn-italic-subset.ttf
      bold_italic: GEM_FONTS_DIR/mplus1mn-bold_italic-subset.ttf
    # IBMPlexSansJP -- custom font
    IBMPlexSansJP:
      normal: GEM_FONTS_DIR/IBMPlexSansJP-Regular.ttf
      bold: GEM_FONTS_DIR/IBMPlexSansJP-Bold.ttf
      italic: GEM_FONTS_DIR/IBMPlexSansJP-Light.ttf
      bold_italic: GEM_FONTS_DIR/IBMPlexSansJP-SemiBold.ttf
※[base]->[font_family]にcustom fontを指定
base:
  text_align: justify
  # color as hex string (leading # is optional)
  font_color: 333333
  # color as RGB array
  #font_color: [51, 51, 51]
  # color as CMYK array (approximated)
  #font_color: [0, 0, 0, 0.92]
  #font_color: [0, 0, 0, 92%]
#  font_family: Noto Serif
  font_family: IBMPlexSansJP
PDF出力
- 作業ディレクトリで以下を実行(コマンドプロンプト)
- このときのファイルの配置
C:\mywork\faq.adocC:\mywork\my-theme.ymlC:\mywork\IBMPlexSansJP\IBMPlexSansJP-*.ttf
- このときのファイルの配置
- コマンドについて
asciidoctor-pdf -a pdf-theme=basic-theme.yml -a pdf-fontsdir=path/to/fonts document.adoc
※実行例
C:\mywork> asciidoctor-pdf -a pdf-theme=my-theme.yml -a pdf-fontsdir=IBMPlexSansJP faq.adoc -o faq1.pdf

C:\mywork>
- adocファイル
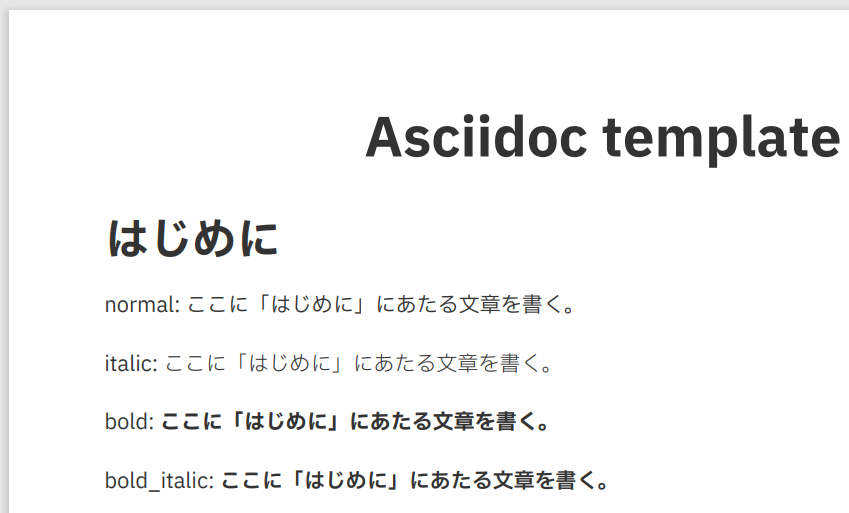
# Asciidoc template

== はじめに

normal: ここに「はじめに」にあたる文章を書く。

// italicによる強調は「_」で囲む
italic: _ここに「はじめに」にあたる文章を書く。_

// boldによる強調は「*」で囲む
bold: *ここに「はじめに」にあたる文章を書く。*

// bold_italicによる強調は「*_」で囲む
bold_italic: *_ここに「はじめに」にあたる文章を書く。_*
-
生成されたPDF
-
Italicになってない理由
- 公式サイトに「ブラウザのようにフォントを動的にイタリック化できないため、テキストをイタリック化するにはイタリック体のスタイルが必要」とあります。
Asciidoctor PDF cannot italicize a font dynamically like a browser can, so the italic styles are required to italicize text.
- IBM Plex SansのItalicはどこにある??
- 以下をみると、SansJPではなくてSansにはありそう
- 最近のリリースを参照し、v6.0.2のTrueType.zipをダウンロード
- IBM-Plex-Sansには以下のファイルがあるが、IBM-Plex-SansJPには相当するものがない
- IBMPlexSans-BoldItalic.ttf
- IBMPlexSans-Italic.ttf
- なので、、日本語でのItalic、BoldItalicは実装できないということになるのかな、、と理解。(上記のJPではないttfを指定してPDFを生成すると、日本語の場合は文字化けする)


さいごに
とりあえずAsciidocを書けるように整えた状況ですが、本来の場合、チームでドキュメントを作成する場合、theme.ymlの設定や利用するttfファイルの統一など、もう少しルールの整備が必要になると理解しました。
以上。