AWS Codestarがリリースされて少し経ちましたが、まだ東京リージョンには来ないですね。待ち遠しい。
Codestar自体は知っていたのですがAWSSummitTokyoで思った以上に便利そうな印象を受けたことと、LambdaのServerlessApplicationModel(SAM)を使ってみたくなったため、社内向けのbotのデプロイ作業をこれで置き換えてみました。
※2017/7/11現在、東京リージョンにはまだ来ていませんのでバージニアリージョンで試しています
これからやること
請求情報をSkypeへ毎日通知するBotを作成して、CodeStarでデプロイする。
前提
- LambdaFunctionのコード自体の説明はしません。
- 他のChatツールへの通知もLambdaのコードを多少書きかえればすぐできると思います。
手順
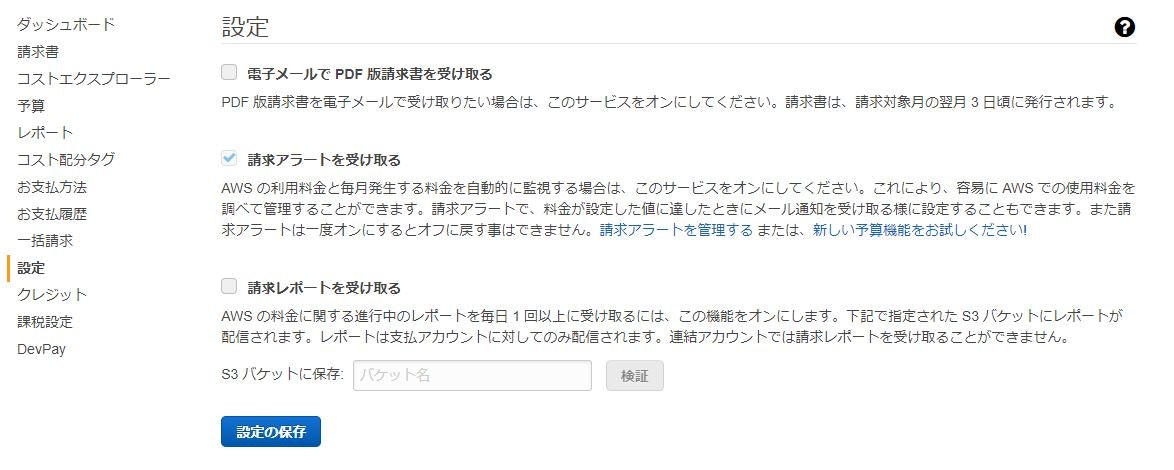
1. 請求情報を取得できるように設定を行う
右上のアカウントのプルダウンから「請求ダッシュボード」を選択。
左側のメニューの「設定」で、「請求アラートを受け取る」にチェックを入れる。
2. Codestarでプロジェクトを作成
a. マネジメントコンソールからCodeStarを開く
b. ポップアップでロールを作るか?という質問が出るので「yes」を選択。
裏で「aws-codestar-service-role」ロールが作られています。
(初回やったときにこれが出なくて権限エラーが出てはまりました・・)
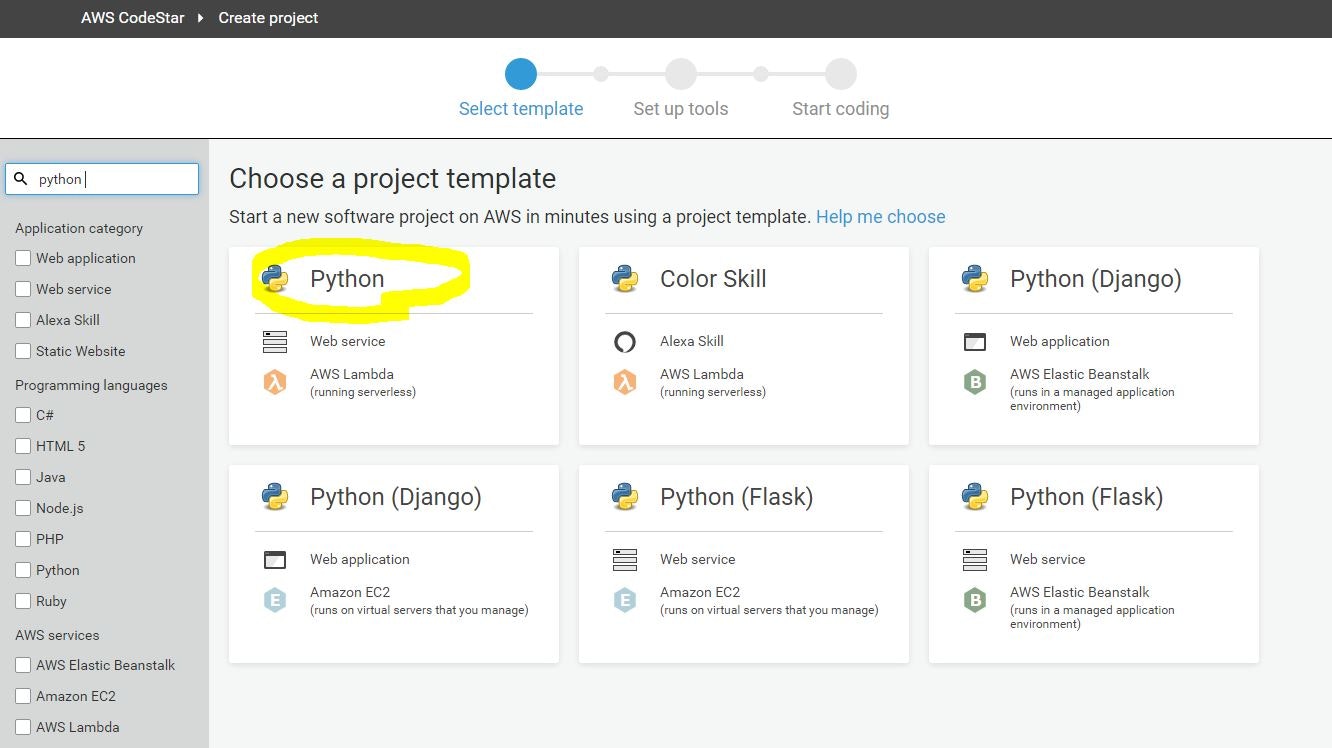
c. 「create new project」
d. pythonの新規プロジェクトを選択
e. プロジェクト名を「billing-bot」にして「create project」
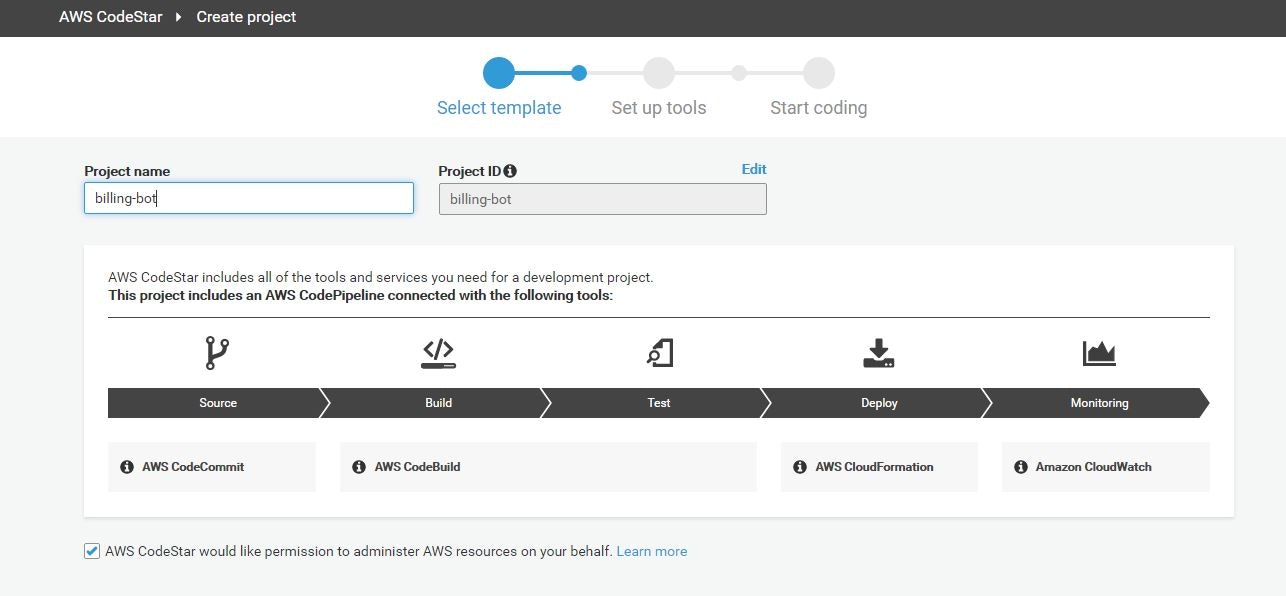
f. 開発ツールを選択する画面はSkipして完了。
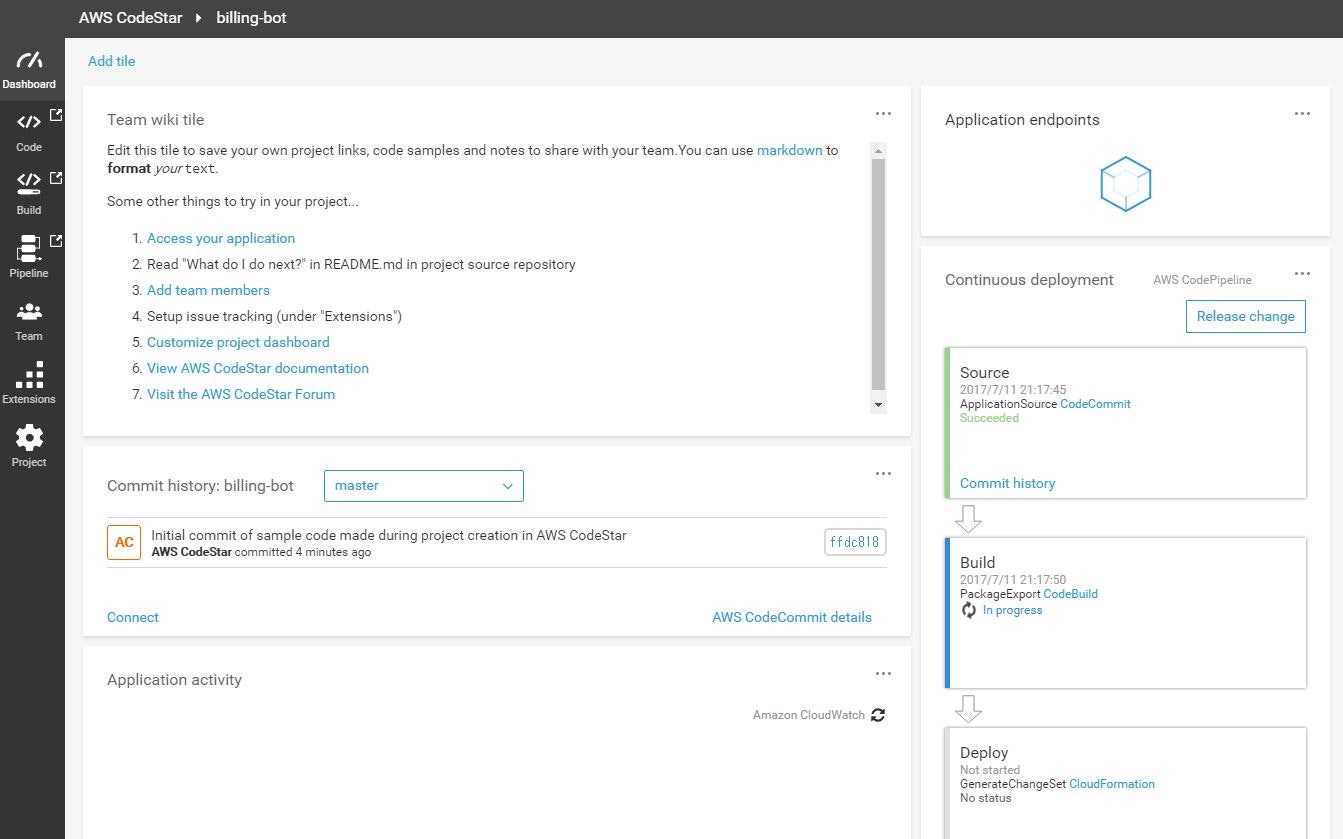
なんかかっこいい画面が出てきましたね。
3. CodeCommitからひな形となるファイルをclone
CodeCommitのgitリポジトリにはsshで接続するものとします。
a. マネジメントコンソールのIAMを開く。
b. ユーザ一覧から利用しているユーザを選択する。
c. 認証情報欄で[SSH公開キーのアップロード]を押して、公開鍵を張り付ける。
d. SSHキーIDが表示されるのでメモっておく。
e. SSHキーIDが覚えにくいのでCodeCommitの場合はこのsshキーを使うということをconfigに書いておく。 <SSH_KEY_ID>は自分のSSHキーIDに置き換えること。
$ cat ~/.ssh/config
Host git-codecommit.*.amazonaws.com
User <SSH_KEY_ID>
IdentityFile ~/.ssh/id_rsa
f. git cloneしてパスフレーズを入力するとcloneが実行される。
(cloneするURLはCodeCommitのページに行けば参照可能です。
$ git clone ssh://git-codecommit.us-east-1.amazonaws.com/v1/repos/<REPOSITORY_NAME>
Enter passphrase for key '*****/.ssh/id_rsa':
httpsでの接続の場合は下記手順 c の下のあたりに認証情報(ユーザ名、パスワード)を生成する手順がありましたので、それでできると思います
初期ファイルはこのようになっていました
$ cd <REPOSITORY_NAME>
$ find -type f | grep -v .git
./buildspec.yml
./index.py
./README.md
./template.yml
READMEに説明が書かれています(英語ですが)
- buildspec.yml - コードをパッケージングする方法を記載したCodeBuild用設定ファイル
- index.py - Lambdaの実行コード
- template.yml - LambdaとAPIGatewayにデプロイするためのSAMの設定ファイル
非常にわかりにくかったのですが、buildspec.ymlの中の
aws cloudformation package --template template.yml --s3-bucket $S3_BUCKET --output-template template-export.json
にてtemplate.ymlをtemplate-export.jsonに変換して出力されます。
そして、ServerlessApplicationModelでデプロイする際はtemplate-export.jsonを使用しているようです。
template.ymlではGetEvent/PostEventなどからも想像できるようにApiGatewayの設定も行われています。
4. 実行コードの作成
lambdaの実行コードを書いていきます。作成対象は以下の★がついている3つのファイルです。
index.pyはいらないので消しておいてもOKです
$ find  -type f | grep -v .git
./buildspec.yml
./README.md
./requirements.txt   ★
./src/billing_bot.py  ★
./src/skype_adapter.py ★
./template.yml
requests
pytz
# -*- coding: utf-8 -*-

from skype_adapter import SkypeAdapter
from datetime import datetime, timedelta

import boto3
import pytz
import os

def post_current_charges():

	startDate = datetime.today() - timedelta(days = 1)
	endDate = datetime.today()

	session = boto3.Session()
	client = session.client('cloudwatch')
	response = client.get_metric_statistics (
		MetricName = 'EstimatedCharges',
		Namespace  = 'AWS/Billing',
		Period	 = 86400,
		StartTime  = startDate,
		EndTime	= endDate,
		Statistics = ['Maximum'],
		Dimensions = [
			{
				'Name': 'Currency',
				'Value': 'USD'
			}
		]
	)

	maximum = response['Datapoints'][0]['Maximum']
	date = response['Datapoints'][0]['Timestamp'].strftime('%Y/%m/%d')

	roomid = os.environ['ROOM_ID']
	message = date + "時点でのAWS利用料は" + str(maximum) + "ドルです"
	print message

	SkypeAdapter().postConversation(roomid, message)

def lambda_handler(event, context):
	"""Lambda使う場合のエントリポイント"""
	post_current_charges()


if __name__ == "__main__":
	"""コマンド実行のエントリポイント"""
	post_current_charges()
# -*- coding: utf-8 -*-

import requests
import json
import os

class SkypeAdapter:
	""" Skypeに投稿するためのAdapterClass """

	def postConversation(self, roomid, message):
		""" Skypeへメッセージを投稿する """
		token = self.__auth()
		self.__post( token, roomid, message )

	def __auth(self):
		""" MicrosoftBotFrameworkのOAuthClient認証を行いaccess_tokenを取得する """

		headers = { 'Content-Type' : 'application/x-www-form-urlencoded' }
		data = {
			'grant_type' : 'client_credentials',
			'client_id' : os.environ['CLIENT_ID'],
			'client_secret' : os.environ['CLIENT_SECRET'],
			'scope' : 'https://graph.microsoft.com/.default'
		}

		access_token_response = requests.post( 'https://login.microsoftonline.com/common/oauth2/v2.0/token', headers=headers, data=data )

		if access_token_response.status_code != 200 :
			print access_token_response.headers
			print access_token_response.text
			raise StandardError('Skype OAuth Failed')

		tokens = json.loads(access_token_response.text)
		return tokens['access_token']

	def __post(self, token, roomid, message):
		""" MicrosoftBotFrameworkのチャット投稿用RESTAPIを叩く """

		headers = {
			'Authorization' : 'Bearer ' + token,
			'Content-Type' : 'application/json'
		}

		data = {
			'type' : 'message/text',
			'text' : message
		}

		url = 'https://api.skype.net/v3/conversations/' + roomid + '/activities/'

		response = requests.post( url, headers=headers, json=data)

		if response.status_code != 201 :
			print response.status_code
			print response.headers
			print response.text
			raise StandardError('Skype Post Failed')

		return
5. buildspec.yml
CodeBuildでの処理内容を定義するbuildspec.ymlを編集していきます。
installフェーズを追加して、pipを使って関連ライブラリの取得を行います。
version: 0.1

phases:
  install:
    commands:
      - pip install -r requirements.txt -t ./src
  build:
    commands:
      - aws cloudformation package --template template.yml --s3-bucket $S3_BUCKET --output-template template-export.json
artifacts:
  type: zip
  files:
    - template-export.json
ただ、これをCodeCommitにpushしてBuildを実行しても落ちました・・
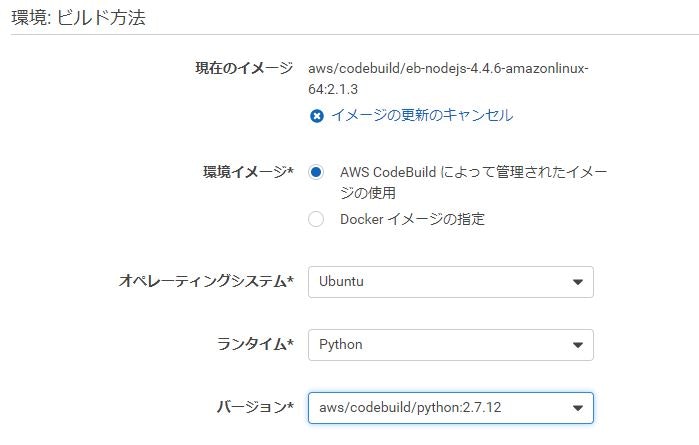
CodeBuildを詳しく見てみると、「ビルド環境」というもので実行環境のイメージを選択する部分があり、なぜか nodejs のイメージが選択されている!!!
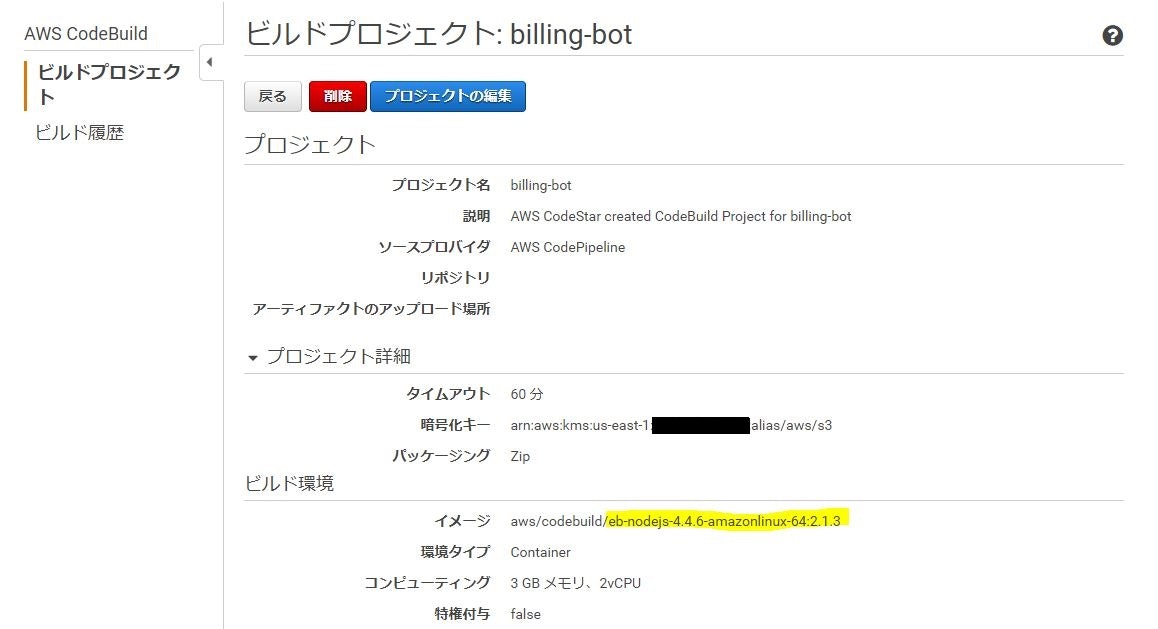
怒りを抑えて、python用のイメージに変えておきましょう。
6. template.ymlの設定
最後はLambdaをデプロイするためのtemplate.ymlです。
環境変数の部分は自分の環境にあったものを指定してください。アカウント取得方法は過去記事を参考に。
AWSTemplateFormatVersion: 2010-09-09
Transform:
- AWS::Serverless-2016-10-31
- AWS::CodeStar
Description: AWS利用料を通知するbot

Parameters:
  ProjectId:
    Type: String
    Description: CodeStar projectId used to associate new resources to team members

Resources:
  billingbot:
    Type: AWS::Serverless::Function
    Properties:
      Handler: billing_bot.lambda_handler
      Runtime: python2.7
      CodeUri: src
      Description: AWS利用料を通知するbot
      MemorySize: 128
      Timeout: 60
      Role: arn:aws:iam::860559588436:role/CodeStarWorker-billing-bot-Lambda
      Events:
        Schedule1:
          Type: Schedule
          Properties:
            Schedule: cron(0 1 * * ? *)
      Environment:
        Variables:
          CLIENT_SECRET: ********
          ROOM_ID: '19:*******@thread.skype'
          CLIENT_ID: *******
7. IAMロールに足りていない権限を付与
今回の用途に応じた権限をIAMのロールの設定画面から付与します。
- CloudFormationのロール:スケジュール実行用トリガ作成用にCloudWatchEventFullAccessが必要
- Lambdaのロール:請求情報を参照するためにCloudWatchReadOnlyAccessが必要
これらがないとビルドが当然ビルドは落ちます。
ここもはまりポイントでした。落ちてからじゃないとロールが作られていることにすら気づかなかったです。
ここも怒りを抑えてポチポチ設定。
8. CodeCommitにコードをpush
最後にこれらのコードをpushするとCodePipelineが動き出します。あとは、じっと待ちましょう。
9. テスト
Lambdaの画面を開いて、テスト!(パラメータは適当でいいです)
Skypeに通知が届けばテスト成功です!

あとは毎日朝10時に自動投稿してくれます。
感想
なんか遅い
- コードをCodeCommitにプッシュしてからのPipelineの起動に少し間が空く
- CodeCommitがInProgress状態になる(単にpushされただけなのに何が動いているのか不明)
逆にCodeBuildはDockerベースなのに思ったより早い。
完成度がまだ微妙
- CodeCommitはプルリクができなかったり
- CodeBuild用のDockerイメージがなぜかnodeJSで作られていたり
- 裏で勝手に作られているIAMロールに対して権限をつけることがわかりにくかったり
- (Cloudformationの機能ですが)失敗したときのデバッグ・リトライがつらかったり
と微妙なところも多いですが、トータルで見れば今後に期待が持てるサービスですね。