本記事の目的
2023年12月5日、ReactをつくったMeta社がスタイリングライブラリ「StyleX」の正式版を公開した。
フロントエンド業務経験のないエンジニアにもわかるように、
StyleXについて調べて得た知見を共有することを本記事の目的とした:

具体的には、以下の3️点について共有する:
- かんたんなStyleXの導入方法
- StyleXの使い方・コード例
- StyleXを使用した感想
類似記事
用語解説
CSS-in-JS
- Webページの見た目に関するスタイルを、従来のCSSファイルの代わりに、JavaScript内で定義し適用する手法
- CSSではページ全体に適用するのに対し、CSS-in-JSではスタイルをコンポーネントに適用する
- スタイルの衝突や名前空間汚染のリスクが低減され、プロジェクトの管理が容易になる
StyleXの紹介
高速性について
-
コンパイル時に静的なCSSファイルへバンドル
- すべてのスタイルを1つのCSSファイルにまとめ上げる
- ブラウザがページを読み込む際に追加のスタイル計算が不要になり、読み込み時間が短縮される
- すべてのスタイルを1つのCSSファイルにまとめ上げる
-
実行時にクラス名の組み合わせを最適化
- 生成された静的CSSファイルが必要なスタイルのみを含むように最適化されている
- 実行時のパフォーマンスが向上する
- 生成された静的CSSファイルが必要なスタイルのみを含むように最適化されている
スケーラビリティに対するアプローチ
-
Atomic CSSの採用
- Atomic CSSの原則に従い、スタイルを最小の単位に分解する
- 重複するスタイルの削減とCSS全体のサイズの縮小を実現する
- 大規模なプロジェクトでも管理しやすくなる
- Atomic CSSの原則に従い、スタイルを最小の単位に分解する
-
コードベースの成長に対応
- プロジェクトの規模が拡大しても、スタイルの読みやすさと保守のしやすさを維持できる
予測可能性の確保
-
要素固有のスタイル適用
- クラス名を使って特定の要素に直接スタイルを適用する
- 意図しないスタイルの衝突を防ぎ、CSSの特異性による問題を解消できる
- クラス名を使って特定の要素に直接スタイルを適用する
-
スタイルの優先順位が明確
- 「最後に適用されたスタイルが勝つ」という原則がある
- スタイルの適用順序が直感的に理解でき、予測可能になる
- 「最後に適用されたスタイルが勝つ」という原則がある
組み合わせやすさの向上
-
条件付きスタイルの適用
- 状況に応じてスタイルを動的に変更することができる
- 同じコンポーネントでも異なるスタイルを適用できるようになる
- 状況に応じてスタイルを動的に変更することができる
-
スタイルの再利用
- ローカル定数や式を使用してスタイルを定義できる
- スタイルの重複を避けつつ、必要に応じて再利用できるようになる
- パフォーマンスの懸念なくスタイルを繰り返し使用することができる
- ローカル定数や式を使用してスタイルを定義できる
その他
-
型安全性
- TypeScriptやFlowを利用することで、スタイルプロパティの型安全性を確保できる
- 予期せぬスタイルの適用ミスを防ぐことができる
- TypeScriptやFlowを利用することで、スタイルプロパティの型安全性を確保できる
-
コロケーションの奨励
- スタイル定義をコンポーネントと同じファイル内に記述することを奨励している
- スタイルの可読性と保守性を向上させる
- スタイル定義をコンポーネントと同じファイル内に記述することを奨励している
-
テスト可能性の強化
- デバッグクラス名を設定し、出力することができる
- スタイルの変更のスナップショットテストに与える影響が最小限となる
- デバッグクラス名を設定し、出力することができる
導入
StyleXをインストール
下記のコマンドを実行:
npm install --save @stylexjs/stylex
❓️ --save と --save-dev はなにがちがうのか
-
--save- npm5 からデフォルトで適用
- dependenciesに追加
-
--save-dev- 開発に必要なものを記載
- devDependenciesに追加
[Vite] プラグインをインストール
詳細
下記のコマンドを実行:
npm i vite-plugin-stylex
下記のように設定ファイルを更新:
import react from '@vitejs/plugin-react-swc';
import { defineConfig } from 'vite';
+ import styleX from 'vite-plugin-stylex';

// https://vitejs.dev/config/
export default defineConfig({
-   plugins: [react()],
+   plugins: [react(), styleX()],
    base: '/react_ui_comparison',
});
[VSCODE] 拡張機能をインストール
その他
公式が、各種プラグインを紹介したり、各種フレームワークでの始めるためのテンプレートを共有したりしてくれている。
使い方
公式コード例
通常使用
import * as stylex from '@stylexjs/stylex';

const styles = stylex.create({
  base: {
    fontSize: 16,
    lineHeight: 1.5,
    color: 'grey',
  },
  highlighted: {
    color: 'rebeccapurple',
  },
});


<div {...stylex.props(styles.base, styles.highlighted)} />;
- stylex.create にオブジェクトを入れてスタイルを生成
- オブジェクトは
任意のキー: { 任意のスタイル名: スタイルに応じた値 } - stylex.props に生成したスタイルを渡して要素に入れて適用
疑似要素とメディアクエリ
import * as stylex from '@stylexjs/stylex';

const styles = stylex.create({
  button: {
    color: {
      default: 'var(--blue-link)',
      ':hover': {
        default: null,
        '@media (hover: hover)': 'scale(1.1)',
      },
      ':active': 'scale(0.9)',
    },
  },
});
- 疑似要素を適用する場合は、スタイルオブジェクト内で対象の疑似要素をキーとして指定
- メディアクエリや条件付きスタイルを適用したい場合には、疑似要素と同様にキーとして指定
- 組み合わせる場合は片方の値にオブジェクトとしてネストする
- 特定の条件や疑似要素が適用されない場合のデフォルトのスタイルを定義するにはdefaultキーを指定
動的なスタイル
import * as stylex from '@stylexjs/stylex';

const styles = stylex.create({
  // Function arguments must be simple identifiers
  // -- No destructuring or default values
  bar: (height) => ({
    height,
    // The function body must be an object literal
    // -- { return {} } is not allowed
  }),
});

function MyComponent() {
  // The value of `height` cannot be known at compile time.
  const [height, setHeight] = useState(10);

  return <div {...stylex.props(styles.bar(height))} />;
}
- 動的なスタイルを定義する場合は、関数を使用する
keyframe
import * as stylex from '@stylexjs/stylex';

const pulse = stylex.keyframes({
  '0%': {transform: 'scale(1)'},
  '50%': {transform: 'scale(1.1)'},
  '100%': {transform: 'scale(1)'},
});

const styles = stylex.create({
  pulse: {
    animationName: pulse,
    animationDuration: '1s',
    animationIterationCount: 'infinite',
  },
});
-
stylex.keyframesでキーフレームを定義 -
stylex.createにキーフレームを渡す
私のコード
- ライブラリにReactを使用している
ボタン

上のボタンが使用前で、下のボタンが使用後。
見た目・動作とも全く同じ。
仕様
- ブラウザがダークモードなら黒色
- ブラウザがライトモードなら灰色
- ホバー時とフォーカス時に枠の色が変わる
使用前
スタイル定義部分(CSS)
.def-vite-button {
  width: 128px;
  height: 48px;
  font-family: inherit;
  font-size: 1em;
  font-weight: 500;
  color: #646cff;
  cursor: pointer;
  background-color: #1a1a1a;
  border: 1px solid transparent;
  border-radius: 8px;
  transition: border-color 0.25s;
}

.def-vite-button:hover {
  border-color: #646cff;
}

.def-vite-button:focus,
.def-vite-button:focus-visible {
  border-color: white;
}
コンポーネント使用部分(TSX)
<button
    type='button'
    className='def-vite-button'
    onClick={handleClickButton}
>
    count is {count}
</button>
使用後
スタイル定義部分(TSX)
Reactのbuttonオブジェクト要素ButtonHTMLAttributesを継承してみた。
import * as stylex from '@stylexjs/stylex';
import type { ButtonHTMLAttributes, FC } from 'react';

interface Props extends ButtonHTMLAttributes<HTMLButtonElement> {
    size?: 'small' | 'medium' | 'large';
}

const styles = stylex.create({
    base: {
        fontFamily: 'inherit',
        color: '#646cff',
        cursor: 'pointer',
        backgroundColor: {
            default: '#1a1a1a',
            '@media (prefers-color-scheme: dark)': '#1a1a1a',
            '@media (prefers-color-scheme: light)': '#f9f9f9',
        },
        borderWidth: 1,
        borderStyle: 'solid',
        borderColor: {
            default: 'transparent',
            ':hover': '#646cff',
            ':focus': '#eee',
        },
        borderRadius: 8,
        transition: 'border-color 0.25s',
        willChange: 'border-color',
    },
});

const sizes = stylex.create({
    small: {
        width: 96,
        height: 32,
        fontSize: '0.8em',
        fontWeight: 300,
    },
    medium: {
        width: 128,
        height: 48,
        fontSize: '1em',
        fontWeight: 500,
    },
    large: {
        width: 160,
        height: 64,
        fontSize: '1.2em',
        fontWeight: 700,
    },
});

export const Button: FC<Props> = ({
    type = 'button',
    size = 'medium',
    children,
    ...props
}) => (
    <button type={type} {...stylex.props(styles.base, sizes[size])} {...props}>
        {children}
    </button>
);
コンポーネント使用箇所
<Button onClick={handleClickButton}>
    count is {count}
</Button>
相違点
- 使用するコンポーネントがHTML標準buttonから自作Buttonに
- typeプロパティがデフォルトで"button"なので省略可能に
- StylesをStyleXに書いたのでclassNameを削除
ドロップエリア

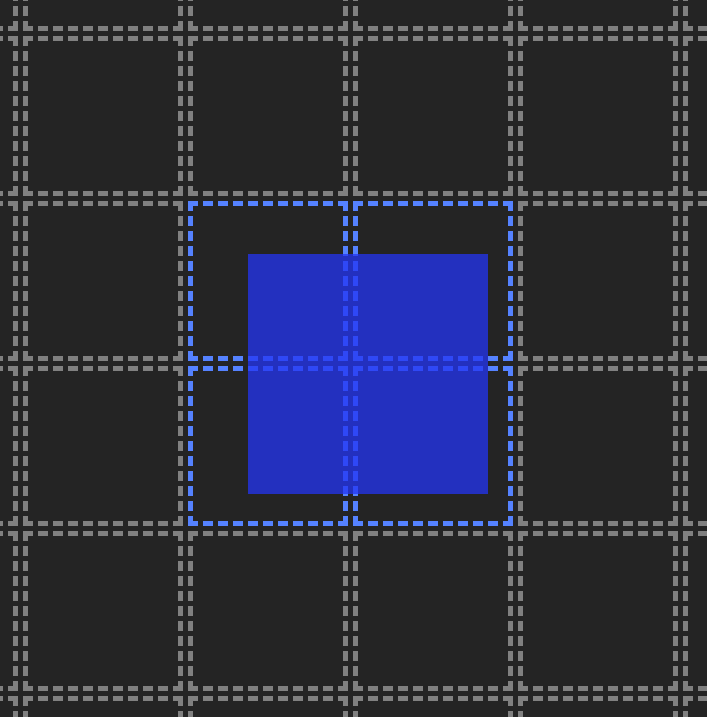
仕様
- 通常時は灰点線ボーダーの四角形
- ドラッグ要素が重なることで、ボーダーの色が変化する
使用前
TSX
import { useEffect, useRef, useState } from 'react';
import {
    DragData,
    DropData,
    dropStyle,
} from '../../../pages/dnd/pointer/configs';
import './DropPointer.css';

interface Props {
    dragData: DragData | null;
    dropData: DropData;
}
export function Drop(props: Props) {
    const [isOver, setIsOver] = useState<boolean>(false);

    const ref = useRef<HTMLDivElement | null>(null);

    useEffect(() => {
        if (props.dragData && props.dropData) {
            if (!ref.current) return;
            setIsOver(
                props.dropData.isOver(
                    props.dragData,
                    ref.current.getBoundingClientRect(),
                ),
            );
        } else {
            setIsOver(false);
        }
    }, [props.dragData, props.dropData]);

    return (
        <div
            ref={ref}
            className={
                isOver
                    ? 'dnd-pointer-drop dnd-pointer-over'
                    : 'dnd-pointer-drop'
            }
            style={{
                ...dropStyle,
                borderColor: isOver ? props.dropData?.color : 'gray',
            }}
        />
    );
}
CSS
.dnd-pointer-drop {
  /* 枠 */
  border-style: dashed;

  /* 動的 */
  will-change: filter;
}

.dnd-pointer-over {
  /* 色 */
  filter: brightness(2.5);
}
使用後
諸事情でファイル名やコンポーネントの定義方法を更新している。
TSX
import stylex from '@stylexjs/stylex';
import { type FC, memo, useEffect, useRef, useState } from 'react';
import type { DragData, DropData } from '../../pages/dnd/config';

interface Props {
    dragData: DragData | undefined;
    dropData: DropData | undefined;
}

export const DropWidth = 60;
export const DropHeight = 60;
export const DropBorderWidth = 2;

const styles = stylex.create({
    base: {
        width: DropWidth,
        height: DropHeight,
        borderWidth: DropBorderWidth,
        borderStyle: 'dashed',
        willChange: 'border-style',
        borderColor: 'gray',
    },
    over: (color: string | undefined) => ({
        filter: 'brightness(2.5)',
        borderColor: color,
    }),
});

const Drop: FC<Props> = props => {
    const [isOver, setIsOver] = useState<boolean>(false);

    const ref = useRef<HTMLDivElement | null>(null);

    useEffect(() => {
        if (props.dragData && props.dropData) {
            if (!ref.current) return;
            setIsOver(
                props.dropData.isOver(
                    props.dragData,
                    ref.current.getBoundingClientRect(),
                ),
            );
        } else {
            setIsOver(false);
        }
    }, [props.dragData, props.dropData]);

    return (
        <div
            ref={ref}
            {...stylex.props(
                styles.base,
                isOver && styles.over(props.dropData?.color),
            )}
        />
    );
};

export const PointerDrop = memo(Drop);
ドラッグ要素

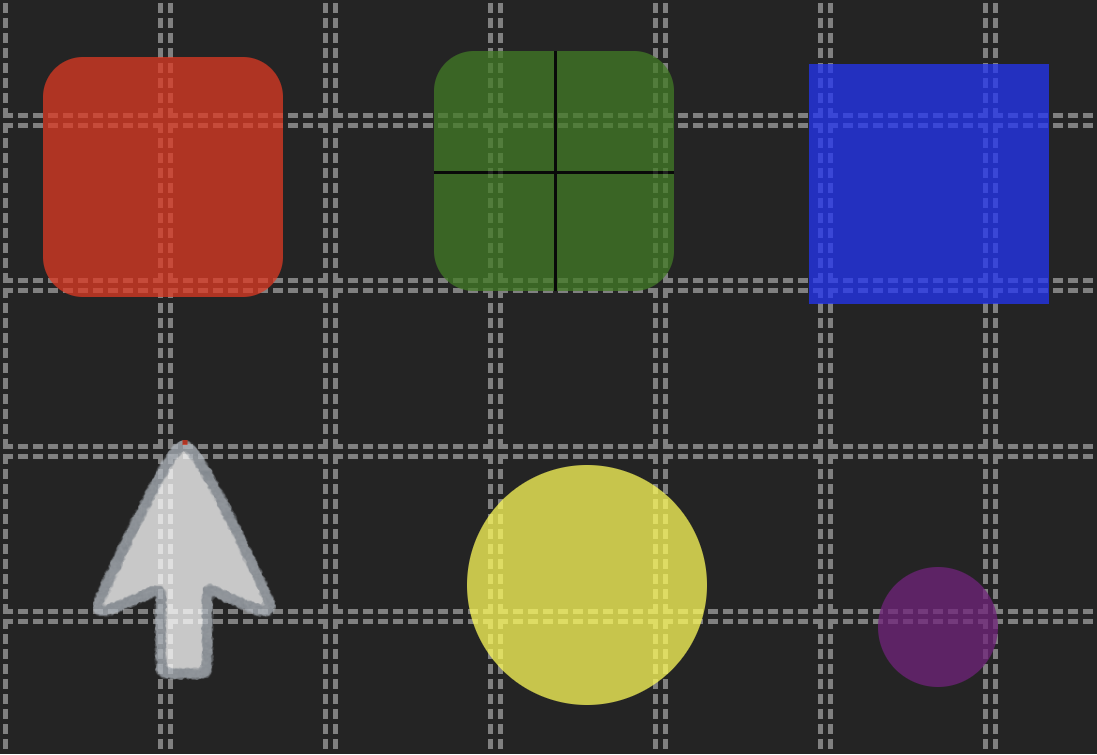
仕様
- 同じようにドラッグ可能
- 見た目とドロップ対象の識別方法がそれぞれ異なる
使用前
TSX
import React, { useRef, useState } from 'react';
import {
    DragData,
    DropData,
    location,
} from '../../../pages/dnd/pointer/configs';
import './DragPointer.css';

interface Props {
    id: string;
    dragData: DragData;
    dropData: DropData;
    handleDragStart: (id: string) => void;
    handleDrag: (props: DragData) => void;
}
export function Drag(props: Props) {
    const [isDragging, setIsDragging] = useState<boolean>(false);
    const [locOffset, setLocOffset] = useState<location>({ x: 0, y: 0 });
    const [locRectLast, setLocRectLast] = useState<location>({ x: 0, y: 0 });
    const [timeLast, setTimeLast] = useState<number>(0);

    const ref = useRef<HTMLDivElement>(null);

    const handlePointerDown = (event: React.PointerEvent) => {
        if (!ref.current) return;
        ref.current.classList.add('dnd-pointer-dragging');
        setIsDragging(true);
        event.currentTarget.setPointerCapture(event.pointerId);
        const rect = event.currentTarget.getBoundingClientRect();
        const x = event.clientX - rect.x;
        const y = event.clientY - rect.y;
        props.handleDrag({
            locScroll: { x: window.scrollX, y: window.scrollY },
            locClient: { x: event.clientX, y: event.clientY },
            locRect: rect,
            sizRect: rect,
        });
        setLocOffset({ x, y });
        setLocRectLast({ x, y });
        setTimeLast(Date.now());
        props.handleDragStart(props.id);
    };
    const handlePointerMove = (event: React.PointerEvent) => {
        if (!(isDragging && ref.current)) return;
        const x = event.clientX + window.scrollX - locOffset.x;
        const y = event.clientY + window.scrollY - locOffset.y;
        ref.current.style.left = `${x}px`;
        ref.current.style.top = `${y}px`;
        const rect = ref.current.getBoundingClientRect();
        const time = Date.now();
        const timeDelta = (time - timeLast) / 100;
        props.handleDrag({
            locScroll: { x: window.scrollX, y: window.scrollY },
            locClient: { x: event.clientX, y: event.clientY },
            locRect: {
                x,
                y,
            },
            sizRect: rect,
            locNext: {
                x: x + (x - locRectLast.x) / timeDelta,
                y: y + (y - locRectLast.y) / timeDelta,
            },
        });
        setLocRectLast({ x, y });
        setTimeLast(Date.now());
    };
    const handlePointerUp = () => {
        if (!(isDragging && ref.current)) return;
        setIsDragging(false);
        ref.current.classList.remove('dnd-pointer-dragging');
    };

    return (
        <div
            ref={ref}
            id={props.id}
            className='dnd-pointer-drag-wrap'
            onPointerDown={handlePointerDown}
            onPointerMove={handlePointerMove}
            onPointerUp={handlePointerUp}
        />
    );
}
CSS
/* 共通 */
.dnd-pointer-drag-wrap {
  position: absolute;
  touch-action: none;
  cursor: pointer;
  opacity: 0.75;
  will-change: left, top, filter, opacity;
}

.dnd-pointer-dragging {
  filter: drop-shadow(0 0 16px black);
  opacity: 0.9;
}

/* 固有 */

/* 01 */
#cursor {
  /* 位置 */
  top: 100px;
  left: 20%;

  /* サイズ */
  width: 96px;
  height: 96px;

  /* 色 */
  background-color: red;

  /* 枠 */
  border-radius: 16px;
}

/* 02 */
#center {
  /* 位置 */
  top: 200px;
  left: 40%;

  /* サイズ */
  width: 96px;
  height: 96px;

  /* 色 */
  background-color: green;

  /* 枠 */
  border-radius: 16px;
}

#center::before,
#center::after {
  position: absolute;
  content: "";
  background: black;
}

#center::before {
  top: 50%;
  right: 0;
  left: 0;
  height: 1px;
}

#center::after {
  top: 0;
  bottom: 0;
  left: 50%;
  width: 1px;
}

/* 03 */
#percent {
  /* 位置 */
  top: 300px;
  left: 60%;

  /* サイズ */
  width: 96px;
  height: 96px;
}

#percent::after {
  position: absolute;
  top: 0;
  left: 0;
  z-index: -1;
  width: 100%;
  height: 100%;
  content: "";
  background-color: blue;
}

/* 04 */

#hotspot {
  /* 位置 */
  top: 400px;
  left: 20%;

  /* サイズ */
  width: 96px;
  height: 96px;

  /* 画像 */
  background-image: url("/public/computer_cursor_arrow_white.png");
  background-repeat: no-repeat;
  background-position: top;
  background-size: contain;
}

#hotspot::after {
  position: absolute;
  top: 0;
  left: 50%;
  width: 2px;
  height: 2px;
  content: "";
  background-color: red;
  transform: translateX(-50%);
}

/* 05 */
#distance {
  /* 位置 */
  top: 500px;
  left: 40%;

  /* サイズ */
  width: 96px;
  height: 96px;

  /* 色 */
  background-color: yellow;

  /* 枠 */
  border-radius: 50%;
}

#distance.dragging {
  filter: drop-shadow(0 0 32px yellow);
}

/* 06 */
#velocity {
  /* 位置 */
  top: 600px;
  left: 60%;

  /* サイズ */
  width: 48px;
  height: 48px;

  /* 色 */
  background-color: purple;

  /* 枠 */
  border-radius: 50%;
}
使用後
index.d.ts
import type { UserAuthoredStyles } from '@stylexjs/stylex';
import type { Location, Size } from '../../@types';

// ドラッグ情報
export interface DragData {
    locScroll?: Location;
    locClient?: Location;
    locRect?: Location;
    sizRect?: Size;
    locNext?: Location;
}

// 型
type StyleKeys = 'base' | 'dragging' | 'image';

// ドロップ情報
export interface DropData {
    color: string;
    isOver: (dragData: DragData, rectDrop: DOMRect) => boolean;
    styles: { [key in StyleKeys]: UserAuthoredStyles };
}

export type DndKeys =
    | 'cursor'
    | 'center'
    | 'percent'
    | 'hotspot'
    | 'distance'
    | 'velocity';

export type DropDatas = {
    [K in DndKeys]: DropData;
};
設定ファイル(一部)
import * as stylex from '@stylexjs/stylex';
import type { DragData, DropData } from '.';

const styles = stylex.create({
    base: {
        backgroundColor: 'red',
        top: 100,
        left: '20%',
        borderRadius: 16,
    },
    dragging: {},
    image: {},
});

export const cursor: DropData = {
    color: 'red',
    isOver: (props: DragData, dropRect: DOMRect) => {
        const { locClient } = props;
        if (!locClient) return false;
        return (
            locClient.x >= dropRect.left &&
            locClient.x <= dropRect.right &&
            locClient.y >= dropRect.top &&
            locClient.y <= dropRect.bottom
        );
    },
    styles,
};
TSX
import stylex from '@stylexjs/stylex';
import type { FC, PointerEvent } from 'react';
import { memo, useRef, useState } from 'react';
import type { Location } from '../../@types';
import type { DragData, DropData } from '../../pages/dnd/config';

const styles = stylex.create({
    base: {
        position: 'absolute',
        touchAction: 'none',
        width: 96,
        height: 96,
        cursor: 'pointer',
        opacity: 0.75,
        willChange: 'left, top, filter, opacity',
    },
    dragging: {
        filter: 'drop-shadow(0 0 16px black)',
        opacity: 0.9,
    },
});

interface Props {
    id: string;
    dragData: DragData;
    dropData: DropData;
    handleDragStart: (id: string) => void;
    handleDrag: (props: DragData) => void;
}

const Drag: FC<Props> = props => {
    const [isDragging, setIsDragging] = useState<boolean>(false);
    const [locOffset, setLocOffset] = useState<Location>({ x: 0, y: 0 });
    const [locRectLast, setLocRectLast] = useState<Location>({ x: 0, y: 0 });
    const [timeLast, setTimeLast] = useState<number>(0);

    const ref = useRef<HTMLDivElement>(null);

    const handlePointerDown = (event: PointerEvent) => {
        if (!ref.current) return;
        setIsDragging(true);
        event.currentTarget.setPointerCapture(event.pointerId);
        const rect = event.currentTarget.getBoundingClientRect();
        const x = event.clientX - rect.x;
        const y = event.clientY - rect.y;
        props.handleDrag({
            locScroll: { x: window.scrollX, y: window.scrollY },
            locClient: { x: event.clientX, y: event.clientY },
            locRect: rect,
            sizRect: rect,
        });
        setLocOffset({ x, y });
        setLocRectLast({ x, y });
        setTimeLast(Date.now());
        props.handleDragStart(props.id);
    };
    const handlePointerMove = (event: PointerEvent) => {
        if (!(isDragging && ref.current)) return;
        const x = event.clientX + window.scrollX - locOffset.x;
        const y = event.clientY + window.scrollY - locOffset.y;
        ref.current.style.left = `${x}px`;
        ref.current.style.top = `${y}px`;
        const rect = ref.current.getBoundingClientRect();
        const time = Date.now();
        const timeDelta = (time - timeLast) / 100;
        props.handleDrag({
            locScroll: { x: window.scrollX, y: window.scrollY },
            locClient: { x: event.clientX, y: event.clientY },
            locRect: { x, y },
            sizRect: rect,
            locNext: {
                x: x + (x - locRectLast.x) / timeDelta,
                y: y + (y - locRectLast.y) / timeDelta,
            },
        });
        setLocRectLast({ x, y });
        setTimeLast(Date.now());
    };
    const handlePointerUp = () => {
        if (!(isDragging && ref.current)) return;
        setIsDragging(false);
    };

    return (
        <div
            ref={ref}
            className='dnd-pointer-drag-wrap'
            onPointerDown={handlePointerDown}
            onPointerMove={handlePointerMove}
            onPointerUp={handlePointerUp}
            {...stylex.props(
                styles.base,
                isDragging && styles.dragging,
                props.dropData.styles.base,
                isDragging && props.dropData.styles.dragging,
                props.dropData.styles.image,
            )}
        />
    );
};

export const PointerDrag = memo(Drag);
回転するロゴ(キーフレーム使用)

仕様
- 永遠に回転する
- ホバー時に発光する
導入前
TSX
<div className='def-vite-logo-wrap'>
    <a
        href='https://vitejs.dev'
        target='_blank'
        rel='noreferrer'
        className='def-vite-a'
    >
        <div className='def-vite-dummy' />
        <img
            src={viteLogo}
            className='def-vite-logo'
            alt='Vite logo'
        />
    </a>
</div>
<div className='def-vite-logo-wrap'>
    <a
        href='https://react.dev'
        target='_blank'
        rel='noreferrer'
        className='def-vite-a'
    >
        <div className='dummy' />
        <img
            src={reactLogo}
            className='def-vite-logo def-vite-react'
            alt='React logo'
        />
    </a>
</div>
CSS
.def-vite-logo-wrap {
  position: relative;
}

.def-vite-a {
  font-weight: 500;
  color: #646cff;
  text-decoration: inherit;
}

.def-vite-a:hover {
  color: #535bf2;
}

.def-vite-dummy {
  position: absolute;
  width: 100%;
  height: 100%;
}

.def-vite-logo {
  height: 6em;
  padding: 1.5em;
  transition: filter 300ms;
  will-change: filter;
}

.def-vite-logo:hover {
  filter: drop-shadow(0 0 2em #646cffaa);
}

.def-vite-logo.react:hover {
  filter: drop-shadow(0 0 2em #61dafbaa);
}

@keyframes logo-spin {
  from {
    transform: rotate(0deg);
  }

  to {
    transform: rotate(360deg);
  }
}

@media (prefers-reduced-motion: no-preference) {
  .def-vite-logo {
    animation: logo-spin infinite 20s linear;
  }
}
導入後
TSX
import type { UserAuthoredStyles } from '@stylexjs/stylex';
import stylex from '@stylexjs/stylex';
import { type FC, memo } from 'react';

interface Props {
    url: string;
    src: string;
    alt: string;
    styles: { img: UserAuthoredStyles };
}

const spin = stylex.keyframes({
    from: { transform: 'rotate(0deg)' },
    to: { transform: 'rotate(360deg)' },
});

const styles = stylex.create({
    wrap: {
        position: 'relative',
    },
    a: {
        fontWeight: 500,
        color: {
            default: '#646cff',
            ':hover': '#535bf2',
        },
        textDecoration: 'inherit',
    },
    img: {
        height: '6em',
        padding: '1.5em',
        transition: 'filter 300ms',
        willChange: 'filter',
    },
    spin: {
        animationName: spin,
        animationDuration: '20s',
        animationIterationCount: 'infinite',
        animationTimingFunction: 'linear',
    },
});

const Component: FC<Props> = props => {
    return (
        <div {...stylex.props(styles.wrap)}>
            <a
                {...stylex.props(styles.a)}
                href={props.url}
                target='_blank'
                rel='noreferrer'
            >
                <img
                    {...stylex.props(styles.img, props.styles.img, styles.spin)}
                    src={props.src}
                    alt={props.alt}
                />
            </a>
        </div>
    );
};

export const Logo = memo(Component);
感想
前提として、従来方式とStyleXとの比較
従来: CSS
.button {
    background-color: 'red';
}
.button:hover {
    background-color: 'blue';
}
従来: styled-component
const style = styled.button`
    background-color: 'red';
    &:hover {
        background-color: 'blue';
    }
`
StyleX
const styles = stylex.create({
    button: {
        backgroundColor: {
            default: 'red',
            ':hover': 'blue',
        },
    },
});
hoverやfocusを並列に置けて最高
これまでのCSS-in-JSライブラリでは、疑似要素をオブジェクトのルート階層に書くことが多かった。
そのため、スタイルが条件ごとにどのように変化するか確認するのが面倒だった。
StyleXではスタイルごとに条件を書けるようになり、見やすい構成となっている。
オブジェクトで書けて嬉しい
これまでのCSS-in-JSライブラリでは、スタイルを文字列で定義することが多かった。
そのため、スタイルを流用することが難しく、フォーマッターも機能しづらかった。
StyleXではオブジェクトで書けるようになり、TypeScriptで書くことに向いている。
CSSからの移植が少し面倒
styled-componentなどで文字列として記述できるのは、CSSからそのまま移植するためである。
オブジェクトのキーにはハイフンなどが使えない仕様から、StyleXではCSSをそのままコピー・アンド・ペーストすることはできない。
CSSから移植する場合には、スタイル名をオブジェクト用に変更したり、セミコロンをカンマに変えたりなど、他のCSS-in-JSと比べると少し手間がかかる。そこもかわいいけどね
参考