はじめに
Azure上に仮想サーバを構築する際、PackerとTerraformを使ったのでそのときのまとめ。
前提
- MacOS上で作業
Azure とは
Microsoftが提供するクラウドサービス。
AWSやGCPの仲間である。
Packer とは
Packerとは、HashiCorp社が開発しているオープンソースのイメージ作成ツール。
JSONファイルで記述した設定ファイルからイメージを構築することができる。
プロビジョニングは、シェルをJSONファイル内にガリガリ書くこともできるが、Ansibleのplaybookを指定することもできる。
Terraform とは
Terraformとは、同じくHashiCorp社が開発しているIaC(Infrastructure as Code)。
インフラの構成をコード管理できる。
AWS, Azure, GCP に対応しているので、反映先のクラウドを意識せず使うことができる。
事前準備
1. Azureアカウント作成しておく
まずは以下からAzureアカウントを作成する。
一定期間無料で使うことができるし、課金が発生する際はユーザの承認が必要なので「勝手にお金が発生していた」ということはない。
2. Azure CLIのインストール
Homebrewで必要なパッケージをインストールしていく。
まずはAzure CLI。
$ brew update
$ brew install azure-cli
なお、Azure CLIはPython3.10に依存しているため、ない場合は以下のようにインストールする。
$ brew update && brew install python@3.10 && brew upgrade python@3.10
$ brew link --overwrite python@3.10
3. サービスプリンシパルを使ってAzure CLIにサインインする
サービスプリンシパルとは、Azureリソースにアクセスするために使われる、特定のユーザにも紐づかないID。
自動化ツール等でアクセスする場合は個人のアカウントを使いたくないので、サービスプリンシパルを使う。
詳細は以下を参照。
実際の作成は以下のようにする。
# まずは自分のアカウントでログイン。対話形式でブラウザが開く
$ az login
# パスワードベースの認証を使ったサービスプリンシパルを作成
$ az ad sp create-for-rbac --name testServicePrincipal --role Contributor
{
  "appId": "XXXXX-XXXX-XXXX-XXXXXX",
  "displayName": "testServicePrincipal",
  "password": "XXXXXXXXXXXXXXXXXXXXXXX",
  "tenant": "XXXXXX-XXXX-XXXX-XXXX-XXXXXXXXXX"
}
# サービスプリンシパルを使ってログインしてみる
$ az login --service-principal -u <app-id> -p <password-or-cert> --tenant <tenant>
なお、サービスプリンシパルの情報はあとで使うのでひかえておくこと。
4. Packerのインストール
以下を参考にPackerをインストールする。
# HashiCorpのtapリポジトリをインストール
$ brew tap hashicorp/tap
# packerのインストール
$ brew install hashicorp/tap/packer
# 最新にする
$ brew upgrade hashicorp/tap/packer
# 確認
$ packer -v
1.7.10
6. Terraformのインストール
以下を参考にTerraformをインストールする。
tapリポジトリの追加は上記で済んでいるので不要。
brew install hashicorp/tap/terraform
7. Azure Cloud ShellでTerraformを構成する
Azureポータルにアクセス、以下のボタンを押下

はじめて利用する場合は環境とストレージの設定をしなくてはならない。
コマンドライン環境は「Bash」を選択、サブスクリプションはそのままで「作成」する。
作成が完了するとポータル上に以下のようにターミナルが開く。

Azure Cloud Shell上で最新のTerraformをインストールする。
現時点でのコマンドは記載するが、最新情報は以下の資料を参照してほしい。
# 現在のバージョン確認。最新でない場合はそのようにメッセージが表示される。
$ terraform version
Terraform v1.1.5
on linux_amd64

Your version of Terraform is out of date! The latest version
is 1.1.6. You can update by downloading from https://www.terraform.io/downloads.html
# 最新バージョンをインストール
$ curl -O https://releases.hashicorp.com/terraform/1.1.6/terraform_1.1.6_linux_amd64.zip
$ unzip terraform_1.1.6_linux_amd64.zip
$ mkdir bin
$ mv terraform bin/
ホーム直下に作られたbinファイルはAzure Cloud Shellを再起動すると自動的にPATHに追加されるとのこと。
シェルを再起動してterraformのバージョンを確認してみる。
# 確認
$ terraform version
Terraform v1.1.6
on linux_amd64
これで最新になった。
構築
1. Packerイメージを作成する
# Packerイメージを格納するリソースグループを作成
$ az group create -n myPackerImages -l eastus
{
  "id": "/subscriptions/XXXXXX-XXXX-XXXX-XXXX-XXXXXXXXX/resourceGroups/myPackerImages",
  "location": "eastus",
  "managedBy": null,
  "name": "myPackerImages",
  "properties": {
    "provisioningState": "Succeeded"
  },
  "tags": null,
  "type": "Microsoft.Resources/resourceGroups"
}
# Packerがサービスプリンシパルを使用してAzureの認証ができるようにする
$ az ad sp create-for-rbac --role Contributor --query "{ client_id: appId, client_secret: password, tenant_id: tenant }"
# 現在のAzureサブスクリプションIDを確認
$ az account show --query "{ subscription_id: id }"
{
  "subscription_id": "XXXXXX-XXXX-XXXX-XXXX-XXXXXXXX"
}
ubuntu.json ファイルを作って以下のように記載する。
{
    "builders": [{
      "type": "azure-arm",

      "client_id": "{{user `client_id`}}",
      "client_secret": "{{user `client_secret`}}",
      "tenant_id": "{{user `tenant_id`}}",
      "subscription_id": "{{user `subscription_id`}}",

      "managed_image_resource_group_name": "myPackerImages",
      "managed_image_name": "myPackerImage",

      "os_type": "Linux",
      "image_publisher": "Canonical",
      "image_offer": "UbuntuServer",
      "image_sku": "16.04-LTS",

      "azure_tags": {
          "dept": "Engineering",
          "task": "Image deployment"
      },

      "location": "East US",
      "vm_size": "Standard_DS2_v2"
    }],
    "provisioners": [{
      "execute_command": "chmod +x {{ .Path }}; {{ .Vars }} sudo -E sh '{{ .Path }}'",
      "inline": [
        "apt-get update",
        "apt-get upgrade -y",
        "apt-get -y install nginx",

        "/usr/sbin/waagent -force -deprovision+user && export HISTSIZE=0 && sync"
      ],
      "inline_shebang": "/bin/sh -x",
      "type": "shell"
    }]
  }
Packerイメージをビルドしてみる。
client_id, client_secret, tenant_id にサービスプリンシパルからの値をそれぞれ設定する。
subscription_idには先ほど表示したIDを設定する。
$ packer build \
 -var 'client_id=XXXXXX-XXXX-XXXX-XXXX-XXXXXXXXXX' \
 -var 'client_secret=XXXXXXXXXXXXXXXXXXXXXXXXX' \
 -var 'tenant_id=XXXXXX-XXXX-XXXX-XXXX-XXXXXXXXXX' \
 -var 'subscription_id=XXXXXX-XXXX-XXXX-XXXX-XXXXXXXXXX' \
ubuntu.json
しばらくするとイメージの作成が完了した。
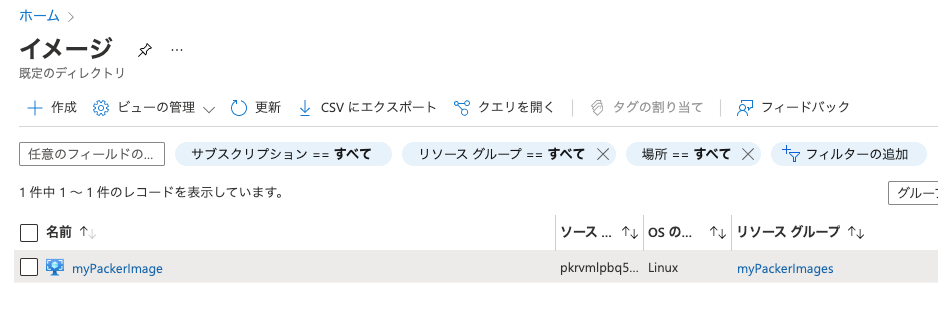
Azureポータル上で確認してみる。
サービスから「イメージ」というものを検索し見てみる。
以下のように作成したイメージが確認できた。
2. Terraformを実装する
Azure上に作成したイメージからVMを作ることは既に可能だが、構成情報をTerraformで管理するとなお良い。
terraformディレクトリを作り、main.tf というファイルに以下を記載する。
設定は別ファイルに切り出し、後述する variables.tf に記載する。
terraform {
  required_version = ">=0.12"
  # Azureなのでazurermを指定
  required_providers {
    azurerm = {
      source = "hashicorp/azurerm"
      version = "~>2.0"
    }
  }
}
# プロバイダーの設定
provider "azurerm" {
  features {}
}
###############################################
# WEBサーバ構築
###############################################
# 作成するリソースの設定
resource "azurerm_resource_group" "vmss" {
  name     = var.resource_group_name
  location = var.location
  tags = var.tags
}
# FQDNの設定
resource "random_string" "fqdn" {
 length  = 6
 special = false
 upper   = false
 number  = false
}
# 仮想ネットワークの設定
resource "azurerm_virtual_network" "vmss" {
  name                = "vmss-vnet"
  address_space       = ["10.0.0.0/16"]
  location            = var.location
  resource_group_name = azurerm_resource_group.vmss.name
  tags = var.tags
}
# サブネットの設定
resource "azurerm_subnet" "vmss" {
  name                 = "vmss-subnet"
  resource_group_name  = azurerm_resource_group.vmss.name
  virtual_network_name = azurerm_virtual_network.vmss.name
  address_prefixes       = ["10.0.2.0/24"]
}
# パブリックIPアドレスの設定
resource "azurerm_public_ip" "vmss" {
  name                         = "vmss-public-ip"
  location                     = var.location
  resource_group_name          = azurerm_resource_group.vmss.name
  allocation_method            = "Static"
  domain_name_label            = random_string.fqdn.result
  tags = var.tags
}
# ロードバランサの設定
resource "azurerm_lb" "vmss" {
  name                = "vmss-lb"
  location            = var.location
  resource_group_name = azurerm_resource_group.vmss.name

  frontend_ip_configuration {
    name                 = "PublicIPAddress"
    public_ip_address_id = azurerm_public_ip.vmss.id
  }

  tags = var.tags
}
resource "azurerm_lb_backend_address_pool" "bpepool" {
  loadbalancer_id     = azurerm_lb.vmss.id
  name                = "BackEndAddressPool"
}
resource "azurerm_lb_probe" "vmss" {
  resource_group_name = azurerm_resource_group.vmss.name
  loadbalancer_id     = azurerm_lb.vmss.id
  name                = "ssh-running-probe"
  port                = var.application_port
}
resource "azurerm_lb_rule" "lbnatrule" {
  resource_group_name            = azurerm_resource_group.vmss.name
  loadbalancer_id                = azurerm_lb.vmss.id
  name                           = "http"
  protocol                       = "Tcp"
  frontend_port                  = var.application_port
  backend_port                   = var.application_port
  backend_address_pool_id        = azurerm_lb_backend_address_pool.bpepool.id
  frontend_ip_configuration_name = "PublicIPAddress"
  probe_id                       = azurerm_lb_probe.vmss.id
}
# リソースグループの設定
data "azurerm_resource_group" "image" {
  name                = var.packer_resource_group_name
}
# イメージの設定
data "azurerm_image" "image" {
  name                = var.packer_image_name
  resource_group_name = data.azurerm_resource_group.image.name
}
# スケールセットを設定する
resource "azurerm_virtual_machine_scale_set" "vmss" {
  name                = "vmscaleset"
  location            = var.location
  resource_group_name = azurerm_resource_group.vmss.name
  upgrade_policy_mode = "Manual"

  sku {
    name     = "Standard_DS1_v2"
    tier     = "Standard"
    capacity = 2
  }

  storage_profile_image_reference {
    id=data.azurerm_image.image.id
  }

  storage_profile_os_disk {
    name              = ""
    caching           = "ReadWrite"
    create_option     = "FromImage"
    managed_disk_type = "Standard_LRS"
  }

  storage_profile_data_disk {
    lun          = 0
    caching        = "ReadWrite"
    create_option  = "Empty"
    disk_size_gb   = 10
  }

  os_profile {
    computer_name_prefix = "vmlab"
    admin_username       = var.admin_user
    admin_password       = var.admin_password
  }

  os_profile_linux_config {
    disable_password_authentication = true

    ssh_keys {
      path     = var.ssh_authorized_keys_path
      key_data = file(var.ssh_pub_key_path)
    }
  }

  network_profile {
    name    = "terraformnetworkprofile"
    primary = true

    ip_configuration {
      name                                   = "IPConfiguration"
      subnet_id                              = azurerm_subnet.vmss.id
      load_balancer_backend_address_pool_ids = [azurerm_lb_backend_address_pool.bpepool.id]
      primary = true
    }
  }

  tags = var.tags
}

###############################################
# 踏み台サーバ(ジャンプボックス)の構築
###############################################
resource "azurerm_public_ip" "jumpbox" {
  name                         = "jumpbox-public-ip"
  location                     = var.location
  resource_group_name          = azurerm_resource_group.vmss.name
  allocation_method            = "Static"
  domain_name_label            = "${random_string.fqdn.result}-ssh"
  tags = var.tags
}
# ネットワークインターフェースの設定
resource "azurerm_network_interface" "jumpbox" {
  name                = "jumpbox-nic"
  location            = var.location
  resource_group_name = azurerm_resource_group.vmss.name

  ip_configuration {
    name                          = "IPConfiguration"
    subnet_id                     = azurerm_subnet.vmss.id
    private_ip_address_allocation = "dynamic"
    public_ip_address_id          = azurerm_public_ip.jumpbox.id
  }

  tags = var.tags
}
# 仮想マシンを作成する設定
resource "azurerm_virtual_machine" "jumpbox" {
  name                  = "jumpbox"
  location              = var.location
  resource_group_name   = azurerm_resource_group.vmss.name
  network_interface_ids = [azurerm_network_interface.jumpbox.id]
  vm_size               = "Standard_DS1_v2"

  storage_image_reference {
    publisher = "Canonical"
    offer     = "UbuntuServer"
    sku       = "16.04-LTS"
    version   = "latest"
  }

  storage_os_disk {
    name              = "jumpbox-osdisk"
    caching           = "ReadWrite"
    create_option     = "FromImage"
    managed_disk_type = "Standard_LRS"
  }

  os_profile {
    computer_name  = "jumpbox"
    admin_username = var.admin_user
    admin_password = var.admin_password
  }

  os_profile_linux_config {
    disable_password_authentication = true

    ssh_keys {
      path     = var.ssh_authorized_keys_path
      key_data = file(var.ssh_pub_key_path)
    }
  }

  tags = var.tags
}
以下が切り出した設定ファイル
variable "packer_resource_group_name" {
   description = "Name of the resource group in which the Packer image will be created"
   default = "myPackerImages"
}

variable "packer_image_name" {
   description = "Name of the Packer image"
   default = "myPackerImage"
}

variable "resource_group_name" {
   description = "Name of the resource group in which the resources will be created"
   default = "myResourceGroup"
}

variable "location" {
   default = "eastus"
   description = "Location where resources will be created"
}

variable "tags" {
   description = "Map of the tags to use for the resources that are deployed"
   type        = map(string)
   default = {
      environment = "codelab"
   }
}

variable "application_port" {
   description = "Port that you want to expose to the external load balancer"
   default = 80
}

variable "admin_user" {
   description = "User name to use as the admin account on the VMs that will be part of the VM scale set"
   default = "azureuser"
}

variable "admin_password" {
   description = "Default password for admin account"
}

variable "ssh_authorized_keys_path" {
   description = "authorized_keys path"
   default = "/home/azureuser/.ssh/authorized_keys"
}

variable "ssh_pub_key_path" {
   description = "SSH public key path"
   default = "~/.ssh/id_rsa.pub"
}
さらに、Terraformで表示する値を指定する output.tf を作成する。
Terraform実行後にここで設定した値がターミナルに表示される。
ログインするのに必要なIPアドレス、表示を確認するのに必要なFQDNなどを設定しておくとよい。
output "vmss_public_ip_fqdn" {
    value = azurerm_public_ip.vmss.fqdn
}

output "vmss_public_ip" {
    value = azurerm_public_ip.vmss.ip_address
}

output "jumpbox_public_ip_fqdn" {
    value = azurerm_public_ip.jumpbox.fqdn
}

output "jumpbox_public_ip" {
    value = azurerm_public_ip.jumpbox.ip_address
}
ここまで書いたらTerraformの初期化をしてみる。
$ terraform init
続いてTerraformの実行プランを作成・適用する。
なお、サービスプリンシパルの権限では実行できないので、必要であればadminアカウントでログインし直す。
# 実行プランの作成
$ terraform plan -out main.tfplan
# 実行プランを適用
$ terraform apply main.tfplan

...

Apply complete! Resources: 13 added, 0 changed, 0 destroyed.

Outputs:

jumpbox_public_ip = "XXX.XXX.XXX.XXX"
jumpbox_public_ip_fqdn = "xxxxx.xxxxx.cloudapp.azure.com"
vmss_public_ip = "XXX.XXX.XXX.XXX"
vmss_public_ip_fqdn = "xxxxx.xxxxx.cloudapp.azure.com"
完了すると上記のようにIPアドレスが表示された。
3. 実際に確認してみる
まずはAzureポータル上で生成されたものを確認してみる。
- 「Virtual Machines」を見ると作成した踏み台サーバ「jumpbox」がいることがわかる
- 「Virtual Machine Scale Sets」を見ると作成したスケールセットのインスタンスがいることがわかる
- さらに上記からリソースグループを見てみると、作成したLBやIPなどの情報が見れる。

では実際にWEBサーバにアクセスしてみる。
先ほど表示されたFQDNを打ち込んでみると...Packerで設定したまっさらなnginxのページが表示された。

続いて踏み台サーバへSSHしてみる。
$ ssh azureuser@XXX.XXX.XXX.XXX
Welcome to Ubuntu 16.04.7 LTS (GNU/Linux 4.15.0-1113-azure x86_64)

 * Documentation:  https://help.ubuntu.com
 * Management:     https://landscape.canonical.com
 * Support:        https://ubuntu.com/advantage

UA Infra: Extended Security Maintenance (ESM) is not enabled.

0 updates can be applied immediately.

52 additional security updates can be applied with UA Infra: ESM
Learn more about enabling UA Infra: ESM service for Ubuntu 16.04 at
https://ubuntu.com/16-04

Ubuntu comes with ABSOLUTELY NO WARRANTY, to the extent permitted by
applicable law.


The programs included with the Ubuntu system are free software;
the exact distribution terms for each program are described in the
individual files in /usr/share/doc/*/copyright.

Ubuntu comes with ABSOLUTELY NO WARRANTY, to the extent permitted by
applicable law.

To run a command as administrator (user "root"), use "sudo <command>".
See "man sudo_root" for details.

azureuser@jumpbox:~$
さらに踏み台サーバからWEBサーバのインスタンスにSSHしてみる。
インスタンスのプライベートIPアドレスはAzureポータルから取得してきた。
SSHの鍵はTerraformの設定ファイルに指定したものを踏み台サーバに置いてあげる必要がある。
azureuser@jumpbox:~$ ssh azureuser@10.0.2.8

Welcome to Ubuntu 16.04.7 LTS (GNU/Linux 4.15.0-1113-azure x86_64)

 * Documentation:  https://help.ubuntu.com
 * Management:     https://landscape.canonical.com
 * Support:        https://ubuntu.com/advantage

UA Infra: Extended Security Maintenance (ESM) is not enabled.

0 updates can be applied immediately.

91 additional security updates can be applied with UA Infra: ESM
Learn more about enabling UA Infra: ESM service for Ubuntu 16.04 at
https://ubuntu.com/16-04

Ubuntu comes with ABSOLUTELY NO WARRANTY, to the extent permitted by
applicable law.

New release '18.04.6 LTS' available.
Run 'do-release-upgrade' to upgrade to it.


The programs included with the Ubuntu system are free software;
the exact distribution terms for each program are described in the
individual files in /usr/share/doc/*/copyright.

Ubuntu comes with ABSOLUTELY NO WARRANTY, to the extent permitted by
applicable law.

To run a command as administrator (user "root"), use "sudo <command>".
See "man sudo_root" for details.
踏み台サーバからインスタンスへログインできた。
まとめ
Azureの公式ドキュメントが割と充実しており、PackerやTerraformを使った構築もほぼほぼAzureの公式ドキュメントを見ながらできた。
Terraformのjsonは一見長大で複雑に見えるが、中身を1つ1つ見てみるとたいしたことはなかった。
どれも簡単に使えてインフラの構築が捗った。
より複雑なプロビジョニングをしたい場合はPackerとAnsibleを組み合わせるなどすると思うが、そうなると使うツールがさらに増えて難しくなるのが悩みどころ。
Terraformもサーバ数が増えてくるとファイル分割して大きな構成管理になりそうで、なるべく1つ1つをシンプルに保てるかが重要な気がした。