目的
業務にて画像をSQLite3のDBへ登録し保存する機能を実装する必要があり、調査を兼ね実装を行いました。
HTTPサーバーを兼ねたRaspberry PiにUSB接続のWebカメラを接続し、このカメラを外部から制御(画像の撮影)を行い、サーバー内のDBへ保存します。
外部機器(PC、スマートフォン)からサーバーへリクエストをかけたら、任意の画像を取得するなどの機能を実装する必要がありました。
今回は、有線接続したWebカメラから画像を取得し、DBへ保存、保存完了後にDBから画像を取得し、ローカルディレクトリに任意のファイルネームで保存するまでを実装しました。
開発環境
IDE
PyCharm Community Edition
ライブラリ
SQLite3
OpenCv
PyQt5
環境構築
pythonはHomebrewでインストールします。
SQLite3はpythonに標準で入っているので、インストールは不要です。
OpneCvはPyCharmからインストールしました。
Preference->Project Interpreterを開き、+ボタンを押します。
Availabel Packagesが開くので、opencv-pythonを検索し、Install Packageにてインストールしました。
PyQt5はHomebrewでインストールします。
brew install pyqt5
実装
import cv2
import sqlite3
import sys
from PyQt5.QtWidgets import QApplication, QWidget, QPushButton
from PyQt5.QtGui import QIcon
from PyQt5.QtCore import pyqtSlot

class App (QWidget):

    def __init__(self):
        super().__init__()
        self.title = 'Sample image to save to DB'
        self.left = 10
        self.top = 10
        self.width = 320
        self.height = 240
        self.initUI()

    def initUI(self):

        # ウィンドウのtitleを設定
        self.setWindowTitle(self.title)

        # ウィンドウサイズを設定
        self.setGeometry(self.left, self.top, self.width, self.height)

        # ボタンのtitleを設定
        buttton = QPushButton('Save Captcha to DB', self)
        # ボタンの意味を設定
        buttton.setToolTip('This is a button to save the camera Captcha image to DB')
        # ボタンの描画位置を設定
        buttton.move(80, 70)
        # ボタン押下処理を設定
        buttton.clicked.connect(self.on_click)

        self.show()

    def camera_capture(self):
        cap = cv2.VideoCapture(0)
        count = 0

        while count < 10:
            count+=1
            ret, frame = cap.read()
            # デバッグ用:画像表示
            #cv2.imshow('camera capture', frame)
            cv2.waitKey(1)

            if count == 10:
                # データベース作成・コネクション作成
                db = sqlite3.connect("my.db")
                # カーソルをコネクションから作成
                cur = db.cursor()
                # テーブル作成
                try:
                    cur.execute('''create table images (id string, img blob)''')
                except sqlite3.OperationalError:
                    print
                    "table images already exists!"

                # コネクションを保存(コミット)
                db.commit()

                # 画像エンコーディング
                _, enc = cv2.imencode(".png", frame)

                # データを追加
                sql = "insert into images values (?, ?)"
                cur.execute(sql, ("camera", memoryview(enc)))

                # コネクションを保存(コミット)
                db.commit()

                # データの読み出し
                # byteデータの取得
                row = cur.execute('SELECT * FROM images').fetchone()
                pic = row[1]

                # 画像保存
                f = open('load2DBforCameraImage.png', 'wb')
                f.write(pic)
                f.close()
                cur.close()
                # OpneCvでも画像保存
                cv2.imwrite("save.png", frame)

        cap.release()
        exit()


    @pyqtSlot()
    def on_click(self):
        print('button on click!')
        self.camera_capture()


if __name__ == '__main__':
    app = QApplication(sys.argv)
    ex = App()
    sys.exit(app.exec_())
結果
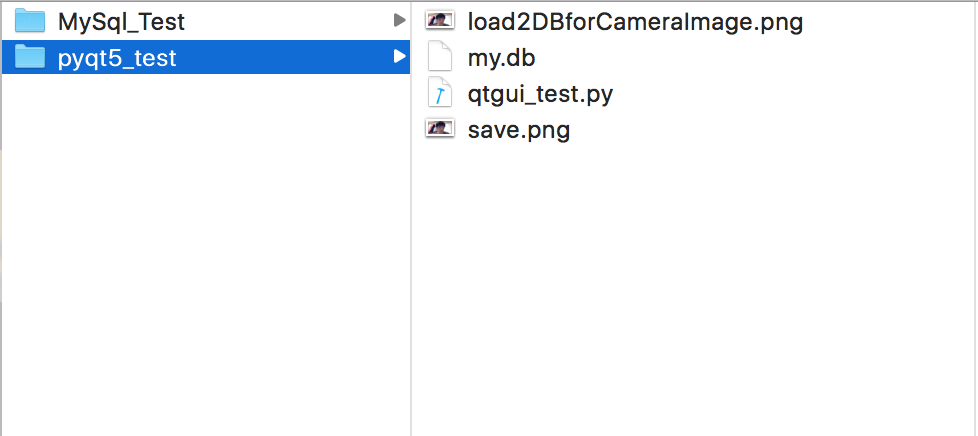
 中央のボタンを押下すると、画像をVideoCaptchaの画像をDBへ保存し、その後DBから取得しリネームしローカルディレクトに保存します。
ついでに、OpenCvのimwrite()メソッドでも保存を行っています。
現状では、VideoCaptcha()が起動し画像が取得できるまでに、すこし時間がかかるためカウンターを回し、10回カウントしたところで保存処理を行っています。
(C++書いていたときは、特にこんなコトはなかったんですけどね...)

上記のとおり、DBから取得しリネームした画像ファイルと、imwrite()メソッドで保存した2つのファイルが出来上がっていることがわかります。
おわりに
CやC++でゴリゴリコードを書いてきて、ここ最近MySQLやPHPなんかをやったりしていました。
今回取り組んだpythonによるSQLite画像の保存処理も、比較的簡単に記述できることがわかりました。
また、PyQt5によるGUIの作成も簡単に行えることがわかりました。
(ImGUIより簡単に書けますね!)
まだ、最終目的の機能は実装出来ていませんので、pythonによるGPIOの制御、javascriptとの連携処理などを実装していきたいと思います。
もっとスマートに記述できる箇所が多々あると思いますので、ツッコミ等頂けましたらと思います。
よろしくお願いします。