概要
例えばVSCodeをインストールしていれば、ファイルとかフォルダを右クリックするとCodeで開くというオプションが出てくるかと思います。

自作のアプリが同じようにそこに出てきたらかっこいいなーと思いました。
調べてみたところ意外と簡単にできそうだったので、Electron で作成したアプリで実現してみます。
なお、筆者はElectronもレジストリも今回初めて触るので、お作法等が守られていない可能性があります。また、本記事はWindows向けの内容なので、Windows専用のオプション等を使用しています。ご承知おきください。
今回作ったアプリの概要
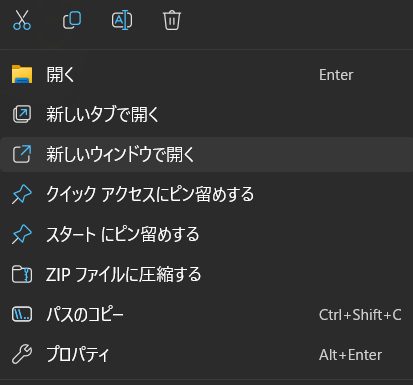
ファイルやフォルダを右クリックするとOpen with MyAppというオプションが出てきて、選択するとアプリが起動します。

今回は、選択されたファイル/フォルダのパスをそのまま表示してみます。

作成手順
1. ファイル配置
このような形でファイルを配置します。
root
├ assets
│ └ icon.ico
├ build
│ └ installer.nsh
├ src
│ ├ index.html
│ └ main.js
└ package.json
各ファイルの内容と説明
electronアプリの最小限の構成を作って、インストール周りに多少手を加えているだけなので、
今回ポイントになる箇所だけざっくりと解説します。
- icon.ico
- アイコンファイルです。
- installer.nsh
- インストール/アンインストール時等に実行されるマクロを記述します。ここに色々記載することで、インストーラーにオプションをつけられたりもするらしいです。
- 今回は、レジストリを操作して、インストール時⇒ファイル右クリックのメニューを追加、アンインストール時⇒ファイル右クリックのメニューを削除 の処理を書いています。
- アプリ起動時の引数としてファイルパスを渡すよう指定するのもここでやっています。
- echo-file-path.exe の部分は自身のアプリ名に書き換えてください
!macro customInstall
  # 任意のファイルのコンテキストメニューに「Open with MyApp」を追加
  WriteRegStr HKEY_CLASSES_ROOT '*\shell\Open with MyApp\command' '' '"$INSTDIR\echo-file-path.exe" "%1"'
  # 「Open with MyApp」のアイコンを設定
  WriteRegStr HKEY_CLASSES_ROOT '*\shell\Open with MyApp' 'Icon' '$INSTDIR\echo-file-path.exe'
  # 任意のフォルダのコンテキストメニューに「Open with MyApp」を追加
  WriteRegStr HKEY_CLASSES_ROOT 'Directory\shell\Open with MyApp\command' '' '"$INSTDIR\echo-file-path.exe" "%1"'
  # 「Open with MyApp」のアイコンを設定
  WriteRegStr HKEY_CLASSES_ROOT 'Directory\shell\Open with MyApp' 'Icon' '$INSTDIR\echo-file-path.exe'
!macroend

!macro customUnInstall
  # ファイルのコンテキストメニューから「Open with MyApp」を削除
  DeleteRegKey HKEY_CLASSES_ROOT '*\shell\Open with MyApp'
  # フォルダのコンテキストメニューから「Open with MyApp」を削除
  DeleteRegKey HKEY_CLASSES_ROOT 'Directory\shell\Open with MyApp'
!macroend
- index.html
- ブラウザ上の処理(レンダラープロセス)です
- 今回は起動時のパラメータを受け取って表示するだけです
<h1  id="path"></h1>
<script>
document.getElementById("path").innerText = new URLSearchParams(window.location.search).get("path");
</script>
- main.js
- OSから呼び出される処理(メインプロセス)です
- アプリ起動時のパラメータを読み取って、メインプロセスを起動しつつパラメータを渡しています。
'use strict';

const {app, BrowserWindow} =  require("electron");

let  mainWindow;

app.on('ready', function() {
  // 実行時引数取得
  let  path  =  process.argv[1] ?  encodeURI(process.argv[1]) :  '';
    mainWindow  =  new  BrowserWindow({width:  800, height:  600, webPreferences: {
    nodeIntegration:  false
  }});

  // URLパラメータで実行時引数を渡す
  mainWindow.loadURL('file://'  +  __dirname  +  '/index.html'  +  '?path='  +  path );
});
- package.json
- Node.jsの依存関係・設定記述ファイルです。
- パッケージ化のため electron-builder の依存関係を追加しています。
- nsisオプションにインストール関係の設定を記述しています。
{
  "name": "echo-file-path",
  "version": "1.0.0",
  "main": "src/main.js",
  "scripts": {
    "start": "electron ."
  },
  "keywords": [],
  "author": "",
  "license": "ISC",
  "description": "",
  "devDependencies": {
    "electron": "^31.2.1",
    "electron-builder": "^24.13.3"
  },
  "build": {
    "appId": "com.electron.echo-file-path",
    "directories": {
      "output": "dist"
    },
    "files": [
      "assets",
      "src",
      "package.json",
      "package-lock.json"
    ],
    "win": {
      "icon": "assets/icon.ico",
      "target": "nsis"
    },
    "nsis": {
      "oneClick": false,
      "allowToChangeInstallationDirectory": true,
      "perMachine": true,
      "include": "build/installer.nsh"
    }
  }
}
2. ビルド
アプリのインストーラーを作成します。
プロジェクトのルートディレクトリで以下のコマンドを実行してください
npm install
node_modules/.bin/electron-builder --win --x64
成功すると、/dist 配下に ~~Setup 1.0.0.exe みたいなファイルが出来上がると思います。そちらを実行するとアプリがインストールされ、ファイル/フォルダ右クリックのオプションメニューに「Open with MyApp」が追加されます
仕組み
インストール後、レジストリエディタを開いてみると、このようにHKEY_CLASSES_ROOT/*/shell/Open with MyAppがあるかと思います。

これは、任意のファイルを右クリックしたときのオプションに「Open with MyApp」を表示することを意味しています。
また、HKEY_CLASSES_ROOT/*/shell/Open with MyApp/commandを見てみると、アプリのインストールパスが登録されていると思います。

これは、「Open with MyApp」が選択されたら、そのパスのアプリを起動することを意味しています。
また、%1と書くことで、ファイルのパスをアプリに引数として渡しています。
もし任意のファイルではなく、特定の拡張子ファイルの右クリックメニューに追加したい場合は、例えばHKEY_CLASSES_ROOT/.htmlを見ると、(規定)にhtmlfileと入っているかと思います。それを確認して、HKEY_CLASSES_ROOT/htmlfile/shellに同様に登録すれば、.htmlファイルを右クリックしたときのみ登録したメニューが表示されるようになります。
フォルダについては、HKEY_CLASSES_ROOT/Directory/shellに登録することで、メニューに項目を追加できます。
最後に
今回記載した内容以外に気になるポイントとして、以下の課題があります。
機会があればこれらについても取り上げて記事にしたいと思います。
-
ツリーメニューの登録の仕方

-
Windows11のメニューへの登録の仕方
以上です。
最後まで読んでいただきいただきありがとうございます。