概要
前回の記事に続き、Electronアプリをファイルコンテキストメニューに表示してみます。
今回は、階層化されたメニューの表示方法について紹介します。

これにより、メニューを煩雑にすることなく、展開/圧縮のようにファイル操作のオプションを複数用意することが可能です。
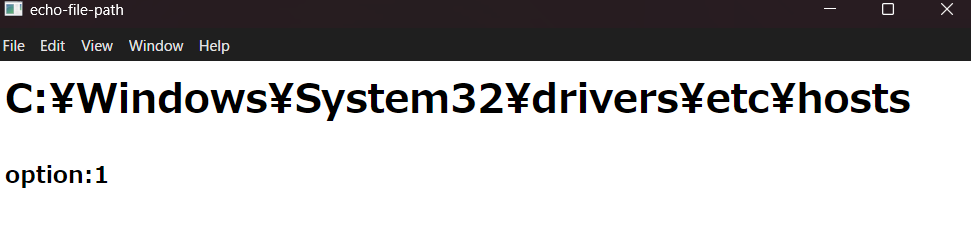
メニューを選択したときにアプリに正しくパラメータが渡っていることを確認するために、アプリ側ではファイルのパスと選択されたオプションを表示してみます。
完成形のレジストリ
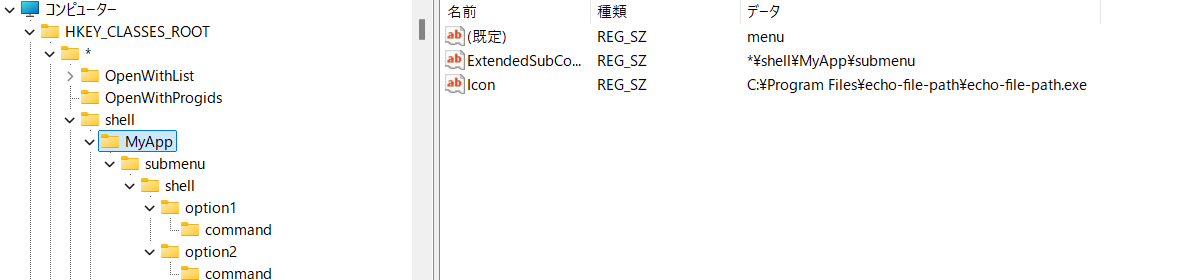
まず初めに、どのようにレジストリを登録すればメニュー表示となるかを見てみます。
以下の構造が、今回登録するレジストリです。
HKEY_CLASSES_ROOT
└ *
  └ shell
    └ MyApp
      ├ (Default): menu
      ├ ExtendedSubCommandsKey: *\shell\MyApp\submenu
      └ submenu
        └ shell
          └ option1
            ├ (Default): オプション1で開く
            └ command
              └ (Default): "{インストールパス}\echo-file-path.exe"  "%1" "1"
          └ option2
            ├ (Default): オプション2で開く
            └ command
              └ (Default): "{インストールパス}\echo-file-path.exe"  "%1" "2"
解説
- MyAppの(Default)が親メニュー名にあたります。
- ExtendedSubCommandsKey が、HKEY_CLASSES_ROOT直下からサブメニューの設定が置いてあるところまでのパスです。
- option1, option2 の(Default)がサブメニューに表示される名称です。
- commandの(Default)がメニューをクリックしたときの動作です。上記の例だと、第一引数: ファイルパス、第二引数: 1 or 2 を持ってアプリを起動するという処理になっています。
- 上記はファイル右クリック時のメニューを表示するレジストリです。HKEY_CLASSES_ROOT\Directory 配下に同様の構造を登録することで、フォルダ右クリック時のメニューにも表示することができます。
Electronの実装
前回の記事から変更のないファイル は省略します
main.js
第二引数(option)の読み取りを追加
main.js
'use strict';

const {app, BrowserWindow} = require("electron");

let mainWindow;

app.on('ready', function() {
  // 実行時引数取得
  let path = process.argv[1] ? encodeURI(process.argv[1]) : '';
  let option = process.argv[2] ?? '';
  mainWindow = new BrowserWindow({width: 800, height: 600, webPreferences: {
    nodeIntegration: false
  }});

  // URLパラメータで実行時引数を渡す
  mainWindow.loadURL('file://' + __dirname + '/index.html' + '?path=' + path + '&option=' + option );
});
index.html
optionの表示を追加
index.html
<h1 id="path"></h1>
<h3>option:<span id="option"></span></h3>

<script>
    document.getElementById("path").innerText = new URLSearchParams(window.location.search).get("path");
    document.getElementById("option").innerText = new URLSearchParams(window.location.search).get("option");
</script>
installer.nsh
インストール時: 前述したレジストリ構造を登録
アンインストール時: 登録したレジストリを削除
installer.nsh
!macro customInstall
  WriteRegStr HKEY_CLASSES_ROOT '*\shell\MyApp' '' 'menu'
  WriteRegStr HKEY_CLASSES_ROOT '*\shell\MyApp' 'ExtendedSubCommandsKey' '*\shell\MyApp\submenu'
  WriteRegStr HKEY_CLASSES_ROOT '*\shell\MyApp' 'Icon' '$INSTDIR\echo-file-path.exe'
  WriteRegStr HKEY_CLASSES_ROOT '*\shell\MyApp\submenu\shell\option1' '' 'オプション1で開く'
  WriteRegStr HKEY_CLASSES_ROOT '*\shell\MyApp\submenu\shell\option1\command' '' '"$INSTDIR\echo-file-path.exe" "%1" "1"'
  WriteRegStr HKEY_CLASSES_ROOT '*\shell\MyApp\submenu\shell\option2' '' 'オプション2で開く'
  WriteRegStr HKEY_CLASSES_ROOT '*\shell\MyApp\submenu\shell\option2\command' '' '"$INSTDIR\echo-file-path.exe" "%1" "2"'

  WriteRegStr HKEY_CLASSES_ROOT 'Directory\shell\MyApp' '' 'menu'
  WriteRegStr HKEY_CLASSES_ROOT 'Directory\shell\MyApp' 'ExtendedSubCommandsKey' 'Directory\shell\MyApp\submenu'
  WriteRegStr HKEY_CLASSES_ROOT 'Directory\shell\MyApp' 'Icon' '$INSTDIR\echo-file-path.exe'
  WriteRegStr HKEY_CLASSES_ROOT 'Directory\shell\MyApp\submenu\shell\option1' '' 'オプション1で開く'
  WriteRegStr HKEY_CLASSES_ROOT 'Directory\shell\MyApp\submenu\shell\option1\command' '' '"$INSTDIR\echo-file-path.exe" "%1" "1"'
  WriteRegStr HKEY_CLASSES_ROOT 'Directory\shell\MyApp\submenu\shell\option2' '' 'オプション2で開く'
  WriteRegStr HKEY_CLASSES_ROOT 'Directory\shell\MyApp\submenu\shell\option2\command' '' '"$INSTDIR\echo-file-path.exe" "%1" "2"'
!macroend

!macro customUnInstall
  DeleteRegKey HKEY_CLASSES_ROOT '*\shell\MyApp'
  DeleteRegKey HKEY_CLASSES_ROOT 'Directory\shell\MyApp'
!macroend
以上の点を修正し、electron-builderのビルドコマンドを実行しなおしてインストールすれば、ファイル/フォルダ右クリック時に階層化されたメニューが表示されるようになります
node_modules/.bin/electron-builder --win --x64
メニューで、「オプション1で開く」や「オプション2で開く」を選択すると、ファイル/フォルダのパスと、オプションの数値が表示されます。
以上で完了です。
最後に
今回は、前回の記事で今後の課題としていた階層化メニューについて取り上げました。
同じく課題として挙げていたWindows11のメニューへの登録については、対応しているアプリがいくつかあるようなので、それらのアプリのレジストリを確認して方法が分かれば記事にしたいと思います。
お読みいただきありがとうございました。