前回の記事ではHTTP+tomcat構成におけるセッション維持および共有ゾーンを利用したCookie情報の共有の動作を見ていきました。
次は、keepalivedを実装して且つHTTPS化した状態でのテストを実施してみます。
1. 前提
前回記事の構成をそのまま使用しています。本記事の内容を実施する場合、下記の記事を参照ください。
2. keepalivedのインストール
2台のNignxにnginx-ha-keepalivedをインストールします。
yum -y nginx-ha-keepalived
インストールを実行すると/usr/bin/nginx-ha-setup がインストールされます。
このnginx-ha-setupスクリプトファイルをそれぞれのNginxで実行します。
[root@nginx-plus-01 keepalived]# nginx-ha-setup
Thank you for using NGINX Plus!

This script is intended for use with RHEL/CentOS/SLES/Debian/Ubuntu-based systems.
It will configure highly available NGINX Plus environment in Active/Passive pair.

NOTE: you will need the following in order to continue:
 - 2 running systems (nodes) with static IP addresses
 - one free IP address to use as Cluster IP endpoint

It is strongly recommended to run this script simultaneously on both nodes,
e.g. use two terminal windows and switch between them step by step.

It is recommended to run this script under screen(1) in order to allow
installation process to continue in case of unexpected session disconnect.

Press <Enter> to continue...                                                # Enterを押します。

Step 1: configuring internal management IP addresses.

In order to communicate with each other, both nodes must have at least one IP address.

The guessed primary IP of this node is: 10.2.0.112/24

Do you want to use this address for internal cluster communication? (y/n)  # yを押します。
IP address of this host is set to: 10.2.0.112/24
Primary network interface: ens192

Now please enter IP address of a second node: 10.2.0.113/24                # 2号機のアドレスを入力します。
You entered: 10.2.0.113/24
Is it correct? (y/n)                                                       # yを押します。
★IP address of the second node is set to: 10.2.0.113/24

Press <Enter> to continue...                                               # Enterを押します。

Step 2: creating keepalived configuration

Now you have to choose cluster IP address.
This address will be used as en entry point to all your cluster resources.
The chosen address must not be one already associated with a physical node.

Enter cluster IP address: 10.2.0.1                                         # クライアントが通信する仮想IPを設定します。
You entered: 10.2.0.1/24
Is it correct? (y/n)                                                       # yを押します。

You must choose which node should have the MASTER role in this cluster.

Please choose what the current node role is:
1) MASTER
2) BACKUP

(on the second node you should choose the opposite variant)

★Press 1 or 2.                                                              # 1を押します。
This is the MASTER node.

Step 3: starting keepalived

Starting keepalived...
keepalived has been successfully started.

Press <Enter> to continue...                                               # Enterを押します。

Step 4: configuring cluster

Enabling keepalived and nginx at boot time...
情報:'systemctl enable nginx.service'へ転送しています。
情報:'systemctl enable keepalived.service'へ転送しています。
Created symlink from /etc/systemd/system/multi-user.target.wants/keepalived.service to /usr/lib/systemd/system/keepalived.service.
Initial configuration complete!

keepalived logs are written to syslog and located here:
/var/log/messages

Further configuration may be required according to your needs
and environment.
Main configuration file for keepalived can be found at:
 /etc/keepalived/keepalived.conf

To control keepalived, use 'service keepalived' command:
 service keepalived status

keepalived documentation can be found at:
http://www.keepalived.org/

NGINX-HA-keepalived documentation can be found at:
/usr/share/doc/nginx-ha-keepalived/README

Thank you for using NGINX Plus!
1号機では上記のように設定し、2号機では★のつけた部分のみ2号機に置き換えて実行します。
★IP address of the second node is set to: 10.2.0.112/24
★Press 1 or 2.                                                              # 2を押します。
2台とも設定が終わったら、1号機のkeepalivedを起動て仮想IPが付与されていることを確認。
systemctl start keepalived
ip a

2: ens192: <BROADCAST,MULTICAST,UP,LOWER_UP> mtu 1500 qdisc mq state UP group default qlen 1000
    link/ether 00:0c:29:2d:58:18 brd ff:ff:ff:ff:ff:ff
    inet 10.2.0.112/24 brd 10.2.0.255 scope global noprefixroute ens192
       valid_lft forever preferred_lft forever
★  inet 10.2.0.1/24 scope global secondary ens192
       valid_lft forever preferred_lft forever
2号機も同様に確認
systemctl start keepalived
ip a

2: ens192: <BROADCAST,MULTICAST,UP,LOWER_UP> mtu 1500 qdisc mq state UP group default qlen 1000
    link/ether 00:0c:29:19:53:ee brd ff:ff:ff:ff:ff:ff
    inet 10.2.0.113/24 brd 10.2.0.255 scope global noprefixroute ens192
       valid_lft forever preferred_lft forever
3. 証明書作成のための事前準備
まずは自己CAを作成する事前作業として、各ファイルに設定されている期間を1年/3年から50年に変更します。
sed -i "s/365/18250/g" /etc/pki/tls/openssl.cnf
sed -i "s/365/18250/g" /etc/pki/tls/misc/CA
sed -i "s/1095/18250/g" /etc/pki/tls/misc/CA
次にopenssl.cnfの設定(デフォルト値)を下記のように変更します。
vim /etc/pki/tls/openssl.cnf

130 countryName_default             = JP
135 stateOrProvinceName_default     = Tokyo
138 localityName_default            = Toshima-ku
141 0.organizationName_default      = Technical Engineer Department
148 organizationalUnitName_default  = NW-Engineer Dept.
:wq
4. 自己CA作成
自己CA用のopenssl.cnfをopenssl-ca.cnfとして作成します。
cp -p /etc/pki/tls/openssl.cnf /etc/pki/tls/openssl-ca.cnf
vim /etc/pki/tls/openssl-ca.cnf
172 basicConstraints=CA:TRUE
250 nsCertType = sslCA, emailCA
:wq
cd /etc/pki/tls
自己CAを作成します。
CADAYS="-days 18250" SSLEAY_CONFIG="-config /etc/pki/tls/openssl-ca.cnf" /etc/pki/tls/misc/CA -newca
CA certificate filename (or enter to create) # Enterを押します。
Making CA certificate ...
Generating a 2048 bit RSA private key
..............................................................+++
........................................................................+++
writing new private key to '/etc/pki/CA/private/./cakey.pem'
Enter PEM pass phrase: # パスフレーズを入力します。
Verifying - Enter PEM pass phrase: # もう一度パスフレーズを入力します。
-----
You are about to be asked to enter information that will be incorporated
into your certificate request.
What you are about to enter is what is called a Distinguished Name or a DN.
There are quite a few fields but you can leave some blank
For some fields there will be a default value,
If you enter '.', the field will be left blank.
-----
Country Name (2 letter code) [JP]: # Enterを押します。
State or Province Name (full name) [Tokyo]: # Enterを押します。
Locality Name (eg, city) [Toshima-ku]: # Enterを押します。
Organization Name (eg, company) [Technical Engineer Department]: # Enterを押します。
Organizational Unit Name (eg, section) [NW-Engineer Dept.]: # Enterを押します。
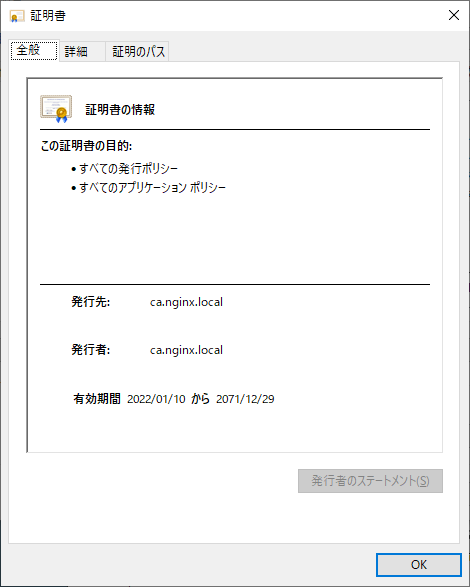
Common Name (eg, your name or your servers hostname) []:ca.nginx.local # ca用のCommonNameを入力します。
Email Address []: # Enterを押します。
Please enter the following 'extra' attributes
to be sent with your certificate request
A challenge password []: # Enterを押します。
An optional company name []: # Enterを押します。
Using configuration from /etc/pki/tls/openssl-ca.cnf
Enter pass phrase for /etc/pki/CA/private/./cakey.pem: # 先ほど入力したパスフレーズを入力します。
Check that the request matches the signature
Signature ok
Certificate Details:
Serial Number:
b6:36:72:b4:23:13:8a:45
Validity
Not Before: Jan 10 09:38:25 2022 GMT
Not After : Dec 29 09:38:25 2071 GMT
Subject:
countryName = JP
stateOrProvinceName = Tokyo
organizationName = Technical Engineer Department
organizationalUnitName = NW-Engineer Dept.
commonName = ca.nginx.local
X509v3 extensions:
X509v3 Subject Key Identifier:
50:AB:F4:7B:FC:8A:23:6C:51:14:BF:D8:9A:D1:B0:F8:6E:B1:09:FB
X509v3 Authority Key Identifier:
keyid:50:AB:F4:7B:FC:8A:23:6C:51:14:BF:D8:9A:D1:B0:F8:6E:B1:09:FB
X509v3 Basic Constraints:
CA:TRUE
Netscape Cert Type:
SSL CA, S/MIME CA
Certificate is to be certified until Dec 29 09:38:25 2071 GMT (18250 days)
Write out database with 1 new entries
Data Base Updated
5. 自己サーバ証明書作成
次にCSR発行時に使用するファイルをopenssl-server.cnfとして作成します。
cp -p /etc/pki/tls/openssl.cnf /etc/pki/tls/openssl-server.cnf
vim /etc/pki/tls/openssl-server.cnf
178 nsCertType                      = server
198 subjectAltName = @alt_names
225 subjectAltName = @alt_names
226
227 [ alt_names ]
228 DNS.1 = www.nginx.local
229 DNS.2 = app.nginx.local
:wq
CSRファイルを生成します。
DAYS="-days 18250" SSLEAY_CONFIG="-config /etc/pki/tls/openssl-server.cnf" /etc/pki/tls/misc/CA -newreq
etc/pki/tls/misc/CA -newreq
Generating a 2048 bit RSA private key
.......................................+++
.................+++
writing new private key to 'newkey.pem'
Enter PEM pass phrase:                                                          # パスフレーズを入力します。
Verifying - Enter PEM pass phrase:                                              # パスフレーズを入力します。
-----
You are about to be asked to enter information that will be incorporated
into your certificate request.
What you are about to enter is what is called a Distinguished Name or a DN.
There are quite a few fields but you can leave some blank
For some fields there will be a default value,
If you enter '.', the field will be left blank.
-----
Country Name (2 letter code) [JP]:                                              # Enterを押します。
State or Province Name (full name) [Tokyo]:                                     # Enterを押します。
Locality Name (eg, city) [Toshima-ku]:                                          # Enterを押します。
Organization Name (eg, company) [Technical Engineer Department]:                # Enterを押します。
Organizational Unit Name (eg, section) [NW-Engineer Dept.]:                     # Enterを押します。
Common Name (eg, your name or your servers hostname) []:www.nginx.local        # CommonNameを入力します。
Email Address []:                                                               # Enterを押します。

Please enter the following 'extra' attributes
to be sent with your certificate request
A challenge password []:                                                        # Enterを押します。
An optional company name []:                                                    # Enterを押します。
Request is in newreq.pem, private key is in newkey.pem
CSRをもとにサーバ証明書を作成します。
SSLEAY_CONFIG="-config /etc/pki/tls/openssl-server.cnf" /etc/pki/tls/misc/CA -sign
Enter pass phrase for /etc/pki/CA/private/cakey.pem:
Check that the request matches the signature
Signature ok
Certificate Details:
        Serial Number:
            b6:36:72:b4:23:13:8a:46
        Validity
            Not Before: Jan 10 09:55:04 2022 GMT
            Not After : Dec 29 09:55:04 2071 GMT
        Subject:
            countryName               = JP
            stateOrProvinceName       = Tokyo
            localityName              = Toshima-ku
            organizationName          = Technical Engineer Department
            organizationalUnitName    = NW-Engineer Dept.
            commonName                = www.nginx.local
        X509v3 extensions:
            X509v3 Basic Constraints:
                CA:FALSE
            Netscape Cert Type:
                SSL Server
            Netscape Comment:
                OpenSSL Generated Certificate
            X509v3 Subject Key Identifier:
                2D:58:CC:95:61:4D:B3:F9:1C:FA:CC:20:F9:57:42:F5:79:E1:97:5A
            X509v3 Authority Key Identifier:
                keyid:50:AB:F4:7B:FC:8A:23:6C:51:14:BF:D8:9A:D1:B0:F8:6E:B1:09:FB

            X509v3 Subject Alternative Name:
                DNS:www.nginx.local, DNS:app.nginx.local
Certificate is to be certified until Dec 29 09:55:04 2071 GMT (18250 days)
Sign the certificate? [y/n]:y                                                        # yを押します。

1 out of 1 certificate requests certified, commit? [y/n]y                            # yを押します。
Write out database with 1 new entries

~~~~~省略~~~~~
-----END CERTIFICATE-----
Signed certificate is in newcert.pem
6. 証明書/鍵の配置
サーバ証明書の準備ができたら、証明書と鍵をしかるべき場所に配置します。
mkdir /etc/nginx/ssl
chown nginx:nginx /etc/nginx/ssl
mv newcert.pem /etc/nginx/ssl/nginx.pem
openssl rsa -in /etc/pki/tls/newkey.pem -out /etc/nginx/ssl/nginx.key
Enter pass phrase for /etc/pki/tls/newkey.pem:                                      # CSR作成時のパフレーズを入力
writing RSA key

cd /etc/nginx/ssl/
chown nginx:nginx /etc/nginx/ssl/*
chmod 640 /etc/nginx/ssl/nginx.pem
chmod 600 /etc/nginx/ssl/nginx.key

mkdir /tmp/nginx-certs                                                              # 2号機転送用の準備
cp -p /etc/pki/CA/cacert.pem /tmp/nginx-certs/nginx-cacert.pem                      # CA証明書コピー
cp -p /etc/nginx/ssl/* /tmp/nginx-certs/                                            # サーバ証明書/鍵をコピー
cd /tmp
tar czvf nginx-certs.tar.gz nginx-certs
scp nginx-certs.tar.gz 10.2.0.113:/tmp/                                             # scpで2号機に転送

### 2号機作業
mkdir /etc/nginx/ssl
chown nginx:nginx /etc/nginx/ssl
cd /tmp
tar zxvf nginx-certs.tar.gz
cp -p nginx-certs/nginx.* /etc/nginx/ssl
7. Nginxファイル修正
配置した証明書と鍵を読み込ませてHTTPS化に対応できるよう変更します。(1号機/2号機ともに)
vim /etc/nginx/nginx.conf
 43     server {
 44         #listen 80;
 45         listen 443 ssl http2;
 46         server_name www.nginx.local;
 47         ssl_certificate /etc/nginx/ssl/nginx.pem;
 48         ssl_certificate_key /etc/nginx/ssl/nginx.key;
:wq

systemctl restart nginx
8. 動作確認
SSL証明書関連でエラーが出るのが嫌だったので、私が実行した環境では作成したnginx-cacert.pemをローカル端末にダウンロードし、信頼されたルート証明書機関にインストールしました。
また、端末のhostsも下記の通り書き換えました。(keepalivedのVIP)
10.2.0.1 www.nginx.local
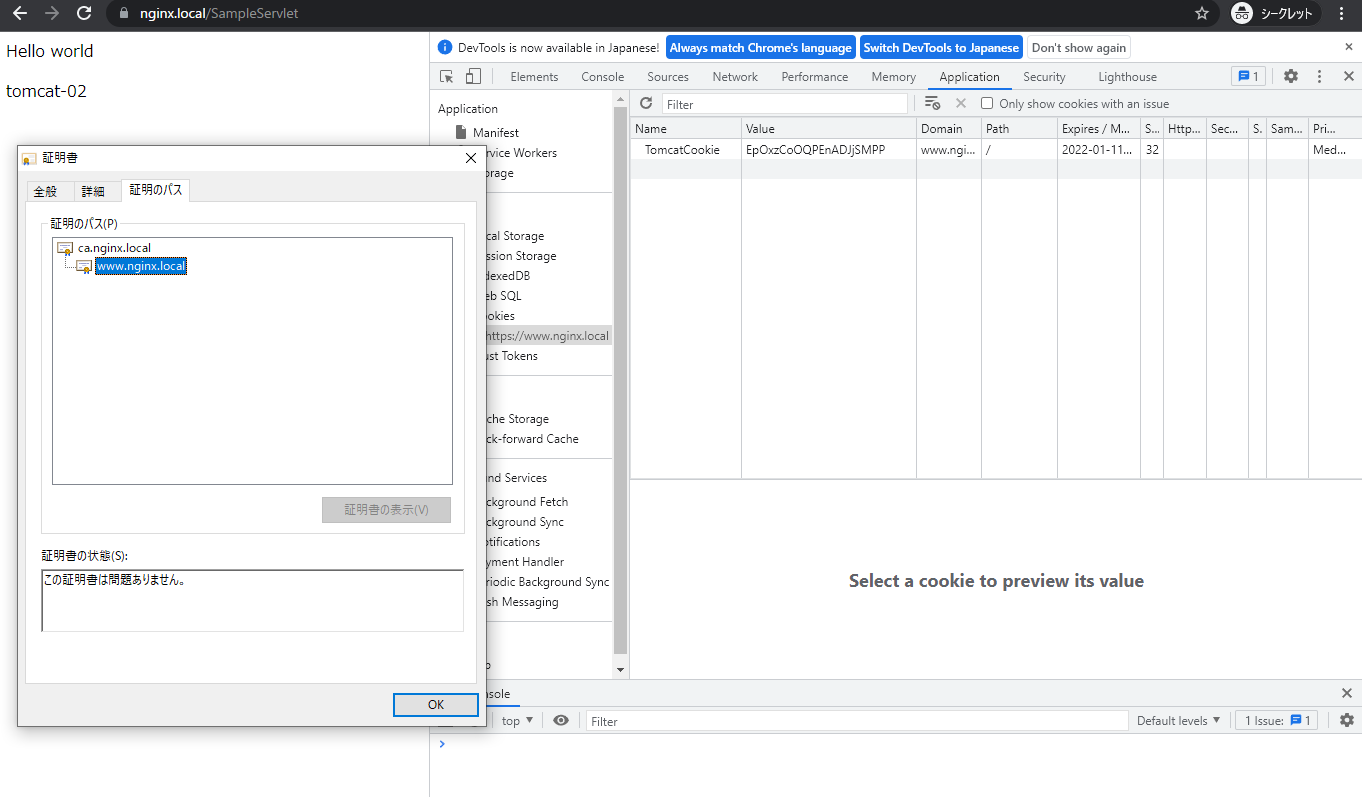
前回同様、www.nginx.localにアクセスしてみます。証明書も問題なくCookieも払い出されているのがわかります。
dumpも下記の通りです。
[root@nginx-plus-01 tls]# tcpdump -i ens224 port 8080 -nnn
tcpdump: verbose output suppressed, use -v or -vv for full protocol decode
listening on ens224, link-type EN10MB (Ethernet), capture size 262144 bytes
20:35:15.486548 IP 10.20.0.100.37792 > 10.20.0.2.8080: Flags [S], seq 2513320957, win 29200, options [mss 1460,sackOK,TS val 189437335 ecr 0,nop,wscale 7], length 0
20:35:15.486792 IP 10.20.0.2.8080 > 10.20.0.100.37792: Flags [S.], seq 4236307157, ack 2513320958, win 28960, options [mss 1460,sackOK,TS val 184718333 ecr 189437335,nop,wscale 7], length 0
20:35:15.486808 IP 10.20.0.100.37792 > 10.20.0.2.8080: Flags [.], ack 1, win 229, options [nop,nop,TS val 189437335 ecr 184718333], length 0
20:35:15.486972 IP 10.20.0.100.37792 > 10.20.0.2.8080: Flags [P.], seq 1:730, ack 1, win 229, options [nop,nop,TS val 189437335 ecr 184718333], length 729: HTTP: GET /example/SampleServlet HTTP/1.1
20:35:15.487039 IP 10.20.0.2.8080 > 10.20.0.100.37792: Flags [.], ack 730, win 238, options [nop,nop,TS val 184718334 ecr 189437335], length 0
20:35:15.488408 IP 10.20.0.2.8080 > 10.20.0.100.37792: Flags [P.], seq 1:338, ack 730, win 238, options [nop,nop,TS val 184718335 ecr 189437335], length 337: HTTP: HTTP/1.1 200 OK
20:35:15.488416 IP 10.20.0.100.37792 > 10.20.0.2.8080: Flags [.], ack 338, win 237, options [nop,nop,TS val 189437336 ecr 184718335], length 0
20:35:15.488477 IP 10.20.0.100.37792 > 10.20.0.2.8080: Flags [F.], seq 730, ack 338, win 237, options [nop,nop,TS val 189437336 ecr 184718335], length 0
20:35:15.488699 IP 10.20.0.2.8080 > 10.20.0.100.37792: Flags [F.], seq 338, ack 731, win 238, options [nop,nop,TS val 184718335 ecr 189437336], length 0
20:35:15.488712 IP 10.20.0.100.37792 > 10.20.0.2.8080: Flags [.], ack 339, win 237, options [nop,nop,TS val 189437337 ecr 184718335], length 0
では、nginxを停止してvipを2号機に切り替えます。
systemctl stop nginx        # 1号機で実施
ip a
ip a show ens192
2: ens192: <BROADCAST,MULTICAST,UP,LOWER_UP> mtu 1500 qdisc mq state UP group default qlen 1000
    link/ether 00:0c:29:2d:58:18 brd ff:ff:ff:ff:ff:ff
    inet 10.2.0.112/24 brd 10.2.0.255 scope global noprefixroute ens192
       valid_lft forever preferred_lft forever
アクセス確認した結果、同じくtomcat-02に割り振られていることがわかります。
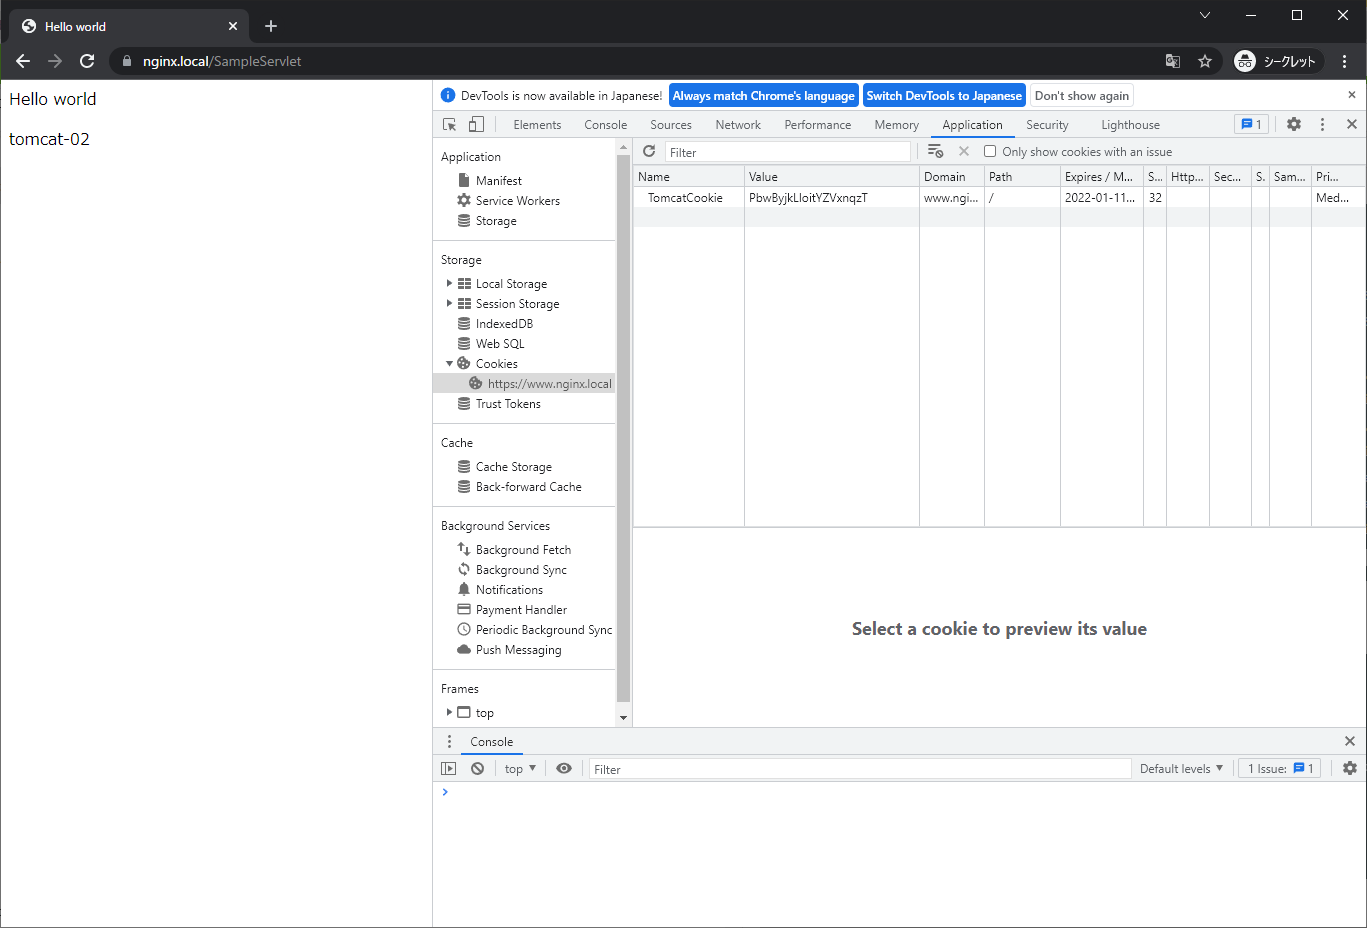
dumpの結果もhttpとかわらず、送信元は2号機になったものの割り振り先は2号機のままとなっています。
tcpdump: verbose output suppressed, use -v or -vv for full protocol decode
listening on ens224, link-type EN10MB (Ethernet), capture size 262144 bytes
20:44:14.936517 IP 10.20.0.101.45074 > 10.20.0.2.8080: Flags [S], seq 3861977258, win 29200, options [mss 1460,sackOK,TS val 189936784 ecr 0,nop,wscale 7], length 0
20:44:14.936668 IP 10.20.0.2.8080 > 10.20.0.101.45074: Flags [S.], seq 1097718939, ack 3861977259, win 28960, options [mss 1460,sackOK,TS val 185257783 ecr 189936784,nop,wscale 7], length 0
20:44:14.936681 IP 10.20.0.101.45074 > 10.20.0.2.8080: Flags [.], ack 1, win 229, options [nop,nop,TS val 189936784 ecr 185257783], length 0
20:44:14.936726 IP 10.20.0.101.45074 > 10.20.0.2.8080: Flags [P.], seq 1:730, ack 1, win 229, options [nop,nop,TS val 189936784 ecr 185257783], length 729: HTTP: GET /example/SampleServlet HTTP/1.1
20:44:14.936790 IP 10.20.0.2.8080 > 10.20.0.101.45074: Flags [.], ack 730, win 238, options [nop,nop,TS val 185257783 ecr 189936784], length 0
20:44:14.937771 IP 10.20.0.2.8080 > 10.20.0.101.45074: Flags [P.], seq 1:338, ack 730, win 238, options [nop,nop,TS val 185257784 ecr 189936784], length 337: HTTP: HTTP/1.1 200 OK
20:44:14.937779 IP 10.20.0.101.45074 > 10.20.0.2.8080: Flags [.], ack 338, win 237, options [nop,nop,TS val 189936785 ecr 185257784], length 0
20:44:14.937853 IP 10.20.0.101.45074 > 10.20.0.2.8080: Flags [F.], seq 730, ack 338, win 237, options [nop,nop,TS val 189936785 ecr 185257784], length 0
20:44:14.938025 IP 10.20.0.2.8080 > 10.20.0.101.45074: Flags [F.], seq 338, ack 731, win 238, options [nop,nop,TS val 185257785 ecr 189936785], length 0
20:44:14.938032 IP 10.20.0.101.45074 > 10.20.0.2.8080: Flags [.], ack 339, win 237, options [nop,nop,TS val 189936785 ecr 185257785], length 0
8. その他
Nginx Plusを冗長化構成にした際の挙動(共有メモリゾーン)についてみていきました。オンプレ環境であれば今回のような構成で使う機会もあるのではないでしょうか。その際どなたかのお役に立てば幸いです。