前回はForitgateVMとVyOSをアプライアンスとして登録するところまで実施しました。今回はその二つを使ったダイナミックルーティングの検証をしてみたいと思います。GNS3はこれからという方は以下の記事を参考にしてもらえると幸いです。
1. 検証構成
GNS3での検証構成は下記の通りです。

Fortigateについては、GUIでの操作もできるように仮想OSのインタフェース(雲の形をしたアイコン)をPort1とマッピングしています。これが出来るおかげで操作端末から直接ブラウザアクセスが可能となります。複数台Fortigateがある時は間にSwitchアイコンをいれてあげましょう。それ以外は特別な事はしていません。上記構成もアプライアンスとして登録したFortigateVM・VyOSあとデフォルトで準備されているSwitchとVPCSというPCのアイコンをドラックアンドドロップし、線でつなぐだけです。簡単に作る事が出来ます。超便利です!
2. Fortigate/VyOS起動
早速起動してみましょう。アイコンを右クリックして「Start」をクリックします。全台同時に起動する事もできますがCPU負荷がかなり上がるため、1台ずつStartしています。
以下、Fortigate起動時のメッセージです。
System is starting...
Formatting shared data partition ... done!
Starting system maintenance...
Serial number is XXXXXXXXXXXXXXXX


Disk usage changed, please wait for reboot...

Formatting the disk...
- unmounting /data2 :  ok
Partitioning and formatting /dev/vdb label LOGUSEDXF5E7A44B ... done


The system is going down NOW !!

Please stand by while rebooting the system.
Restarting system.

System is starting...
Serial number is FGVMEVCW1ZNVFXF9


FortiGate-VM64-KVM login: admin
Password:
You are forced to change your password. Please input a new password.
New Password:
Confirm Password:
Confirm Password:
Welcome!

FortiGate-VM64-KVM #
FortiGate-VM64-KVM #
こちらはVyOSです。
[   13.625100] bridge: filtering via arp/ip/ip6tables is no longer available by default. Update your scripts to load br_netfilter if you need this.
[   13.662430] Bridge firewalling registered
[   13.769832] mpls_gso: MPLS GSO support

Welcome to VyOS - vyos ttyS0

vyos login: vyos
Password:
Linux vyos 5.4.149-amd64-vyos #1 SMP Mon Sep 27 17:44:04 UTC 2021 x86_64

The programs included with the Debian GNU/Linux system are free software;
the exact distribution terms for each program are described in the
individual files in /usr/share/doc/*/copyright.

Debian GNU/Linux comes with ABSOLUTELY NO WARRANTY, to the extent
permitted by applicable law.
vyos@vyos:~$
3. 設定投入
では、VyOSから設定を投入していきます。
conf

set interfaces ethernet eth0 address 192.168.100.2/24    # eth0のIPをセット
set interfaces ethernet eth1 address 172.16.253.254/24   # eth1のIPをセット
set interfaces loopback lo address 10.10.10.2/32         # ループバックI/FのIPをセット

set protocols ospf area 0                                # OSPF定義追加
set protocols ospf area 0 network 192.168.100.0/24       # ネットワークコマンドでWAN側設定
set protocols ospf area 0 network 172.16.253.0/24        # ネットワークコマンドでLAN側設定
set protocols ospf parameters router-id 10.10.10.2       # router-IDをループバックとして設定
続いてFortigate。まずはコンソール上で
config system interface
edit port1
set allowaccess http ping ssh fgfm    # 管理用I/Fにブラウザアクセスできるよう設定
end
これで、ブラウザアクセスできるようになりますので、DHCPで割り当てられたIPをブラウザにセットしてアクセスします。まずはインタフェースを下記の通り設定します。

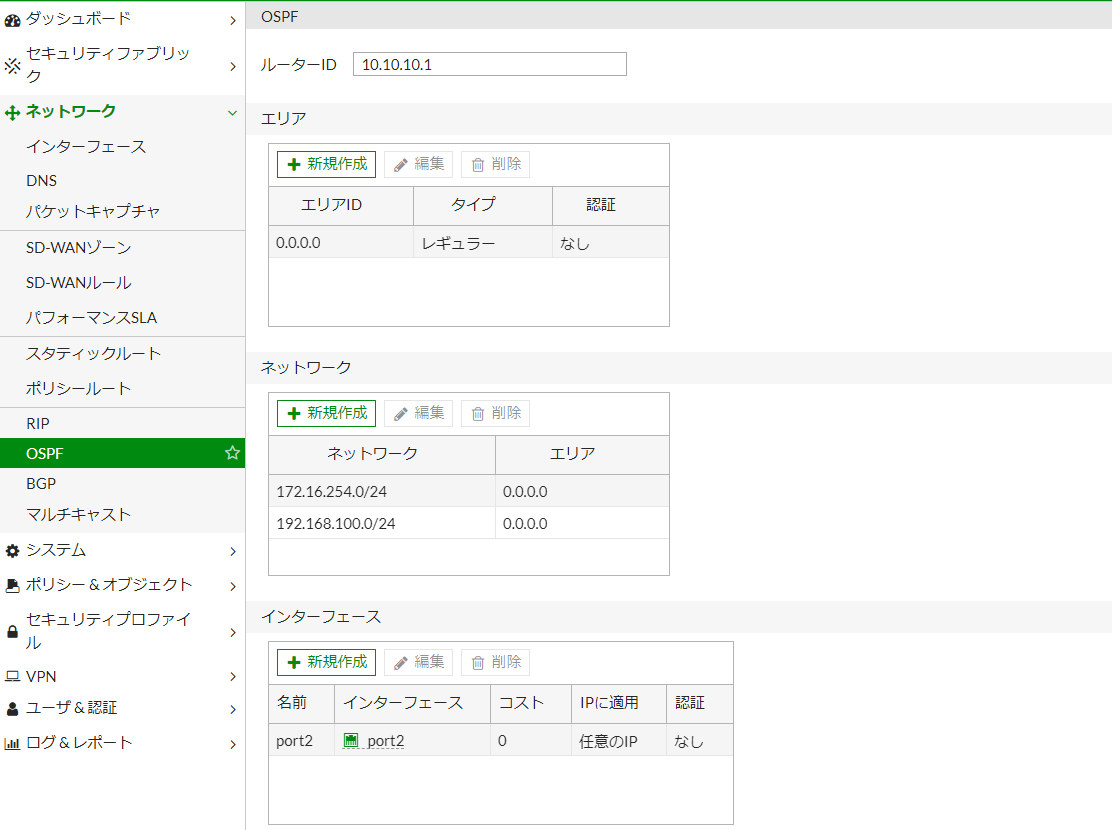
次はOSPFの設定です。画面左のネットワークから「OSPF」をクリックします。画面遷移したら下記の通り設定しましょう。
これで準備が整いました。Fortigateは即時反映の機器ですが、VyOSは反映のためcommitする必要がありますのでVyOSのコンソールにもどって
commit
save
exit
としてあげましょう。
4. ステータス確認
実際にOSPFで会話できているのかどうか確認してみます。FortigateVMのコンソールで確認します。
FortiGate-VM64-KVM # get router info ospf neighbor
OSPF process 0, VRF 0:
Neighbor ID     Pri   State           Dead Time   Address         Interface
10.10.10.2        1   Full/Backup     00:00:34    192.168.100.2   port2
FortiGate-VM64-KVM # get router info ospf route

OSPF process 0:
Codes: C - connected, D - Discard, O - OSPF, IA - OSPF inter area
       N1 - OSPF NSSA external type 1, N2 - OSPF NSSA external type 2
       E1 - OSPF external type 1, E2 - OSPF external type 2

O  172.16.253.0/24 [101] via 192.168.100.2, port2, Area 0.0.0.0
C  172.16.254.0/24 [1] is directly connected, port3, Area 0.0.0.0
C  192.168.100.0/24 [1] is directly connected, port2, Area 0.0.0.0
Neighborがはれていて、経路情報も広報されているのが分かります。VyOSでも確認しましょう。
vyos@vyos:~$ show ip ospf neighbor

Neighbor ID     Pri State           Dead Time Address         Interface                        RXmtL RqstL DBsmL
10.10.10.1        1 Full/DR           38.410s 192.168.100.1   eth0:192.168.100.2                   0     0     0

vyos@vyos:~$ show ip route
Codes: K - kernel route, C - connected, S - static, R - RIP,
       O - OSPF, I - IS-IS, B - BGP, E - EIGRP, N - NHRP,
       T - Table, v - VNC, V - VNC-Direct, A - Babel, D - SHARP,
       F - PBR, f - OpenFabric,
       > - selected route, * - FIB route, q - queued, r - rejected, b - backup

C>* 10.10.10.2/32 is directly connected, lo, 00:17:49
O   172.16.253.0/24 [110/100] is directly connected, eth1, weight 1, 00:17:12
C>* 172.16.253.0/24 is directly connected, eth1, 01:56:22
O>* 172.16.254.0/24 [110/101] via 192.168.100.1, eth0, weight 1, 00:16:55
O   192.168.100.0/24 [110/100] is directly connected, eth0, weight 1, 00:17:00
C>* 192.168.100.0/24 is directly connected, eth0, 01:59:10
vyos@vyos:~$
同じく経路情報が広報されているのが分かります。
5. 疎通確認
最後に172.16.[253|254]配下にいる端末(PC1/PC2)間で疎通確認してみましょう。そのため一時的にFortigateのPolicyは下記の通り設定しました。※これもSourceNATとかDstNATとか少しややこしい部分があるので、いずれ記事にしたいと思います。。。

では、PC1からIP/GWを設定してみます。PC1のコンソールを起動して
PC1> ip 172.16.254.10/24 172.16.254.254
Checking for duplicate address...
PC1 : 172.16.254.10 255.255.255.0 gateway 172.16.254.254

PC1> save
Saving startup configuration to startup.vpc
.  done

PC1>
続いてPC2も。
PC2> ip 172.16.253.10/24 172.16.253.254
Checking for duplicate address...
PC2 : 172.16.253.10 255.255.255.0 gateway 172.16.253.254

PC2> save
Saving startup configuration to startup.vpc
.  done

PC2>
それでは、Pingしてみましょう。
PC1> ping 172.16.253.10

84 bytes from 172.16.253.10 icmp_seq=1 ttl=62 time=4.246 ms
84 bytes from 172.16.253.10 icmp_seq=2 ttl=62 time=1.974 ms
84 bytes from 172.16.253.10 icmp_seq=3 ttl=62 time=1.178 ms
84 bytes from 172.16.253.10 icmp_seq=4 ttl=62 time=1.092 ms
84 bytes from 172.16.253.10 icmp_seq=5 ttl=62 time=1.066 ms

PC1>
到達しました!
6. その他
GNS3上でFortigate/VyOSを利用したOSPFの検証を実施してみました。いかがでしたでしょうか。GNS3を利用する事でこういったベーシックな機能検証はもちろんの事、実際のWAN回線を模した複雑な構成検証なども比較的簡単で楽に実施できます。何よりも超便利です。VyOSもコマンドはネットワーク機器で広く利用されているベンダーのものがベースになっていますので、試験勉強の役にも立つと思います。※この記事がどなたかのお役に立てば幸いです。