古典的ですが自分のためにまとめておきます。
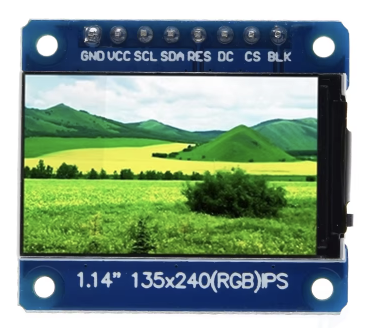
1.14 135x240
XIAO RP2040と接続しました。
写真は少しボケましたが、非常にキレイです。満足
| 1 | 2 | 3 | 4 | 5 | 6 | 7 | 8 | 9 |
|---|---|---|---|---|---|---|---|---|
| Display | GND | VCC | SCL | SDA | RES | DC | CS | BLK |
| XIAO RP2040 | GND | 3V3 | P2 SCK | P3 MOSI | P6 | P7 | P1 CSn | P0 |
XIAO RP2040のファームは以下を使います。
以下をデバイスのルートに置きます。
from machine import Pin, SPI
import st7789

TFA = 40    # top free area when scrolling
BFA = 40	# bottom free area when scrolling

def config(rotation=0, buffer_size=0, options=0):
    Pin(0, Pin.OUT, value=1) # backlight
    return st7789.ST7789(
        SPI(0, baudrate=62500_000, polarity=0, phase=0, sck=Pin(2, Pin.OUT), mosi=Pin(3, Pin.OUT), miso=None),
        135,
        240,
        reset=Pin(6, Pin.OUT),
        cs=Pin(1, Pin.OUT),
        dc=Pin(7, Pin.OUT),
        backlight=Pin(0, Pin.OUT),
        rotation=rotation,
        options=options,
        buffer_size=buffer_size)
個人的によく使う「書き換えできるテキスト」のサンプルです。
from machine import Pin, SPI
import st7789
import tft_config

tft = tft_config.config(0)
tft.init()

#Pin(0, Pin.OUT, value=1)


#import vga1_8x8 as font
#import vga1_8x16 as font
#import vga1_16x16 as font
#import vga1_bold_16x16 as font
#import vga1_bold_16x32 as font

#import vga1_16x32 as font
import vga2_16x32 as font

tft.rotation(1)

'''
rotation(0):
+------+
|      |* terminals
|      |*  |
|      |*  |
|      |*  |
|      |*  v
+------+

rotation(1):

  terminals
+-----------+
|           |
|           |
|           |
+-----------+
'''


tft.text(font, "XIAO RP2040", 16, 48, st7789.WHITE, st7789.BLACK)

import time
time.sleep(1)

tft.fill(st7789.BLACK)

class TextBox:
    def __init__(self,x,y,font,fc,bc):
        self.x=x
        self.y=y
        self.s=''
        self.font=font
        self.fc=fc # text color
        self.bc=bc # background color
        tft.text(self.font, self.s,
            self.x,self.y,
            self.fc,self.bc
         )
    def draw(self,s):
        tft.text(self.font, self.s,
            self.x,self.y,
            self.bc,self.bc
         )
        tft.text(self.font, s,
            self.x,self.y,
            self.fc,self.bc
                 )
        self.s=s

label0=TextBox(0,0*32,font,st7789.YELLOW, st7789.BLACK)
label1=TextBox(0,1*32,font,st7789.CYAN, st7789.BLACK)
label2=TextBox(0,2*32,font,st7789.MAGENTA, st7789.BLACK)
label3=TextBox(0,3*32,font,st7789.GREEN, st7789.BLACK)

label0.draw("  vga2_16x32")
label1.draw("--- use SPI ---")
label2.draw("   magenta")
label3.draw("        Fine.")
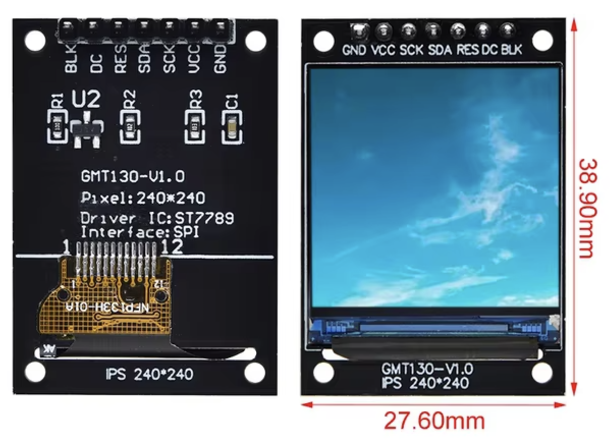
1.3 240x240
MicroPythonで動かしたかったのですが、諦めました。
CSを追加する猛者もいらっしゃるようですが...
SPIのモードを変えれば動かせる、という記事も見かけたのですが、RP2040 + MicroPythonではどうも動きません。本当は波形を見るべきなのでしょうが、とりあえず諦め。
改造せず、Arduinoで動かすことができました。
PIO + Arduino ライブラリは TFT_eSPI を使いました。
; PlatformIO Project Configuration File
;
;   Build options: build flags, source filter
;   Upload options: custom upload port, speed and extra flags
;   Library options: dependencies, extra library storages
;   Advanced options: extra scripting
;
; Please visit documentation for the other options and examples
; https://docs.platformio.org/page/projectconf.html

[env:pico]
platform = https://github.com/maxgerhardt/platform-raspberrypi.git
board = pico
framework = arduino
board_build.core = earlephilhower
lib_deps = bodmer/TFT_eSPI

build_flags =
    -DUSER_SETUP_LOADED=1
    -DUSER_SETUP_ID=137
    -DST7789_DRIVER=1
    -DTFT_WIDTH=240
    -DTFT_HEIGHT=240
    -DCGRAM_OFFSET=1
    -DTFT_CS=-1
    -DTFT_RST=6
    -DTFT_DC=7
    -DTFT_MOSI=3
    -DTFT_SCLK=2
    -DSPI_FREQUENCY=40000000
    -DSPI_READ_FREQUENCY=20000000
    -DSPI_TOUCH_FREQUENCY=2500000
    -DLOAD_GLCD=1
    -DLOAD_FONT2=1
    -DLOAD_FONT4=1
    -DLOAD_FONT6=1
    -DLOAD_FONT7=1
    -DLOAD_FONT8=1
    -DLOAD_GFXFF=1
    -DSMOOTH_FONT=1
    -TFT_SPI_MODE=SPI_MODE3
TFT_eSPI の設定はいくつかやり方があるようですが、ここではビルドオプションを使う方法です。ここで SPI モードも指定して、動くようになりました。
これもしょうもないサンプルですが
#include <TFT_eSPI.h>

#include <stdio.h>
#include "pico/stdlib.h"

#define TFT_BL 0

#define LED 25

TFT_eSPI tft = TFT_eSPI();

void setup()
{
  pinMode(LED, OUTPUT);

  pinMode(TFT_BL, OUTPUT);
  digitalWrite(TFT_BL, 1);

  tft.init();
  tft.setRotation(0);

  //  *******
  // +-------+
  // |       |
  // |       |
  // +-------+


  tft.setTextSize(2);
  tft.setSwapBytes(true);
  // analogWrite(TFT_BL, 0xff);

  tft.setTextColor(TFT_WHITE);

}

void print_demo_text() {
  tft.setTextColor(TFT_CYAN);
  tft.println("Hello XIAO RP2040");
  tft.setTextColor(TFT_YELLOW);
  tft.println("abcdefghijklmnopqrstuvwxyz");
  tft.setTextColor(TFT_WHITE);
  tft.println("012345678901234567890123456789012345678901234567890123456789");
}

void loop()
{

  // 0 same as 1
  tft.fillScreen(TFT_BLACK);
  digitalWrite(LED, !digitalRead(LED));
  tft.setCursor(0, 0);
  tft.setTextFont(0);
  tft.println("font 0");
  print_demo_text();
  delay(2000);

  // font 2
  digitalWrite(LED, !digitalRead(LED));
  tft.fillScreen(TFT_BLACK);
  tft.setCursor(0, 0);
  tft.setTextFont(2);
  tft.println("font 2");
  print_demo_text();
  delay(2000);

  // font 4 good looking
  digitalWrite(LED, !digitalRead(LED));
  tft.fillScreen(TFT_BLACK);
  tft.setCursor(0, 0);
  tft.setTextFont(4);
  tft.println("font 4");
  print_demo_text();
  delay(2000);

}
platformio.ini を編集して、PIO + Arduino + STM32 NUCLEO でも動かすことができました。やった!
ブレッドボードでは接続が不安定だったので、はんだ付けしてみました。良好です!
(追記)Nucleo 用 platformio.ini 編集
- 相変わらず波形を見ていないのでアレですが... この場合、
SPI_MODE3を指定しなくても動きました。 - Nucleoではなくて Generic な基板でも動かすことを見越して、ピン定義を Arduino 番号ではなくて、デバイスのポート番号にしてみました。
- 個人的に font=4 が気に入ったので、容量をケチるためほかをコメントアウトしました。
[env:nucleo_g070rb]
platform = ststm32
board = nucleo_g070rb
framework = arduino


lib_deps = bodmer/TFT_eSPI

build_flags =
    -DUSER_SETUP_LOADED=1
    -DUSER_SETUP_ID=137
    -DST7789_DRIVER=1
    -DTFT_WIDTH=240
    -DTFT_HEIGHT=240
    -DCGRAM_OFFSET=1
    -DTFT_CS=-1
    -DTFT_RST=PA9 ; PA9 = D8
    -DTFT_DC=PC7 ; PC7 = D9
    -DTFT_MOSI=PA7  ; PA7 = D11 = SPI1_MOSI
    -DTFT_SCLK=PA5   ; PA5 = D13 = SPI1_SCK
    -DSPI_FREQUENCY=62500000
    -DSPI_READ_FREQUENCY=20000000
    -DSPI_TOUCH_FREQUENCY=2500000
    -DLOAD_GLCD=1
;   -DLOAD_FONT2=1
    -DLOAD_FONT4=1
;    -DLOAD_FONT6=1
;    -DLOAD_FONT7=1
;    -DLOAD_FONT8=1
    -DLOAD_GFXFF=1
    -DSMOOTH_FONT=1
;    -TFT_SPI_MODE=SPI_MODE3

; Wow!
; NUCLEO don't request "SPI_MODE3" option!


