Node.jsって言語なの?
Node.jsは言語ではなくJavaScriptを使ったサーバサイドの設計手法のようなもの
使うメリット
Node.jsはJavaScriptを学ぶだけでクライアントとサーバーも作ることができることができる。
非同期処理が得意なのでラインやチャットなどのリアルタイムアプリに向いている。
Node.jsの環境構築
ここからNode.jsの環境構築をまとめます。
nodeインストール
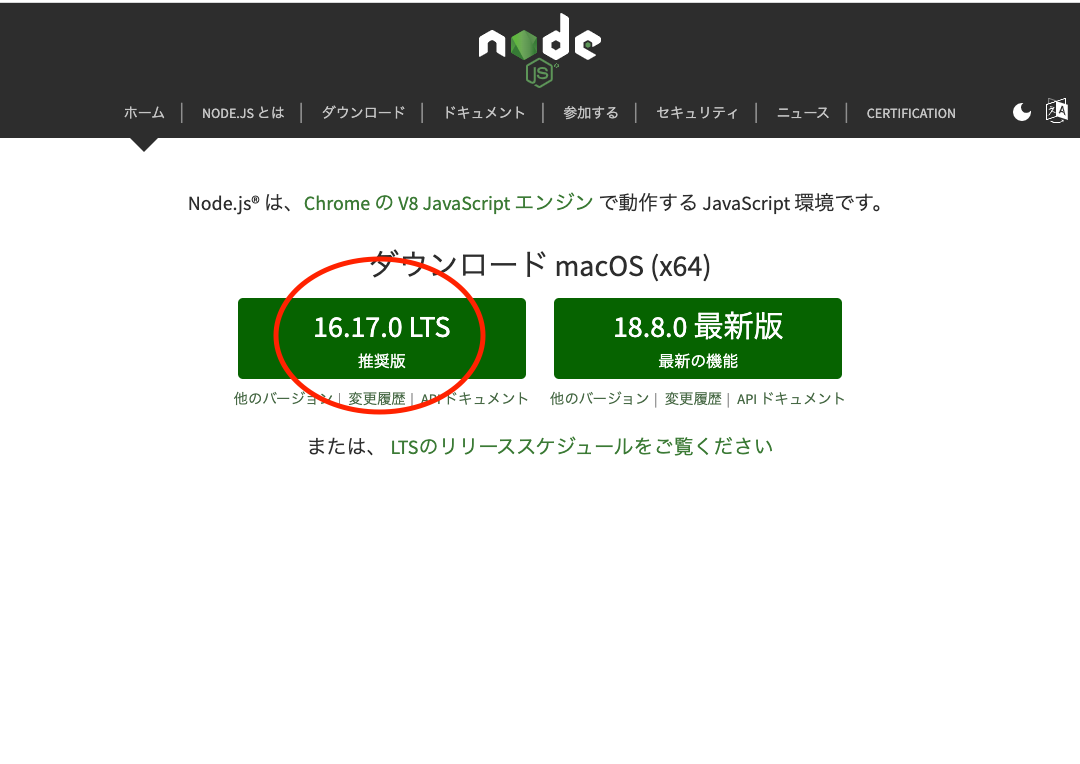
まずは公式ホームページからNode.jsをインストールしましょう。
Node.js公式
nodebrewを使ったやり方の方が望ましいですが今回は公式ページからダウンロードします。
npmを使ってモジュールをダウンロードする。
npmとはアプリで使う部品(モジュール)インストールした時の依存関係を管理するものです。
Node.jsをダウンロードすると。
npmコマンドが使えるようになります。
ターミナルを開いて以下のコマンドを実行してみましょう。
$ npm -v
Node.jsが正しくインストールされていればバージョンが出てくるはずです。
ここまでできたら次にnpmの初期化コマンドを実行しpackgeファイルを作成します。
$ npm init -y
コマンド実行後このようなファイルが自動生成されます
packge.jsonlはインストールしたモジュールのバージョンを管理するものです
{
  "name": "test",
  "version": "1.0.0",
  "description": "",
  "main": "index.js",
  "scripts": {
    "test": "echo \"Error: no test specified\" && exit 1"
  },
  "keywords": [],
  "author": "",
  "license": "ISC"
}
ここからモジュールをインストールしていきます。
$ npm install --save-dev http
httpがインストールされたと思います。
httpモジュールとはクライアントとサーバーがやりとりができるようになるもの。
{
  "name": "test",
  "version": "1.0.0",
  "description": "",
  "main": "index.js",
  "scripts": {
    "test": "echo \"Error: no test specified\" && exit 1"
  },
  "keywords": [],
  "author": "",
  "license": "ISC",
  "devDependencies": {
    "http": "^0.0.1-security"
  }
}
サーバーを立てよう
モジュールのインストールが完了したのでここから実際にサーバーを立ててみようと思います。
サーバを立てるにあたってserver.jsファイルを作成します。
requireでhttpを読み込みます。
const http = require("http");
package.jsonlで作成したserver.jsファイルを指定してあげましょう。
{
  "name": "test",
  "version": "1.0.0",
  "description": "",
  "main": "index.js",
  "scripts": {
    "dev": "node server.js"
  },
  "keywords": [],
  "author": "",
  "license": "ISC",
  "devDependencies": {
    "http": "^0.0.1-security"
  }
}
これでサーバーを立てる準備が整いましたがこのまま立ち上げても何も表示されません。
ここからブラウザに表示させる処理を記述します。
const http = require("http");
const PORT = 8000;

//webサーバーを作ろう
const server = http.createServer((req, res) => {
  //ブラウザからアクセスが来た時の処理
  res.writeHead(200, { "Content-Type": "text/html" });
  res.write("<h1>Hello World!</h1>");
  res.end();
})

server.listen(PORT, () => {
  console.log("server running!")
});
一つず解説していくと
httpメソッドを使用してサーバを作成します。その際に引数を受け取ることができるのでブラウザから来たリクエスト(req)とレスポンス(res)を引数として受け取ります.
const server = http.createServer((req, res) => {
})
レスポンスの中にはwriteHeadという関数があります。
レスポンスを返すときにHead情報を付与してやり取りをしていきます。
Head情報に200というアクセスが成功したステータスコード記述しタイプを指定してあげます。
const server = http.createServer((req, res) => {
  //ブラウザからアクセスが来た時の処理
  res.writeHead(200, { "Content-Type": "text/html" });
})
次にwrite出力したいhtml要素の書き込みを行っていきます。
最後にendを忘れずに記述しましょう。
const server = http.createServer((req, res) => {
  //ブラウザからアクセスが来た時の処理
  res.writeHead(200, { "Content-Type": "text/html" });
  res.write("<h1>Hello World!</h1>");
  res.end();
})
最後にサーバを立ち上げるためにポート番号を指定してあげます。
サーバーが立ち上がったことが分かりやすくするためconsole.logを書いています。
const http = require("http");
const PORT = 8000;

//webサーバーを作ろう
const server = http.createServer((req, res) => {
  //ブラウザからアクセスが来た時の処理
  res.writeHead(200, { "Content-Type": "text/html" });
  res.write("<h1>Hello World!</h1>");
  res.end();
})

server.listen(PORT, () => {
  console.log("server running!")
});
コマンドでサーバーを立ち上げましょう。
$ npm run dev
これでサーバーが立ち上がったのでhttp://localhost:8000/
で確認することができます。

ただここでテキストを書いていくのは大変なので
res.write("<h1>Hello World!</h1>");
index.htmlファイルを作成します。
<!DOCTYPE html>
<html lang="en">
<head>
  <meta charset="UTF-8">
  <meta name="viewport" content="width=device-width, initial-scale=1.0">
  <title>Document</title>
</head>
<body>
  <h1>Hello World!</h1>
</body>
</html>
server.jsで先ほど作成したindex.htmlファイルを読み込んであげると先ほどと同じようにブラウザに表示させることができます。
const http = require("http");
const PORT = 8000;
const html = require("fs").readFileSync("./index.html");

//webサーバーを作ろう
const server = http.createServer((req, res) => {
  //ブラウザからアクセスが来た時の処理
  res.writeHead(200, { "Content-Type": "text/html" });
  res.write(html);
  res.end();
})

server.listen(PORT, () => {
  console.log("server running!")
});
まとめ
今回は生のNode.jsを使った環境構築になります。
初めてのNode.jsでしたがjavaScriptのみでクライアントとサーバーを作ることができるのはとても驚きました。
今後はフレームワークを使ったやり方も学んでいきたいと思います。
プログラミングチュートリアルさんの動画を参考に今回は環境構築をおこなったのでよければご参考ください!
初めてのNode.js入門!環境構築からWebサーバーを作ってみよう!