結論
コードでAutoLayoutすればイケる。
// ボタンの生成
let authorizationButton = ASAuthorizationAppleIDButton(type: .signIn, style: .white)
// コードでAutoLayoutするためのおまじない(意味を知りたい方は調べてください)
authorizationButton.translatesAutoresizingMaskIntoConstraints = false
// Storyboardで作成済みのUIStackViewに追加
self.signInBtnStackView.insertArrangedSubview(authorizationButton, at: 0)
// サイズ比率のAutoLayoutを記述(この場合は5:1の割合になる)
authorizationButton.widthAnchor.constraint(equalTo: authorizationButton.heightAnchor, multiplier: 5/1).isActive = true
Sign in with Appleボタンとは
アプリ内でログインが必要な場合に、自前のサーバーでアカウントを管理せずにApple IDを利用してログインしてもらうことができる機能が「Sign in with Apple」。
そしてその機能を利用する際に、自身でログインボタンを作らなくてもAppleがログインボタンのクラス(ASAuthorizationAppleIDButton)を用意してくれているので、開発者はそれをViewに追加するだけで済むというボタンのこと。
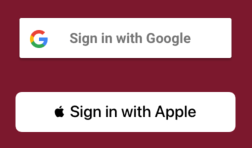
iPhoneユーザーなら一度は見たことであろうあのボタンである。

Apple公式より引用
自分で用意しなくていいのは楽だけど、、、
例えばFirebase Authなどで「Sign in with Google」も一緒に設置する場合、こちらも同じくGoogleが用意しているGIDSignInButtonを利用することができる。がしかし、
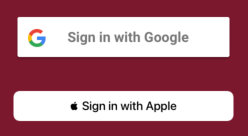
このように、GoogleとAppleがデフォルトにしているボタンの大きさが異なるのでどちらかを揃えなければならない。
気にしなければよいという意見があるかもしれないが、Appleのドキュメントに
Make a Sign in with Apple button no smaller than other sign-in buttons
(他のサインインボタンより小さくしないで!)
と明記されているので恐らくこのままではリリース審査で指摘されてしまう。
bounds変えれば良いのでは?
// ボタンの生成
let authorizationButton = ASAuthorizationAppleIDButton(type: .signIn, style: .white)
// Storyboardで作成済みのUIStackViewに追加
self.signInBtnStackView.insertArrangedSubview(authorizationButton, at: 0)
// boundsのサイズを変更
authorizationButton.bounds.size = CGSize(width: <CGFloat>, height: <CGFloat>)
こんな感じで、boundsのサイズを変えてみるも、UIStackViewでAutoLayoutが使用されるためコードでのサイズ変更は全く効かない。
(UIStackViewを使用しているのは、Storyboard上で「ログインせずに使用する」ボタンを定義しているのでそれに簡単に揃えたかったからです)
答え: コードでもAutoLayoutを使う!
// ボタンの生成
let authorizationButton = ASAuthorizationAppleIDButton(type: .signIn, style: .white)
// コードでAutoLayoutするためのおまじない(意味を知りたい方は調べてください)
authorizationButton.translatesAutoresizingMaskIntoConstraints = false
// Storyboardで作成済みのUIStackViewに追加
self.signInBtnStackView.insertArrangedSubview(authorizationButton, at: 0)
// サイズ比率のAutoLayoutを記述(この場合は11:2の割合になる)
authorizationButton.widthAnchor.constraint(equalTo: authorizationButton.heightAnchor, multiplier: 11/2).isActive = true
このようにコードでボタンのサイズのAutoLayoutを設定することで、無事UIStackViewを使用したまま「Sign in with Apple」ボタンの大きさを変えることができました!
Googleの方はデフォルトでドロップシャドウが設定されているので幅が少し小さくなっています。次はこれのサイズ調整も考えなければ...
おしまい
不安定なことは多いですが、やはりビルドしなくても見た目がわかるStoryboardはいいですね。できる限りStoryboardで部品を配置したいものです。