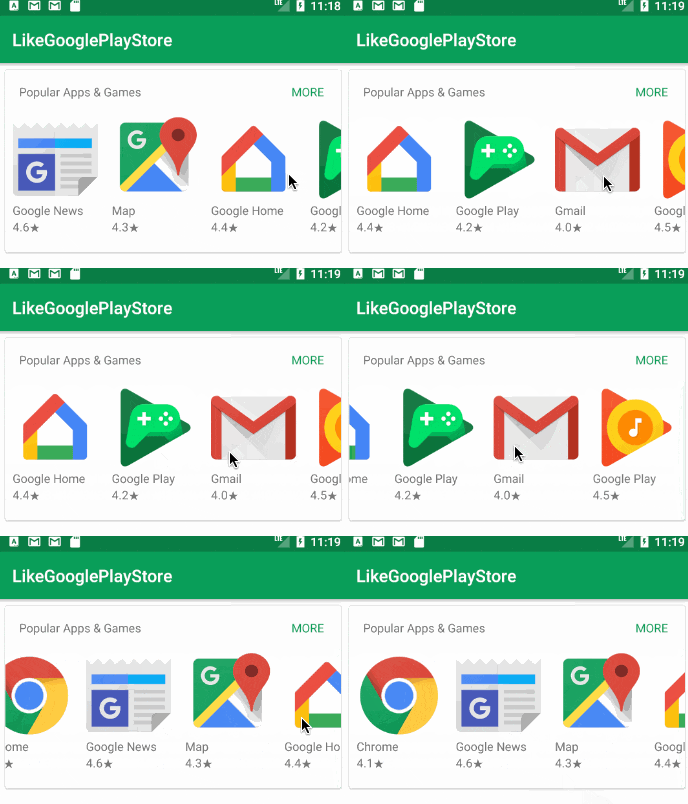
最近業務でRecyclerViewを使ったViewを大量に作っていたのですが、他のViewと比べて必要な記述量が多いこともあり、基本カスタムビュー化してしまっていいのではと思いました。
例えば、以下のようなGooglePlayストアのような画面を作るとします。

ここまで独立したViewの場合、Activityに直接書こうという人は少ないかもしれませんがRecyclerViewの一例です。
以下のようなカスタムビューを作ります。
※ 以下のコードではDataBinding, Glideを使用しています。
public class HorizontalAppListView extends RelativeLayout {
    public HorizontalAppListView(Context context) {
        this(context, null);
    }

    public HorizontalAppListView(Context context, AttributeSet attrs) {
        this(context, attrs, 0);
    }

    public HorizontalAppListView(Context context, AttributeSet attrs, int defStyleAttr) {
        super(context, attrs, defStyleAttr);
        ViewHorizontalAppListBinding binding = ViewHorizontalAppListBinding.inflate(LayoutInflater.from(context), this, true);

        HorizontalAppListAdapter adapter = new HorizontalAppListAdapter();
        adapter.addApps(generateApps());

        RecyclerView recyclerView = binding.appList;
        recyclerView.setLayoutManager(new LinearLayoutManager(context, LinearLayoutManager.HORIZONTAL, false));
        recyclerView.setAdapter(adapter);
        recyclerView.setHasFixedSize(true);
    }

    private class HorizontalAppListAdapter extends RecyclerView.Adapter<HorizontalAppListAdapter.HorizontalAppListViewHolder> {
        private List<AppData> apps = new ArrayList<>();

        @Override
        public HorizontalAppListViewHolder onCreateViewHolder(ViewGroup parent, int viewType) {
            return new HorizontalAppListViewHolder(LayoutInflater.from(getContext()).inflate(R.layout.row_app_card, parent, false));
        }

        @Override
        public void onBindViewHolder(HorizontalAppListViewHolder holder, int position) {
            holder.render(position);
        }

        @Override
        public int getItemCount() {
            return apps.size();
        }

        void addApps(List<AppData> apps) {
            this.apps.addAll(apps);
            notifyDataSetChanged();
        }

        class HorizontalAppListViewHolder extends RecyclerView.ViewHolder {
            private RowAppCardBinding appCardBinding;

            HorizontalAppListViewHolder(View itemView) {
                super(itemView);
                appCardBinding = RowAppCardBinding.bind(itemView);
            }

            void render(final int position) {
                Glide.with(getContext()).load(apps.get(position).getDrawableId()).into(appCardBinding.appImage);
                appCardBinding.appTitle.setText(apps.get(position).getName());
                appCardBinding.appScore.setText(apps.get(position).getScore());
                appCardBinding.appImage.setOnClickListener(new OnClickListener() {
                    @Override
                    public void onClick(View view) {
                        Toast.makeText(getContext(), apps.get(position).getName() + " is Clicked", Toast.LENGTH_LONG).show();
                    }
                });
            }
        }
    }

    private List<AppData> generateApps() {
        // ダミーデータ : 画像, アプリ名, 評価
        List<AppData> apps = new ArrayList<>();
        apps.add(new AppData(R.drawable.gmail, "Gmail", "4.0"));
        apps.add(new AppData(R.drawable.chrome, "Chrome", "4.1"));
        apps.add(new AppData(R.drawable.game, "Google Play Games", "4.2"));
        apps.add(new AppData(R.drawable.map, "Map", "4.3"));
        apps.add(new AppData(R.drawable.home, "Google Home", "4.4"));
        apps.add(new AppData(R.drawable.music, "Google Play Music", "4.5"));
        apps.add(new AppData(R.drawable.news, "Google News", "4.6"));
        Collections.shuffle(apps);
        return apps;
    }
カード部分をカスタムビューにしていますが、ケースによってはRecyclerViewを継承しても良いと思います。
とりあえずカスタムビューにしておくことで、以下のようなメリットがあります。
名前がつく
上記の例ではHorizontalAppListViewをいう名前にしました。名前が良いかはさておき、なんかアプリのリストを水平に表示するViewなんだなと分かると思います。
これによって、Activityで実際に利用する際にも分かりやすくなります。
HorizontalAppListView appListView = new HorizontalAppListView();
// or
HorizontalAppListView appListView = (HorizontalAppListView) findViewById(R.id.app_list_view);
設定などをActivityから切り離せる
RecyclerViewは柔軟性が高いとよく言われますが、柔軟性が高いということは、カスタマイズが必要ということで、カスタマイズが必要ということは、それだけ設定のための記述量が増えるということです。
LayoutManagerや、ItemDecoration、SnapHelper、OnScrollChangeListenerなど標準の使い方をするだけでも多くの設定が必要です。
これらを毎回Activityに書いていると肥大化の原因になります。
RecyclerView recyclerView = binding.appList;
recyclerView.setLayoutManager(new LinearLayoutManager(context, LinearLayoutManager.HORIZONTAL, false));
recyclerView.setAdapter(adapter);
recyclerView.setHasFixedSize(true);
Adapter、ViewHolderも内部クラスで持てる
内部クラスにするかどうかは好みもあるかもしれませんが、上記の設定多い問題と関連して、Adapter + ViewHolderもそこそこのコード量になります。
内部クラスに持つことで、Viewと紐付けて管理でき、ViewHolderでClick処理も書いてしまえば、このカスタムビューからどこに遷移するのかなども追いやすくなります。
差し替えが容易
後からこの部分を差し替えたいとなった際にカスタムビューに切り出してあると、Activityからその部分を外して、新しいカスタムビューと差し替えれば良いので、非常に楽です。
また、使わなくなったカスタムビューも残しておけるので、ABテストや試してから戻すようなことも容易になります。
シンプルな画面なので、Activityに直接書いても大丈夫と思っていると、後から追加や変更が入って辛くなります。
まとめ
ライフサイクル依存の処理や、View同士の連携などは一手間加える必要があるかもしれませんが、Activityから操作するようなメソッド生やしたり、RxJavaやEventBus等でだいたいなんとかなるので、とりあえずカスタムビュー化していいのではと思いました。