この記事は Android Advent Calendar 2020 17日目の記事です。
昨年に紹介されていた Android Emulator Container Scripts ですが、今年新たにビルド済みのエミュレータコンテナが実験的に提供されているとのことで、本記事ではこのスクリプトを利用してDockerコンテナでAndroidエミュレータを立ち上げ、adb接続やテストの実行、Webブラウザから起動したエミュレータを操作する手順を紹介します。
Continuous Testing with Android Emulator Containers
Android Developers Blog / Continuous testing with new Android emulator tools
実行環境
2020年12月17日現在、READMEに記載の通りKVMが必須となっており、MacやWindowsのDockerでは動きません。クラウドサービス上で実行する場合には、EC2 ベアメタルインスタンスの利用やネストされた仮想化を有効にし、KVMが利用できる環境が必要です。
- Amazon EC2 / ベアメタルインスタンス
- Compute Engine / VM インスタンスのネストされた仮想化の有効化
- Azure / How to enable nested virtualization in an Azure VM
また、イメージを自身で作る場合にはジェネレータ(emu-dockerコマンド)が提供されており、実行にPythonインタプリタが必要になる他、Webでのリモートストリーミングを行う場合には、Node.js、npmが必要になります。
ビルド済みのイメージを利用する
前述の通り、ビルド済みのエミュレータコンテナが提供されるようになり、パブリックリポジトリでホストされているため、そちらを指定することでビルドせずに実行ができます。
2020年12月現在、エミュレーターとの対話が可能なイメージとして、以下が提供されています。
- us-docker.pkg.dev/android-emulator-268719/images/28-playstore-x64:30.1.2
- us-docker.pkg.dev/android-emulator-268719/images/28-playstore-x64-no-metrics:30.1.2
- us-docker.pkg.dev/android-emulator-268719/images/29-google-x64:30.1.2
- us-docker.pkg.dev/android-emulator-268719/images/29-google-x64-no-metrics:30.1.2
- us-docker.pkg.dev/android-emulator-268719/images/30-google-x64:30.1.2
- us-docker.pkg.dev/android-emulator-268719/images/30-google-x64-no-metrics:30.1.2
コンテナの起動
docker run \
  -e ADBKEY="$(cat ~/.android/adbkey)" \
  --device /dev/kvm \
  --publish 8554:8554/tcp \
  --publish 5555:5555/tcp  \
  us-docker.pkg.dev/android-emulator-268719/images/30-google-x64:30.1.2
ADBKEY の環境変数へは adbkey (秘密鍵)を指定します。
adbkey はAndroid 4.2.2以降でUSBデバッグなどを行う際、このパソコン経由のデバッグを許可する RSA 鍵を受け入れるかどうかを尋ねるダイアログが表示されますが、この鍵を利用してデバイス保護を行なっています。通常は .android 配下に自動生成されているかと思いますが所定の場所から取得して環境変数に渡します。
--device /dev/kvm でdockerがKVMを利用することを許可し、--publish で 8554ポートと、5555ポートをメインマシンから同一のポートでアクセスできるようにします。8554はgRPCポートでAndroid StudioやJavaScriptからのアクセスに利用され、5555はADBのポートになります。
コンテナが立ち上がり、logcatが出力されるようになっていたら完了です。
docker ps

CONTAINER ID        IMAGE               COMMAND                  CREATED              STATUS                        PORTS                                                                     NAMES
2591234e0901        f202bb98c138        "/android/sdk/launch…"   About a minute ago   Up About a minute (healthy)   0.0.0.0:5555->5555/tcp, 0.0.0.0:8554->8554/tcp, 0.0.0.0:32768->5554/tcp   zen_khorana
ネットワーク経由でADB
メインマシンの localhost:5555 へ adb connect すると、Docker上のエミュレータへadb接続ができるようになります。
adb connect localhost:5555
adb devices

List of devices attached
localhost:5555	device
adb install でのapkのインストールや、connectedAndroidTest によるテストの実行が可能になります。
./gradlew connectedAndroidTest
https://developer.android.com/studio/test/command-line
接続を切りたい場合には、
adb disconnect
で切断できます。
スクリプト
このような一連の流れをスクリプト化したサンプルが公開されているので、こちらを参考にスクリプトを用意してCIで実行すると良いでしょう。
自身でイメージを作成する
上記で利用したようなイメージを作成するジェネレータが用意されており、リストにないイメージやエミュレータを利用したい場合には別途作成が可能です。
提供されている各種スクリプトを利用するため、cloneしてメインマシンにスクリプトを持ってきます。
git clone git@github.com:google/android-emulator-container-scripts.git
cd android-emulator-container-scripts
configure.sh を実行すると、python virtualenv(venv)上でemu-docker コマンドが利用可能になります。
source ./configure.sh
emu-docker -h

usage: emu-docker [-h] [-v] {list,licenses,create,interactive,cloud-build} ...

List and create emulator docker containers (0+untagged.253.gbcb1f3f).

positional arguments:
  {list,licenses,create,interactive,cloud-build}
    list                list all the available the publicly available
                        emulators and system images.
    licenses            Lists all licenses and gives you a chance to accept or
                        reject them.
    create              Given an emulator and system image zip file, generates
                        a Docker image comprising complete environment in
                        which the Android Emulator runs. After the Docker
                        image is started up, interaction with the emulator is
                        made possible via port forwarding and ADB, or gRPC and
                        WebRTC.
    interactive         Interactively select which system image and emulator
                        binary to use when creating a docker container
    cloud-build         Create a cloud builder distribution. This will create
                        a distribution for publishing container images to a
                        GCE repository.This is likely only useful if you are
                        within Google.

optional arguments:
  -h, --help            show this help message and exit
  -v, --verbose         Set verbose logging (default: False)
emu-docker list で利用可能なエミュレータとシステムイメージの一覧が確認できます。
SYSIMG K android x86 19 https://dl.google.com/android/repository/sys-img/android/x86-19_r06.zip
SYSIMG K google_apis x86 19 https://dl.google.com/android/repository/sys-img/google_apis/x86-19_r40.zip
SYSIMG L android x86 21 https://dl.google.com/android/repository/sys-img/android/x86-21_r05.zip
SYSIMG L google_apis x86 21 https://dl.google.com/android/repository/sys-img/google_apis/x86-21_r32.zip
SYSIMG L android x86 22 https://dl.google.com/android/repository/sys-img/android/x86-22_r06.zip
SYSIMG L google_apis x86 22 https://dl.google.com/android/repository/sys-img/google_apis/x86-22_r26.zip
SYSIMG M android x86 23 https://dl.google.com/android/repository/sys-img/android/x86-23_r10.zip
SYSIMG M google_apis x86 23 https://dl.google.com/android/repository/sys-img/google_apis/x86-23_r33.zip
SYSIMG N android x86 24 https://dl.google.com/android/repository/sys-img/android/x86-24_r08.zip
SYSIMG N google_apis x86 24 https://dl.google.com/android/repository/sys-img/google_apis/x86-24_r27.zip
SYSIMG N google_apis_playstore x86 24 https://dl.google.com/android/repository/sys-img/google_apis_playstore/x86-24_r19.zip
SYSIMG N android x86 25 https://dl.google.com/android/repository/sys-img/android/x86-25_r01.zip
SYSIMG N google_apis x86 25 https://dl.google.com/android/repository/sys-img/google_apis/x86-25_r18.zip
SYSIMG N google_apis_playstore x86 25 https://dl.google.com/android/repository/sys-img/google_apis_playstore/x86-25_r09.zip
SYSIMG O android x86_64 26 https://dl.google.com/android/repository/sys-img/android/x86_64-26_r01.zip
SYSIMG O android x86 26 https://dl.google.com/android/repository/sys-img/android/x86-26_r01.zip
SYSIMG O google_apis x86_64 26 https://dl.google.com/android/repository/sys-img/google_apis/x86_64-26_r16.zip
SYSIMG O google_apis x86 26 https://dl.google.com/android/repository/sys-img/google_apis/x86-26_r16.zip
SYSIMG O google_apis_playstore x86 26 https://dl.google.com/android/repository/sys-img/google_apis_playstore/x86-26_r07.zip
SYSIMG O android x86_64 27 https://dl.google.com/android/repository/sys-img/android/x86_64-27_r01.zip
SYSIMG O android x86 27 https://dl.google.com/android/repository/sys-img/android/x86-27_r01.zip
SYSIMG O google_apis x86 27 https://dl.google.com/android/repository/sys-img/google_apis/x86-27_r11.zip
SYSIMG O google_apis_playstore x86 27 https://dl.google.com/android/repository/sys-img/google_apis_playstore/x86-27_r03.zip
SYSIMG P android x86_64 28 https://dl.google.com/android/repository/sys-img/android/x86_64-28_r04.zip
SYSIMG P android x86 28 https://dl.google.com/android/repository/sys-img/android/x86-28_r04.zip
SYSIMG P google_apis x86_64 28 https://dl.google.com/android/repository/sys-img/google_apis/x86_64-28_r11.zip
SYSIMG P google_apis_playstore x86_64 28 https://dl.google.com/android/repository/sys-img/google_apis_playstore/x86_64-28_r08.zip
SYSIMG P google_apis_playstore x86 28 https://dl.google.com/android/repository/sys-img/google_apis_playstore/x86-28_r08.zip
SYSIMG P google_apis_playstore x86 28 https://dl.google.com/android/repository/sys-img/google_apis_playstore/x86-28_r09.zip
SYSIMG P google_ndk x86 28 https://dl.google.com/android/repository/sys-img/google_ndk/x86-28_r10.zip
SYSIMG Q google_apis x86_64 29 https://dl.google.com/android/repository/sys-img/google_apis/x86_64-29_r11.zip
SYSIMG Q google_apis x86 29 https://dl.google.com/android/repository/sys-img/google_apis/x86-29_r11.zip
SYSIMG R google_apis x86_64 30 https://dl.google.com/android/repository/sys-img/google_apis/x86_64-30_r09.zip
SYSIMG R google_apis x86 30 https://dl.google.com/android/repository/sys-img/google_apis/x86-30_r09.zip
EMU stable 30.2.6 macosx https://dl.google.com/android/repository/emulator-darwin-6962233.zip
EMU stable 30.2.6 linux https://dl.google.com/android/repository/emulator-linux-6962233.zip
EMU stable 30.2.6 windows https://dl.google.com/android/repository/emulator-windows-6962233.zip
EMU stable 28.0.25 windows https://dl.google.com/android/repository/emulator-windows-5395263.zip
EMU canary 30.3.4 macosx https://dl.google.com/android/repository/emulator-darwin-7020230.zip
EMU canary 30.3.4 linux https://dl.google.com/android/repository/emulator-linux-7020230.zip
EMU canary 30.3.4 windows https://dl.google.com/android/repository/emulator-windows-7020230.zip
SYSIMG がシステムイメージ、EMU がエミュレータになります。それぞれ必要なものをダウンロードし、
curl -O 'https://dl.google.com/android/repository/emulator-linux-7020230.zip'
curl -O 'https://dl.google.com/android/repository/sys-img/google_apis/x86_64-30_r09.zip'
emu-docker create <emulator.zip> <sysimg.zip> を実行することでsrc 配下にDockerFileを初めとした必要なファイルが配置されます。
emu-docker create emulator-linux-7020230.zip sys-img-google_apis-30-R-x86_64.zip
# Copyright 2019 - The Android Open Source Project
#
# Licensed under the Apache License, Version 2.0 (the "License");
# you may not use this file except in compliance with the License.
# You may obtain a copy of the License at
#
#     http://www.apache.org/licenses/LICENSE-2.0
#
# Unless required by applicable law or agreed to in writing, software
# distributed under the License is distributed on an "AS IS" BASIS,
# WITHOUT WARRANTIES OR CONDITIONS OF ANY KIND, either express or implied.
# See the License for the specific language governing permissions and
# limitations under the License.
FROM debian:stretch-slim AS emulator

# Install all the required emulator dependencies.
# You can get these by running ./android/scripts/unix/run_tests.sh --verbose --verbose --debs | grep apt | sort -u
# pulse audio is needed due to some webrtc dependencies.
RUN apt-get update && apt-get install -y --no-install-recommends \
# Emulator & video bridge dependencies
    libc6 libdbus-1-3 libfontconfig1 libgcc1 \
    libpulse0 libtinfo5 libx11-6 libxcb1 libxdamage1 \
    libnss3 libxcomposite1 libxcursor1 libxi6 \
    libxext6 libxfixes3 zlib1g libgl1 pulseaudio socat \
# Enable turncfg through usage of curl
    curl ca-certificates && \
    apt-get clean && \
    rm -rf /var/lib/apt/lists/* /tmp/* /var/tmp/*

# Now we configure the user account under which we will be running the emulator
RUN mkdir -p /android/sdk/platforms && \
    mkdir -p /android/sdk/platform-tools && \
    mkdir -p /android/sdk/system-images/android && \
    mkdir -p /android-home

# Make sure to place files that do not change often in the higher layers
# as this will improve caching.
COPY launch-emulator.sh /android/sdk/
COPY platform-tools/adb /android/sdk/platform-tools/adb
COPY default.pa /etc/pulse/default.pa

RUN gpasswd -a root audio && \
    chmod +x /android/sdk/launch-emulator.sh /android/sdk/platform-tools/adb

COPY emu/ /android/sdk/
COPY avd/ /android-home
COPY sys/ /android/sdk/system-images/android/
# Create an initial snapshot so we will boot fast next time around,
# This is currently an experimental feature, and is not easily configurable//
# RUN --security=insecure cd /android/sdk && ./launch-emulator.sh -quit-after-boot 120

# This is the console port, you usually want to keep this closed.
EXPOSE 5554

# This is the ADB port, useful.
EXPOSE 5555

# This is the gRPC port, also useful, we don't want ADB to incorrectly identify this.
EXPOSE 8554

ENV ANDROID_SDK_ROOT /android/sdk
ENV ANDROID_AVD_HOME /android-home
WORKDIR /android/sdk

# You will need to make use of the grpc snapshot/webrtc functionality to actually interact with
# the emulator.
CMD ["/android/sdk/launch-emulator.sh"]

# Note we should use gRPC status endpoint to check for health once the canary release is out.
HEALTHCHECK --interval=30s \
            --timeout=30s \
            --start-period=30s \
            --retries=3 \
            CMD /android/sdk/platform-tools/adb shell getprop dev.bootcomplete | grep "1"

# Date frequently changes, so we place this in the last layer.
LABEL maintainer="ntsk@linux" \
      SystemImage.Abi=x86_64 \
      SystemImage.TagId=google_apis \
      SystemImage.GpuSupport=true \
      AndroidVersion.ApiLevel=30 \
      com.google.android.emulator.description="Pixel 2 Emulator, running API 30" \
      com.google.android.emulator.version="google_apis-30-x86_64/30.3.4"
docker build -> docker run で最初に行なった際と同様に起動できます。
docker build src
...
...
Successfully built 809a82460bb3
docker run -e ADBKEY="$(cat ~/.android/adbkey)" \                                                                                                                                       + master
--device /dev/kvm \
--publish 8554:8554/tcp \
--publish 5555:5555/tcp 809a82460bb3
docker run に関しては、run.sh にラッパーのスクリプトが用意されているので、そちらを利用しても良いでしょう。
https://github.com/google/android-emulator-container-scripts/blob/master/run.sh
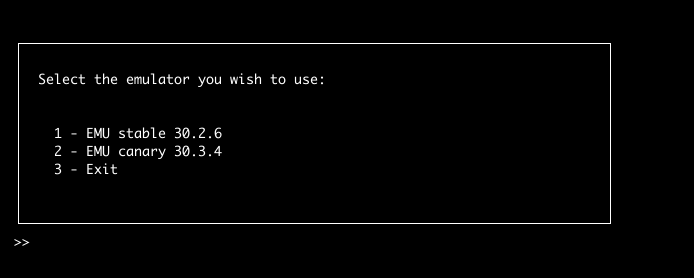
ここまでの内容を実はインタラクティブにやってくれるオプションが提供されており、こちらを実行することで、対話的にイメージの作成を行い、—start を指定することで起動まで行なってくれます。
emu-docker interactive --start

Webでのリモートストリーミング
Web経由でアクセスを可能にするサンプルが用意されており、docker-composeを利用することで、以下の4つのコンテナを立ち上げてエミュレータへのWebアクセスを行うことができます。
- Envoy
- Nginx
- JWT認証サービス
- エミュレータ
エッジプロキシやサービスプロキシとしてEnvoyが利用されており、Nginx上で動かしているReactアプリケーションがWebRTCでエミュレータの描画を行う形になっています。また、JWTを利用した簡易的なBasic認証のサンプルもついています。
version: "3.7"
services:
  front-envoy:
    image: emulator_envoy:latest
    container_name: emulator_envoy
    networks:
      - envoymesh
    expose:
      - "8080"
      - "8001"
      - "8443"
    ports:
      - "80:8080"
      - "443:8443"
      - "8001:8001"

  emulator:
    image: emulator_emulator:latest
    container_name: emulator_emulator
    networks:
      envoymesh:
        aliases:
          - emulator
    devices: [/dev/kvm]
    shm_size: 128M
    expose:
      - "8554"

  jwt_signer:
    image: emulator_jwt_signer:latest
    container_name: emulator_jwt_signer
    networks:
      envoymesh:
        aliases:
          - jwt_signer
    expose:
      - "8080"

  nginx:
    image: emulator_nginx:latest
    container_name: emulator_nginx
    networks:
      envoymesh:
        aliases:
          - nginx
    expose:
      - "80"

networks:
  envoymesh: {}
前項目と同様に事前にエミュレータとシステムイメージを利用してコンテナを作成しておきます。
emu-docker create emulator-linux-7020230.zip sys-img-google_apis-30-R-x86_64.zip
作成後、./create_web_container.sh を実行します。-p オプションでユーザーidとパスワードを渡すことで、ユーザーに応じたトークンサービスが構成され、JWTトークンの暗号/複合に利用されるキーペアが生成されます。 実行にはNode.js, npmが必要になります。
./create_web_container.sh -p user,password
js/docker/docker-compose.yml を指定して、docker-compose up 。
docker-compose -f js/docker/docker-compose.yaml up
adbを利用したい場合には、以下のように js/docker/development.yaml も指定します。
docker-compose -f js/docker/docker-compose.yaml -f js/docker/development.yaml up
docker ps

CONTAINER ID        IMAGE                        COMMAND                  CREATED              STATUS                        PORTS                                                                            NAMES
3c9dda3ce35c        emulator_jwt_signer:latest   "python jwt-provider…"   About a minute ago   Up About a minute             8080/tcp                                                                         emulator_jwt_signer
d8537ef89c1a        emulator_emulator:latest     "/android/sdk/launch…"   About a minute ago   Up About a minute (healthy)   5554-5555/tcp, 8554/tcp                                                          emulator_emulator
49f29b2717d1        emulator_envoy:latest        "/docker-entrypoint.…"   About a minute ago   Up About a minute             0.0.0.0:8001->8001/tcp, 10000/tcp, 0.0.0.0:80->8080/tcp, 0.0.0.0:443->8443/tcp   emulator_envoy
b1eec8500916        emulator_nginx:latest        "nginx -g 'daemon of…"   About a minute ago   Up About a minute             80/tcp                                                                           emulator_nginx
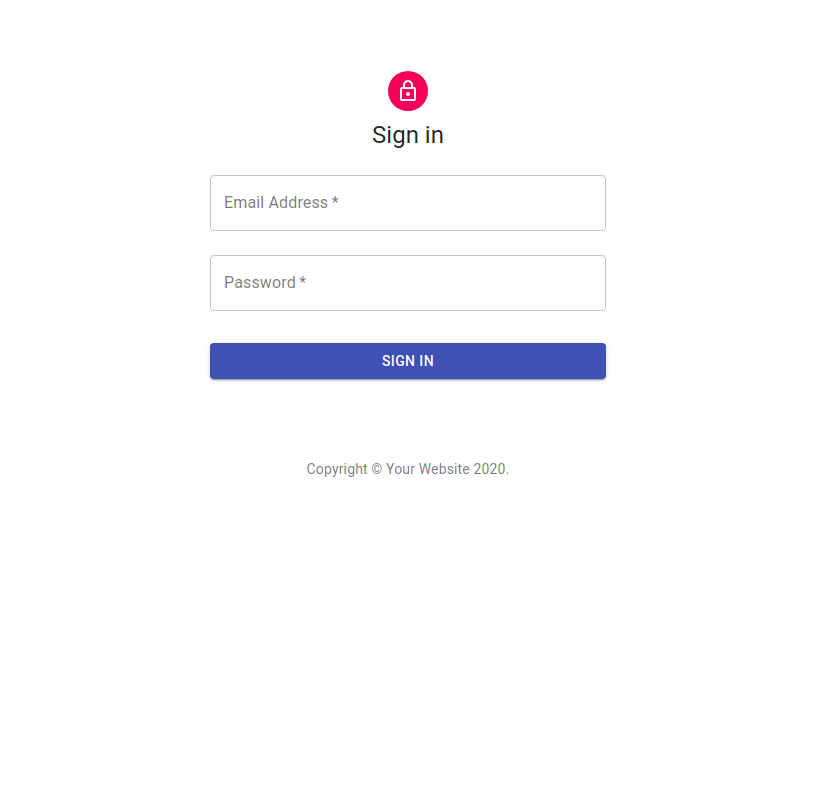
localhostに接続すると、ログイン画面が起動されるので、作成時に指定したid/passwordでログインします。
ログインすると、ブラウザ上でエミュレータの操作が可能です。

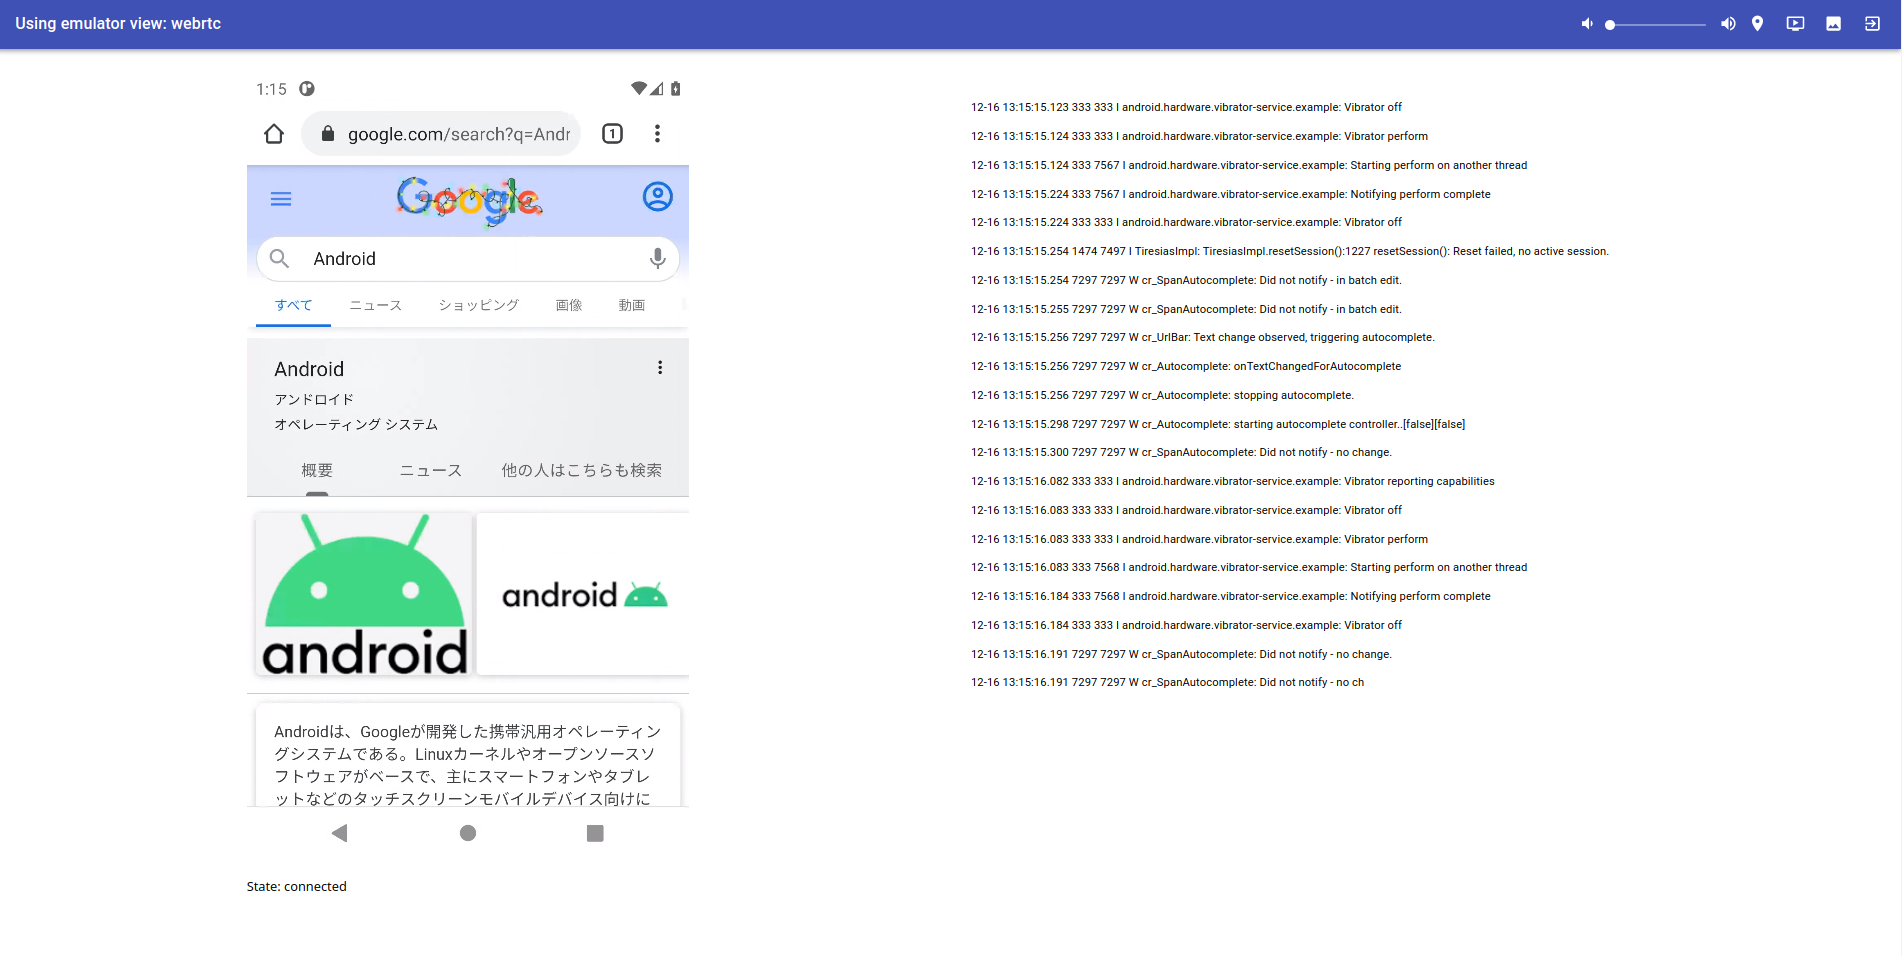
エミュレータの描画は、エミュレータをホストしているサーバーへP2P接続が作成できる場合にはWebRTCを使用してリアルタイムに表示されますが、利用できない場合には毎秒画像を作成しブラウザに表示するようです(パフォーマンス低)。
まとめ
CI上でエミュレータを起動しテストを行う場合、Firebase Test Lab や AWS Device Farm 等がカジュアルに利用できるツールとして存在しますが、これらのサンプルを参考にすることでエミュレータを利用したCI環境の内製も容易になっていきそうです。
GoogleからこのようなCI環境構築のためのサンプルを提供してくれるのは大変ありがたく、引き続き動向をチェックしようと思います。