Goal
こんにちは。Nuxt.jsとRailsのDocker環境構築の記事はたくさんあったのですがNext.jsの記事がなかったので試行錯誤で環境構築した記録です。
Qiitaに投稿することもあまりないので記事タイトル・記事構成なんか @at-946 様を参考にさせていただいております。
1.Dockerの準備
準備するファイル構成は以下のようにしました。
/
|--front/
|    |--Dockerfile
|--back/
|    |--Dockerfile
|    |--Gemfile
|    |--Gemfile.lock #空ファイル
|--docker-compose.yml
From node:14-alpine

WORKDIR /usr/src/app
FROM ruby:2.5

ENV LANG=C.UTF-8 \
  TZ=Asia/Tokyo

WORKDIR /app

RUN apt-get update -qq && \
  apt-get install -y nodejs default-mysql-client

COPY Gemfile /app/Gemfile
COPY Gemfile.lock /app/Gemfile.lock
RUN bundle install
source 'https://rubygems.org'
gem 'rails', '~> 6.0.3', '>= 6.0.3.2'
version: "3"

services:
  db:
    container_name: database
    image: mysql:5.7
    command: --character-set-server=utf8mb4 --collation-server=utf8mb4_unicode_ci
    environment:
      MYSQL_ROOT_PASSWORD: password
      MYSQL_DATABASE: sample
      MYSQL_USER: root
      MYSQL_PASSWORD: password
      TZ: Asia/Tokyo
    ports:
      - 3308:3306
    volumes:
      - ./database/my.cnf:/etc/mysql/conf.d/my.cnf
      - ./database/data:/var/lib/mysql
      - ./database/sql:/docker-entrypoint-initdb.d

  api:
    container_name: back
    tty: true
    depends_on:
      - db
    build:
      context: back/
      dockerfile: Dockerfile
    ports:
      - 3000:3000
    volumes:
      - ./back:/app
    command: rails server -b 0.0.0.0

  front:
    build:
      context: front/
      dockerfile: Dockerfile
    container_name: web
    volumes:
      - ./front/app:/usr/src/app
    command: 'yarn dev'
    ports:
      - "4001:3000"
上記のファイルを準備できたらビルドします。
$ docker-compose build
2.Next.jsアプリを作ってみましょう
$ docker-compose run --rm front yarn create next-app .
しばらく待てばNext.jsアプリが生成された(はず)と思います。
さっそく起動してみましょう。
$ docker-compose up
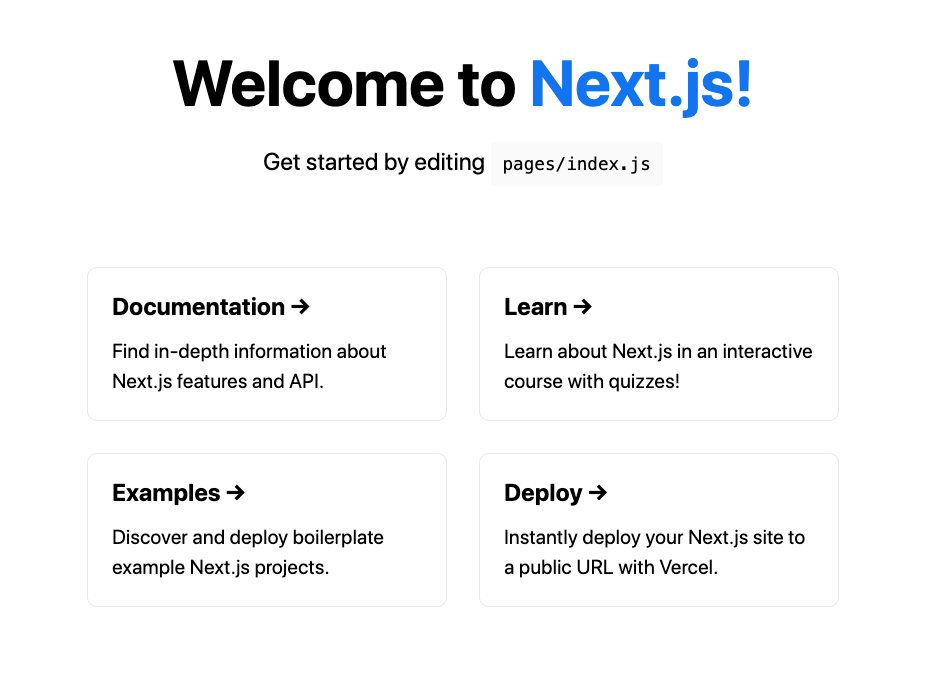
localhost:4001 にアクセスしてみてください。うまくいってれば Welcome to Next.js! が出てるはずです。
3.Railsの環境を構築する
つづいてRailsの環境構築です。RDBは MySQL を採用します。Railsは APIモード にします。
$ docker-compose run --rm api bundle exec rails new . --api -d mysql
途中、Gemfileがコンフリクトするので上書きするようにしましょう。
Overwrite /app/Gemfile? (enter "h" for help) [Ynaqdhm] Y
Railsアプリができたあとはデータベースの設定を docker-compose.yml で作ったMysqlの設定に合わせましょう。
# MySQL. Versions 5.5.8 and up are supported.
#
# Install the MySQL driver
#   gem install mysql2
#
# Ensure the MySQL gem is defined in your Gemfile
#   gem 'mysql2'
#
# And be sure to use new-style password hashing:
#   https://dev.mysql.com/doc/refman/5.7/en/password-hashing.html
#
default: &default
  adapter: mysql2
  encoding: utf8mb4
  pool: <%= ENV.fetch("RAILS_MAX_THREADS") { 5 } %>
  username: root
  password: password
  host: database

development:
  <<: *default
  database: sample

# Warning: The database defined as "test" will be erased and
# re-generated from your development database when you run "rake".
# Do not set this db to the same as development or production.
test:
  <<: *default
  database: app_test

# As with config/credentials.yml, you never want to store sensitive information,
# like your database password, in your source code. If your source code is
# ever seen by anyone, they now have access to your database.
#
# Instead, provide the password as a unix environment variable when you boot
# the app. Read https://guides.rubyonrails.org/configuring.html#configuring-a-database
# for a full rundown on how to provide these environment variables in a
# production deployment.
#
# On Heroku and other platform providers, you may have a full connection URL
# available as an environment variable. For example:
#
#   DATABASE_URL="mysql2://myuser:mypass@localhost/somedatabase"
#
# You can use this database configuration with:
#
#   production:
#     url: <%= ENV['DATABASE_URL'] %>
#
production:
  <<: *default
  database: app_production
  username: app
  password: <%= ENV['APP_DATABASE_PASSWORD'] %>
それでは起動させてみましょう。
$ docker-compose up --build
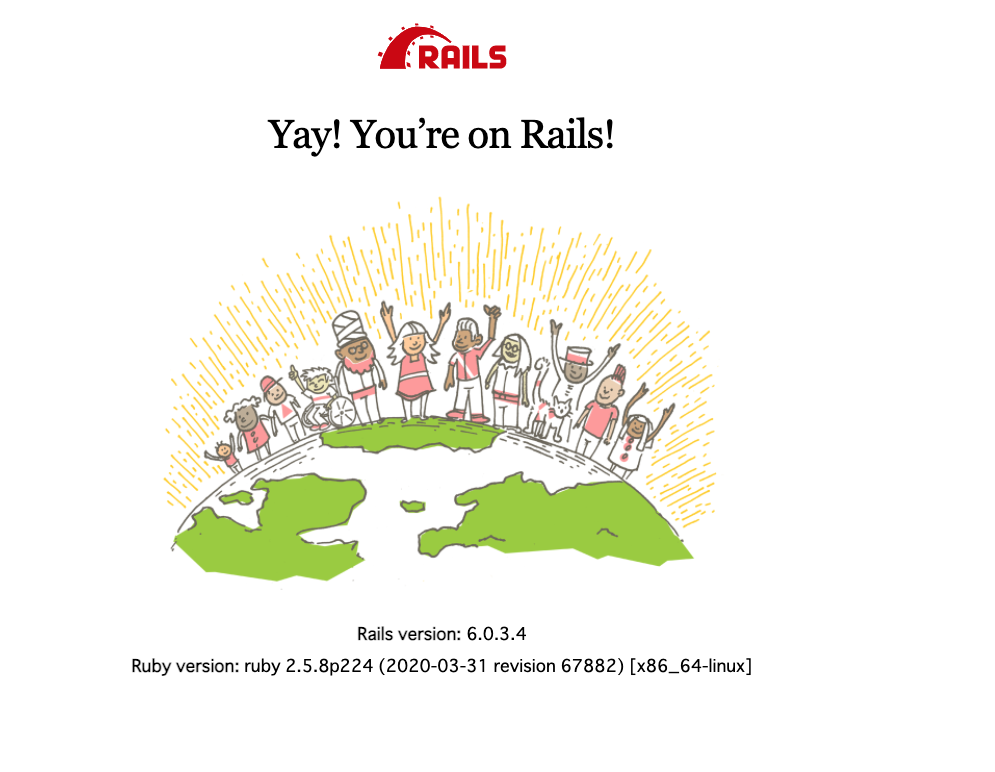
localhost:3000 へアクセスしてみてください。以下の画面が表示されればOKです。
4.JSONを返すAPIを作ってみる
Next.js側と連携できるようにRails側でAPIを作ってみましょう。
$ docker-compose run --rm api bundle exec rails g scaffold post title:string
さらっとできたと思います。 テーブルを作るので migrate しましょう。
$ docker-compose run --rm api bundle exec rake db:migrate
テーブルを作ったところでデータが無いのでJSONを返すことができません。困りました・・・。テストデータを作りましょう。
Railsには seed という初期データを取り込む便利機能があります。
# This file should contain all the record creation needed to seed the database with its default values.
# The data can then be loaded with the rails db:seed command (or created alongside the database with db:setup).
#
# Examples:
#
#   movies = Movie.create([{ name: 'Star Wars' }, { name: 'Lord of the Rings' }])
#   Character.create(name: 'Luke', movie: movies.first)
Post.create!(
  [
    {
      title: 'オフィスの近くの焼き芋を売ってる店がある'
    },
    {
      title: '焼き芋を配るフロントエンジニアがいるらしい'
    }
  ]
)
おっと、テストデータに日頃の鬱憤を吐いてしまいました。どうか見てませんよーに。
ではテストデータをテーブルに取り込みましょう。
$ docker-compose run --rm api bundle exec rake db:seed
では、確認してみましょう。
$ docker-compose up
localhost:3000/posts へアクセスしてみましょう。それっぽいデータがみれますね。成功です。

5.Next.jsでデータをみる
さぁ、いよいよAPIで取得したデータをNext.js側で表示させてみましょう。
front/app/pages/index.js を以下のように書き換えてみました。
シンプルにAPIで取得したデータを表示するだけです。
export default function Home(props) {
  return (
    <div>
      <h1>POSTの一覧</h1>
      {props.posts.map((post) =>
        <p>{ post.title }</p>
      )}
    </div>
  )
}

export async function getStaticProps() {
  const response = await fetch("http://localhost:3000/posts", {method: "GET"});
  const json = await response.json();

  return {
    props: {
      posts: json
    },
  };
}
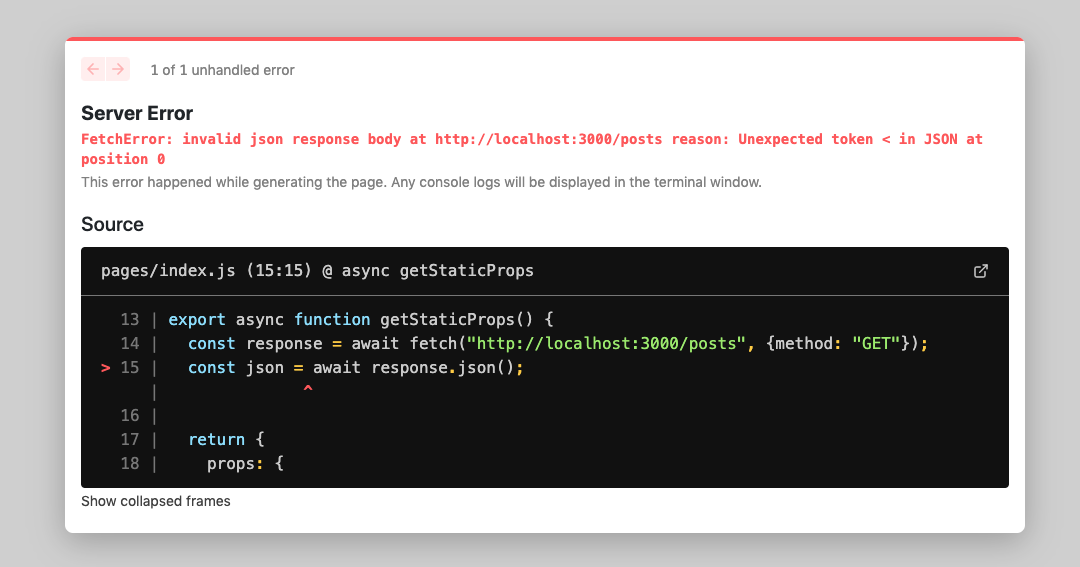
http://localhost:4001 へアクセスしてみましょう・・・・あれ???弊社のフロントエンジニアの呪いでしょうか??
6.Rails側の設定
localhost:3000 ではNext.js側でうまくいかないようです。
環境設定でホストを指定しましょう。(なぜかはよくわかっていません)
docker-compose.yml のコンテナ名に合わせました。
Rails.application.configure do
...
  config.hosts << "api"
end
7.Next.jsでAPIのURLを変更する
続いてNext.js側でAPIのURLを変更します。
export async function getStaticProps() {
  const response = await fetch("http://api:3000/posts", {method: "GET"});
・・・
}
ではもう一度、dockerを起動してみましょう。
$ docker-compose up
お、ようやく表示できたようです。

感想
久々に記事書いて疲れました。