AlexaスキルをPython/Lambdaで実装する
はじめに
Mac環境の記事ですが、Windows環境も同じ手順になります。環境依存の部分は読み替えてお試しください。
目的
この記事を最後まで読むと、次のことができるようになります。
- Alexaスキルを作成する
- AWS Lambdaを構築する
Alexaシミュレータ

関連する記事
実行環境
| 環境 | Ver. |
|---|---|
| macOS Mojave | 10.14.6 |
| Python | 3.7.3 |
| ask-sdk | 1.11.0 |
ソースコード
実際に実装内容やソースコードを追いながら読むとより理解が深まるかと思います。是非ご活用ください。
事前準備
Amazon Developerアカウントの作成
Amazon AlexaのログインからAmazon Developerアカウントを作成する
AWSアカウントの作成
AWSのコンソールにサインインからAWSアカウントを作成する
skill.zipの作成
pj_folder
└── fortune_telling.py
import random

from ask_sdk_core.handler_input import HandlerInput
from ask_sdk_core.skill_builder import SkillBuilder
from ask_sdk_core.utils import get_slot_value, is_intent_name, is_request_type
from ask_sdk_model import Response
from ask_sdk_model.ui import SimpleCard

sb = SkillBuilder()


@sb.request_handler(can_handle_func=is_request_type("LaunchRequest"))
def launch_request_handler(handler_input):
    # type: (HandlerInput) -> Response
    speech_text = "今日の運勢を占いますか? (はい/いいえ)"

    handler_input.response_builder.speak(speech_text).set_card(
        SimpleCard("Fortune Telling", speech_text)).set_should_end_session(
        False)
    return handler_input.response_builder.response


@sb.request_handler(can_handle_func=is_intent_name("FortuneTellingIntent"))
def fortune_telling_intent_handler(handler_input):
    # type: (HandlerInput) -> Response
    yes_no = get_slot_value(handler_input=handler_input, slot_name="continue")
    if yes_no == 'はい':
        num = random.randint(0, 9)
        if num >= 0 and num <= 2:
            speech_text = "大吉ですねっ!ホッとした。"
        elif num >= 3 and num <= 6:
            speech_text = "小吉かぁ。微妙な1日。"
        else:
            speech_text = "大凶ですよ。はい残念!"
        speech_text = '{} 続けますか? (はい/いいえ)'.format(speech_text)
        end_session = False
    elif yes_no == 'いいえ':
        speech_text = "ほな、さいならー"
        end_session = True
    else:
        speech_text = "えっなんて?"
        end_session = False

    handler_input.response_builder.speak(speech_text).set_card(
        SimpleCard("Fortune Telling", speech_text)).set_should_end_session(end_session)
    return handler_input.response_builder.response


@sb.request_handler(can_handle_func=is_intent_name("AMAZON.HelpIntent"))
def help_intent_handler(handler_input):
    # type: (HandlerInput) -> Response
    speech_text = "こんにちは。と言ってみてください。"

    handler_input.response_builder.speak(speech_text).ask(speech_text).set_card(
        SimpleCard("Fortune Telling", speech_text))
    return handler_input.response_builder.response


@sb.request_handler(
    can_handle_func=lambda handler_input:
        is_intent_name("AMAZON.CancelIntent")(handler_input) or
        is_intent_name("AMAZON.StopIntent")(handler_input))
def cancel_and_stop_intent_handler(handler_input):
    # type: (HandlerInput) -> Response
    speech_text = "さようなら"

    handler_input.response_builder.speak(speech_text).set_card(
        SimpleCard("Fortune Telling", speech_text))
    return handler_input.response_builder.response


@sb.request_handler(can_handle_func=is_request_type("SessionEndedRequest"))
def session_ended_request_handler(handler_input):
    # type: (HandlerInput) -> Response

    return handler_input.response_builder.response


@sb.exception_handler(can_handle_func=lambda i, e: True)
def all_exception_handler(handler_input, exception):
    # type: (HandlerInput, Exception) -> Response
    print(exception)

    speech = "すみません、わかりませんでした。もう一度言ってください。"
    handler_input.response_builder.speak(speech).ask(speech)
    return handler_input.response_builder.response


handler = sb.lambda_handler()
cd pj_folder
mkdir skill
cd skill
cp fortune_telling.py skill/
pip install ask-sdk-core -t .
zip ../skill.zip -r .
pj_folder
├── fortune_telling.py
├── skill
└── skill.zip
Alexaスキルの作成
-
占いスキル(FortuneTelling)を作成する
Alexa Developer Consoleを開く >
スキルの作成をクリック
以下を入力/選択して
スキルの作成をクリック- スキル名に
FortuneTellingを入力 - スキルに追加するモデルを選択で
カスタムを選択 - スキルのバックエンドリソースをホスティングする方法を選択で
ユーザー定義のプロビジョニングを選択
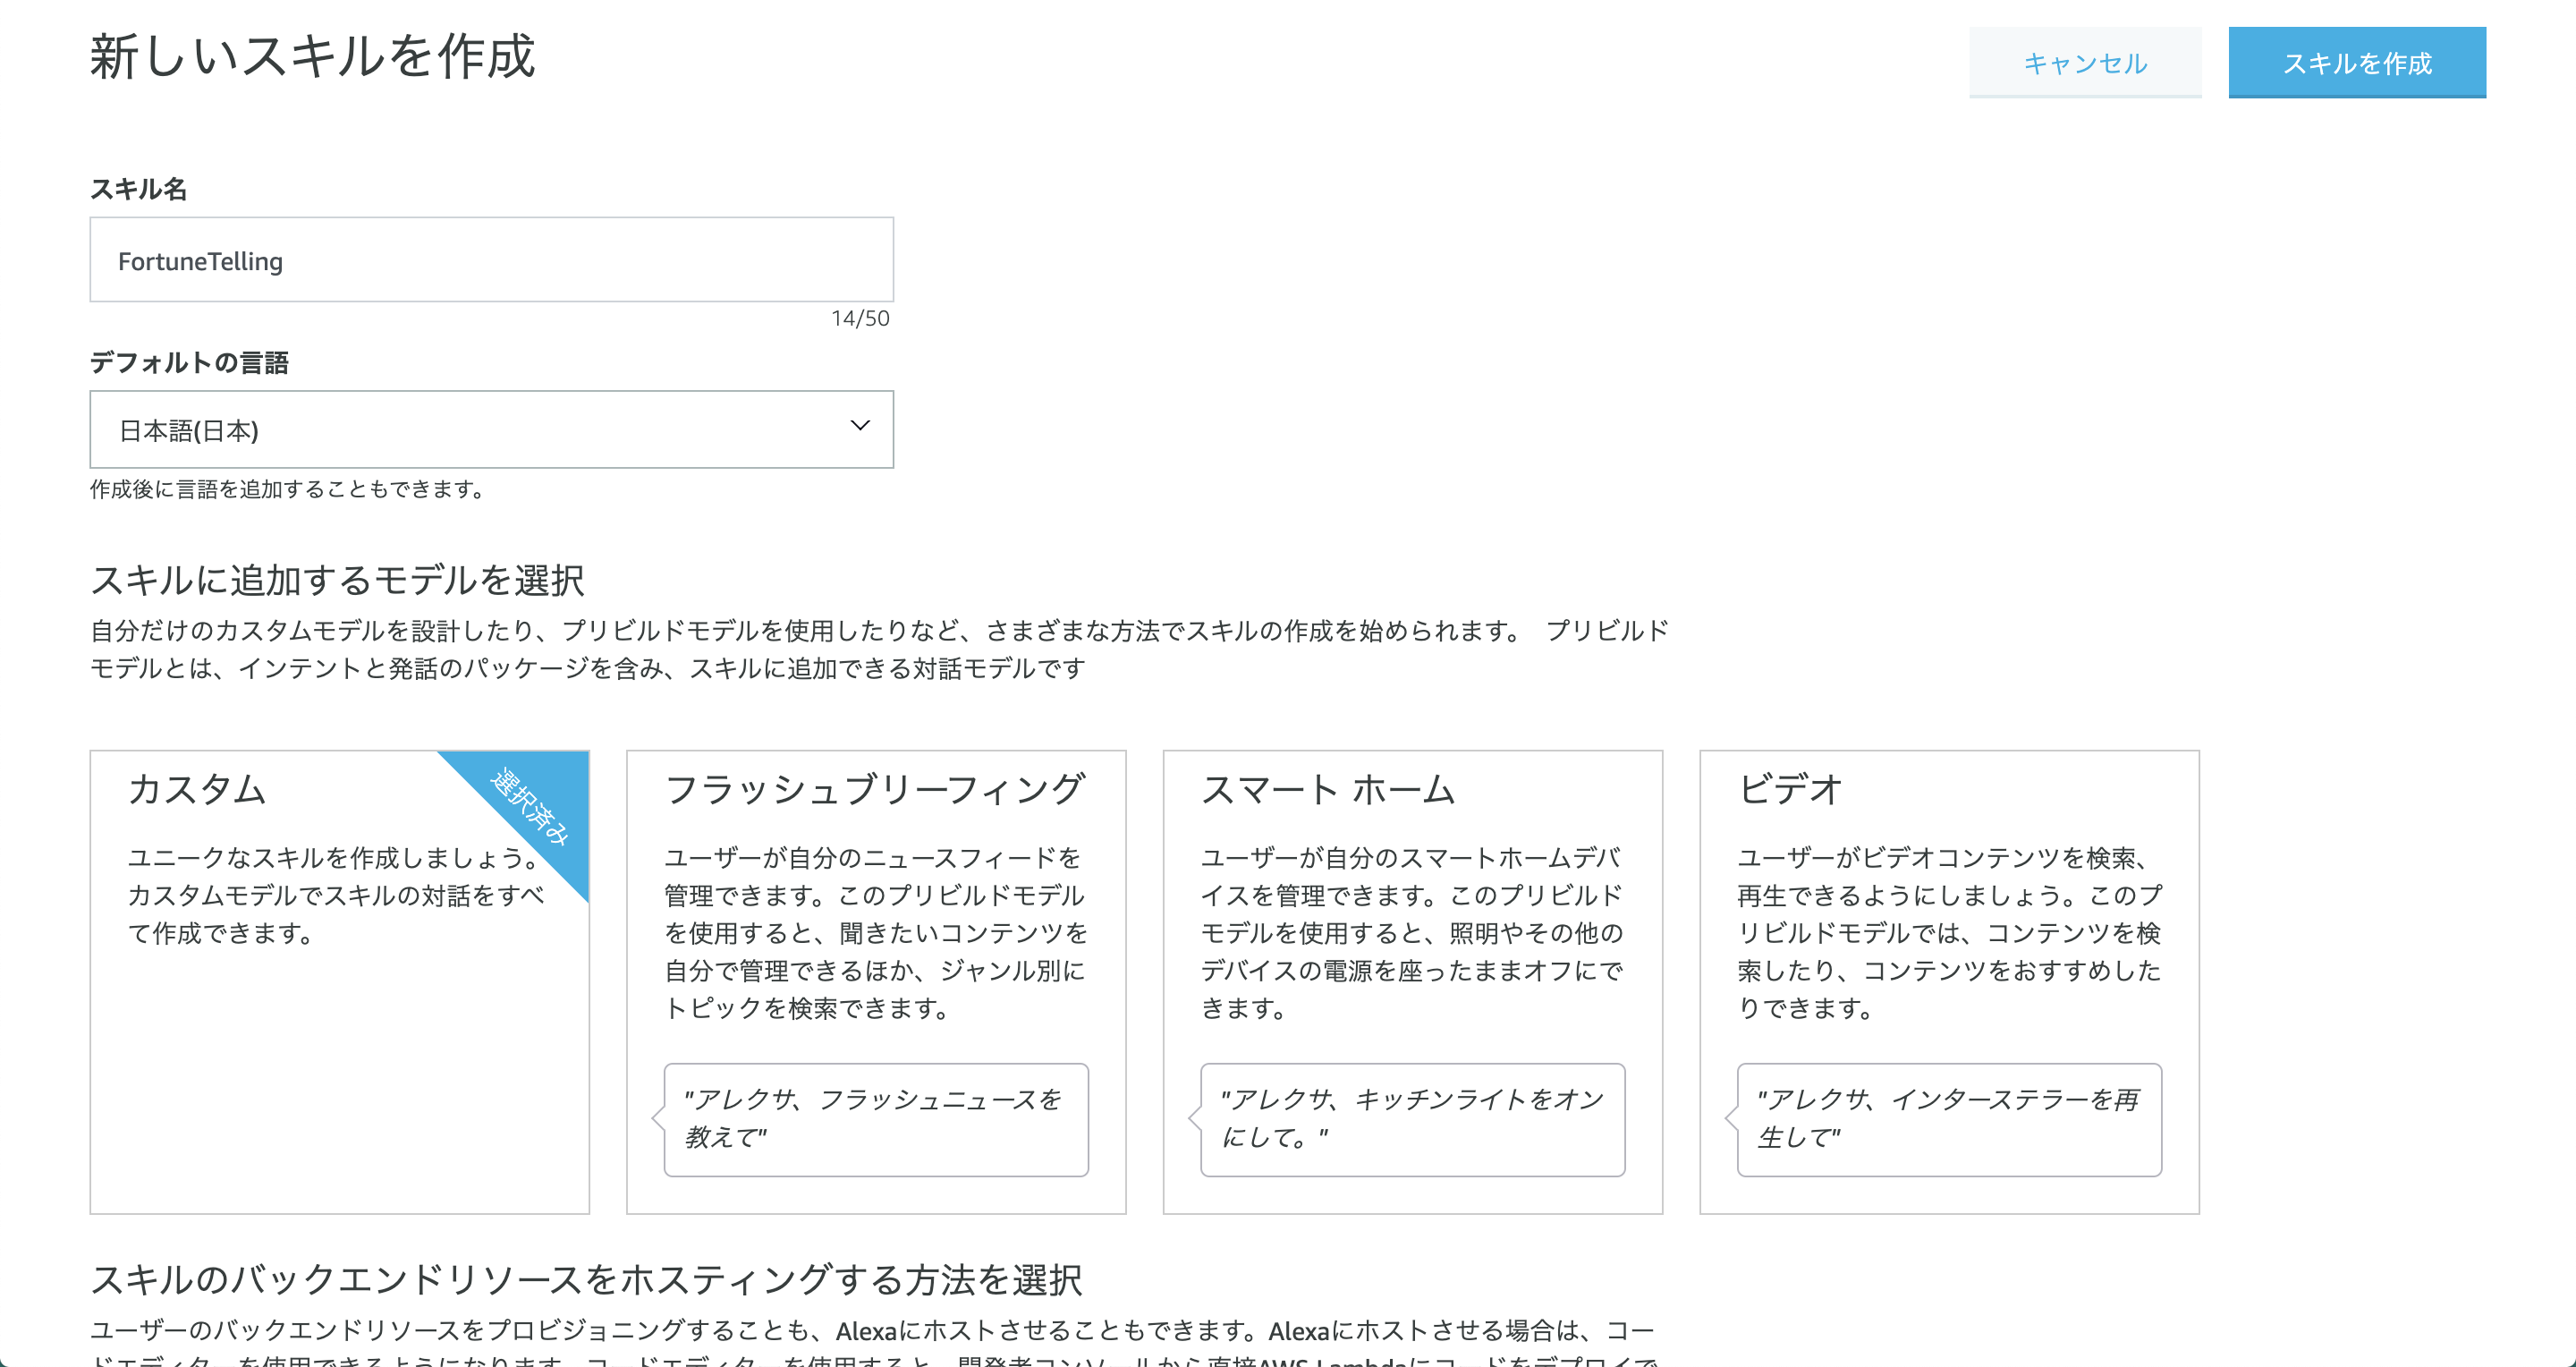
- スキル名に
-
呼び出し名を設定する
呼び出し名に
占いくんを入力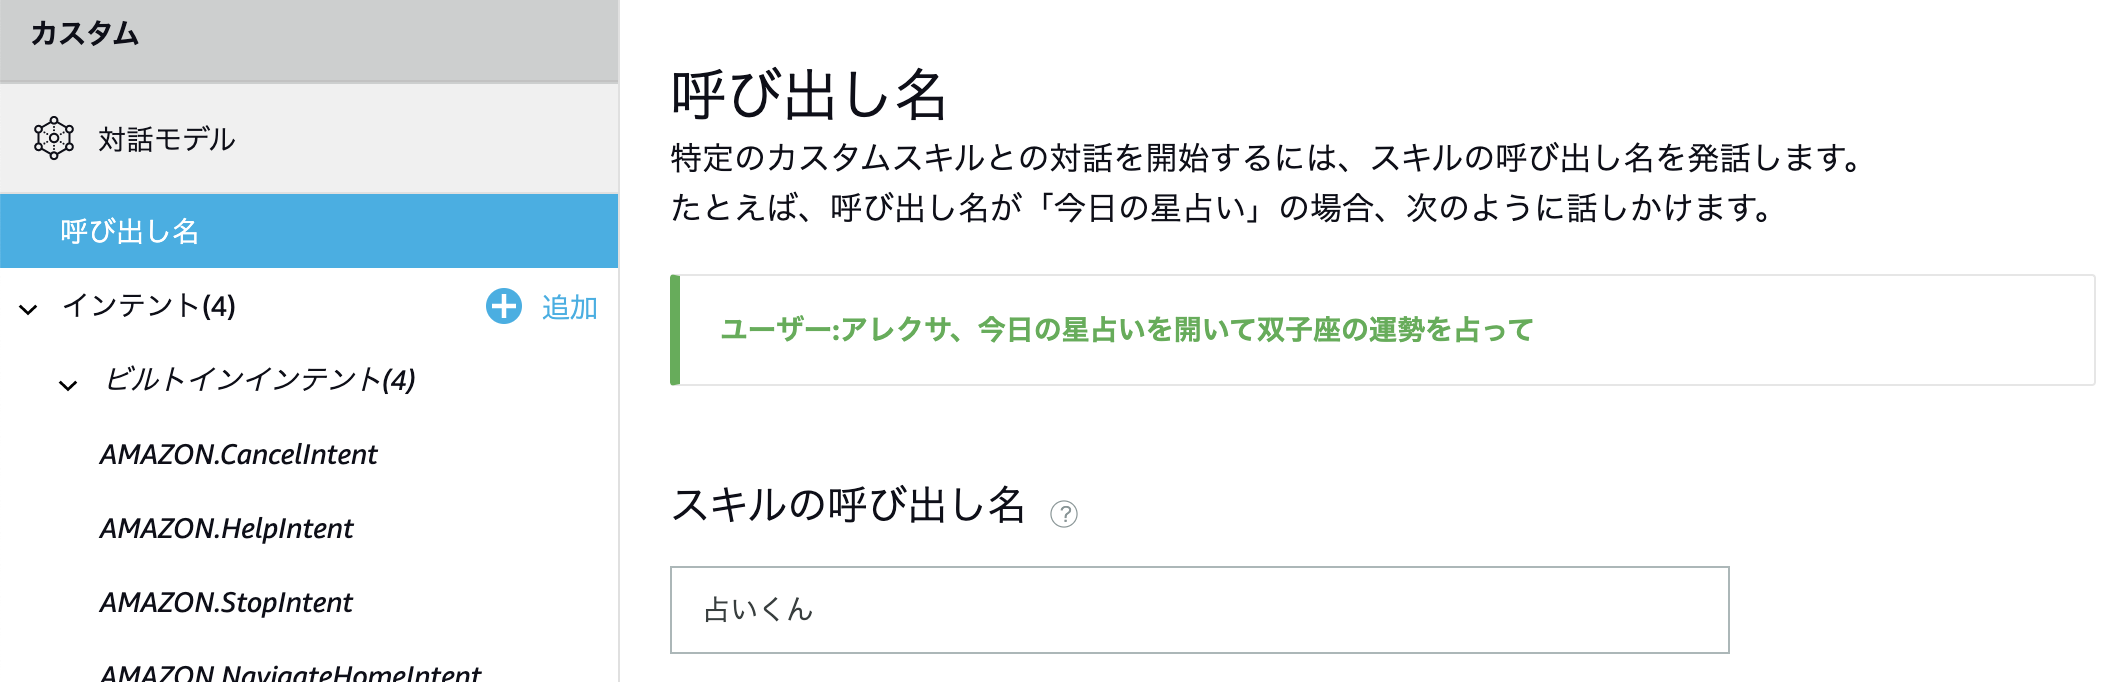
-
スロットタイプを作成する
スロットタイプをクリック > スロットタイプにcontinueTypeを入力 >カスタムスロットタイプを作成をクリックスロット値に
はいといいえを追加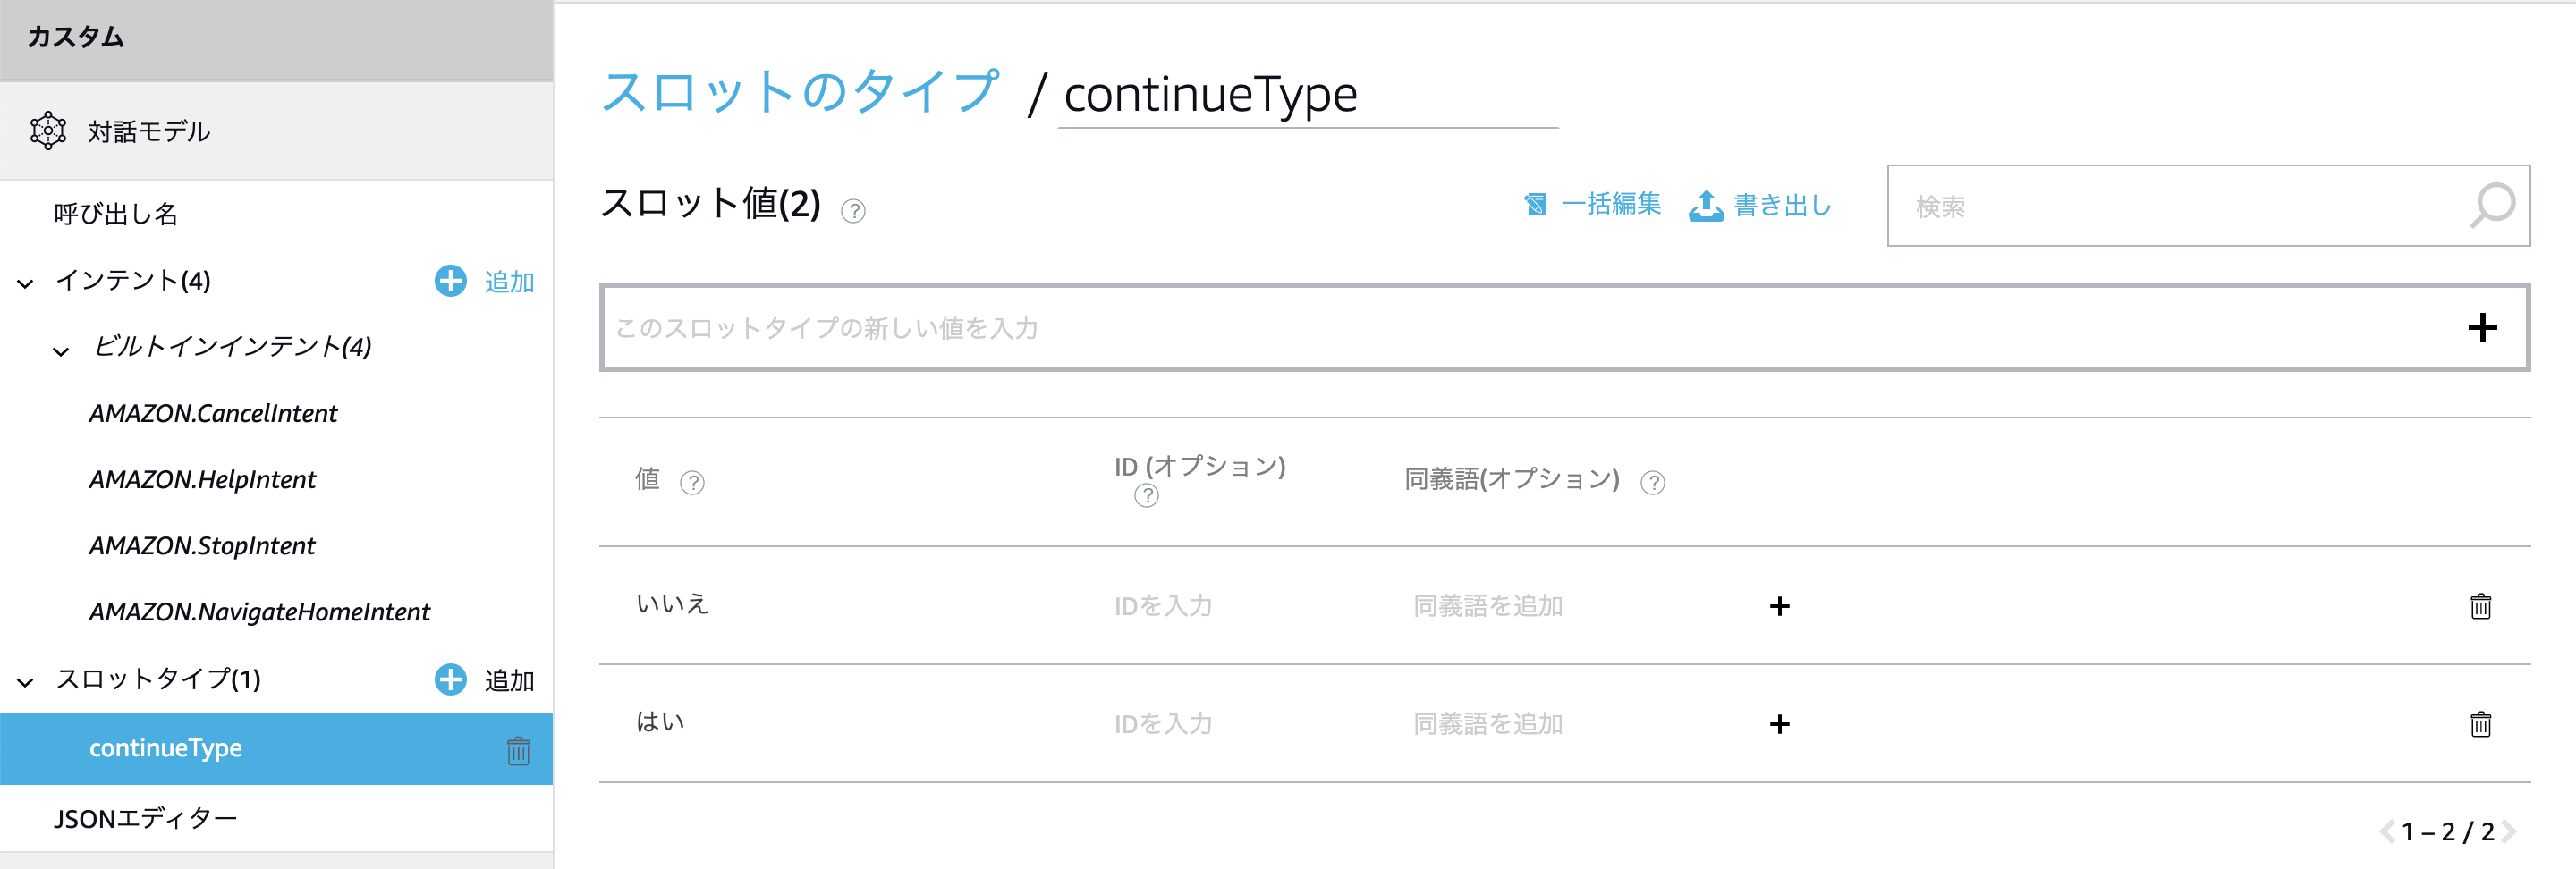
-
インテントを作成する
インテントを追加をクリック >FortuneTellingIntentを入力 >カスタムインテントを作成をクリックインテントスロットに
continueを追加 > スロットタイプにcontinueTypeを入力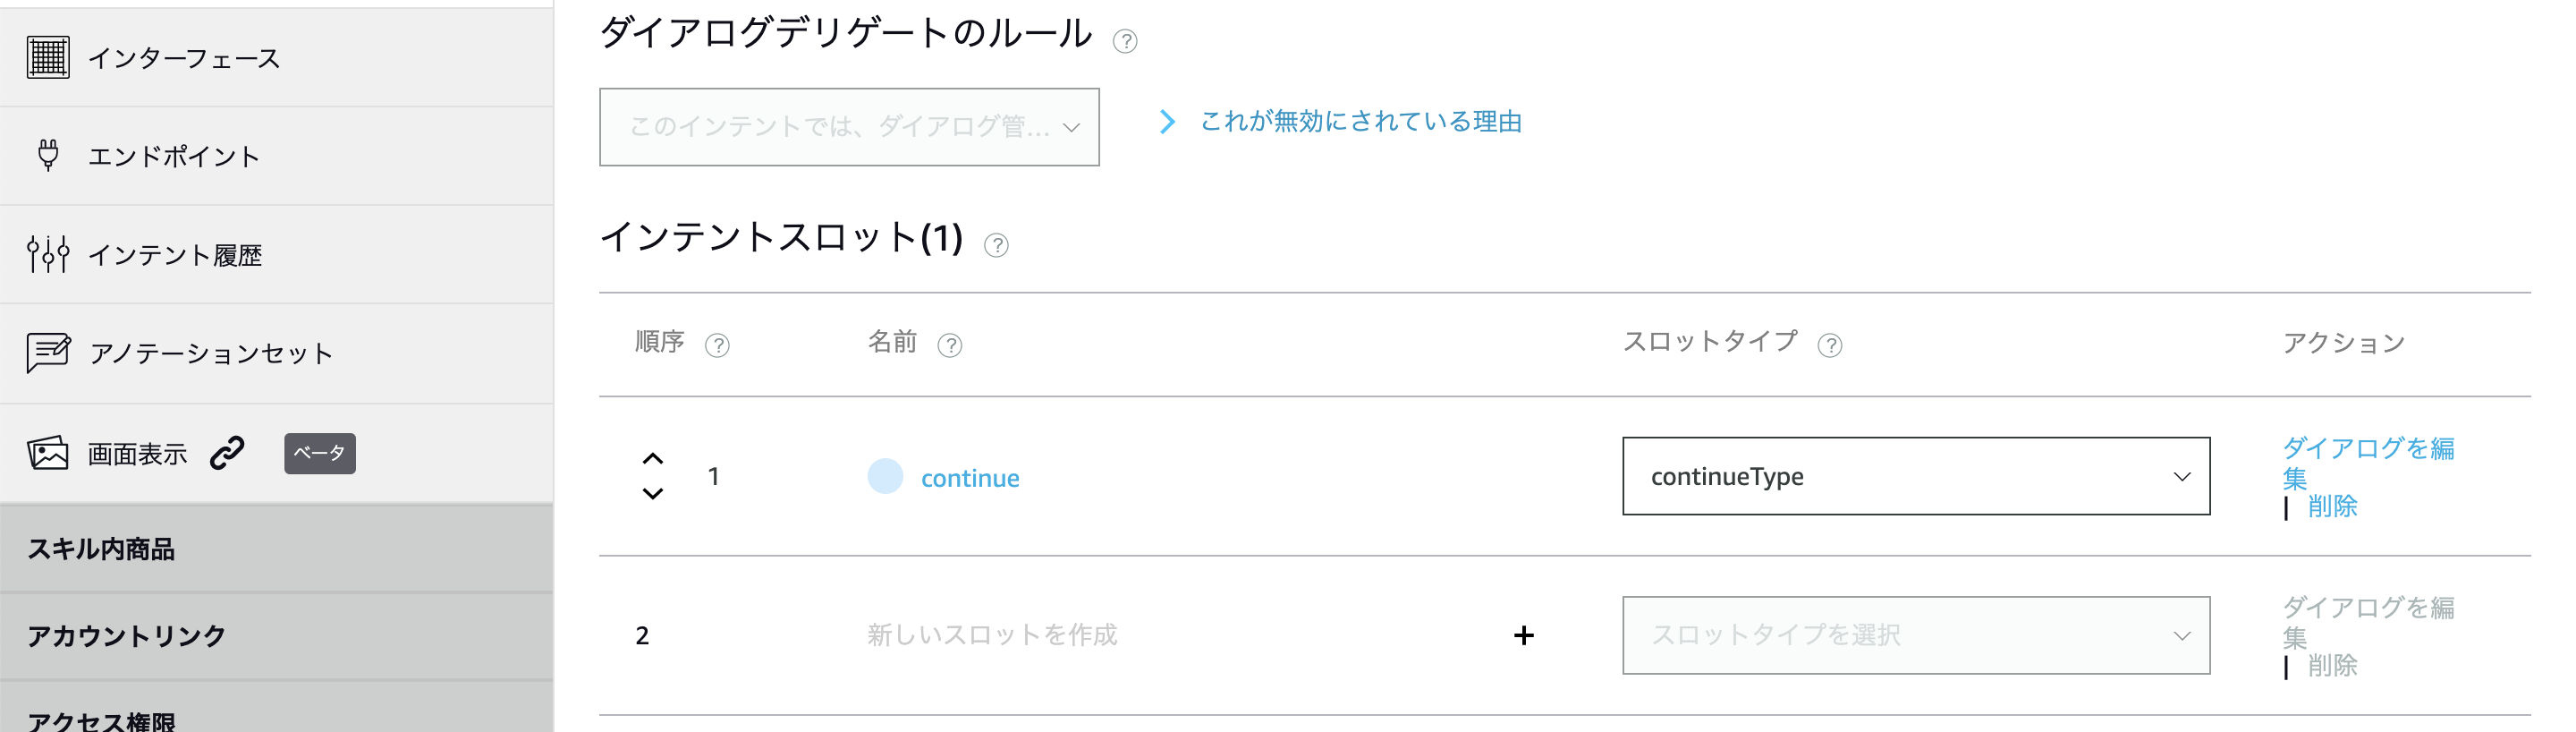
サンプル発話に
{continue}を追加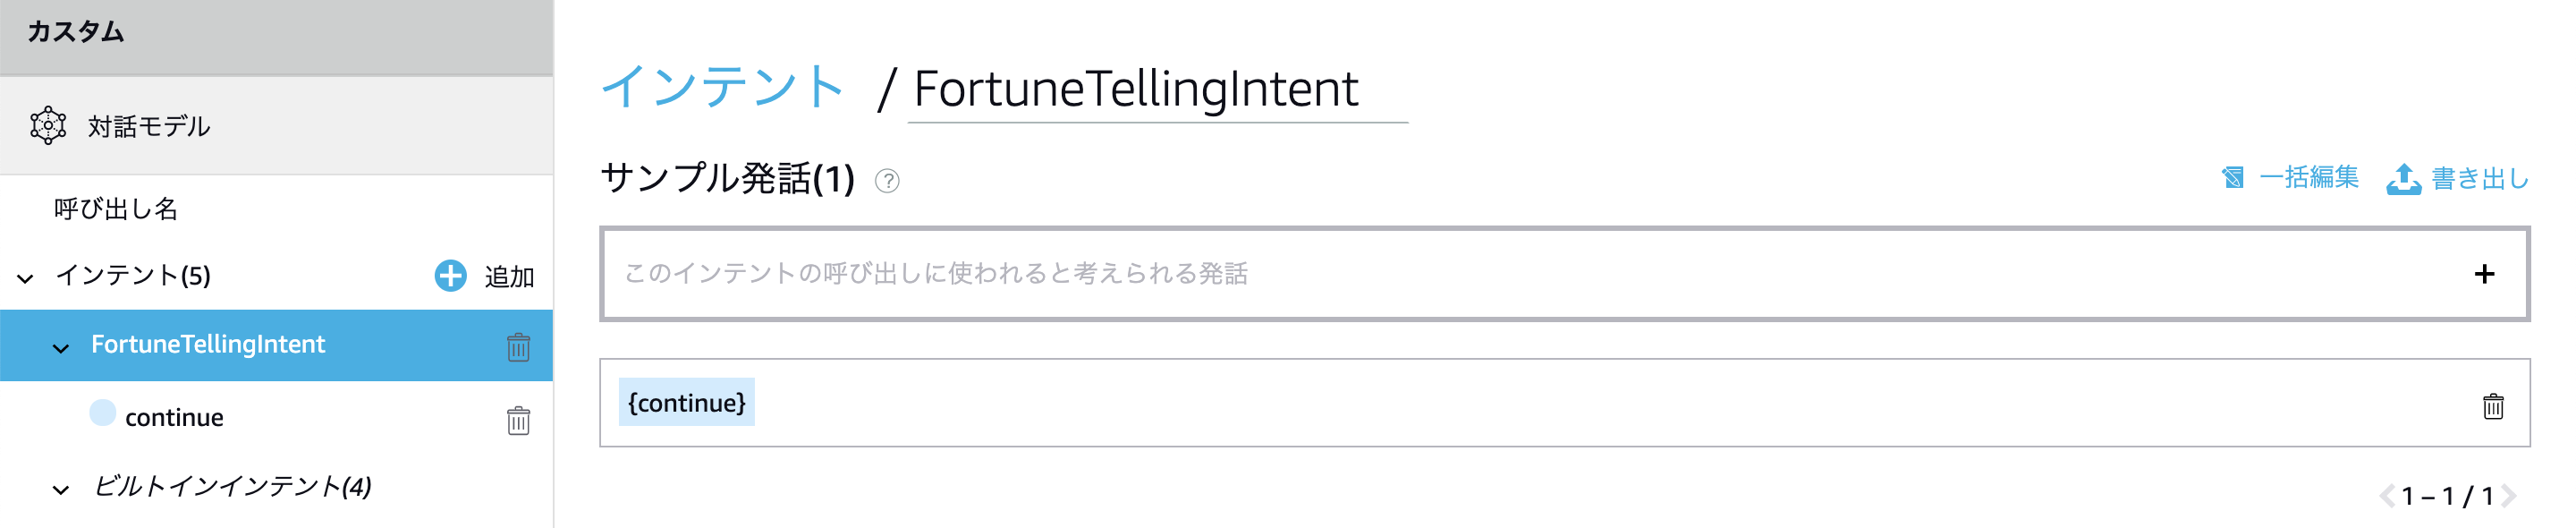
-
JSONエディターで設定内容を確認する
json_editor.json{ "interactionModel": { "languageModel": { "invocationName": "占いくん", "intents": [ { "name": "AMAZON.CancelIntent", "samples": [] }, { "name": "AMAZON.HelpIntent", "samples": [] }, { "name": "AMAZON.StopIntent", "samples": [] }, { "name": "AMAZON.NavigateHomeIntent", "samples": [] }, { "name": "FortuneTellingIntent", "slots": [ { "name": "continue", "type": "continueType" } ], "samples": [ "{continue}" ] } ], "types": [ { "name": "continueType", "values": [ { "name": { "value": "いいえ" } }, { "name": { "value": "はい" } } ] } ] } } }
AWS Lambdaの構築
-
関数を作成する
AWS マネジメントコンソールを開く > サービスをクリック > Lambdaをクリック >
関数の作成をクリックオプションで
一から作成を選択 > 関数名にFortuneTellingを入力 > ランタイムでPython 3.7を選択 >関数の作成をクリック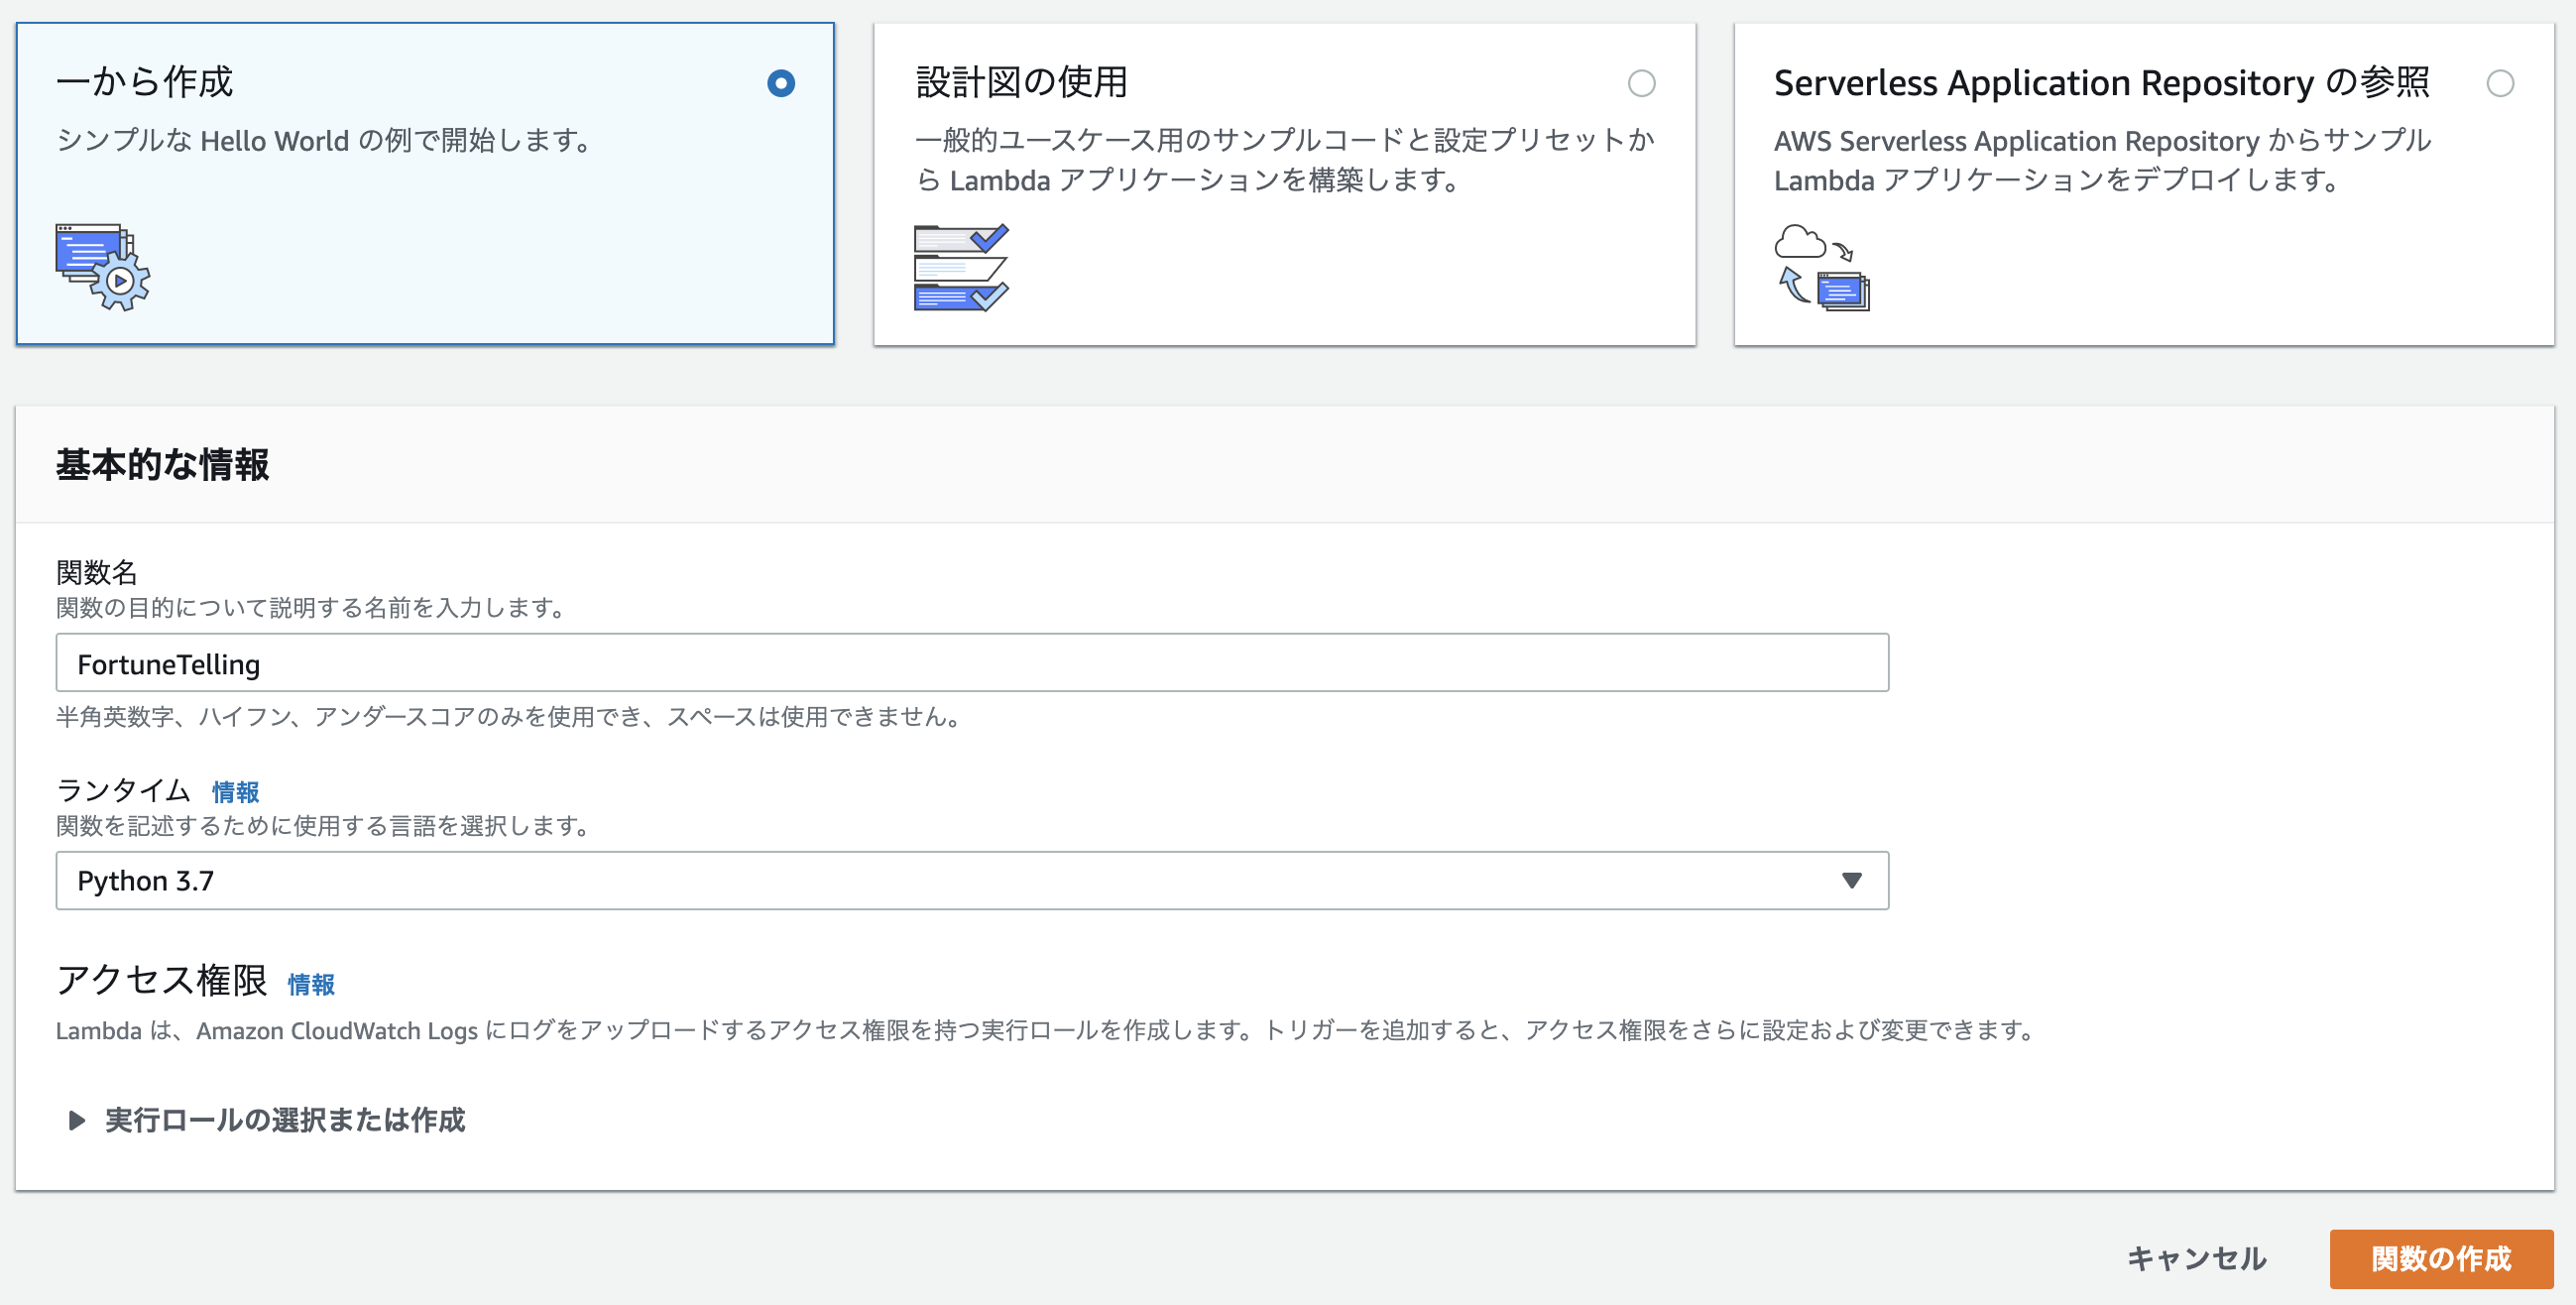
-
トリガーを設定する
作成したスキルのエンドポイントを開く > AWS LambdaのARNをクリック >
スキルIDをコピー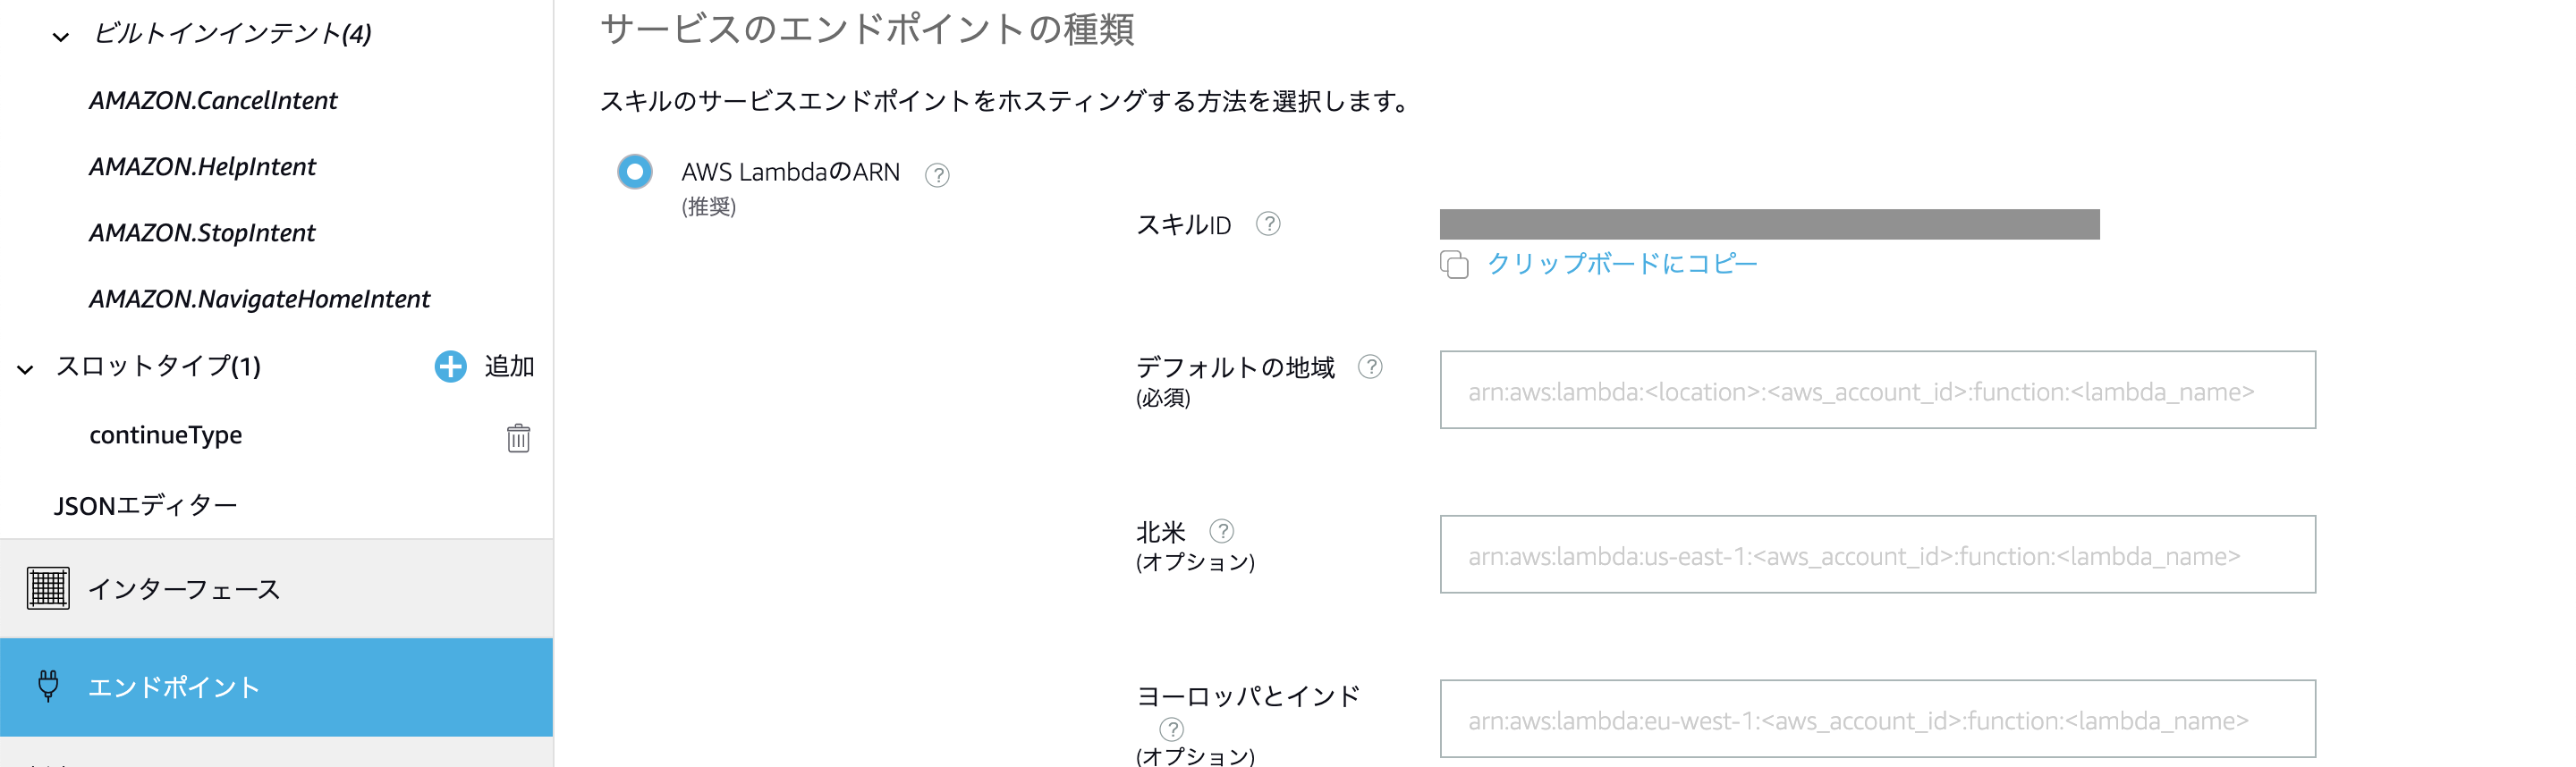
作成した関数の
トリガーを追加をクリック > トリガーを選択でAlexa Skills Kitを選択 > スキルID検証で有効を選択 > スキルIDに先ほどコピーしたスキルIDを入力 >追加をクリック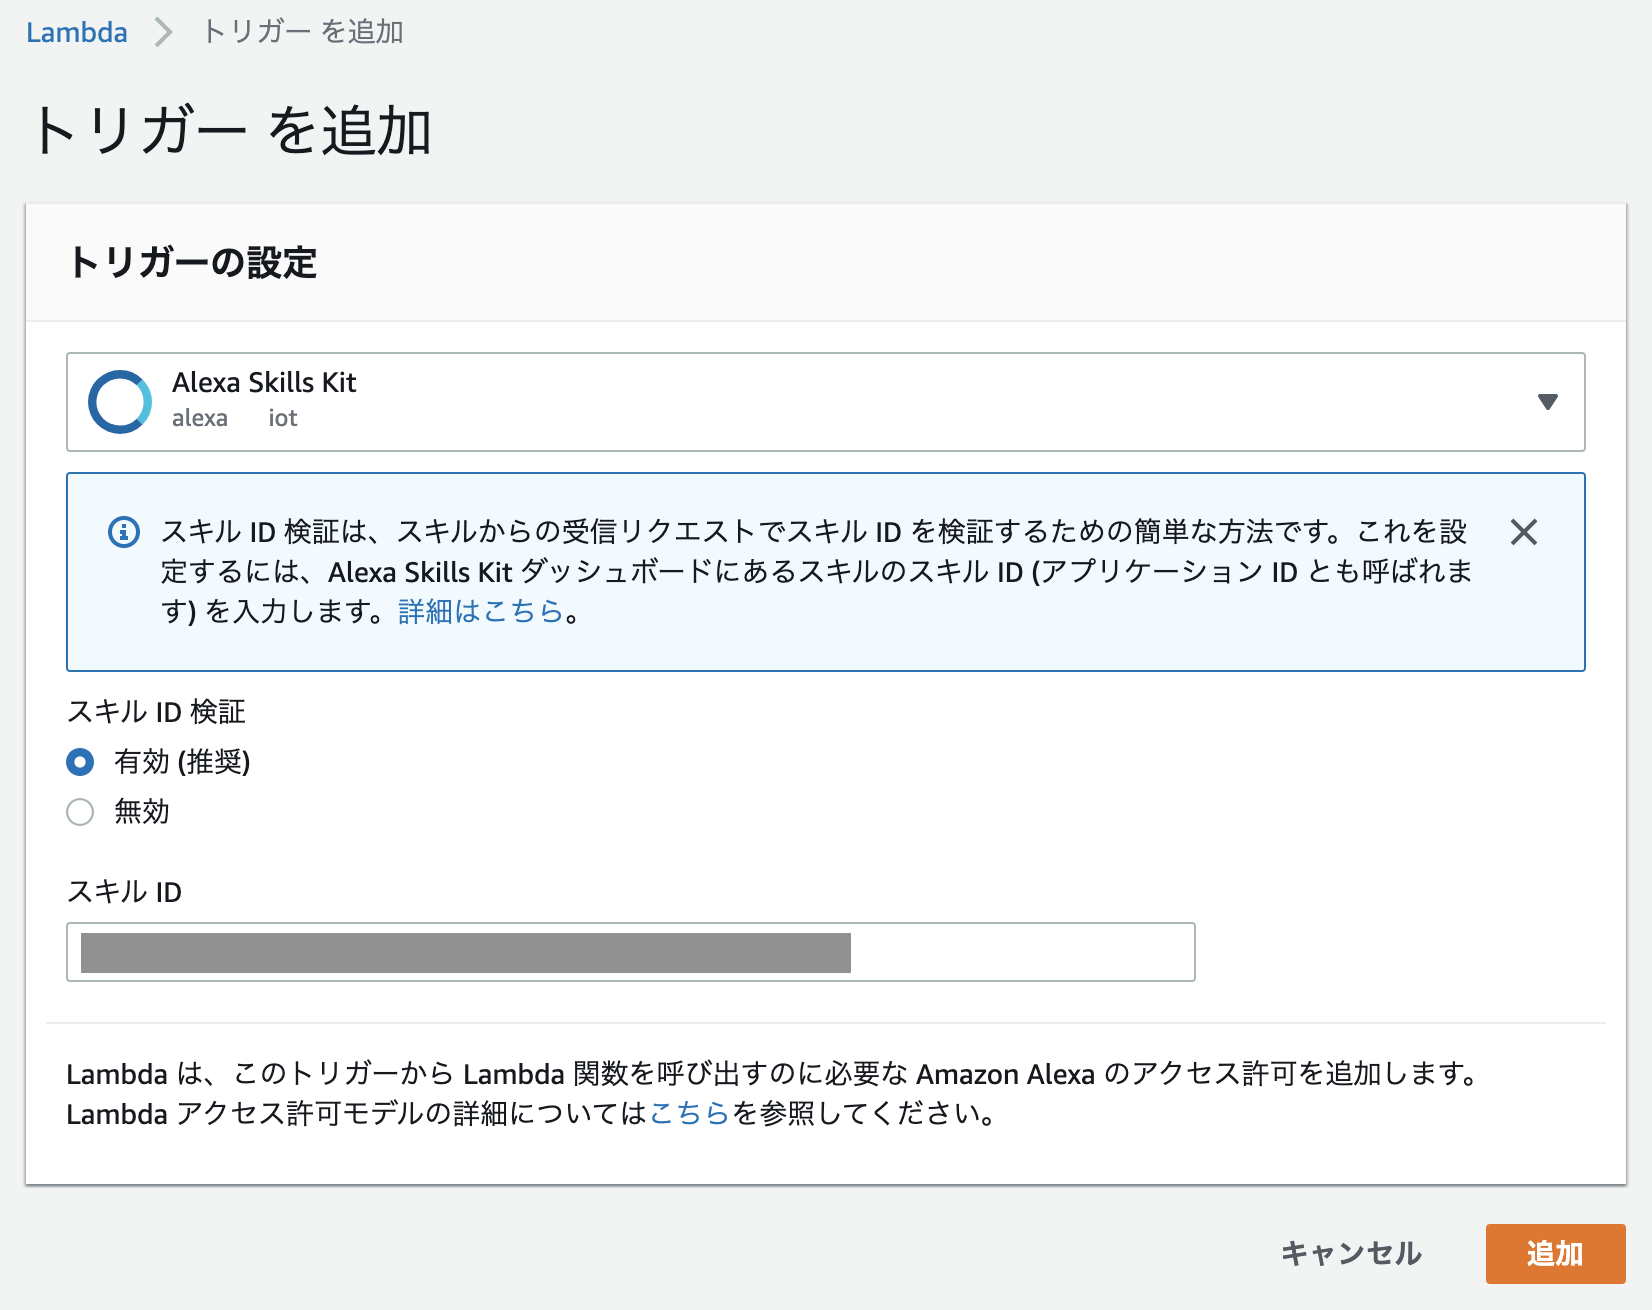
-
関数コードを設定する
ブラウザを更新 > コード エントリ タイプで
.zip ファイルをアップロードを選択 > アップロードをクリック > 事前に準備したskill.zipを選択 > ハンドラにfortune_telling.handlerを入力 >保存をクリック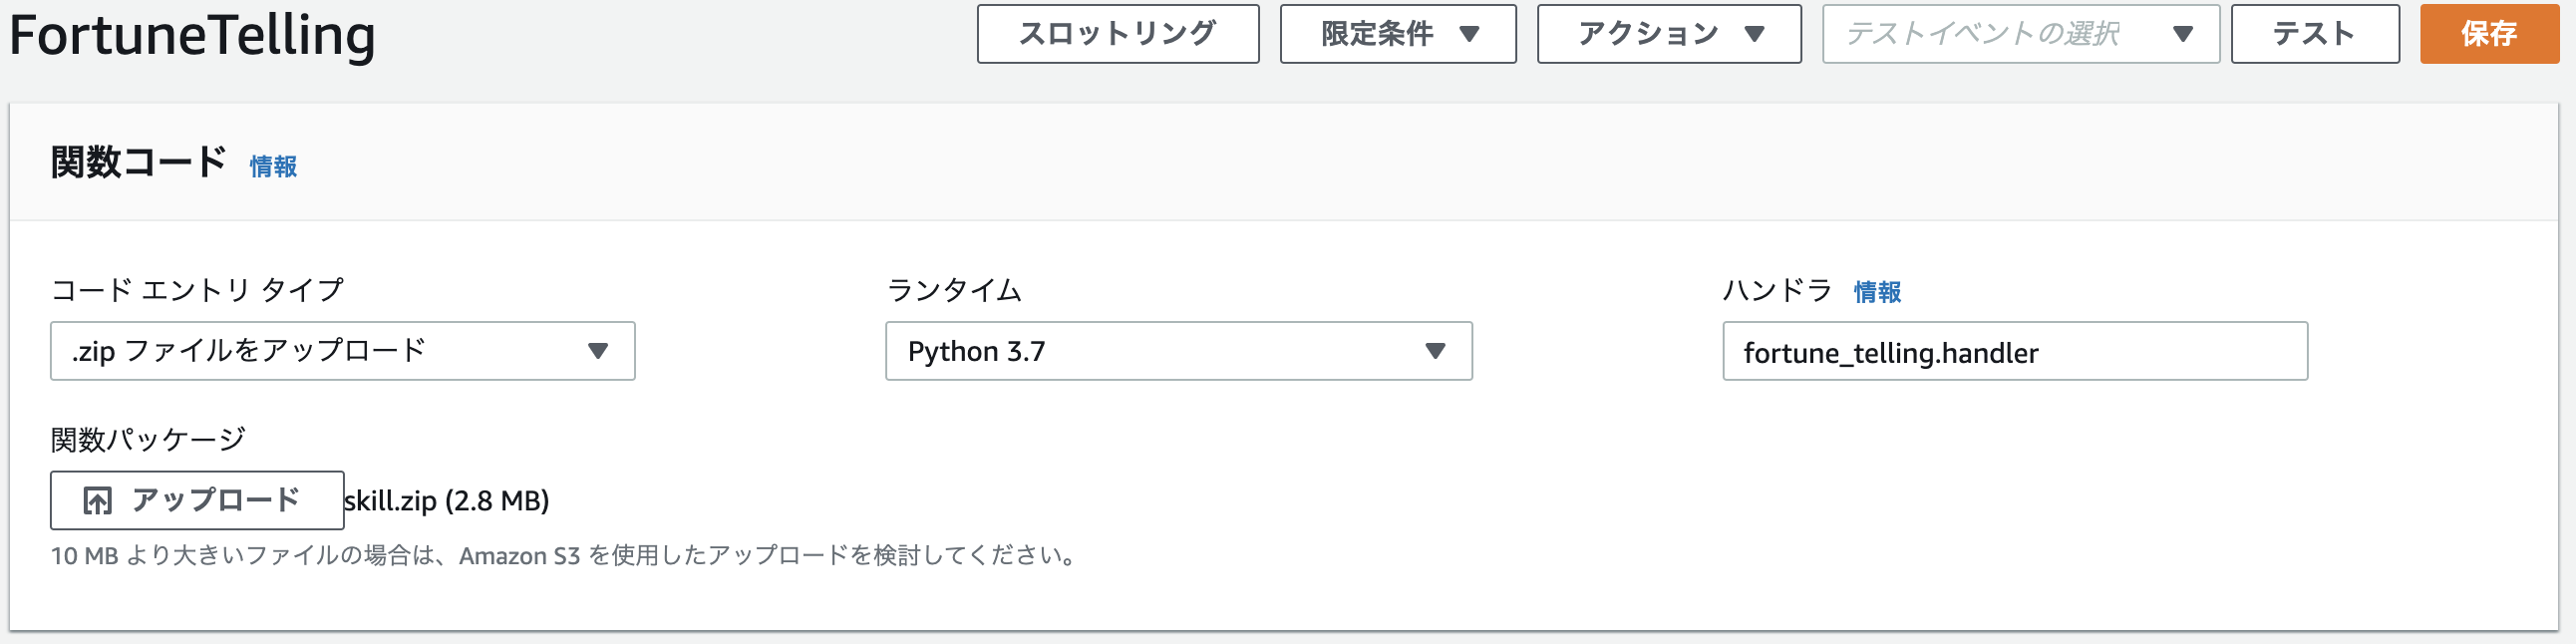
-
エンドポイントを設定する
作成した関数のARNをコピー

作成したスキルのエンドポイントを開く > AWS LambdaのARNをクリック > デフォルトの地域に先ほどコピーした
ARNを入力 >エンドポイントを保存をクリック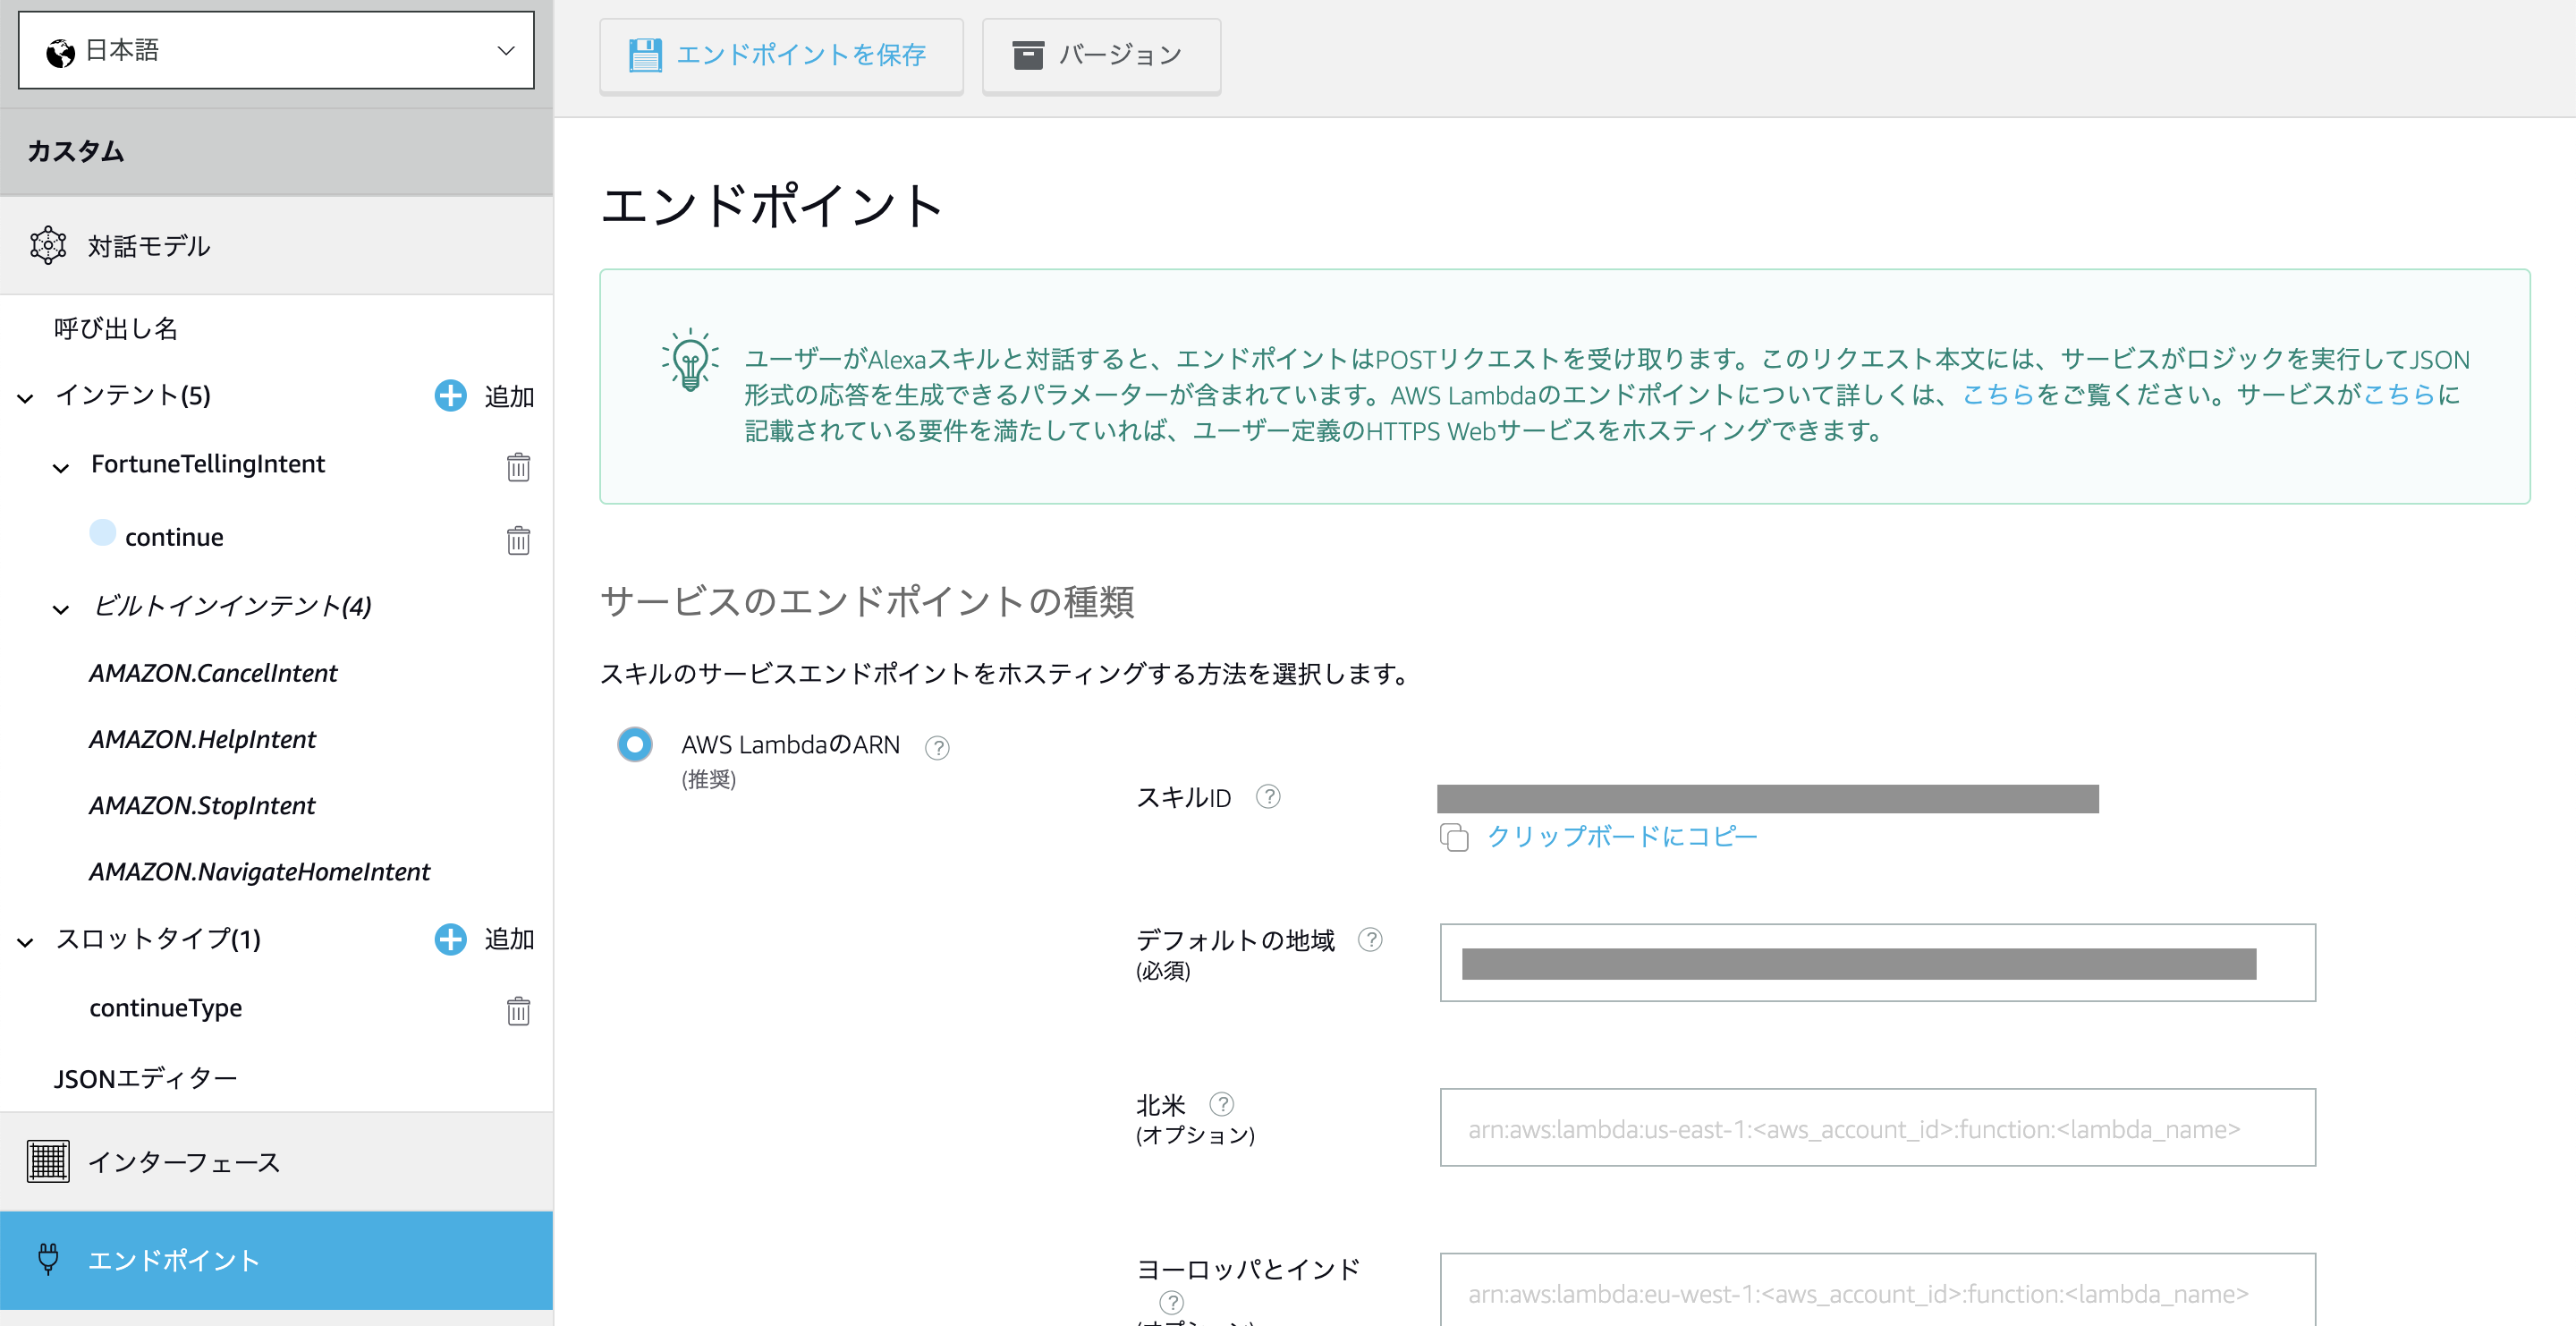
-
モデルをビルドする
モデルを保存をクリック >モデルをビルドをクリック
Alexaスキルのテスト
テストをクリック > 開発中をクリック > 占いくんを入力 > はい or いいえを入力