はじめに
この記事は chillSAP 夏の自由研究2020 の記事として執筆しています。
猛暑が続いておりますが、皆さまいかがお過ごしでしょうか。
今年はコロナの影響で、日々言い知れぬ不安に苛まれることも多いのではないでしょうか。
この状況下で発熱してしまった方のご心境は察するに余りあります。
このような方の症状を一刻でも早く緩和させるため、今回は特に治療の緊急度の高いご高齢&高熱の方を判定してイ〇ジンをかけて治療を行うアプリを開発しました。
(注:本記事はコロナウイルスに対する治療法を提案するものでもなければ、イ〇ジンの効果を証明するものでも無いことをご承知おきください。また、ご気分を害された方がいらっしゃったら誠に申し訳ございません。)
概要
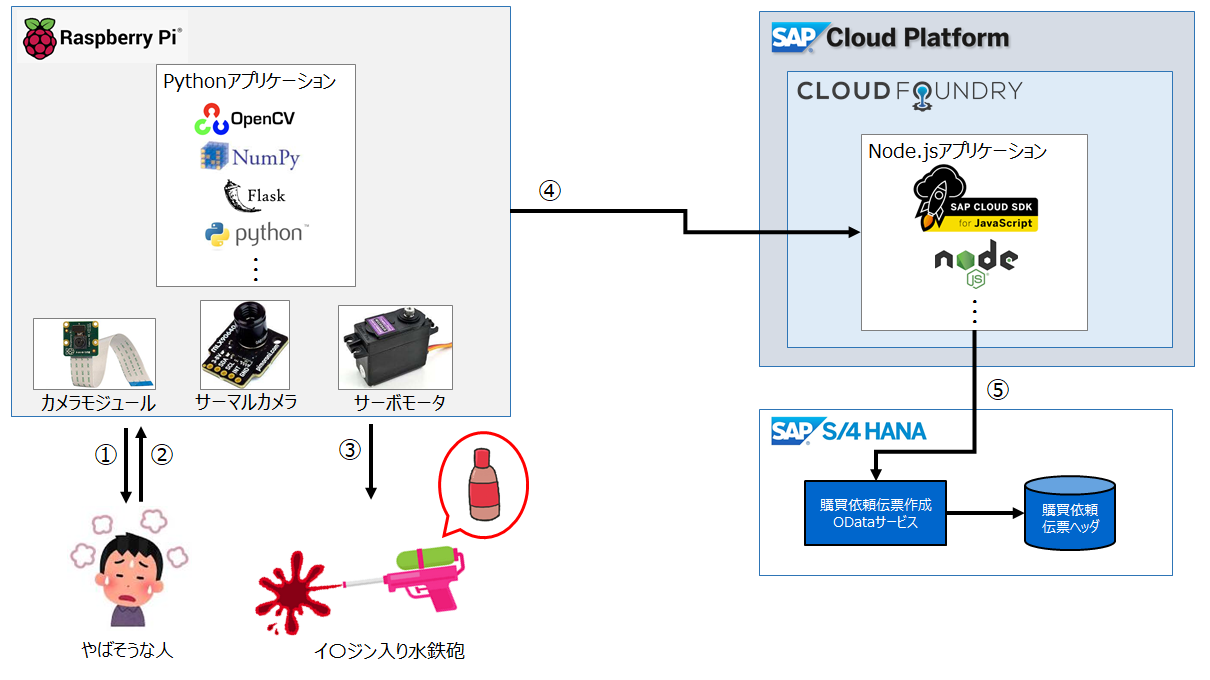
Raspberry Piに接続されたカメラモジュール及びサーマルカメラモジュールにより、測定者の年齢を及び体温を推測します(①、②)。
推定年齢及び体温が基準値を超えた場合は危険性ありと判断し、サーボモータを介して水鉄砲からイ〇ジンを発射します(③)。
またイ〇ジンが足りなくなると困るので、同時にSAP Cloud Platform上のNode.jsアプリケーションを経由して(④)、SAP S/4HANA上の購買依頼伝票作成ODataサービスから購買依頼伝票を作成して購入を進めます(⑤)。
年齢推定や体温測定の結果はRaspberry Pi上でこんな感じで表示されます。

必要なもの
| 製品 | 補足 |
|---|---|
| Raspberry Pi 4 model:B | |
| サーマルカメラモジュール (MLX90640) | |
| Raspberry Pi Camera V2 | |
| サーボモータ(MG996R) | それなりの力が出ないとと水鉄砲のトリガーを引けません |
| 水鉄砲 | |
| イ〇ジン(ポピドンヨード入り) | |
| SAP S/4 HANA 1709 | オンプレミスver |
実装手順
1. Raspberry Piへの各種モジュールの接続
今回はカメラモジュール、サーマルカメラモジュール、サーボモータをRaspberry Piに接続します。
またイ〇ジン発射用の水鉄砲を適当な台に取り付け、サーボモータと接続します。
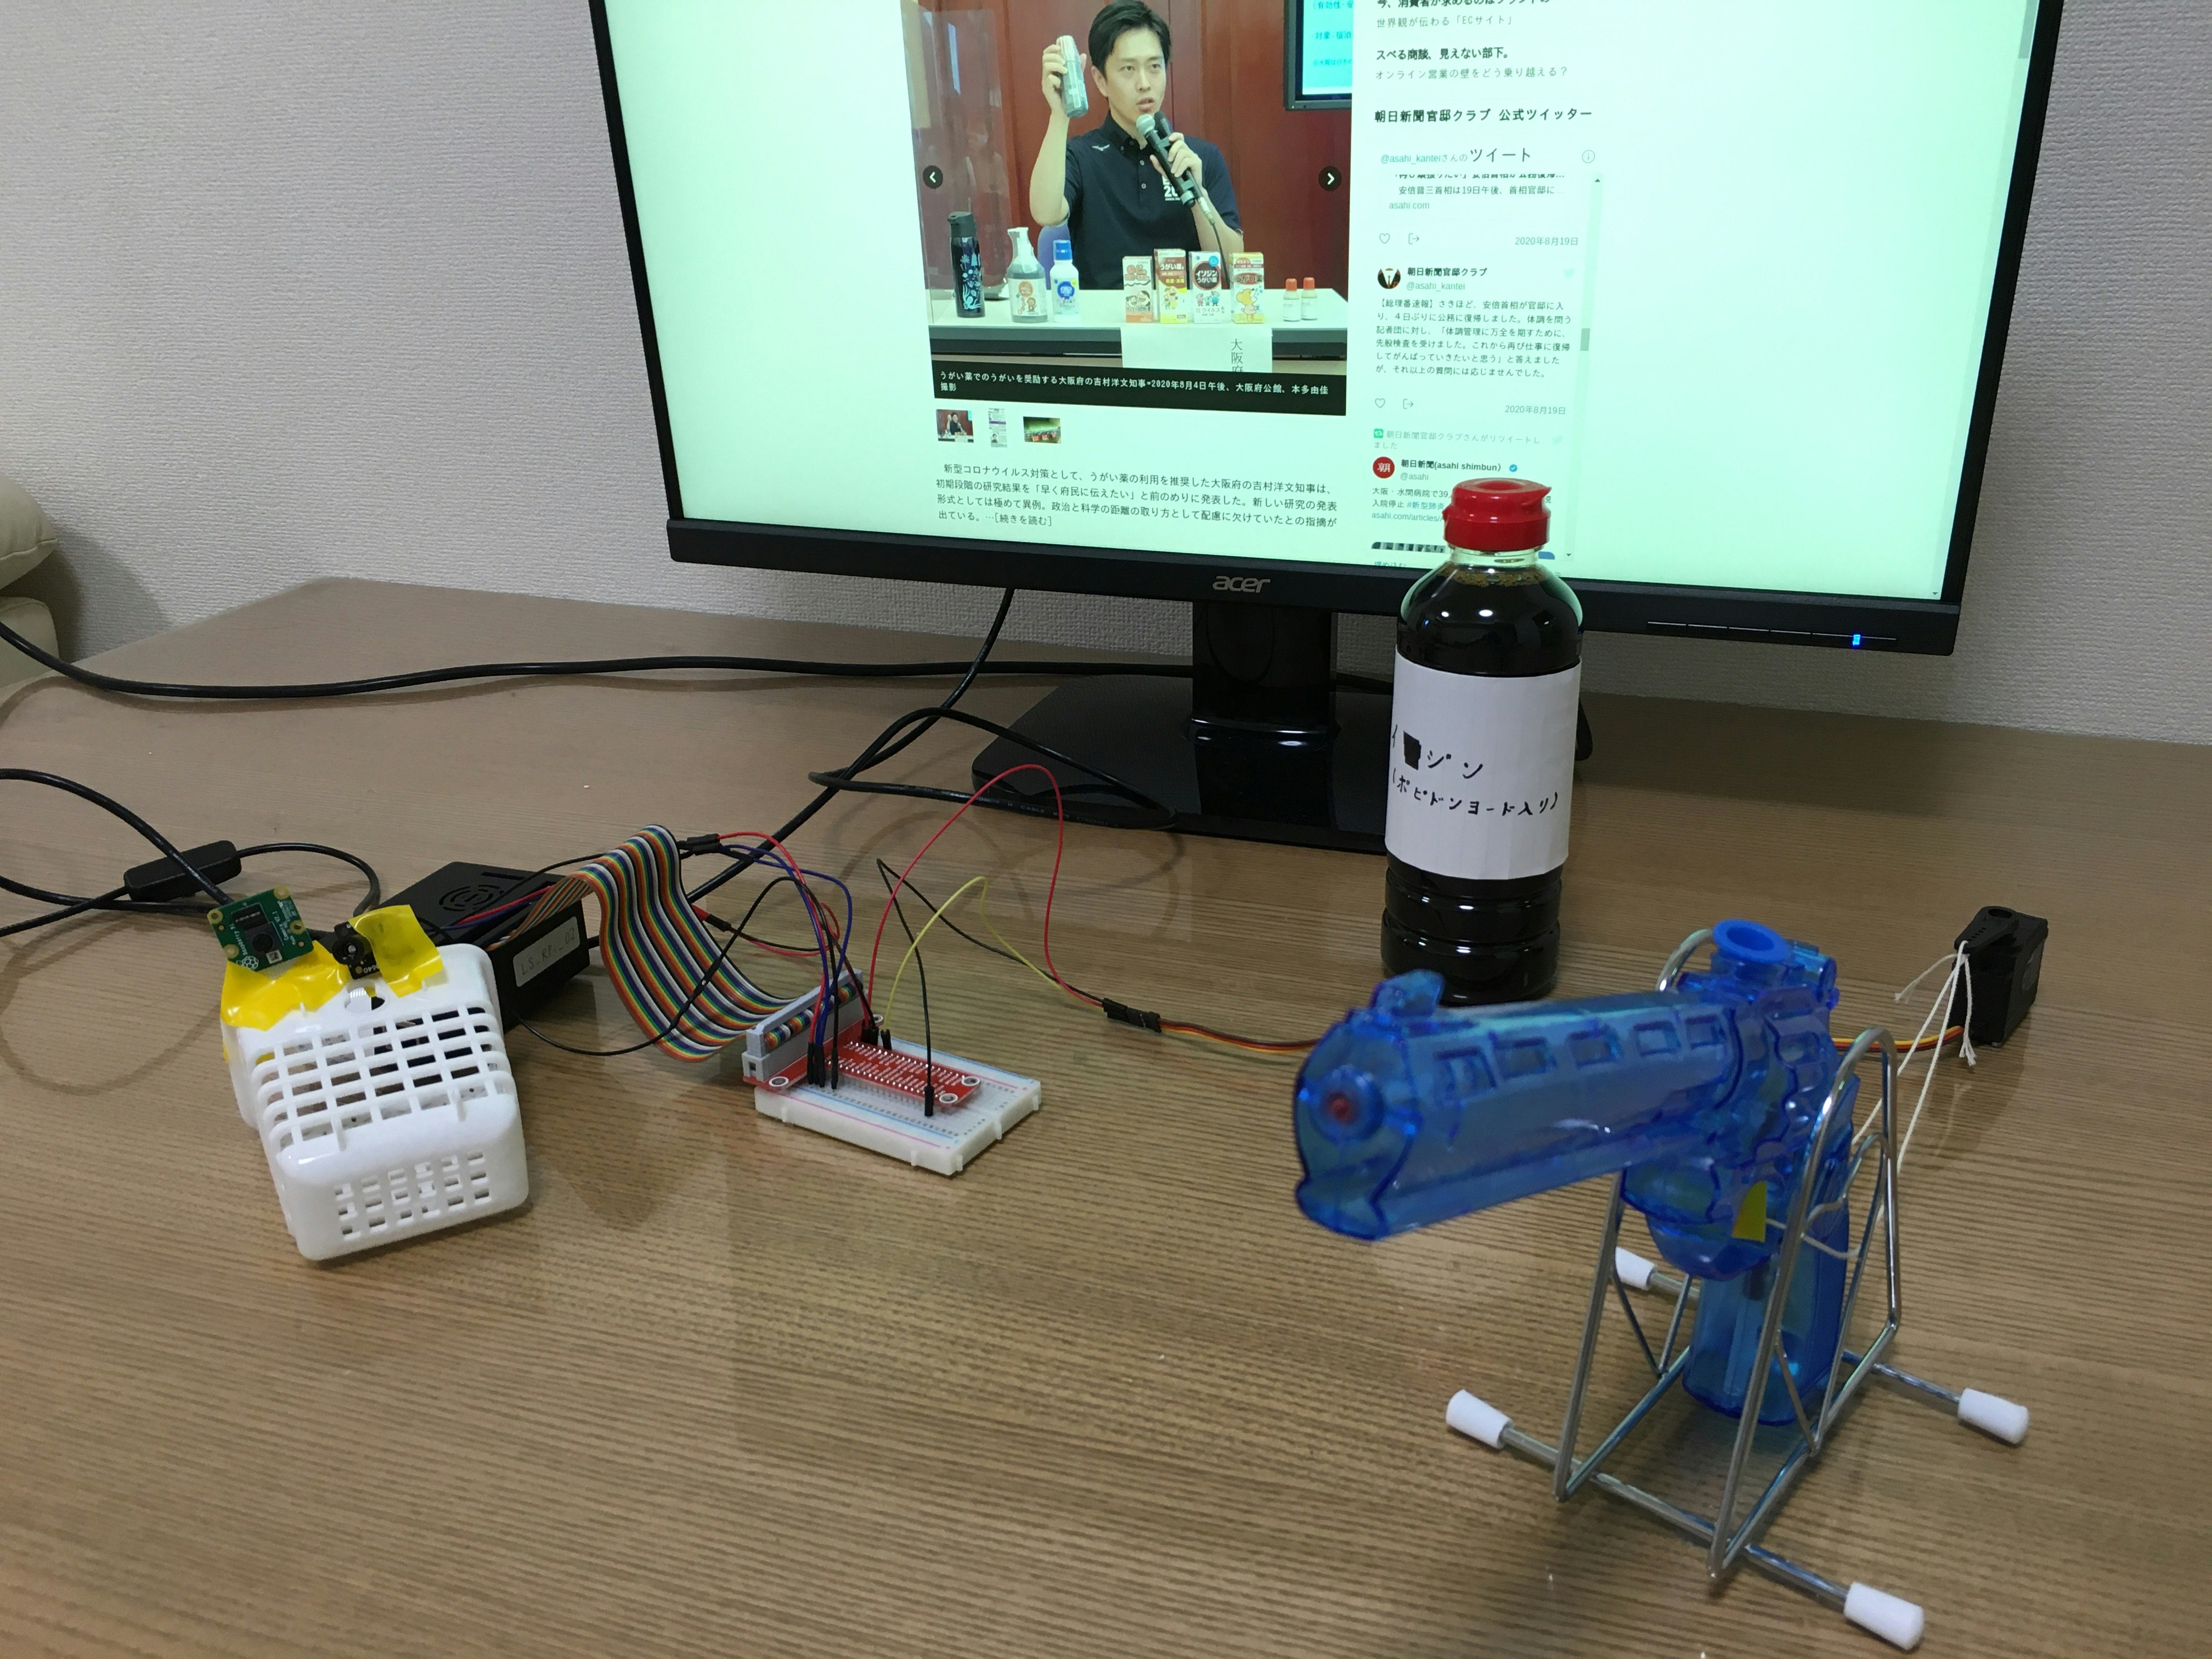
Raspberry Piへの各種モジュールの接続は以下の端子及びGPIOピンを使用しています。
カメラモジュール:ラズパイのカメラ用端子
サーマルカメラモジュール:SDAをGPIO 2ピン、SCLをGPIO 3ピン
サーボモータ:GPIO 18ピン
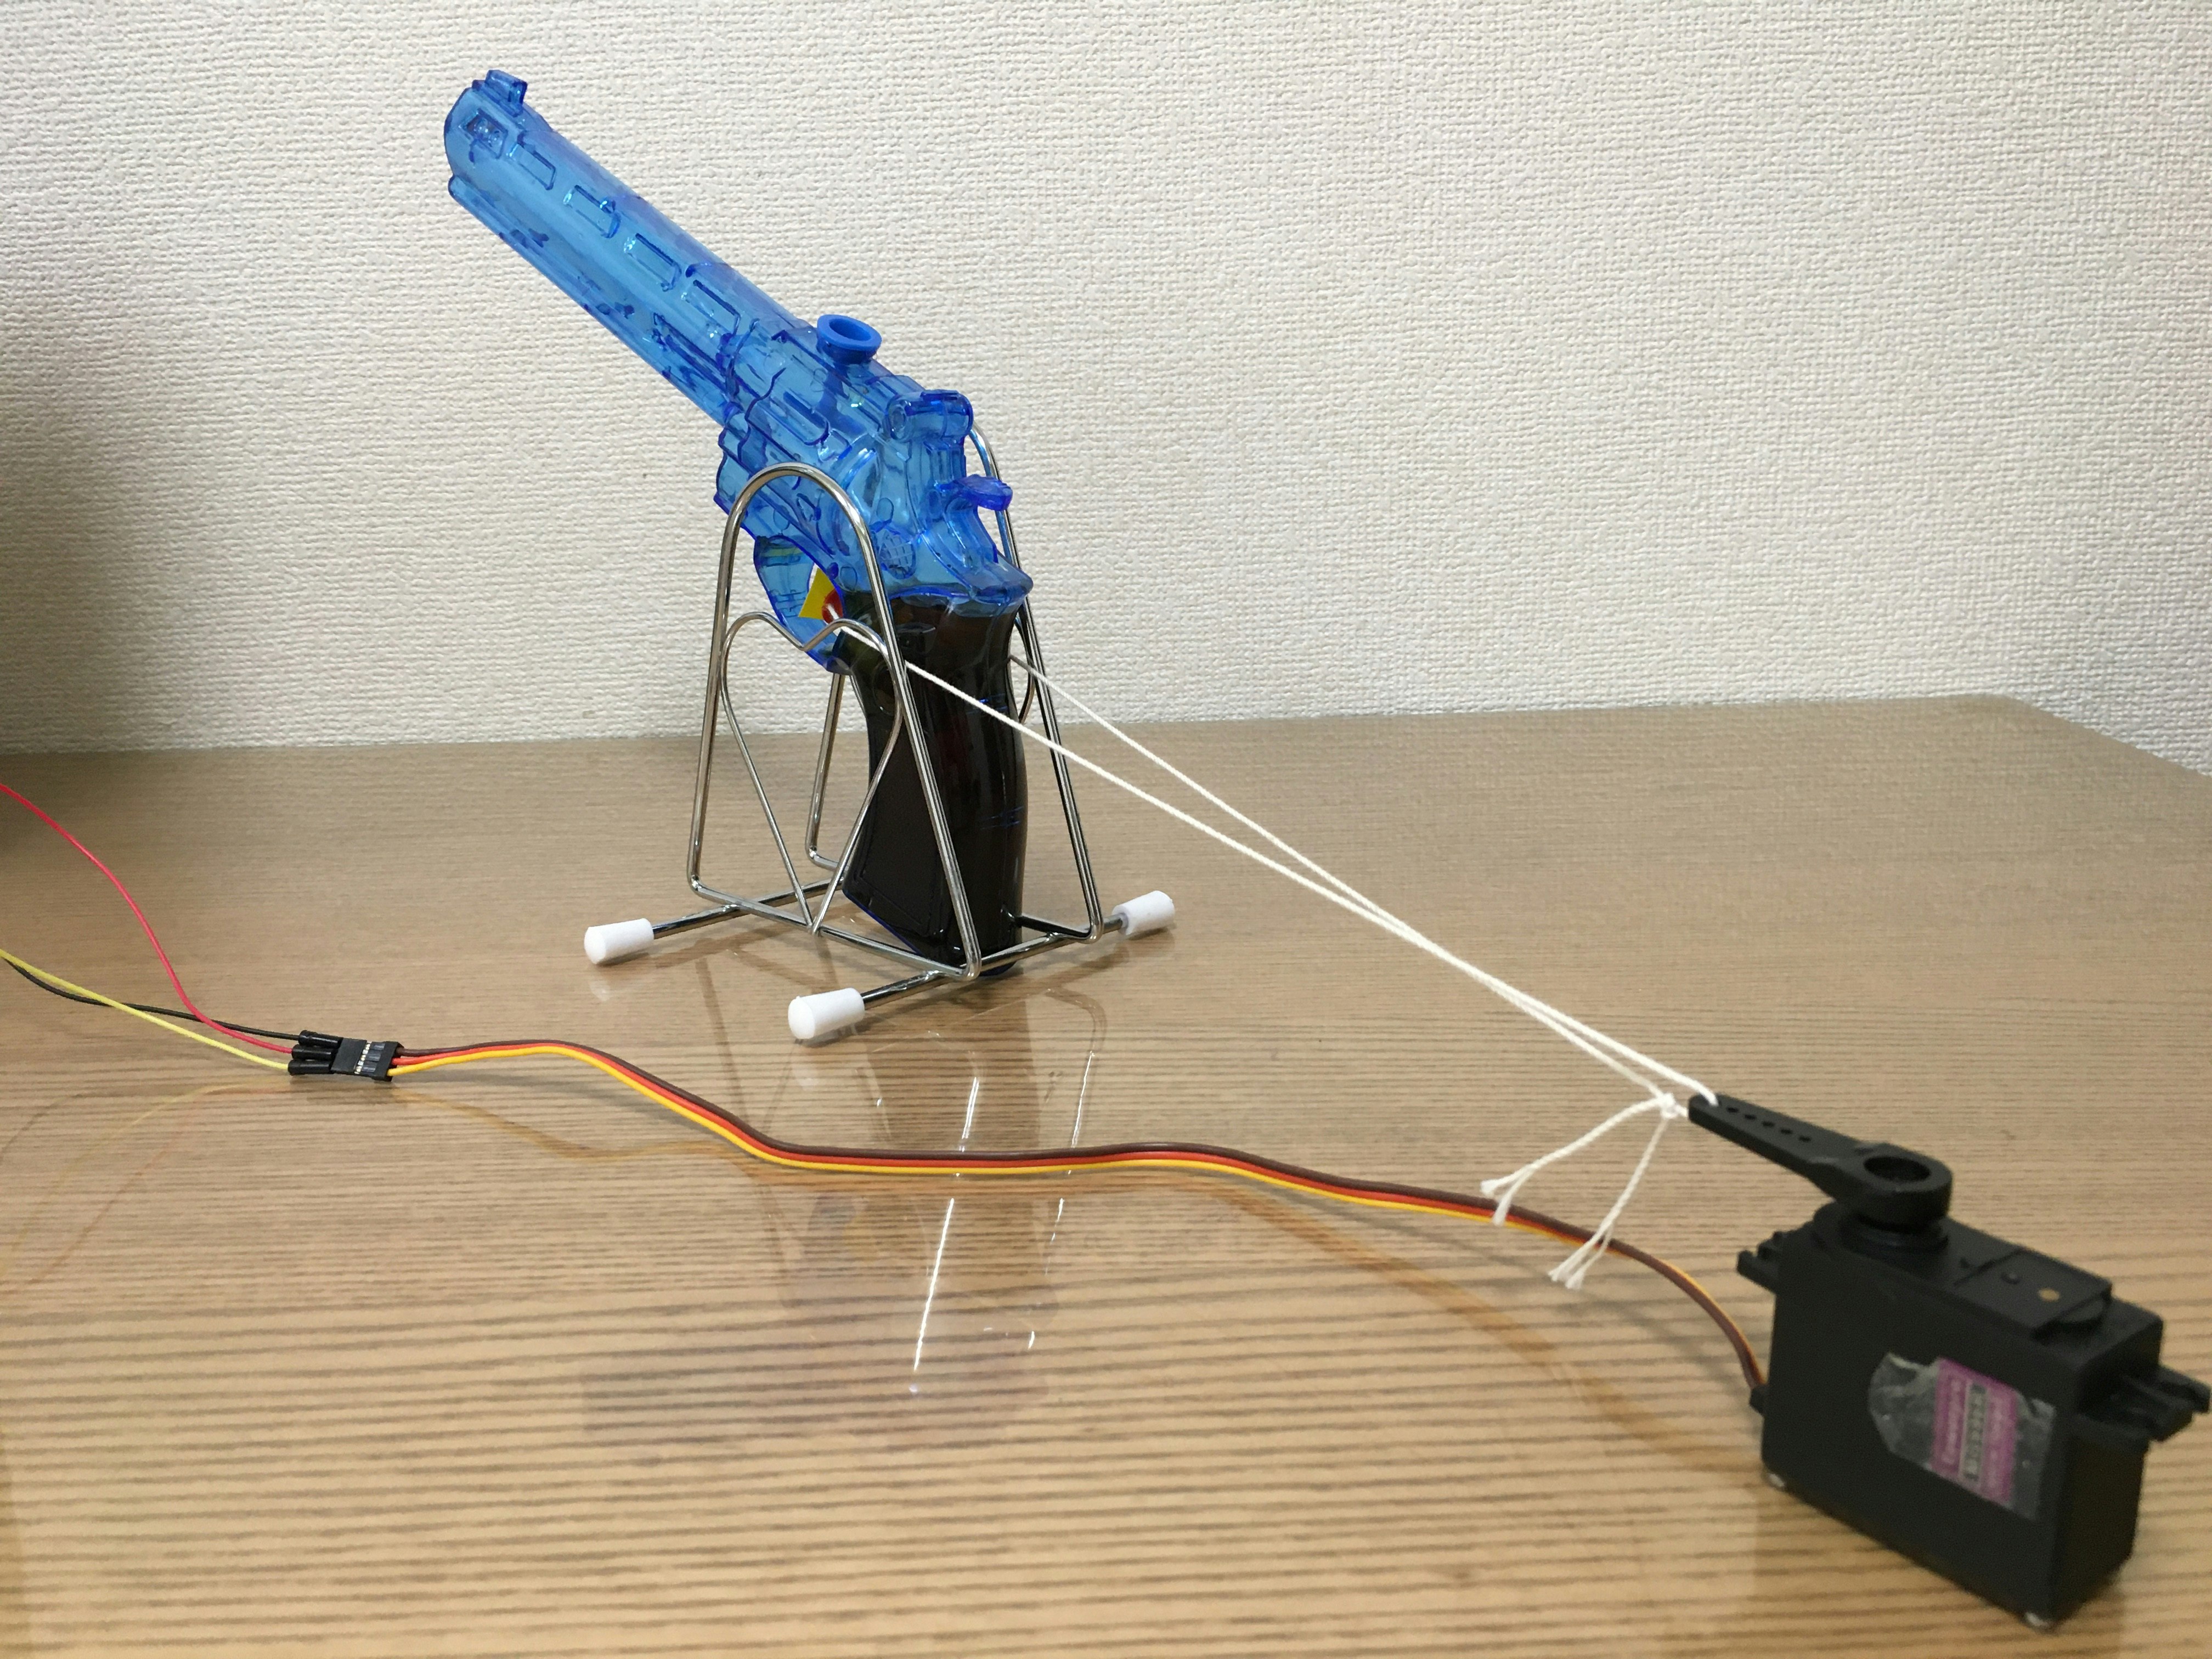
サーボモータと水鉄砲との接続は強めの糸で行い、サーボモータが半回転したときにトリガーが引かれるようにしておきます。
水鉄砲のトリガーは基本的に結構固く、生半可な接続だと糸がずれてしまったりトリガーでは無く水鉄砲やサーボモータ自体が動いてしまうので、しっかり固定するようにしましょう。
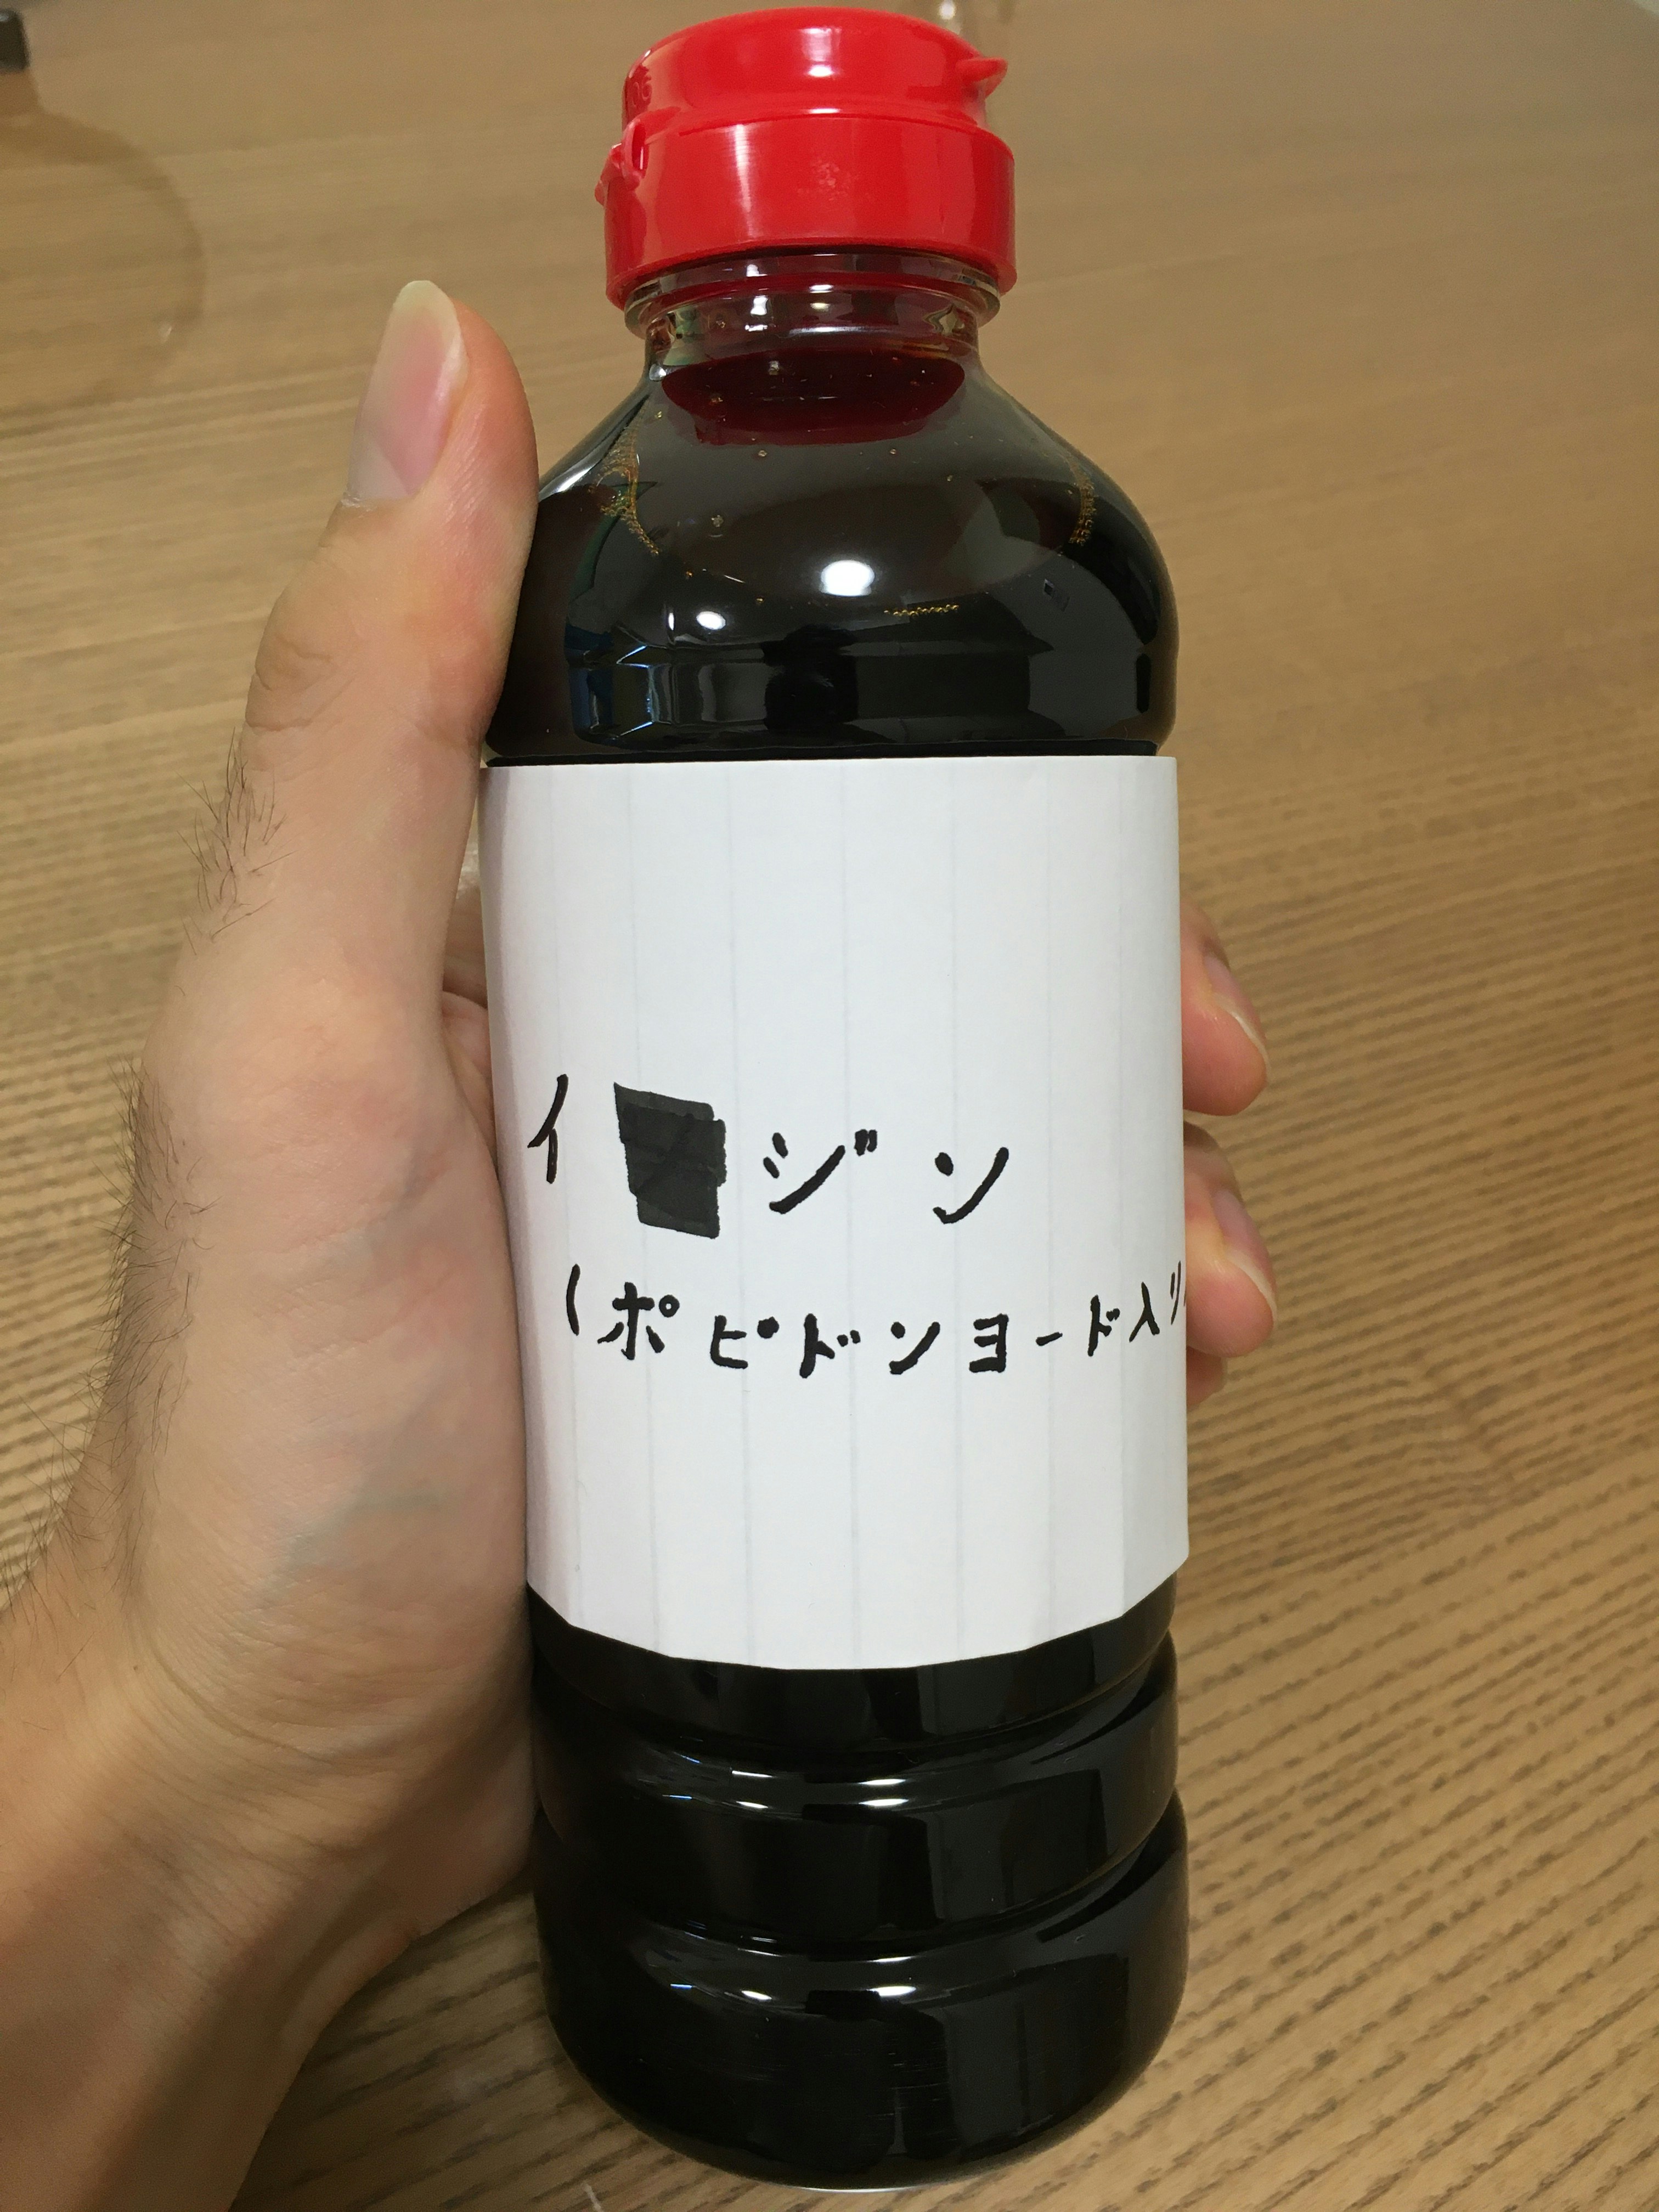
また、水鉄砲の中には今回の主役であるキッコーマン醤油イ〇ジン(ポピドンヨード入り)を充填しておきましょう。
2. Pythonアプリの実装
Raspberry Piに接続した各種モジュールはPythonで記述したスクリプトにより制御します。
Pythonアプリの構成は以下の通りです。
.
├── face
│    └── face.py
├── httpclient
│    └── purchase_create.py
├── templates
│    └── index.html
├── thermal_camera
│    └── thermal_camera.py
├── watergun
│    └── watergun.py
└── camera_app.py
複数のカメラからの動画を別々のウィンドウに表示するのであればopencvのimshowメソッドを使用するだけでOKなのですが、今回は1画面内で(かつブラウザからサーバにアクセスして)複数の動画を表示したかったため、Python用の軽量WebアプリケーションフレームワークであるFlaskを利用しています。
まずエンドポイントに対してリクエストを送った際に表示される画面をindex.html内に記載します。
<html>
  <head>
    <title>Video Streaming Demonstration</title>
  </head>
  <body>
    <img src="{{ url_for('video_feed1') }}">
    <img src="{{ url_for('video_feed2') }}">

  </body>
</html>
index.html 内のimgタグで動画(厳密にはカメラモジュールで撮影した動画の1フレーム)を表示するようになっています。
ソースとなる動画は、url_forで指定したルート名と同一のルートをcamera_app.pyから探して取得しています。
# !/usr/bin/env python
import os
from flask import Flask, render_template, Response
import adafruit_mlx90640
import time

from thermal_camera.thermal_camera import ThermalCamera
from face.face import Face
from httpclient.purchase_create import HttpClient
from watergun.watergun import Watergun

app = Flask(__name__)

age = 0
temperature = 0
last_posted_time = time.time()

@app.route('/')
def index():
    """Video streaming home page."""
    return render_template('index.html')


def generate(camera, value):
    """Video streaming generator function."""
    while True:
        #画像のバイナリデータを取得
        frame = camera.get_frame()

        #推定年齢と体温を取得する
        global age
        global temperature
        global last_posted_time

        if value == 'face':
            age = frame[1]
        elif value == 'temperature':
            temperature = frame[1]

        #推定年齢が40歳以上、体温が36℃であり、前回連携時間から5秒以上が経過している場合
        if age >= 40 and temperature >= 36 and (time.time() - last_posted_time) >=5:
            last_posted_time = time.time()

            #水鉄砲を発射
            Watergun.shoot()

            #購買依頼伝票を作成
            HttpClient.createPurchaseReq()


        yield (b'--frame\r\n'
               b'Content-Type: image/jpeg\r\n\r\n' + frame[0] + b'\r\n')


@app.route('/video_feed1')
def video_feed1():
    """Video streaming route. Put this in the src attribute of an img tag."""
    return Response(generate(Face(),'face'),
                    mimetype='multipart/x-mixed-replace; boundary=frame')


@app.route('/video_feed2')
def video_feed2():
    """Video streaming route. Put this in the src attribute of an img tag."""
    return Response(generate(ThermalCamera(), 'temperature'),
                    mimetype='multipart/x-mixed-replace; boundary=frame')

if __name__ == '__main__':
    app.run(host='0.0.0.0', threaded=True, port=5000)
camera_app.pyでは、①Flaskアプリを起動、②顔認識プログラムからの画像及び推定年齢取得、③体温測定プログラムからの画像及び体温取得、④水鉄砲からのイ〇ジン噴射、⑤購買依頼伝票作成用APIへのリクエスト送信を行っています。
②③についてですが、バイト型の動画フレームをyieldで逐次出力しており、その際mimetypeをmultipart/x-mixed-replaceと指定することでサーバが紙芝居的にレンダリングするようにしています。
thermal_camera.pyではサーマルカメラモジュールからバイナリイメージを取得し、温度の情報と共に呼び出し元に返す実装がなされています。
# !/usr/bin/env python3
import cv2
import time
from PIL import Image, ImageDraw, ImageFont
import os
import board
import busio
import adafruit_mlx90640
import math
import numpy

class ThermalCamera:

    # some utility functions
    def constrain(self, val, min_val, max_val):
        return min(max_val, max(min_val, val))


    def map_value(self, x, in_min, in_max, out_min, out_max):
        return (x - in_min) * (out_max - out_min) / (in_max - in_min) + out_min


    def gaussian(self, x, a, b, c, d=0):
        return a * math.exp(-((x - b) ** 2) / (2 * c ** 2)) + d


    def gradient(self, x, width, cmap, spread=1):
        width = float(width)
        r = sum(
            [self.gaussian(x, p[1][0], p[0] * width, width / (spread * len(cmap))) for p in cmap]
        )
        g = sum(
            [self.gaussian(x, p[1][1], p[0] * width, width / (spread * len(cmap))) for p in cmap]
        )
        b = sum(
            [self.gaussian(x, p[1][2], p[0] * width, width / (spread * len(cmap))) for p in cmap]
        )
        r = int(self.constrain(r * 255, 0, 255))
        g = int(self.constrain(g * 255, 0, 255))
        b = int(self.constrain(b * 255, 0, 255))
        return r, g, b

    def get_frame(self):
        while True:
            INTERPOLATE = 10

            # MUST set I2C freq to 1MHz in /boot/config.txt
            i2c = busio.I2C(board.SCL, board.SDA)

            # low range of the sensor (this will be black on the screen)
            MINTEMP = 20.0
            # high range of the sensor (this will be white on the screen)
            MAXTEMP = 45.0

            # the list of colors we can choose from
            heatmap = (
                (0.0, (0, 0, 0)),
                (0.20, (0, 0, 0.5)),
                (0.40, (0, 0.5, 0)),
                (0.60, (0.5, 0, 0)),
                (0.80, (0.75, 0.75, 0)),
                (0.90, (1.0, 0.75, 0)),
                (1.00, (1.0, 1.0, 1.0)),
            )

            # how many color values we can have
            COLORDEPTH = 1000

            colormap = [0] * COLORDEPTH

            for i in range(COLORDEPTH):
                colormap[i] = self.gradient(i, COLORDEPTH, heatmap)

            # initialize the sensor
            mlx = adafruit_mlx90640.MLX90640(i2c)
            mlx.refresh_rate = adafruit_mlx90640.RefreshRate.REFRESH_2_HZ

            frame = [0] * 768

            try:
                mlx.getFrame(frame)
            except ValueError:
                continue  # these happen, no biggie - retry

            pixels = [0] * 768
            for i, pixel in enumerate(frame):
                coloridx = self.map_value(pixel, MINTEMP, MAXTEMP, 0, COLORDEPTH - 1)
                coloridx = int(self.constrain(coloridx, 0, COLORDEPTH - 1))
                pixels[i] = colormap[coloridx]

            for h in range(24):
                for w in range(32):
                    pixel = pixels[h * 32 + w]

            image = Image.new("RGB", (32, 24))
            image.putdata(pixels)

            #numpy配列(RGBA) <- PILイメージ
            img_numpy = numpy.asarray(image)
            #numpy配列(BGR) <- numpy配列(RGBA)
            img_numpy_bgr = cv2.cvtColor(img_numpy, cv2.COLOR_RGBA2BGR)
            img = cv2.resize(img_numpy_bgr, (320, 240))

            #画像の中から温度の最大値を取得
            max_temperature = numpy.max(frame)

            #温度をテキストから画像に変換
            canvasSize    = (320, 60)
            backgroundRGB = (255, 255, 255)
            textRGB       = (0, 0, 0)
            if max_temperature >= 36.0:
                textRGB = (225, 0, 0)
                backgroundRGB = (255, 255, 0)
            else:
                textRGB = (0, 0, 0)
                backgroundRGB = (255, 255, 255)
            text = "体温は" + str(max_temperature)[:4] + "℃です。"
            image_temperature  = Image.new('RGB', canvasSize, backgroundRGB)
            draw = ImageDraw.Draw(image_temperature)
            font = ImageFont.load_default()
            font = ImageFont.truetype("/usr/share/fonts/truetype/fonts-japanese-gothic.ttf", 30)
            draw.text((1, 1), text, fill=textRGB, font=font)

            #numpy配列(RGBA) <- PILイメージ
            img_numpy_temperature = numpy.asarray(image_temperature)
            #numpy配列(BGR) <- numpy配列(RGBA)
            img_temperature = cv2.cvtColor(img_numpy_temperature, cv2.COLOR_RGBA2BGR)


            #サーマル画像と温度テキスト画像を結合する
            img_concatenated = cv2.vconcat([img, img_temperature])

            # encode as a jpeg image and return it
            return cv2.imencode('.jpg', img_concatenated)[1].tobytes(), max_temperature
face.pyについては諸事情によりソースコードを非公開とさせていただきます。中身としてはカメラモジュールから取得した画像から顔認識を行い、年齢を推定した上で顔パーツをプロットしたバイナリイメージ、及び推定年齢を返す実装がなされています。
watergun.pyではサーボモータを適切な角度に動かす実装がなされており、これにより接続された水鉄砲のトリガーが引かれます。
ご使用の水鉄砲によって角度等の設定が変わってきます。
import pigpio
import time

class Watergun:
    def shoot():
        gpio_pin0 = 18

        pi = pigpio.pi()
        pi.set_mode(gpio_pin0, pigpio.OUTPUT)

        # GPIO18: 50Hz、duty比2.5%
        pi.hardware_PWM(gpio_pin0,50,25000)

        time.sleep(2)

        # GPIO18: 50Hz、duty比7.25%
        pi.hardware_PWM(gpio_pin0,50,72500)

        pi.set_mode(gpio_pin0,pigpio.INPUT)
        pi.stop()
purchase_create.pyでSAP Cloud Platform上のNode.js APIを叩き、S/4HANA上で購買依頼伝票を作成します。
HttpClientでアクセスしているAPIのエンドポイントは「3. SAP Cloud SDK for JavaScriptを用いたAPI実装」でAPIをSAP Cloud Foundry上にデプロイした後にセットしてください。
import urllib.request
import urllib.error
import lxml
import base64
import json
import re
import ssl
from bs4 import BeautifulSoup
from collections import defaultdict

class HttpClient :

    #POSTメソッドによる購買依頼伝票の作成
    def createPurchaseReq():

        url = <<APIのエンドポイント>>
        #ヘッダ情報を設定
        headers = {"Content-Type" : "application/json"}

        #ボディ情報を設定
        json_obj = {
            "matnr": "300002",
            "menge": 1,
            "meins": "PC"
        }

        # POSTリクエスト送信
        json_body = json.dumps(json_obj).encode("utf-8")

        req = urllib.request.Request(url, data=json_body, headers=headers, method='POST')
        try:
            with urllib.request.urlopen(req) as response:

                #レスポンスを取得する
                response_body = response.read().decode("utf-8")
                print()
                # JSONとして読み込む
                json_obj  = json.loads(response_body)

                # 値の取り出し
                pr_number = json_obj['matnr']
                print('購買依頼伝票:' + pr_number + 'を作成しました。')

                #レスポンスから購買依頼伝票番号を取得する

        #例外処理
        except urllib.error.HTTPError as err:
            soup = BeautifulSoup(err, "lxml")
            print(soup)
3. SAP Cloud SDK for JavaScriptを用いたAPI実装
次にS/4 HANA上の購買依頼伝票作成用ODataサービスを呼び出すためのAPIを実装していきます。
普段はSAP Cloud SDKの中でもJavaの方を用いてS/4 HANA上にアクセスしていますが、最近NodeJsを触る機会があったので今回はSAP Cloud SDK for JavaScriptを用いてAPIを作成していきたいと思います。
(ODataサービスは相も変わらず「だっふんだ 」と言うとSAP S/4HANAで購買依頼伝票を打てるiOSアプリを実装する(2/2)で紹介されているものを使用しています。)
まず最初にコマンドライン上で以下を実行してNodeプロジェクトを立ち上げます。
$ npm init
次に必要なモジュールを順にインストールしていきます。
まずはS/4接続に必須のcloud-sdk-generatorをインストールします。
$ npm install @sap/cloud-sdk-generator
このライブラリを使用することでODataサービスのメタデータからVDMを作成したりS/4 HANAに簡単にアクセスすることが出来ます。
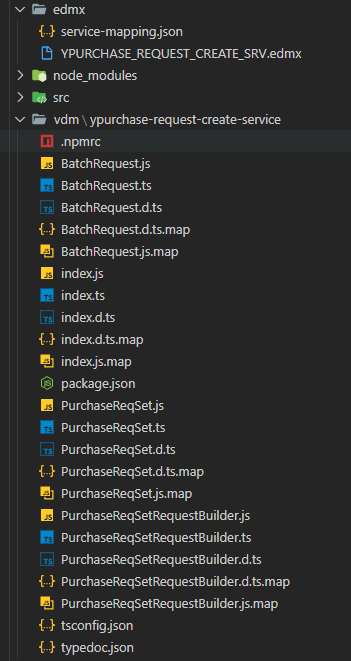
試しにルートにedmxフォルダを作成し、その中に拡張子がedmxのファイル(中身はODataサービスのメタデータをコピペ)を置いて以下のコマンドを実行しましょう。
$ npx generate-odata-client --inputDir edmx --outputDir vdm
するとルートにvdmというフォルダが作成され、edmxフォルダ下のメタデータに対応するvdmが作成されていることが分かります。
次にTypeScriptのコンパイルや実行に必要なモジュールをインストールしましょう。
$ npm install --save-dev typescript ts-node
その後tscを用いてコンパイルに関する設定ファイルであるtsconfig.jsonファイルを作成します。
$ npx tsc --init
tsconfig.jsonを開き、"experimentalDecorators"と"emitDecoratorMetadata"を有効にしておきましょう。
...
    /* Experimental Options */
     "experimentalDecorators": true,        /* Enables experimental support for ES7 decorators. */
     "emitDecoratorMetadata": true,         /* Enables experimental support for emitting type metadata for decorators.
...
次に、ビルド時に最初にcleanを行うためにrimrafをインストールします。
$ npm install rimraf
また今のうちにpackage.jsonの"scripts"を修正してコマンドライン上での実行が楽になるようにしておきます。
...
  "scripts": {
    "vdm": "npx generate-odata-client --inputDir edmx --outputDir vdm --forceOverwrite",
    "clean": "rimraf lib reports",
    "build": "npm run clean && npx tsc",
    "start": "node ./src/index.js",
    "test": "echo \"Error: no test specified\" && exit 1"
  },
...
最後に、APIの実装に必要なモジュールをインストールしておきます。
$ npm install routing-controllers reflect-metadata typeorm
Node.jsアプリケーション実行時に起動されるロジックをindex.tsに記載します。
import "reflect-metadata"
import { createExpressServer } from "routing-controllers";
import { PurchaseRequestController } from './PurchaseRequestController';

const app = createExpressServer({
    controllers: [PurchaseRequestController]
});

app.listen(8080);
Entity、Controller、Serviceを必要に応じて実装します。
import { Entity } from 'typeorm';

@Entity()
export class PurchaseRequestEntity{

    matnr: string;
    menge: number;
    meins: string;

    constructor(matnr: string, menge: number, meins: string){
        this.matnr =matnr;
        this.menge = menge;
        this.meins = meins;
    }

}
import { JsonController, Get, Post, Body } from 'routing-controllers';
import { PurchaseRequestEntity } from './PurchaseRequestEntity';
import { PurchaseRequestService } from './PurchaseRequestService';

@JsonController("/tr")
export class PurchaseRequestController {

    @Get("/all")
    getAllReq() {
        return new PurchaseRequestService().getAllPurchaseRequest();
    }

    @Post("/single")
    createReq(@Body() pr:PurchaseRequestEntity) {
        return new PurchaseRequestService().createPurchaseRequest(pr);
    }
}
import { PurchaseReqSet } from '../vdm/ypurchase-request-create-service/PurchaseReqSet';
import * as PRSrv from '../vdm/ypurchase-request-create-service';
import { BigNumber } from 'bignumber.js';
import { PurchaseRequestEntity } from './PurchaseRequestEntity';

export class PurchaseRequestService {
    getAllPurchaseRequest() {
        return PRSrv.PurchaseReqSet.requestBuilder()
        .getAll()  //照会処理用のメソッド
        .top(10)
        .select(
            PRSrv.PurchaseReqSet.ALL_FIELDS
        )
        .execute({destinationName: '<<Destination名>>'});
    }

    createPurchaseRequest(pr: PurchaseRequestEntity) {
    const purchaseReqSet = PRSrv.PurchaseReqSet.builder()
                                              .matnr(pr.matnr)
                                              .menge(new BigNumber(pr.menge))
                                              .meins(pr.meins)
                                              .build();

    return PurchaseReqSet.requestBuilder()
                        .create(purchaseReqSet)
                        .execute({destinationName: '<<Destination名>>'});

    }
}
さて、CF環境へのデプロイに必要不可欠なmanifest.ymlをルートディレクトリに追加しましょう。
ここにConnectivityやDestinationをバインドするよう記述しても良いですが、今回は面倒なのでデプロイ後にマニュアルでSAP Cloud Platform上からバインドしています。
---
applications:
- name: ynodejs_purchase_request
  memory: 128M
  buildpacks:
  - https://github.com/cloudfoundry/nodejs-buildpack
最終的なディレクトリ構成は以下の通りです。
.
├── edmx
│    └── YPURCHASE_REQUEST_CREATE_SRV.edmx
├── node_modules
├── src
│    ├── index.ts
│    ├── PurchaseRequestController.ts
│    ├── PurchaseRequestEntity.ts
│    └── PurchaseRequestService.ts
├── vdm
├── manifest.yml
├── package.json
├── package-lock.json
└── tsconfig.json
ビルドまで完了したらSCP Cloud Foundryにデプロイします。ルート階層でcf pushを行いましょう。manifest.yml内に記載したアプリ名を指定すればOKです。
$ cf push ynodejs_purchase_request
これでS/4HANA上で購買依頼伝票を作成するためのAPIが完成しました。
※「2. Pythonアプリの実装」のpurchase_create.py内でStubで置いていたAPIのエンドポイントを書き換えてください。
完成
#夏の自由研究2020 #chillSAP 8月24日分の投稿です。
— サイコパスのりお (@norio_psycho) August 23, 2020
Qiita記事「コロナで危険度の高い人を見つけたらイ〇ジンをぶっ掛けて治療するアプリ作ってみた」のデモ動画をご共有いたします、、!#コロナ #イソジン #ご気分を害した方がいらっしゃったら #誠に申し訳ございません #一切の責任は取りかねます pic.twitter.com/ZxO3xmQYH2
同期の間で老け顔キャラだったのですが、機械にまで実年齢+7歳くらいで評価されたのは地味にショックでした。
