これから書く記事について
MQTTを使った双方向通信と制御の勉強のために
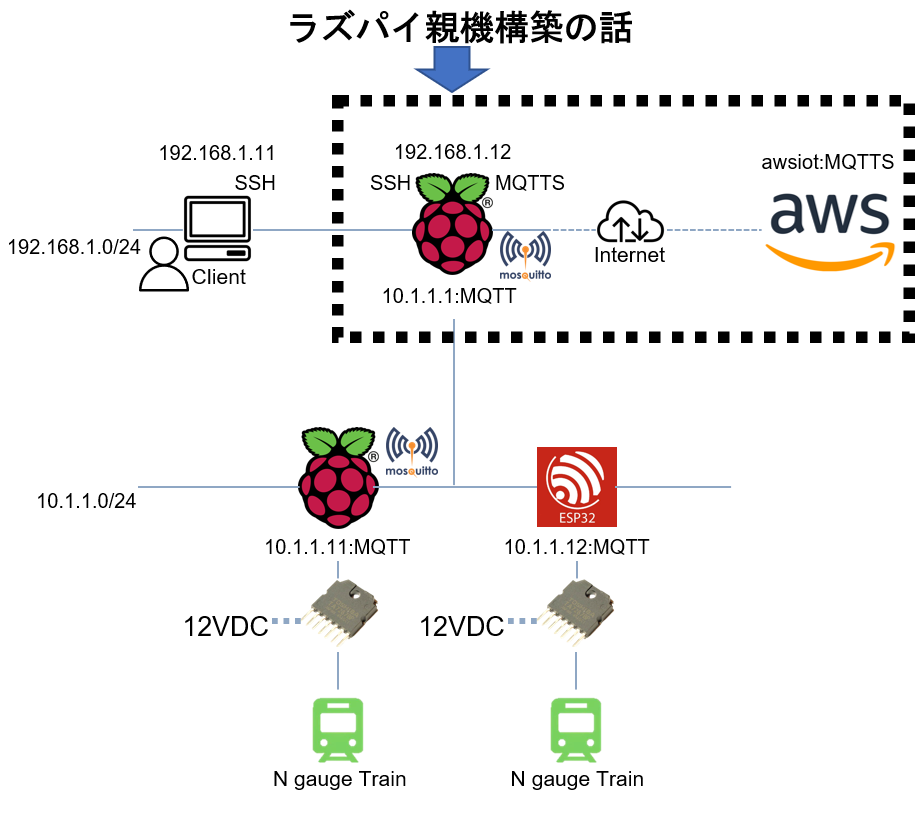
- ラズパイ、ESP32等を使ったNWを構築
- client端末から子機に接続されたモータードライバーでNゲージを遠隔制御
- Nゲージを走行させる際の何らかのデータ(電流・電圧等)をAWSに転送・保存・加工
を構想しています。
既に構築していたNW部分を業務に転用したこともあり構築手順の備忘録を書き始めることにしました。
この記事で説明すること
本稿では、想定する下図のシステム中で太い破線で囲まれたラズパイAP親機の構築について説明します。
環境
Raspberry Pi: Raspberry Pi 4 Model B Rev 1.2
OS: Raspberry Pi OS Lite 32-bit (Raspbian GNU/Linux 11 (bullseye))
USB Wifi adapter: Realtek Semiconductor Corp. RTL88x2bu [AC1200 Techkey]
事前準備
起動用microSDカード
こちらの記事等を参考に起動用環境を作成します
この記事で取り扱う仕様ではLite版の32-bit OSが必要です
AWSアカウント関連
アカウントの作成からkeyの作成までは本稿で特に説明はしません。
AWS IoTを使用しない場合は準備不要です
- AWSアカウントの作成
- AWS IAM userの設定
- IAM userのAccess key IDとSecret access keyの生成
- IAM policyの設定(policyの内容はこちらを参照)
構築内容
図中の色付き部分を構築します。
AWS
AWS IoT: Edgeデータの送信先(親機MQTT BrokerのBridge先)
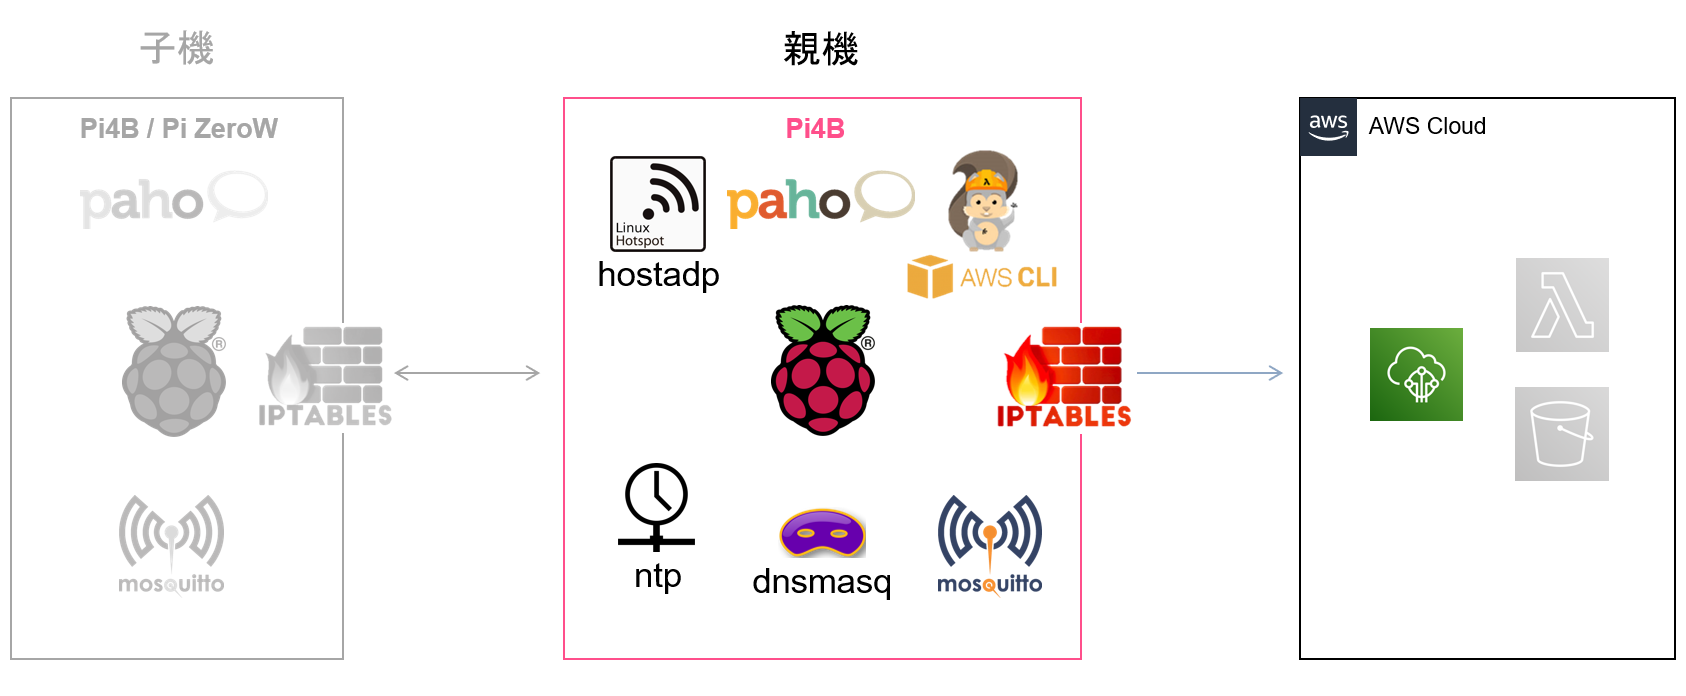
ラズパイ親機
rtl88x2bu: アクセスポイント側wlan1用NICのドライバー
hostapd: ソフトウェアアクセスポイント構築用のパッケージ
dnsmasq: アクセスポイント側wlan1用のdnsパッケージ
ntp: アクセスポイント側wlan1用のntpパッケージ
paho: pythonでmqtt通信したいときに使うパッケージ
mosquitto: AWS IoTにbridgeするMQTT Broker
iptables-persistent: Linux FW(nftables)設定に利用するパッケージ
postfix: cronの実行に使うメーラーパッケージ
awscli: AWS IoTにラズパイを登録する際に利用
aws-sam-cli: AWSにS3とLambdaを構築する際に利用(この記事では使わないがインストール)
導入手順
基本的にshellscriptの実行により構築を進めます。
AWS IoT接続用の証明書保管ディレクトリー作成
userディレクトリーの下に任意の名前で作成します(ここではmcertとします)。
mkdir mcert
パラメーターファイルの作成
パラメーターを~/ap_proc.confと~/mcert/mos_prov.confの2つのconfファイルに予め設定しておきます。confファイルのコメント文は削除して使ったほうが無難です。
/home
┣ /user
┃ ┣ ap_prov.conf
┃ ┗ /mcert
┃   ┣ mos_prov.conf
subnetからAPに接続する子機が10台あると仮定して進めます。
#自分のstatic ip
MYIP_WLAN0=192.168.1.12
#ルーターのstatic ip
WLAN0_ROUTER=192.168.1.1
#dnsのstatic ip(家庭用ルーターだとdefaultはルーターip)
MY_NAME_SERVER=192.168.1.1
#ラズパイAPのSSID(任意の名前)
WLAN1_SSID=MySSID1
#ラズパイAPのpassphrase(任意の文字列)
PSK=MyPassWD
#アクセスポイント(wlan1)側の自分のstatic ip
MYIP_WLAN1=10.1.1.1
#/etc/hostsに登録する子機のstatic ipとhostname
SUB01=10.1.1.11,subpi1
SUB02=10.1.1.12,subpi2
SUB03=10.1.1.13,subpi3
SUB04=10.1.1.14,subpi4
SUB05=10.1.1.15,subpi5
SUB06=10.1.1.16,subpi6
SUB07=10.1.1.17,subpi7
SUB08=10.1.1.18,subpi8
SUB09=10.1.1.19,subpi9
SUB10=10.1.1.20,subpi10
#ラズパイAPがdnsmasqで割り当てるsubnetのアドレス範囲
START_ADDRESS=10.1.1.11
END_ADDRESS=10.1.1.20
#ラズパイAPに/24で許可するアドレス範囲
WLAN1_CIDR=10.1.1.0
#mosquittoに設定するusername(任意の名前)
MOS_USR=MyMosquittoUsername
#mosquitto userのpassphrase(任意の文字列)
MOS_PW=MymosquittoPW
#AWS IoTに登録するモノ(ラズパイ親機)の名前ここではhostnameにする
THING_NAME=test1
#使用するAWS AccountのID
AWS_AccountId={使用するAWS AccountのID}
#AWS AccountのAccess key ID
ACCESS_KEY={使用するAccess key ID}
#AWS AccountのSecret access key
SECRET_KEY={使用するSecret access key}
#使用するAWSのregion
REGION=ap-northeast-1
子機接続用秘密鍵の一時保管ディレクトリー作成
ここではpemという名前で作成します。
mkdir pem
秘密鍵の一時保管
親機のSSH接続に使う秘密鍵をpem ディレクトリーにコピーします。
次稿のラズパイ親機から子機経由でNゲージを遠隔制御する(2)shellscriptでラズパイAP子機を構築で作る子機でも親機と同じキーペアを使い、親機から同一の鍵でSSH接続できるようにします。
/home
┣ /user
┃ ┣ ・・・
┃ ┗ /pem
┃   ┣ 秘密鍵
パッケージ導入
aptとpipでインストールします
#!/bin/bash

sudo apt update
sudo apt -y upgrade

sudo apt install -y python3-dev python3-pip git
sudo apt install -y bc build-essential raspberrypi-kernel-headers
python3 -m pip install --upgrade pip

sudo apt install -y dkms dnsmasq hostapd ntp

echo iptables-persistent iptables-persistent/autosave_v4 boolean true | sudo debconf-set-selections
echo iptables-persistent iptables-persistent/autosave_v6 boolean false | sudo debconf-set-selections
sudo apt install -y iptables iptables-persistent

sudo apt install -y expect
sudo apt install -y awscli mosquitto mosquitto-clients
sudo apt install libgpiod2
sudo pip3 install paho-mqtt --upgrade
sudo pip3 install awscli aws-sam-cli

pi_install_postfix()
{
  cat <<EOF | sudo debconf-set-selections
postfix postfix/main_mailer_type select No configuration
EOF
  sudo apt install -y postfix

  cat <<EOF | sudo tee /etc/postfix/main.cf
myhostname = ${1}
mydomain = ${2}
myorigin = \$myhostname.\$mydomain
mydestination = localhost, localhost.\$mydomain, \$myhostname, \$mydomain, \$myorigin
compatibility_level = 2
command_directory = /usr/sbin
daemon_directory = /usr/lib/postfix/sbin
data_directory = /var/lib/postfix
mail_owner = postfix
inet_interfaces = all
local_recipient_maps = unix:passwd.byname \$alias_maps
unknown_local_recipient_reject_code = 550
mynetworks_style = subnet
mynetworks = 127.0.0.0/8
alias_maps = hash:/etc/aliases
alias_database = hash:/etc/aliases
smtpd_banner = \$myhostname ESMTP \$mail_name (Debian/GNU)
debugger_command =
         PATH=/bin:/usr/bin:/usr/local/bin:/usr/X11R6/bin
         ddd \$daemon_directory/\$process_name \$process_id & sleep 5
sendmail_path = /usr/sbin/sendmail
newaliases_path = /usr/bin/newaliases
mailq_path = /usr/bin/mailq
setgid_group = postdrop
inet_protocols = ipv4
EOF
  sudo newaliases
  sudo systemctl restart postfix
  sudo apt install -y mutt
}

main()
{
  pi_install_postfix $(uname -n) localdomain
}

main

sudo reboot
rtl88x2buドライバーのインストール
過去に作成した手順を参考にインストールします。
汎用性の高い8812auドライバーのインストールはこちらの手順でインストールします。
dnsmasq.confの設定
#!/bin/bash
sudo cp /etc/dnsmasq.conf /etc/dnsmasq.conf.bak

start_address=$(cat ./ap_prov.conf | grep START_ADDRESS | awk -F'=' '{print $2}' | sed -e "s/[\r\n]\+//g")
end_address=$(cat ./ap_prov.conf | grep END_ADDRESS | awk -F'=' '{print $2}' | sed -e "s/[\r\n]\+//g")

echo \# Never forward plain names \(without a dot or domain part\) | sudo tee -a /etc/dnsmasq.conf
echo domain-needed | sudo tee -a /etc/dnsmasq.conf
echo \# Never forward addresses in the non-routed address spaces. | sudo tee -a /etc/dnsmasq.conf
echo bogus-priv | sudo tee -a /etc/dnsmasq.conf
echo no-dhcp-interface=wlan0 | sudo tee -a /etc/dnsmasq.conf
echo interface=wlan1 | sudo tee -a /etc/dnsmasq.conf
echo dhcp-range=${start_address}\,${end_address}\,255.255.255.0,24h | sudo tee -a /etc/dnsmasq.conf
echo "" | sudo tee -a /etc/dnsmasq.conf
hostsの設定
#!/bin/bash

echo "127.0.0.1     local_host" | tee -a new_host
echo "::1           local_host ip6-local_host ip6-loopback" |   tee -a new_host
echo "ff02::1       ip6-allnodes" |   tee -a new_host
echo "ff02::2       ip6-allrouters" |   tee -a new_host
echo ""  |   tee -a new_host

echo "$(cat ./ap_prov.conf | grep MYIP_WLAN1 | awk -F'=' '{print echo $2}' | sed -e "s/[\r\n]\+//g")   $(uname -n)" |  tee -a new_host
echo "$(cat ./ap_prov.conf | grep SUB01 | awk -F'=' '{print $2}' | awk -F',' '{print $1}' | sed -e "s/[\r\n]\+//g")   $(cat ./ap_prov.conf | grep SUB01 | awk -F',' '{print $2}' | sed -e "s/[\r\n]\+//g")" |   tee -a new_host
echo "$(cat ./ap_prov.conf | grep SUB02 | awk -F'=' '{print $2}' | awk -F',' '{print $1}' | sed -e "s/[\r\n]\+//g")   $(cat ./ap_prov.conf | grep SUB02 | awk -F',' '{print $2}' | sed -e "s/[\r\n]\+//g")" |   tee -a new_host
echo "$(cat ./ap_prov.conf | grep SUB03 | awk -F'=' '{print $2}' | awk -F',' '{print $1}' | sed -e "s/[\r\n]\+//g")   $(cat ./ap_prov.conf | grep SUB03 | awk -F',' '{print $2}' | sed -e "s/[\r\n]\+//g")" |   tee -a new_host
echo "$(cat ./ap_prov.conf | grep SUB04 | awk -F'=' '{print $2}' | awk -F',' '{print $1}' | sed -e "s/[\r\n]\+//g")   $(cat ./ap_prov.conf | grep SUB04 | awk -F',' '{print $2}' | sed -e "s/[\r\n]\+//g")" |   tee -a new_host
echo "$(cat ./ap_prov.conf | grep SUB05 | awk -F'=' '{print $2}' | awk -F',' '{print $1}' | sed -e "s/[\r\n]\+//g")   $(cat ./ap_prov.conf | grep SUB05 | awk -F',' '{print $2}' | sed -e "s/[\r\n]\+//g")" |   tee -a new_host
echo "$(cat ./ap_prov.conf | grep SUB06 | awk -F'=' '{print $2}' | awk -F',' '{print $1}' | sed -e "s/[\r\n]\+//g")   $(cat ./ap_prov.conf | grep SUB06 | awk -F',' '{print $2}' | sed -e "s/[\r\n]\+//g")" |   tee -a new_host
echo "$(cat ./ap_prov.conf | grep SUB07 | awk -F'=' '{print $2}' | awk -F',' '{print $1}' | sed -e "s/[\r\n]\+//g")   $(cat ./ap_prov.conf | grep SUB07 | awk -F',' '{print $2}' | sed -e "s/[\r\n]\+//g")" |   tee -a new_host
echo "$(cat ./ap_prov.conf | grep SUB08 | awk -F'=' '{print $2}' | awk -F',' '{print $1}' | sed -e "s/[\r\n]\+//g")   $(cat ./ap_prov.conf | grep SUB08 | awk -F',' '{print $2}' | sed -e "s/[\r\n]\+//g")" |   tee -a new_host
echo "$(cat ./ap_prov.conf | grep SUB09 | awk -F'=' '{print $2}' | awk -F',' '{print $1}' | sed -e "s/[\r\n]\+//g")   $(cat ./ap_prov.conf | grep SUB09 | awk -F',' '{print $2}' | sed -e "s/[\r\n]\+//g")" |   tee -a new_host
echo "$(cat ./ap_prov.conf | grep SUB10 | awk -F'=' '{print $2}' | awk -F',' '{print $1}' | sed -e "s/[\r\n]\+//g")   $(cat ./ap_prov.conf | grep SUB10 | awk -F',' '{print $2}' | sed -e "s/[\r\n]\+//g")" |   tee -a new_host

sudo cp /etc/hosts /etc/hosts.bak
sudo cp ~/new_host /etc/hosts
sudo rm ~/new_host
hostapd.confの設定
#!/bin/bash
sudo cp /etc/hostapd/hostapd.conf /etc/hostapd/hostapd.conf.bak

echo interface=wlan1 | sudo tee -a /etc/hostapd/hostapd.conf
echo ssid=$(cat ./ap_prov.conf | grep WLAN1_SSID | awk -F'=' '{print $2}' | sed -e "s/[\r\n]\+//g") | sudo tee -a /etc/hostapd/hostapd.conf
echo country_code=JP | sudo tee -a /etc/hostapd/hostapd.conf
echo hw_mode=g | sudo tee -a /etc/hostapd/hostapd.conf
echo channel=10 | sudo tee -a /etc/hostapd/hostapd.conf
echo wpa=2 | sudo tee -a /etc/hostapd/hostapd.conf
echo wpa_key_mgmt=WPA-PSK | sudo tee -a /etc/hostapd/hostapd.conf
echo wpa_passphrase=$(cat ./ap_prov.conf | grep PSK | awk -F'=' '{print $2}' | sed -e "s/[\r\n]\+//g") | sudo tee -a /etc/hostapd/hostapd.conf
echo rsn_pairwise=CCMP | sudo tee -a /etc/hostapd/hostapd.conf
echo wpa_pairwise=CCMP | sudo tee -a /etc/hostapd/hostapd.conf

sudo cp /etc/default/hostapd /etc/default/hostapd.bak
echo 'DAEMON_CONF="/etc/hostapd/hostapd.conf"' | sudo tee -a /etc/default/hostapd

sudo systemctl unmask hostapd
sudo systemctl enable hostapd
dhcpcd.confの設定
#!/bin/bash
sudo cp /etc/dhcpcd.conf /etc/dhcpcd.conf.bak

echo interface wlan1 | sudo tee -a /etc/dhcpcd.conf
echo static ip_address=$(cat ./ap_prov.conf | grep MYIP_WLAN1 | awk -F'=' '{print echo $2}' | sed -e "s/[\r\n]\+//g")/24 | sudo tee -a /etc/dhcpcd.conf
echo noipv6 | sudo tee -a /etc/dhcpcd.conf
echo "" | sudo tee -a /etc/dhcpcd.conf
echo interface wlan0 | sudo tee -a /etc/dhcpcd.conf
echo static ip_address=$(cat ./ap_prov.conf | grep MYIP_WLAN0 | awk -F'=' '{print echo $2}' | sed -e "s/[\r\n]\+//g")/24 | sudo tee -a /etc/dhcpcd.conf
echo static routers=$(cat ./ap_prov.conf | grep WLAN0_ROUTER | awk -F'=' '{print echo $2}' | sed -e "s/[\r\n]\+//g") | sudo tee -a /etc/dhcpcd.conf
echo static domain_name_servers=$(cat ./ap_prov.conf | grep MY_NAME_SERVER | awk -F'=' '{print echo $2}' | sed -e "s/[\r\n]\+//g") | sudo tee -a /etc/dhcpcd.conf
echo noipv6 | sudo tee -a /etc/dhcpcd.conf
wpa_supplicant-wlan0.confの設定
内臓のwifi用NICをwlan0、追加のUSB接続NICをwlan1としたいので、wlan0用のwpa_supplicant.confを名称変更します。
sudo mv /etc/wpa_supplicant/wpa_supplicant.conf /etc/wpa_supplicant/wpa_supplicant-wlan0.conf
ntp.confの設定
#!/bin/bash

sudo cp /etc/ntp.conf /etc/ntp.conf.bak
sudo rm /etc/ntp.conf

echo "driftfile /var/lib/ntp/ntp.drift" | sudo tee -a /etc/ntp.conf
echo "" | sudo tee -a /etc/ntp.conf
echo "leapfile /usr/share/zoneinfo/leap-seconds.list" | sudo tee -a /etc/ntp.conf
echo ""  | sudo tee -a /etc/ntp.conf
echo "statistics loopstats peerstats clockstats" | sudo tee -a /etc/ntp.conf
echo "filegen loopstats file loopstats type day enable" | sudo tee -a /etc/ntp.conf
echo "filegen peerstats file peerstats type day enable" | sudo tee -a /etc/ntp.conf
echo "filegen clockstats file clockstats type day enable" | sudo tee -a /etc/ntp.conf
echo "" | sudo tee -a /etc/ntp.conf
echo "pool $(cat ./ap_prov.conf | grep WLAN0_ROUTER | awk -F'=' '{print $2}' | sed -e "s/[\r\n]\+//g")  iburst" | sudo tee -a /etc/ntp.conf
echo "pool ntp.nict.jp iburst" | sudo tee -a /etc/ntp.conf
echo "" | sudo tee -a /etc/ntp.conf
echo "restrict -4 default kod notrap nomodify nopeer noquery limited" | sudo tee -a /etc/ntp.conf
echo "restrict -6 default kod notrap nomodify nopeer noquery limited" | sudo tee -a /etc/ntp.conf
echo "" | sudo tee -a /etc/ntp.conf
echo "restrict 127.0.0.1" | sudo tee -a /etc/ntp.conf
echo "restrict ::1" | sudo tee -a /etc/ntp.conf
echo "" | sudo tee -a /etc/ntp.conf
echo "restrict source notrap nomodify noquery" | sudo tee -a /etc/ntp.conf
echo "" | sudo tee -a /etc/ntp.conf
echo "restrict $(cat ./ap_prov.conf | grep WLAN1_CIDR | awk -F'=' '{print $2}' | sed -e "s/[\r\n]\+//g") mask 255.255.255.0 kod nomodify nopeer notrap" | sudo tee -a /etc/ntp.conf
echo "" | sudo tee -a /etc/ntp.conf

sudo systemctl enable ntp.service
sudo systemctl start ntp.service
再起動
ここで一度再起動します。
sudo reboot
AWS credential設定
~/mcert/mos_prov.confに設定したAWS credentialを~/.aws/credentialsと~/.aws/configに書き込みます。
# -*- coding:utf-8 -*-
import os


def read_parameters():
    filename_in = "./mcert/mos_prov.conf"
    with open(filename_in) as f:
        params = {}
        for line in f:
           params[line.split("=")[0]] = line.split("=")[1]

    return params

def set_cli(params):
    os.makedirs("./.aws", exist_ok=True)
    cred = "./.aws/credentials"
    conf = "./.aws/config"

    access_key = params["ACCESS_KEY"]
    secret_key = params["SECRET_KEY"]
    region = params["REGION"]

    cred_body =  f'''[default]
aws_access_key_id = {access_key}\
aws_secret_access_key = {secret_key}\
'''

    conf_body =  f'''[default]
region = {region}\
'''

    with open(cred, 'w', encoding='utf-8' ) as f:
            f.write(cred_body)
    with open(conf, 'w', encoding='utf-8' ) as f:
            f.write(conf_body)
    return


if __name__ == '__main__':
    params = read_parameters()
    set_cli(params)
AWS IoTのラズパイ登録とmosquittoの設定
~/mcertで作業します。
cd mcert
AWS IoTに登録して証明書をダウンロードして、public networkに対してはmosquittoのAWS IoTへのBridge設定、Private subnetに対してはBasic認証設定をします。
登録するThing名(ラズパイの名前)は{THING_NAME}_mosとします。{THING_NAME}_mosがclientidになります。
#!/bin/bash

sudo apt install jq -y
sudo apt update -y
sudo apt upgrade -y

#THING NAME (is same as Project Name)
THING_NAME=$(cat ~/mcert/mos_prov.conf | grep THING_NAME | awk -F'=' '{print $2}' | sed -e "s/[\r\n]\+//g")
AccountId=$(cat ~/mcert/mos_prov.conf | grep AWS_AccountId | awk -F'=' '{print $2}' | sed -e "s/[\r\n]\+//g")

# create the thing
aws iot create-thing --thing-name ${THING_NAME}_mos | tee create-thing.json

# create and download the keys and device certificate
aws iot create-keys-and-certificate --certificate-pem-outfile ${THING_NAME}_mos-cert.crt --public-key-outfile ${THING_NAME}_mos-public.pem.key --private-key-outfile ${THING_NAME}_mos-private.key --set-as-active | tee create-keys-and-certificate.json

# attach the certificate to the thing
CERT_ARN=$(jq -r '.certificateArn' < ./create-keys-and-certificate.json)
aws iot attach-thing-principal --thing-name ${THING_NAME}_mos --principal ${CERT_ARN}

policy_stm="\"Statement\": [
      {
        \"Effect\": \"Allow\",
        \"Action\": \"iot:Connect\",
        \"Resource\": \"arn:aws:iot:ap-northeast-1:${AccountId}:client/\${iot:Connection.Thing.ThingName}\",
        \"Condition\": {
          \"Bool\": {
            \"iot:Connection.Thing.IsAttached\": \"true\"
          }
        }
      },
      {
        \"Effect\": \"Allow\",
        \"Action\": \"iot:Publish\",
        \"Resource\": \"arn:aws:iot:ap-northeast-1:${AccountId}:topic/\${iot:Connection.Thing.ThingName}/*\"
      },
      {
        \"Effect\": \"Allow\",
        \"Action\": \"iot:Subscribe\",
        \"Resource\": \"arn:aws:iot:ap-northeast-1:${AccountId}:topicfilter/\${iot:Connection.Thing.ThingName}/*\"
      },
      {
        \"Effect\": \"Allow\",
        \"Action\": \"iot:Receive\",
        \"Resource\": \"arn:aws:iot:ap-northeast-1:${AccountId}:topic/\${iot:Connection.Thing.ThingName}/*\"
      }
    ]"

aws iot create-policy --policy-name "${THING_NAME}_mos_subscribe" --policy-document "{\"Version\": \"2012-10-17\",${policy_stm}}"

# attach policy to the certificate
aws iot attach-policy --policy-name "${THING_NAME}_mos_subscribe" --target ${CERT_ARN}

# download the amazon root ca
wget https://www.amazontrust.com/repository/AmazonRootCA1.pem

sudo chmod 644 ./*.crt
sudo chmod 644 ./*.key

echo "0 0 * * * sudo reboot" | sudo tee -a ./cron_mod.conf
echo "" | sudo tee -a ./cron_mod.conf

crontab ./cron_mod.conf

# find out what endpoint we need to connect to
echo $(aws iot describe-endpoint --endpoint-type iot:Data-ATS --region ap-northeast-1) >> ./end_point.json

sudo cp $(ls ./*CA1.pem) /etc/mosquitto/certs/
sudo cp $(ls ./*cert.crt) /etc/mosquitto/certs/
sudo cp $(ls ./*private.key) /etc/mosquitto/certs/

# Set mosquitto Bridges to AWS IOT
sudo cp /etc/mosquitto/conf.d/bridge.conf /etc/mosquitto/conf.d/bridge.conf.bak
sudo rm /etc/mosquitto/conf.d/bridge.conf
echo \# AWS IoT endpoint, use AWS CLI 'aws iot describe-endpoint' | sudo tee -a /etc/mosquitto/conf.d/bridge.conf
echo connection awsiot | sudo tee -a /etc/mosquitto/conf.d/bridge.conf
echo address "$(jq -r '.endpointAddress' < ./end_point.json)":8883 | sudo tee -a /etc/mosquitto/conf.d/bridge.conf
echo "" | sudo tee -a /etc/mosquitto/conf.d/bridge.conf
echo \# Specifying which topics are bridged | sudo tee -a /etc/mosquitto/conf.d/bridge.conf
echo topic ${THING_NAME}_mos/\# both 1 | sudo tee -a /etc/mosquitto/conf.d/bridge.conf
echo \# Setting protocol version explicitly | sudo tee -a /etc/mosquitto/conf.d/bridge.conf
echo bridge_protocol_version mqttv311 | sudo tee -a /etc/mosquitto/conf.d/bridge.conf
echo bridge_insecure false | sudo tee -a /etc/mosquitto/conf.d/bridge.conf
echo \# Bridge connection name and MQTT client Id, | sudo tee -a /etc/mosquitto/conf.d/bridge.conf
echo \# enabling the connection automatically when the broker starts. | sudo tee -a /etc/mosquitto/conf.d/bridge.conf
echo cleansession true | sudo tee -a /etc/mosquitto/conf.d/bridge.conf
echo clientid ${THING_NAME}_mos | sudo tee -a /etc/mosquitto/conf.d/bridge.conf
echo start_type automatic | sudo tee -a /etc/mosquitto/conf.d/bridge.conf
echo notifications false | sudo tee -a /etc/mosquitto/conf.d/bridge.conf
echo log_type all | sudo tee -a /etc/mosquitto/conf.d/bridge.conf
echo \# ============================ | sudo tee -a /etc/mosquitto/conf.d/bridge.conf
echo \# Certificate based SSL/TLS support | sudo tee -a /etc/mosquitto/conf.d/bridge.conf
echo \# ---------------------------- | sudo tee -a /etc/mosquitto/conf.d/bridge.conf
echo \#Path to the rootCA | sudo tee -a /etc/mosquitto/conf.d/bridge.conf
echo bridge_cafile /etc/mosquitto/certs/$(ls ./*CA1.pem | awk -F'/' '{print $2}') | sudo tee -a /etc/mosquitto/conf.d/bridge.conf
echo \# Path to the PEM encoded client certificate | sudo tee -a /etc/mosquitto/conf.d/bridge.conf
echo bridge_certfile /etc/mosquitto/certs/$(ls ./*cert.crt | awk -F'/' '{print $2}') | sudo tee -a /etc/mosquitto/conf.d/bridge.conf
echo \# Path to the PEM encoded client private key | sudo tee -a /etc/mosquitto/conf.d/bridge.conf
echo bridge_keyfile /etc/mosquitto/certs/$(ls ./*private.key | awk -F'/' '{print $2}') | sudo tee -a /etc/mosquitto/conf.d/bridge.conf

# Set mosquitto configure
sudo rm /etc/mosquitto/mosquitto.conf
echo \# Place your local configuration in /etc/mosquitto/conf.d/ | sudo tee -a /etc/mosquitto/mosquitto.conf
echo \# | sudo tee -a /etc/mosquitto/mosquitto.conf
echo \# A full description of the configuration file is at | sudo tee -a /etc/mosquitto/mosquitto.conf
echo \# /usr/share/doc/mosquitto/examples/mosquitto.conf.example | sudo tee -a /etc/mosquitto/mosquitto.conf
echo "" | sudo tee -a /etc/mosquitto/mosquitto.conf
echo per_listener_settings true | sudo tee -a /etc/mosquitto/mosquitto.conf
echo pid_file /run/mosquitto/mosquitto.pid | sudo tee -a /etc/mosquitto/mosquitto.conf
echo "" | sudo tee -a /etc/mosquitto/mosquitto.conf | sudo tee -a /etc/mosquitto/mosquitto.conf
echo persistence true | sudo tee -a /etc/mosquitto/mosquitto.conf
echo persistence_location /var/lib/mosquitto/ | sudo tee -a /etc/mosquitto/mosquitto.conf
echo "" | sudo tee -a /etc/mosquitto/mosquitto.conf | sudo tee -a /etc/mosquitto/mosquitto.conf
echo log_dest file /var/log/mosquitto/mosquitto.log | sudo tee -a /etc/mosquitto/mosquitto.conf
echo "" | sudo tee -a /etc/mosquitto/mosquitto.conf | sudo tee -a /etc/mosquitto/mosquitto.conf
echo include_dir /etc/mosquitto/conf.d | sudo tee -a /etc/mosquitto/mosquitto.conf
echo "" | sudo tee -a /etc/mosquitto/mosquitto.conf | sudo tee -a /etc/mosquitto/mosquitto.conf
echo listener 1883 | sudo tee -a /etc/mosquitto/mosquitto.conf
echo allow_anonymous false | sudo tee -a /etc/mosquitto/mosquitto.conf
echo password_file /etc/mosquitto/passwd | sudo tee -a /etc/mosquitto/mosquitto.conf

sudo systemctl enable mosquitto
sudo systemctl start mosquitto
/home/userに戻ります。
cd
mosquittoのBasic認証に必要なusernameとpassphraseを設定します。
#!/bin/bash
timeout=10
password=$(cat ~/mcert/mos_prov.conf | grep MOS_PW | awk -F'=' '{print $2}' | sed -e "s/[\r\n]\+//g")
username=$(cat ~/mcert/mos_prov.conf | grep MOS_USR | awk -F'=' '{print $2}' | sed -e "s/[\r\n]\+//g")
command="sudo mosquitto_passwd -c /etc/mosquitto/passwd $username"
expect -c "
    set timeout ${timeout}
    spawn ${command}
    expect \"Password:\"
    send \"${password}\n\"
    expect \"Password:\"
    send \"${password}\n\"
    expect \"$\"
    exit 0
"
forward拒否とfilterおよびnatの設定
sysctl.conf、iptables.ipv4.filter、iptables.ipv4.natを設定します。
#!/bin/bash

echo "net.ipv4.ip_forward=0" | sudo tee -a /etc/sysctl.conf

cidr=$(cat ./ap_prov.conf | grep WLAN1_CIDR | awk -F'=' '{print $2}' | sed -e "s/[\r\n]\+//g")
router_ip=$(cat ./ap_prov.conf | grep WLAN0_ROUTER | awk -F'=' '{print $2}' | sed -e "s/[\r\n]\+//g")

sudo rm /etc/iptables/rules.v4
sudo iptables -A INPUT -i lo -j ACCEPT
sudo iptables -A INPUT -d 127.0.0.0/8 ! -i lo -j REJECT --reject-with icmp-port-unreachable
sudo iptables -A INPUT -m state --state RELATED,ESTABLISHED -j ACCEPT
sudo iptables -A INPUT -p tcp -m tcp --dport 8883 -j ACCEPT
sudo iptables -A INPUT -s ${cidr}/24 -i wlan1 -p tcp -m tcp --dport 1883 -j ACCEPT
sudo iptables -A INPUT -s 127.0.0.0/8 -p tcp -m tcp --dport 1883 -j ACCEPT
sudo iptables -A INPUT -s ${cidr}/24 -i wlan1 -p udp -m udp --dport 123 -j ACCEPT
sudo iptables -A INPUT -s ${router_ip}/32 -p udp -m udp --dport 123 -j ACCEPT
sudo iptables -A INPUT -s ${cidr}/24 -i wlan1 -p udp -m udp --dport 53 -j ACCEPT
sudo iptables -A INPUT -p tcp -m state --state NEW -m tcp --dport 22 --tcp-flags FIN,SYN,RST,ACK SYN -m hashlimit --hashlimit-name t_sshd --hashlimit-upto 1/min --hashlimit-burst 10 --hashlimit-mode srcip --hashlimit-htable-expire 120000 -j ACCEPT
sudo iptables -A INPUT -s 192.168.0.0/16 -p icmp -m icmp --icmp-type 8 -j ACCEPT
sudo iptables -A INPUT -s 169.254.0.0/16 -p icmp -m icmp --icmp-type 8 -j ACCEPT
sudo iptables -A INPUT -s ${cidr}/24 -p icmp -m icmp --icmp-type 8 -j ACCEPT
sudo iptables -A INPUT -m limit --limit 5/min -j LOG --log-prefix "iptables denied: " --log-level 7
sudo iptables -A INPUT -j REJECT --reject-with icmp-port-unreachable
sudo iptables -A FORWARD -s ${cidr}/24 -i wlan1 -o wlan0 -j ACCEPT
sudo iptables -A FORWARD -d ${cidr}/24 -i wlan0 -o wlan1 -m state --state RELATED,ESTABLISHED -j ACCEPT
sudo iptables -t nat -A POSTROUTING -s ${cidr}/24 -o wlan0 -j MASQUERADE

sudo service netfilter-persistent reload
sudo service netfilter-persistent save
sudo sh -c "iptables-save >/etc/iptables.ipv4.filter"
sudo sh -c "iptables-save >/etc/iptables.ipv4.nat"
sudo iptables -L
~/.ssh/configファイルの作成
子機へのSSH接続を簡略化するためにconfigファイルを作成します。
#!/bin/bash

sudo cp -r ./pem/* ~/.ssh
cd ./.ssh
sudo chmod 600 *
sudo chown $USER:$USER *
cd

if [ -n "$(cat ./ap_prov.conf | grep SUB01 | awk -F',' '{print $2}' | sed -e "s/[\r\n]\+//g")" ]; then
  echo "Host sub1" | sudo tee -a ~/.ssh/config
  echo "  HostName $(cat ./ap_prov.conf | grep SUB01 | awk -F'=' '{print $2}' | awk -F',' '{print $1}' | sed -e "s/[\r\n]\+//g")" | sudo tee -a ~/.ssh/config
  echo "  User $USER" | sudo tee -a ~/.ssh/config
  echo "  Port 22" | sudo tee -a ~/.ssh/config
  echo "  IdentityFile ~/.ssh/$(basename ~/pem/*.* .pub)" | sudo tee -a ~/.ssh/config
  echo "  TCPKeepAlive yes" | sudo tee -a ~/.ssh/config
  echo "  IdentitiesOnly yes" | sudo tee -a ~/.ssh/config
fi
                       ・
                       ・
                       ・
                       ・
if [ -n "$(cat ./ap_prov.conf | grep SUB10 | awk -F',' '{print $2}' | sed -e "s/[\r\n]\+//g")" ]; then
  echo "Host sub10" | sudo tee -a ~/.ssh/config
  echo "  HostName $(cat ./ap_prov.conf | grep SUB10 | awk -F'=' '{print $2}' | awk -F',' '{print $1}' | sed -e "s/[\r\n]\+//g")" | sudo tee -a ~/.ssh/config
  echo "  User $USER" | sudo tee -a ~/.ssh/config
  echo "  Port 22" | sudo tee -a ~/.ssh/config
  echo "  IdentityFile ~/.ssh/$(basename ~/pem/*.* .pub)" | sudo tee -a ~/.ssh/config
  echo "  TCPKeepAlive yes" | sudo tee -a ~/.ssh/config
  echo "  IdentitiesOnly yes" | sudo tee -a ~/.ssh/config
fi

sudo rm -r ./pem
再起動
再起動します。
sudo reboot
動作確認
user@test1:~ $ ip a
1: lo: <LOOPBACK,UP,LOWER_UP> mtu 65536 qdisc noqueue state UNKNOWN group default qlen 1000
    link/loopback 00:00:00:00:00:00 brd 00:00:00:00:00:00
    inet 127.0.0.1/8 scope host lo
       valid_lft forever preferred_lft forever
    inet6 ::1/128 scope host
       valid_lft forever preferred_lft forever
2: eth0: <NO-CARRIER,BROADCAST,MULTICAST,UP> mtu 1500 qdisc mq state DOWN group default qlen 1000
    link/ether xx:xx:xx:xx:xx:xx brd ff:ff:ff:ff:ff:ff
3: wlan0: <BROADCAST,MULTICAST,UP,LOWER_UP> mtu 1500 qdisc pfifo_fast state UP group default qlen 1000
    link/ether xx:xx:xx:xx:xx:xx brd ff:ff:ff:ff:ff:ff
    inet 192.168.1.12/24 brd 192.168.1.255 scope global noprefixroute wlan0
       valid_lft forever preferred_lft forever
    inet6 240b:251:9020:2900:dea6:32ff:fe90:89c3/64 scope global dynamic mngtmpaddr
       valid_lft 295sec preferred_lft 295sec
    inet6 fe80::xxxx:xxxx:xxxx:xxxx/64 scope link
       valid_lft forever preferred_lft forever
4: wlan1: <BROADCAST,MULTICAST,UP,LOWER_UP> mtu 2312 qdisc mq state UP group default qlen 1000
    link/ether xx:xx:xx:xx:xx:xx brd ff:ff:ff:ff:ff:ff
    inet 10.1.1.1/24 brd 10.1.1.255 scope global noprefixroute wlan1
       valid_lft forever preferred_lft forever
    inet6 fe80::xxxx:xxxx:xxxx:xxxx/64 scope link
       valid_lft forever preferred_lft forever
user@test1:~ $ iw dev
phy#1
        Interface wlan1
                ifindex 4
                wdev 0x100000001
                addr xx:xx:xx:xx:xx:xx
                ssid MySSID1
                type AP
                channel 10 (2457 MHz), width: 20 MHz, center1: 2457 MHz
                txpower 20.00 dBm
phy#0
        Unnamed/non-netdev interface
                wdev 0x2
                addr xx:xx:xx:xx:xx:xx
                type P2P-device
                txpower 31.00 dBm
        Interface wlan0
                ifindex 3
                wdev 0x1
                addr xx:xx:xx:xx:xx:xx
                ssid MySSID0
                type managed
                channel 9 (2452 MHz), width: 20 MHz, center1: 2452 MHz
                txpower 31.00 dBm
次回
ラズパイ親機から子機経由でNゲージを遠隔制御する(2)shellscriptでラズパイAP子機を構築に続きます。
追補
本稿の記録はshellscriptと格闘初期に強引に作成したものがメインですが、現在confファイルへの書き込みは基本的にsedで文字列置換しています。空き時間に順次update版に修正する予定です。