ネクストスケープ配信事業本部AdventCalendar2017の3日目です。
今年も配信とは直接関係ない事を書いていこうと思います。
この記事の内容はASP.NET Core 2.0ベースでの内容です。1.x系では使えない情報が含まれている場合がありますのでご注意ください。
前置き
.NET使いの皆さんは既にASP.NET Coreでプログラミングを行っていらっしゃるでしょうか?
当初ASP.NET 5として開発されていた物が、ASP.NET Coreとして名称変更されてリリースされ、先日2.0になったことはご存知の方も多いと思います。
弊社でもASP.NET Core 2.0を業務で使用してWebサイトを作成するようになってきています。
そんなASP.NET Core 2.0には、旧バージョンと同様にユーザー認証のための仕組みであるASP.NET Identityが用意されています。
今回はこちらの仕組みの簡単な解説とカスタマイズの方法について数回に分けて書いていこうと思います。
今回は導入編という感じで、Identityのデフォルト構成について書いてみます。
よりDeepな情報がお望みの方がいらっしゃいましたら、弊社の別事業部のメンバー達が書いている ネクストスケープ クラウド事業本部 Advent Calendar 2017 の方にもASP.NET Core Identityの上級者向けの話が書かれる予定らしいので、公開されたら是非そちらの記事も見に行ってください。(丸投げ)
記事が公開されたらリンクを張ります。
ASP.NET Coreとは
言わずと知れたWebアプリケーションを作成するためのフレームワークです。
旧ASP.NETとは異なり、オープンソースでクロスプラットフォームとなっており、Windows, Linux, MacOS上でも動作します。
そのため、Dockerコンテナに配置してばら撒く、なんて使い方も可能です。
Windowsコンテナ?知らんな。
ASP.NET Core 2.0とは
本記事を書いている2017/12時点でのASP.NET Coreの最新版です。
詳細は割愛しますが、ASP.NET 1.xからは様々な改良が加わっています。
.NET Standard 2.0に対応しているのも大きな特徴の一つです。
Visual Studio Installerからのインストールも可能ですが、単体のインストーラーも存在し、そちらを使用することも可能です。
(https://www.microsoft.com/net/learn/get-started/windows)
ASP.NET Identityとは
超大雑把に言うと、ASP.NETが標準で用意しているユーザー認証の仕組みです。
ユーザーアカウントによる認証を簡単に構成することが可能です。
細かく説明しようとすると長くなるので割愛しますが、Google認証・Facebook認証・Twitter認証、多要素認証等も簡単に使用することができます。
プロジェクトテンプレートを見てみよう
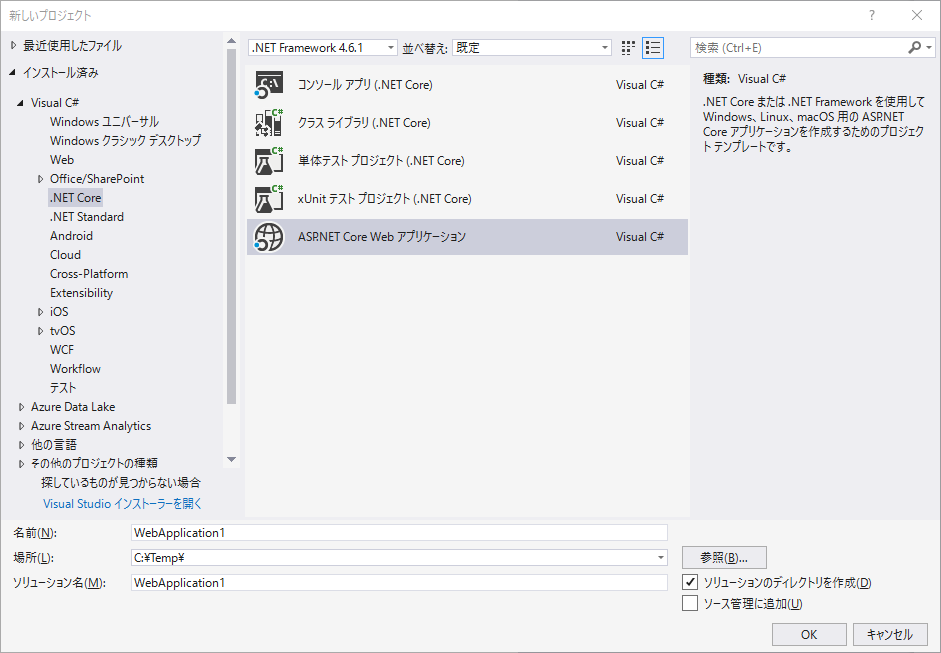
Visual Studioからプロジェクトを作成し、プロジェクトテンプレートの内容から構成を見てみましょう。
プロジェクトを作る
Visual Studio 2017でSP.NET Core Web アプリケーションの新規プロジェクトを作成します。

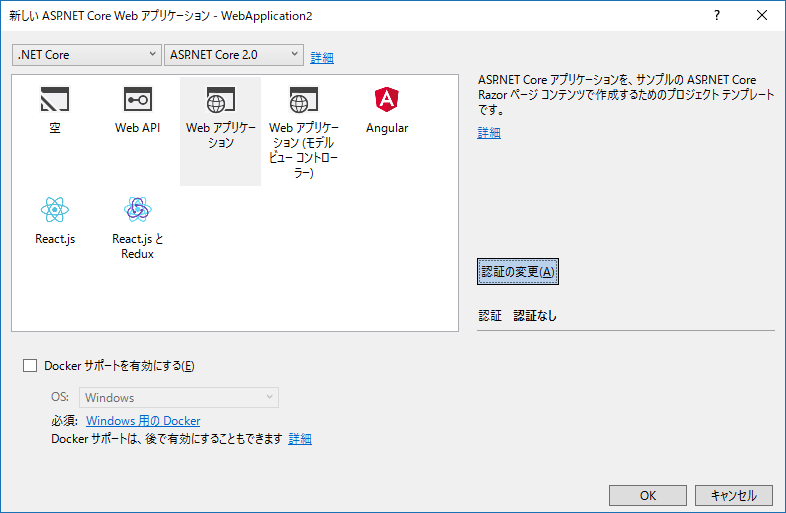
次の画面が出てくるので、「認証の変更」ボタンを押して認証を付けます。

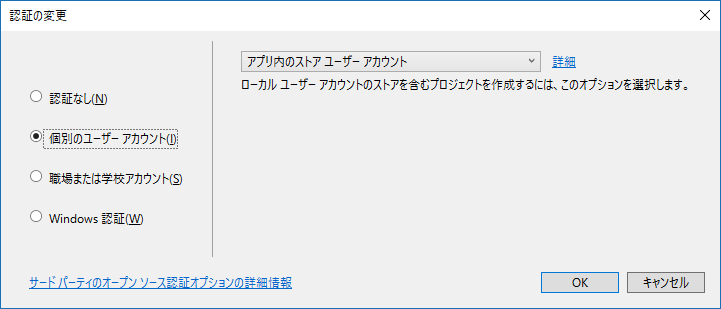
「個別のユーザーアカウント」を選択して、プロジェクトを作成。

そうすると、プロジェクトが作成されます。
Program.csを見てみる
作成されたプロジェクト内のProgram.csが以下の様になります。
public class Program
{
    public static void Main(string[] args)
    {
        BuildWebHost(args).Run();
    }

    public static IWebHost BuildWebHost(string[] args) =>
        WebHost.CreateDefaultBuilder(args)
            .UseStartup<Startup>()
            .Build();
}
WebHost.CreateDefaultBuilderが何をやっているかはスコープから外れるので説明はしません。気になる方は直接ソースを見てみてください。
疑問点があったらすぐにソースを参照することができるのもASP.NET Coreの良い点ですね。
Microsoft.AspNetCore/WebHost.cs
そして、UseStartup<Startup>() でスタートアップ処理が指定されていますが、この中で様々な初期設定を行うのがASP.NET Core 2.0の方式です。
Startup.csを見てみる
Startupクラスは同階層のStartup.csに存在します。
初期状態だと以下のような感じです。
public class Startup
{
    public Startup(IConfiguration configuration)
    {
        Configuration = configuration;
    }

    public IConfiguration Configuration { get; }

    // This method gets called by the runtime. Use this method to add services to the container.
    public void ConfigureServices(IServiceCollection services)
    {
        services.AddDbContext<ApplicationDbContext>(options =>
            options.UseSqlServer(Configuration.GetConnectionString("DefaultConnection")));

        services.AddIdentity<ApplicationUser, IdentityRole>()
            .AddEntityFrameworkStores<ApplicationDbContext>()
            .AddDefaultTokenProviders();

        services.AddMvc()
            .AddRazorPagesOptions(options =>
            {
                options.Conventions.AuthorizeFolder("/Account/Manage");
                options.Conventions.AuthorizePage("/Account/Logout");
            });

        // Register no-op EmailSender used by account confirmation and password reset during development
        // For more information on how to enable account confirmation and password reset please visit https://go.microsoft.com/fwlink/?LinkID=532713
        services.AddSingleton<IEmailSender, EmailSender>();
    }

    // This method gets called by the runtime. Use this method to configure the HTTP request pipeline.
    public void Configure(IApplicationBuilder app, IHostingEnvironment env)
    {
        if (env.IsDevelopment())
        {
            app.UseDeveloperExceptionPage();
            app.UseBrowserLink();
            app.UseDatabaseErrorPage();
        }
        else
        {
            app.UseExceptionHandler("/Error");
        }

        app.UseStaticFiles();

        app.UseAuthentication();

        app.UseMvc(routes =>
        {
            routes.MapRoute(
                name: "default",
                template: "{controller}/{action=Index}/{id?}");
        });
    }
ConfigureServicesメソッドの以下の部分services.AddIdentityメソッドでASP.NET Identityが構成されています。
この中でIdentityの標準構成が設定されています。
services.AddIdentity<ApplicationUser, IdentityRole>()
            .AddEntityFrameworkStores<ApplicationDbContext>()
            .AddDefaultTokenProviders();
ちなみに、AddEntityFrameworkStoresメソッドはデータストアにEntityFramework Coreを使用する場合に呼ぶもので、デフォルトではデータベースに認証情報を永続化するような構成になっていることがわかります。
この場合、ユーザー情報のテーブルなどはデフォルトで定義されており、services.AddDbContext部分でSQL Serverを使用する設定になっています。ソリューション内のData/ApplicationUser.cs内のApplicationUserクラスがそれに当たります。
ApplicationUserクラスが継承しているIdentityUserクラスの詳細が気になる場合はGitHubで確認してみてください。
[Microsoft.Extensions.Identity.Stores/IdentityUser.cs]
(https://github.com/aspnet/Identity/blob/dev/src/Microsoft.Extensions.Identity.Stores/IdentityUser.cs)
また、上記のようにEntityFrameworkをデータストアに使う場合、EntityFramework Code Firstデータベース上にでテーブルが自動で作成されます。
AddDefaultTokenProvidersメソッドはアカウント操作に必要なトークンを使用する指定となっています。
また、Configureメソッドのapp.UseAuthentication();で認証の使用を指定しています。
たったこれだけ、しかもコード内の記述のみでデフォルト構成のIdentityを使用する条件が整った形になっています。
つづく
このまま書き続けると長くなってしまうので、今回はここまで。
次回はservices.AddIdentityメソッド内部で何が行われているのか、認証方式をカスタマイズしたい場合にはどうするのかを説明します。