とあるRuby製のシステムの監視で、Stackdriver Monitoring のカスタム指標を使う機会があり、Rubyからカスタム指標を扱う方法を調査した。
カスタム指標とは
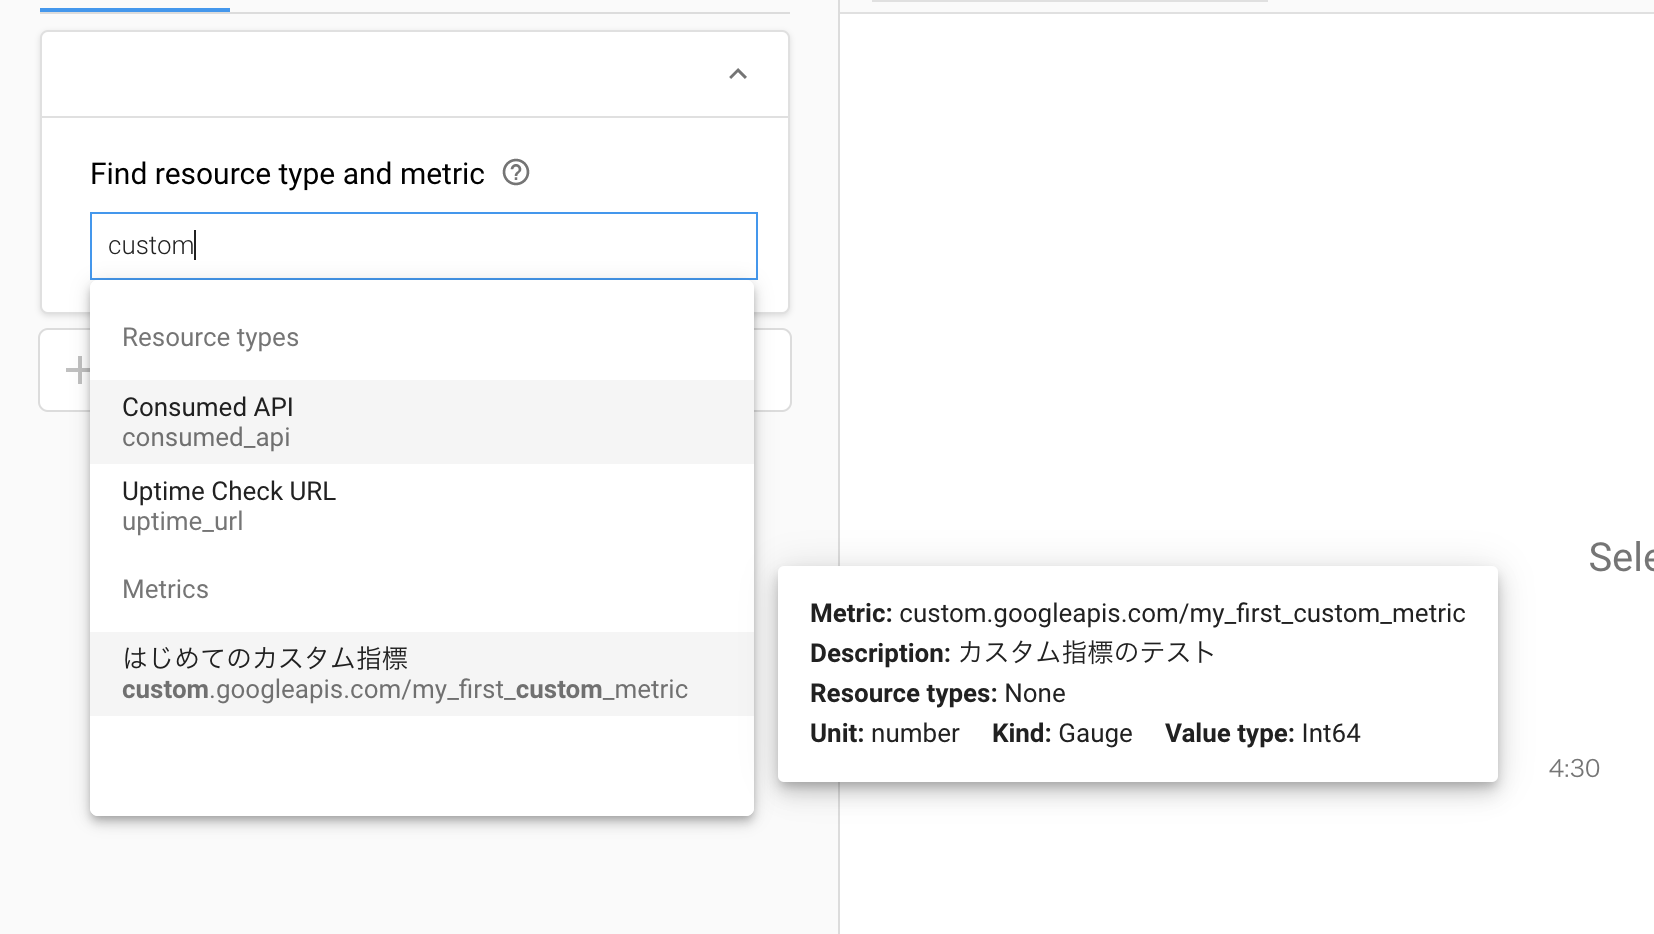
Stackdriver Monitoring のカスタム指標を使うと、独自の指標を Stackdriver で収集、モニタリングできるようになる。つまり、Metrics Explorer の以下のようなあたりに項目が追加され、その指標のグラフ化や、アラートの基準として使うことができるようになる。

前述のシステムでの使用例としては、バッチジョブが完了するたびに指標を書き込むようにしておいて、もし指標が一定期間書き込まれなかったらアラートを出すという不在監視に使用している。
※カスタム指標は課金対象機能です。利用には料金が発生することがあるため注意してください。
前提
google-cloud-monitoring gem が必要。
$ gem install google-cloud-monitoring
流れ
- カスタム指標を作成する。作成は一度だけ行う。カスタム指標はWebコンソールからは作れないため、(gem経由で)APIを使う必要がある。
- 1.のカスタム指標に対し、指標データを書き込む。これはデータが発生するたびに行う(ただし1分以上インターバルをあける必要がある(後述))。
1. カスタム指標の作成
カスタム指標として値を蓄積するためには、まずカスタム指標を作成する必要がある。
https://cloud.google.com/monitoring/custom-metrics/creating-metrics?hl=ja
以下の記事によると、作成をしなくてもいきなり指標の値を送ることはできるようだが、事前に作成しておいたほうがなにかと無難なようだ。
事前定義なしでいきなり送りつけることも可能ですが、その場合はStackDriver側で色々なデフォルト値が利用されます。メトリクスの定義は後から変更できないものが多いようなので、基本的には事前に定義しておいた方がよさそうです。
-- https://kamihikouki.hatenablog.com/entry/2019/02/01/204230
上記の記事、および https://cloud.google.com/monitoring/custom-metrics/creating-metrics?hl=ja#create-metric-desc を参考に、以下のようなスクリプトを作成した。
# Required Environment Variables
# * GOOGLE_CLOUD_PROJECT: GCP's project ID.
# * GOOGLE_CLOUD_KEYFILE: Path to the key file of a service account.

require 'google/cloud/monitoring'

metric_client = Google::Cloud::Monitoring::Metric.new
formatted_name = Google::Cloud::Monitoring::V3::MetricServiceClient.project_path(ENV['GOOGLE_CLOUD_PROJECT'])

label1 = Google::Api::LabelDescriptor.new(
  key: 'label_test',
  description: 'カスタム指標のラベル付与テスト',
  value_type: Google::Api::LabelDescriptor::ValueType::STRING,
)

md = Google::Api::MetricDescriptor.new(
  name: 'my_first_custom_metric',
  type: 'custom.googleapis.com/my_first_custom_metric',
  description: 'カスタム指標のテスト',
  display_name: 'はじめてのカスタム指標',
  # https://cloud.google.com/monitoring/api/v3/metrics-details?hl=ja#metric-kinds
  metric_kind: Google::Api::MetricDescriptor::MetricKind::GAUGE,
  value_type: Google::Api::MetricDescriptor::ValueType::INT64,
  unit: '',
  labels: [label1],
)

result = metric_client.create_metric_descriptor(formatted_name, md)
puts "Created #{result.name}"
ポイント
-
MetricDescriptorを作ってそれをcreate_metric_descriptorに渡すとカスタム指標が作れる。MetricDescriptorの詳細は ここ にある。 - カスタム指標では、
typeは必ずcustom.googleapis.com/*のフォーマットにする必要がある。ここ 参照。 -
metric_kindやvalue_typeの一覧は ここ にある。一部の組み合わせはカスタム指標ではサポートされていないので注意(特にSTRINGはカスタム指標では使えない )。
)。 - ラベルはオプショナル。後ほど指標に値を書き込むときに「リソースタイプ」を指定することになるが、そのリソースタイプによってデフォルトのラベルがいくつか用意されている。普通はそれで事足りるが、それでカバーできないようなメタデータがあるときだけラベルを使うと良さそうだ。リソースタイプとデフォルトラベルは ここ 参照。
上記のスクリプトを実行し、Stackdriver の Metrics Explorer で確認すると、指標が作られていることが確認できる。
2. 指標データの書き込み
https://cloud.google.com/monitoring/custom-metrics/creating-metrics?hl=ja#writing-ts を参考に以下のようなスクリプトを作成した。
require 'google/cloud/monitoring'

metric_client = Google::Cloud::Monitoring::Metric.new
formatted_name = Google::Cloud::Monitoring::V3::MetricServiceClient.project_path(ENV['GOOGLE_CLOUD_PROJECT'])

series = Google::Monitoring::V3::TimeSeries.new
metric = Google::Api::Metric.new(type: 'custom.googleapis.com/my_first_custom_metric')
series.metric = metric

# https://cloud.google.com/monitoring/custom-metrics/creating-metrics?hl=ja#which-resource
resource = Google::Api::MonitoredResource.new(type: 'generic_task')
resource.labels['location'] = 'asia-northeast1'
resource.labels['namespace'] = 'none'
resource.labels['job'] = 'test'
resource.labels['task_id'] = '12345'
series.resource = resource

point = Google::Monitoring::V3::Point.new
point.value = Google::Monitoring::V3::TypedValue.new(int64_value: 12345678)
now = Time.now
end_time = Google::Protobuf::Timestamp.new(seconds: now.to_i, nanos: now.usec)
point.interval = Google::Monitoring::V3::TimeInterval.new(end_time: end_time)
series.points << point

metric_client.create_time_series(formatted_name, [series])
puts "Time series created: #{metric.type}"
ポイント
- 指標データの書き込み =
TimeSeriesを作ること -
TimeSriesは1つのPointを持つ(実装上なぜか複数持てるように見えるが、ドキュメントには「各 TimeSeries オブジェクトには Point オブジェクトを 1 つだけ含める必要があります」とある) -
Pointのvalueに、実際の指標データを格納する。指標データの型はMetricの型と一致させる。 -
Pointのintervalに、その指標データが発生した時刻を格納する。作り方がやや面倒(コード参照)。-
intervalなのは、幅を持つ時間も指定できるようにするためのようだ。今回のようにある瞬間に発生したデータの場合(=metric_kindがGAUGEの場合)はend_timeのみ指定すれば良い。詳しくは ここ を参照。
-
-
TimeSeriesは1つのMetric(上記で作成したもの)と1つのResourceを持つ。これらの組み合わせによって「時系列」が識別される(≒ Stackdriver の画面上でひとつづきのグラフの線になる)。 -
Resourceはそのタイプによっていくつかのラベルを持つ。一覧は ここ にある。
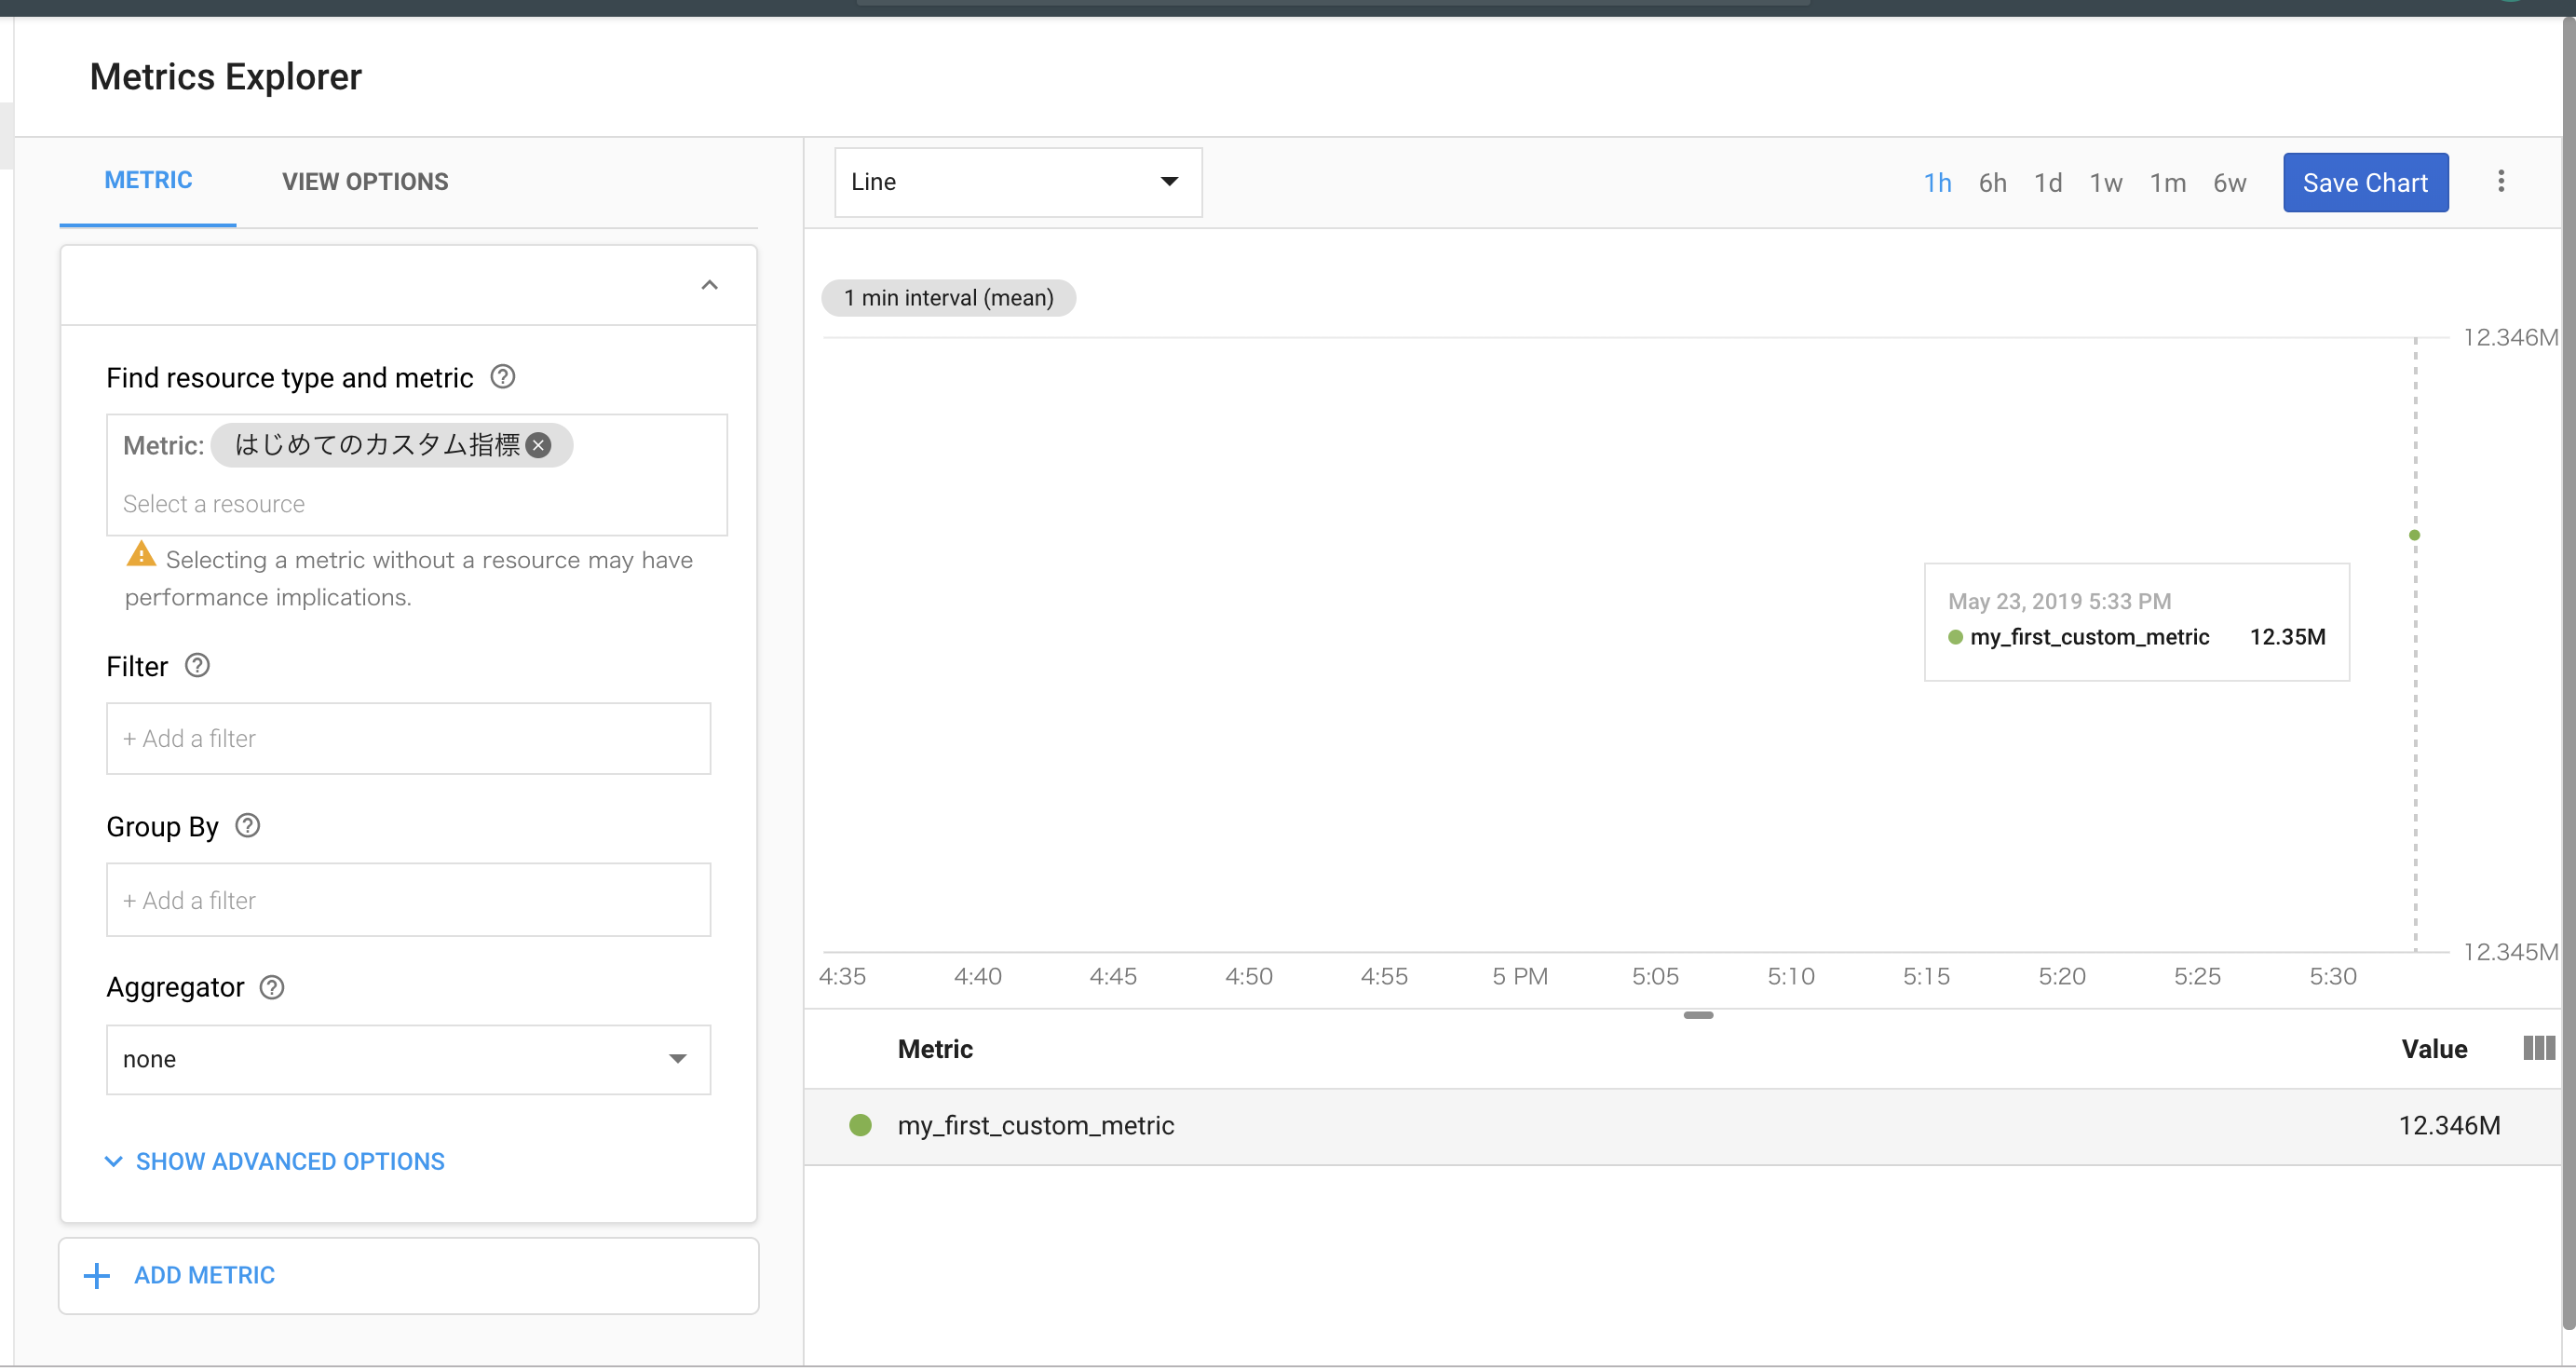
上記のスクリプトを実行し、Stackdriver の Metrics Explorer で確認すると、データが書き込まれていることがわかる。
注意点: 書き込みのインターバル
![]() 同じ時系列(
同じ時系列(Metric と Resource の組み合わせ)への指標データの書き込みは、1分以上のインターバルをあける必要がある。
同じ時系列に複数のポイントを書き込む場合は、各ポイントに対して個別に timeSeries.create メソッドを呼び出します。呼び出しの速度は毎分 1 回よりも速くならないようにしてください。
-- https://cloud.google.com/monitoring/custom-metrics/creating-metrics?hl=ja#writing-ts
間隔を空けずに上記スクリプトを2度実行すると、確かにエラーになった。
$ ruby write-metrics.rb
Time series created: custom.googleapis.com/my_first_custom_metric
$ ruby write-metrics.rb
/Users/notozeki/.rbenv/versions/2.4.1/lib/ruby/gems/2.4.0/gems/google-gax-1.5.0/lib/google/gax/api_callable.rb:369:in `rescue in block in retryable': GaxError Exception occurred in retry method that was not classified as transient, caused by 3:One or more TimeSeries could not be written: One or more points were written more frequently than the maximum sampling period configured for the metric. {Metric: custom.googleapis.com/my_first_custom_metric, Timestamps: {Youngest Existing: '2019/05/23-01:32:56.001', New: '2019/05/23-01:32:58.001'}}: timeSeries[0] (Google::Gax::RetryError)
        from /Users/notozeki/.rbenv/versions/2.4.1/lib/ruby/gems/2.4.0/gems/google-gax-1.5.0/lib/google/gax/api_callable.rb:358:in `block in retryable'
        from /Users/notozeki/.rbenv/versions/2.4.1/lib/ruby/gems/2.4.0/gems/google-gax-1.5.0/lib/google/gax/api_callable.rb:230:in `block in create_api_call'
        from /Users/notozeki/.rbenv/versions/2.4.1/lib/ruby/gems/2.4.0/gems/google-gax-1.5.0/lib/google/gax/api_callable.rb:260:in `block in create_api_call'
        from /Users/notozeki/.rbenv/versions/2.4.1/lib/ruby/gems/2.4.0/gems/google-cloud-monitoring-0.29.4/lib/google/cloud/monitoring/v3/metric_service_client.rb:723:in `create_time_series'
        from write-metrics.rb:32:in `<main>'
まとめと所感
- gemがあるので、やり方さえ把握すれば比較的簡単にカスタム指標をRubyから使うことができる。
- 独特の概念がいくつか登場するため、それを把握するのが少し大変だった。Web上の情報も少なめ。
- 書くコードの量は思ったより多かった。実際に使うときは何らかのヘルパー等に包めるのが良さそう。