概要
Kerasでモデルを作成するにはSequentialモデルを用いる方法とFunctionalAPIを用いる2つの方法があります。公式ドキュメントより
FunctionalAPIの方が柔軟にモデルを作れるのですが、実際どう違うのかをCIFAR10のデータを利用して確認していきたいと思います。
ニューラルネット自体に関しては多くの良記事がありますのでそちらをご参照ください。
余談
PyTorchでCNNモデルを構築する記事も書いたので、PyTorchでのモデル構築方法を知りたい方はこちらをどうぞ。
PyTorch入門!実践的な機械学習のはじめ方
記事の構成
Sequentialモデルの使い方
チュートリアルを参照しながらSequentialモデルを作成する方法を見ていきます。
Sequentialモデルでは、はじめにSequentialクラスのインスタンスを作成します。
そしてaddメソッドを用いてレイヤ(全結合層やCNN層、プーリング層など)を追加していきます。
以下の実装では
(CNN -> CNN -> Pooling)*2 -> 全結合 -> Softmax(10分類)
という構成のネットワークを構築してみました。
import Keras

from keras.models import Sequential
from keras.layers import Dense, Activation, Conv2D, MaxPooling2D, Flatten

# Seqentialモデルのインスタンスを作ります。
model = Sequential()

# addメソッドでレイヤを追加しています。
model.add(Conv2D(32, (3, 3), activation='relu', input_shape=(32,32,3)))
model.add(Conv2D(32, (3, 3), activation='relu', ))
model.add(MaxPooling2D(pool_size=(2, 2)))

model.add(Conv2D(32, (3, 3), activation='relu', ))
model.add(Conv2D(32, (3, 3), activation='relu', ))
model.add(MaxPooling2D(pool_size=(2, 2)))

model.add(Flatten())
model.add(Dense(255, activation='relu'))
model.add(Dense(10, activation='softmax'))
レイヤを連続的(Sequential)に繋げていくので直感的で分かりやすいです。
ただし多入力のモデルなど柔軟なモデル作成には向いていません。
Functional APIでモデルを定義する
続いてSequentialモデルのときと同じモデルを構築してい実装方法の違いを確認します。
公式ドキュメントによるとFunctional APIは次の特徴を持つようです。
- レイヤーのインスタンスは関数呼び出し可能で,戻り値としてテンソルを返す
- Modelを定義することで入力と出力のテンソルは接続される
- 上記で定義したモデルはSequentialと同様に利用可能
Functional APIでは、はじめにInputクラスのインスタンスを作成し入力層を定義します。
そして入力層につなげる形でレイヤを記載していきます。
追加するレイヤはSequentialモデルと同じです。
(CNN -> CNN -> Pooling)*2 -> 全結合 -> Softmax(10分類)
最後のレイヤである出力層まで追加したら
最後にModelクラスに入力と出力を指定することでFunctional APIでのモデルができます。
from keras.models import Model
from keras.layers import Input,Dense, Conv2D, MaxPooling2D, Flatten

# Inputクラスのインスタンスで入力層(サイズ:(32,32,3))を定義します。
inputs = Input(shape=(32,32,3))

# 入力層から先のレイヤを追加していきます。
x = Conv2D(32, (3, 3), activation='relu')(inputs)
x = Conv2D(32, (3, 3), activation='relu')(x)
x = MaxPooling2D(pool_size=(2, 2))(x)

x = Conv2D(32, (3, 3), activation='relu')(x)
x = Conv2D(32, (3, 3), activation='relu')(x)
x = MaxPooling2D(pool_size=(2, 2))(x)

x = Flatten()(x)
x = Dense(255, activation='relu')(x)
x = Dense(10, activation='softmax')(x)

# Modelクラスで入力層と出力層を接続します。
model_functional = Model(inputs=inputs, outputs=x)
Functional APIの方がより柔軟なネットワーク(多入力多出力モデル、スキップ接続など)を実装することができるため、こちらの使い方を覚えた方が良さそうです。
それでは次にSequentialモデルとFunctional APIで定義したモデルを用いてCifar10の分類問題を学習してみます。
Cifar 10のデータセットを用いて評価してみる
SequentialモデルとFunctional APIで構築したモデルを用いてCifar10のデータでの精度を比較してみたいと思います。
期待としては記述が違うだけで同じモデルを作成しているので同様の結果が得られるはずです。
まずはCifar10のデータを学習用に変換します。
SEED = 0 # 乱数を固定し同じ結果が得られるようにしています。
# Cifar10データのダウンロード
from keras.datasets import cifar10
(X_train, y_train), (X_test, y_test) = cifar10.load_data()

# One-hot encoding
y_train_ctg = to_categorical(y_train)
y_test_ctg = to_categorical(y_test)

# 検証用データの作成
x_trn, x_val, y_trn, y_val = train_test_split(X_train, y_train_ctg, random_state=SEED)
print(f'shape of x_trn:{x_trn.shape}, y_trn:{y_trn.shape},x_val:{x_val.shape}, y_val:{y_val.shape}')
Sequentialモデルをトレーニングします。
opt = optimizers.adam(lr=0.0001)
metric_list = ['accuracy']
model.compile(loss='categorical_crossentropy', optimizer=opt, metrics=metric_list)
model.summary()

history = model.fit(x_trn, y_trn, epochs=20, validation_data=(x_val, y_val), batch_size=32)
同じ設定でFunctional APIのモデルもトレーニングします。
opt = optimizers.adam(lr=0.0001)
metric_list = ['accuracy']
model_functional.compile(loss='categorical_crossentropy', optimizer=opt, metrics=metric_list)
model_functional.summary()

history_functional = model_functional.fit(x_trn, y_trn, epochs=20, validation_data=(x_val, y_val), batch_size=32)
各モデルの学習結果を比較
最後にそれぞれの学習結果を確認してみます。
def show_history(history):
    fig, ax = plt.subplots(1, 2, figsize=(15,5))
    ax[0].set_title('loss')
#     ax[0].plot(history.epoch, history.history["loss"], label="Train loss")
    ax[0].plot(history.epoch, history.history["val_loss"], label="Validation loss")
    ax[1].set_title('categorical_accuracy')
#     ax[1].plot(history.epoch, history.history["acc"], label="Train accuracy")
    ax[1].plot(history.epoch, history.history["val_acc"], label="Validation accuracy")
    ax[0].legend()
    ax[1].legend()
    plt.show()

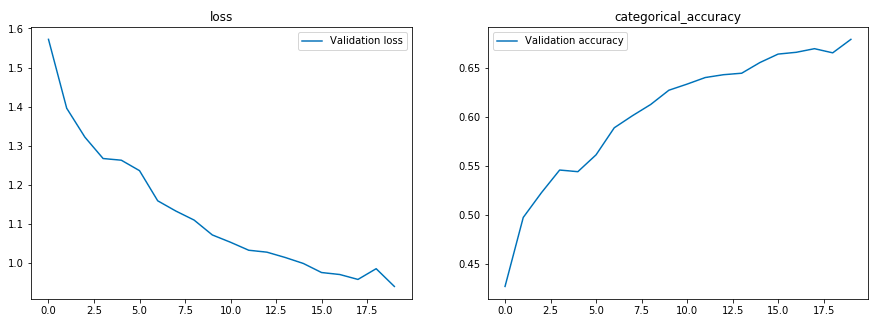
show_history(history)
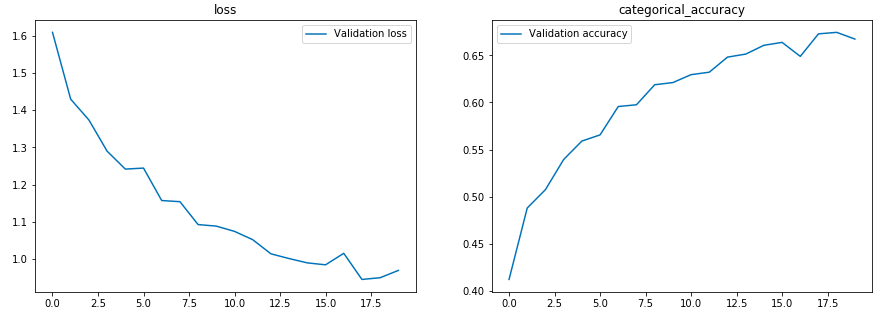
show_history(history_functional)
Sequentialモデルでの学習曲線
Functional APIモデルの学習曲線
どちらもEpoch数20で同様に67%程度のAccuracyになっているのでどちらの手法でも同様なモデルが作成されるという期待通りの結果になりました。
(特に何の工夫もしていないので精度自体は高くないです。)
終わりに
次回以降はFunctional APIを使って有名なネットワーク(VGG〜ResNetなど)を活用していく方法、自分で既存のネットワークを変更する方法を紹介していきたいと思います。
記事に対するご指摘や質問コメント、記載してほしい記事のリクエストなど大歓迎です。
ブラッシュアップしていきたいのでぜひご指摘ください。

