表題の通りの認証を実行してみました。結構苦心したのでまた作るときのメモ、兼今後これをやろうとしている人への助けにでもと思っています。
目標
- VSCodeで環境を作る
- ASP.Net coreのDefaultIdentityを利用してユーザー認証をする
- 承認の属性が使えるようにする
- ロールの属性が利用できるようにする
- CSRFの対策ができている
環境
dotnetコマンドで作る場合のAngularやReactのテンプレートを参考に、ASP.Net coreの環境を基本に作り、その中にSvelteのクライアント環境を作ることにしました。ASP.Net coreのテンプレートはWebAPIで作成します。
- 開発フォルダでコマンド「dotnet new webapi」を実行してまずASP.Net coreのWebApi環境を作る。
- 次に「npx degit sveltejs/template ClientApp」を実行。フロントエンドのために作成するフォルダ名はangularなどSPAのテンプレートに倣って「ClientApp」にしています。
- 「ClientApp」でVSCodeを開いて、前回書いた記事VSCodeでSvelteをTypescriptにしてESLintの環境を整えるを参考にsvelte+typescript+ESLintの環境を整えます。
VSCodeには以下のパッケージを入れておきます。
- Japanese Language Pack まあ、日本人なら入れますね
- C# これは必須ですね
- ESLint これも基本入れておいた方がいいかと。前回の記事を参考にしているなら入ってますよね。
- Svelte for VSCode Svelte使うので入れておいてください。
- Svelte Interisense これも入れておいた方がいいですね。
後は、必要に応じて入れて下さい。Nuget使うのに私が作ったNuget GUI Managerなんか入れてくれると嬉しいです。ちょっとダイアログがバグってますが、そのうち調べます。
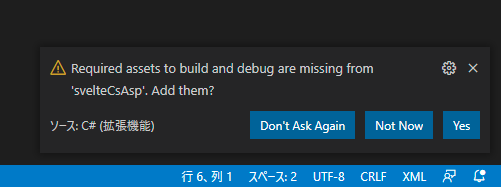
作ったフォルダをVSCodeで開くと、しばらくして右下に次のようなダイアログが出ます(csのファイルを開くか、projectのファイルを開いた時かもしれません。実はタイミングがよく分かってないんです)。ここで「yes」をクリックしておくと、ASP.Net用のタスクとデバッグ設定が作られます。(出ない場合はタスクバーの一番右の鐘のマークをクリックしてみてください。)
rollup.config.jsの変更
開発環境ですが、WebサーバーはASP.Net coreを利用します。Svelteのトランスパイルにはコマンドオプションに-wを付けてファイル更新時に自動的にトランスパイルする方法もありますが、今回はASP.Net coreのデバッグ時に同時にトランスパイルする様にします。また、WebサーバーはASP.Net coreのものを使うので、Svelteの「dev」タスクは使わず「build」タスクを使うのですが、そのまま使うとTypeScriptやSvelteのmapファイルができないので少し設定を変更します。
「rollup.config.js」を開いて出力フォルダをASP.Net coreのwwwrootフォルダに向けます。「!production」を4か所「true」に変更します。最後の3つは変更しません。
	input: 'src/main.ts',
	output: {
		sourcemap: true,
		format: 'iife',
		name: 'app',
		file: '../wwwroot/build/bundle.js'     <= この部分を変更しています。
	},
	plugins: [
		svelte({
			preprocess: sveltePreprocess({ sourceMap: true }),     <= この部分を「!production」から変更する
			compilerOptions: {
				// enable run-time checks when not in production
				dev: true     <= この部分も「!production」から変更します
			}
		}),
		// we'll extract any component CSS out into
		// a separate file - better for performance
		css({ output: 'bundle.css' }),

		// If you have external dependencies installed from
		// npm, you'll most likely need these plugins. In
		// some cases you'll need additional configuration -
		// consult the documentation for details:
		// https://github.com/rollup/plugins/tree/master/packages/commonjs
		resolve({
			browser: true,
			dedupe: ['svelte']
		}),
		commonjs(),
		typescript({
			sourceMap: true,     <= この部分も「!production」から変更します
			inlineSources: true     <= この部分も「!production」から変更します
		}),
task.jsonの変更
次に親のASP.Net coreのフォルダをVSCodeで開いて設定します。以後はこのフォルダで作業をします。
まず、.vscodeフォルダのtask.jsonですが、「build」「publish」「watch」の3つのASP.Net用のタスクが作られていると思います(前にのほうで説明していたダイアログで「yes」とするとできます)。これにsvelteのbuildを追加します。もちろん設定を直接書いてもいいのですが、メニューの「ターミナル」->「タスクの構成」とすると構成するタスクを選択して下さいと出ます(このパターンの処理が多いのですが、最初選択肢が出ているのがわかりませんでした)。ここで、基本的に使えるタスクが選択できるのでここでは「npm: build - ClientApp」を選択して追加します。npmのビルドでClientAppの中にあるのでこういう名前になるようです。さらに2つのタスクを同時に実行するタスクを以下の様に手入力で追加します。2つを同時に実行させるタスクは、あとでlaunchで参照させます。
     ...

         // ここからがタスクの構成で追加されたもの
         {
            "type": "npm",
            "script": "build",
            "path": "ClientApp/",
            "group": "build",
            "problemMatcher": [],
            "label": "npm: build - ClientApp",
            "detail": "rollup -c",
        },
        // 以下を手作業で追加します。ASP.Netのコンパイルと、Svelteのトランスパイルが実行されます
        {
            "label": "AllBuild",
            "dependsOn": [
                "npm: build - ClientApp",
                "build"
            ]
        }
launch.jsonの変更
次にlaunch.jsonを変更します。まず、メニューの「実行」->「構成の追加」で「Chrome: Launch」を選択します(ブラウザは好きなものをえらんでください)。で、追加されたものですが、URLのポートが8080になっているのを5001に変更します。さらに、以下の様に「compounds」を追加して、デバッガを一度に起動する設定をします。この時、設定されている「.NET Core Launch (web)」のpreLaunchTaskは消しておきます。
{
    "version": "0.2.0",
    "configurations": [


  // これが追加された部分です
    {
        "name": "Launch Chrome",
        "request": "launch",
        "type": "pwa-chrome",
        "url": "https://localhost:5001", <= ポート番号を変更します
        "webRoot": "${workspaceFolder}"
    },
        {
            // Use IntelliSense to find out which attributes exist for C# debugging
            // Use hover for the description of the existing attributes
            // For further information visit https://github.com/OmniSharp/omnisharp-vscode/blob/master/debugger-launchjson.md
            "name": ".NET Core Launch (web)",
            "type": "coreclr",
            "request": "launch",
            // "preLaunchTask": "build",  <= ここをコメントアウトしています。
            // If you have changed target frameworks, make sure to update the program path.
            "program": "${workspaceFolder}/bin/Debug/net5.0/svelteCsAsp.dll",
            "args": [],
            "cwd": "${workspaceFolder}",
            "stopAtEntry": false,
            // Enable launching a web browser when ASP.NET Core starts. For more information: https://aka.ms/VSCode-CS-LaunchJson-WebBrowser
            "serverReadyAction": {
                "action": "openExternally",
                "pattern": "\\\\bNow listening on:\\\\s+(https?://\\\\S+)"
            },
            "env": {
                "ASPNETCORE_ENVIRONMENT": "Development"
            },
            "sourceFileMap": {
                "/Views": "${workspaceFolder}/Views"
            }
        },
        {
            "name": ".NET Core Attach",
            "type": "coreclr",
            "request": "attach",
            "processId": "${command:pickProcess}"
        }

    ],
    // 以下を追加しました。
    "compounds": [
        {
            "name": "Compound",
            "configurations": [".NET Core Launch (web)", "Launch Chrome"],
            "preLaunchTask": "AllBuild",
            "stopAll": true
        }
    ]
}
追加した「compounds」は複数のデバッグを実行させる設定で、「configurations」に実行させる複数のデバッグを書き込みます。preLaunchTaskにtask.jsonで作った物を入れて、デバッグ前にASP.Net coreとsvelteの両方をbuildしています。
wwwrootにsvelteの静的ファイルを移動
webサーバはASP.Netを利用しますので、CliantAppのpublicフォルダ内のファイルを、ASP.Netのwwwrootにコピー(移動でもいい)します。svelteで一度実行なりトランスパイルをしているとbindフォルダができていますが、このフォルダは移動しなくてもいいです。rollupの設定を変更しているので、svelteでトランスパイルするとwwwrootの下に作成されます。
ASP.Net coreとsvelteの実装は次の記事に書きます
長くなったので、とりあえずこの記事はここまでです。次の記事でコードを実装します。
