概要
代表的な「 静的サイトジェネレータ 」の一つである Hugo を使って生成されたサイトを、
GitHub Pages により、簡単に( 無料で )公開する方法について紹介します。1
ただし、単純に「 ローカルでビルドしたものを GitHub に push すれば、後は Pages を適切に設定するだけだよね 」というのではなく、
一応、GitHub Actions を利用して、ビルドの自動化にも挑戦してみました。
また、いわゆる「 ユーザーサイト 」ではなく、今回は「 プロジェクト単位の Pages 」を作る手順になります。
Hugo
まず、初めての人は、Quick Start に従い、ローカルで Hugo の開発環境を整えましょう。
例として、hugo-site というディレクトリでプロジェクトを作成し、そのまま hugo-site という名前のリポジトリに push しました。
% brew install hugo
...
% hugo new site hugo-site
Congratulations! Your new Hugo site is created in /Users/normalsalt/Documents/hugo-site.

Just a few more steps and you're ready to go:

1. Download a theme into the same-named folder.
   Choose a theme from https://themes.gohugo.io/ or
   create your own with the "hugo new theme <THEMENAME>" command.
2. Perhaps you want to add some content. You can add single files
   with "hugo new <SECTIONNAME>/<FILENAME>.<FORMAT>".
3. Start the built-in live server via "hugo server".

Visit https://gohugo.io/ for quickstart guide and full documentation.
% cd hugo-site
% ls
archetypes/  config.toml  content/     data/        layouts/     static/      themes/
git init したら、ついでに、サブモジュールで Hugo のテーマを追加して、設定します。2
Quick Start の通りにやると、ananke というシンプルなテーマになりますね。
% git init
...
% git submodule add https://github.com/budparr/gohugo-theme-ananke.git themes/ananke
Cloning into '/Users/normalsalt/Documents/hugo-site/themes/ananke'...
remote: Enumerating objects: 4, done.
remote: Counting objects: 100% (4/4), done.
remote: Compressing objects: 100% (4/4), done.
remote: Total 1959 (delta 0), reused 2 (delta 0), pack-reused 1955
Receiving objects: 100% (1959/1959), 4.39 MiB | 14.00 MiB/s, done.
Resolving deltas: 100% (1074/1074), done.
% echo theme = \"ananke\" >> config.toml
あとは、適当にページを追加し、
% hugo new posts/my-first-post.md
/Users/normalsalt/Documents/hugo-site/content/posts/my-first-post.md created
サーバーを起動すれば、http://localhost:1313/ のような URL にアクセスして、サイトが確認できるはずです。3
% hugo server
Start building sites …

                   | EN
-------------------+-----
  Pages            | 10
  Paginator pages  |  0
  Non-page files   |  0
  Static files     |  1
  Processed images |  0
  Aliases          |  1
  Sitemaps         |  1
  Cleaned          |  0

Built in 12 ms
Watching for changes in /Users/normalsalt/Documents/hugo-site/{archetypes,content,data,layouts,static,themes}
Watching for config changes in /Users/normalsalt/Documents/hugo-site/config.toml, /Users/normalsalt/Documents/hugo-site/themes/ananke/config.yaml
Environment: "development"
Serving pages from memory
Running in Fast Render Mode. For full rebuilds on change: hugo server --disableFastRender
Web Server is available at http://localhost:1313/ (bind address 127.0.0.1)
Press Ctrl+C to stop
さて、ここで hugo -D などと実行すれば、静的サイトを( デフォルトで public ディレクトリに )ビルドでき、
そのまま、それを GitHub に push して Pages の設定を行っても良いのですが、
毎回、ローカルでビルドしてから push するのは、ちょっと面倒なので、自動化しましょう。
GitHub Actions
ビルドの自動化と言っても、実は、ほとんど、次のページの通りにやるだけであり、
もっと言えば、次のようなファイル( .github/workflows/gh-pages.yml )を git 管理するプロジェクトに追加しておくだけです。
name: Hugo

on: push

jobs:
  gh-pages:
    runs-on: ubuntu-latest
    steps:
      - name: Checkout
        uses: actions/checkout@v2
        with:
          submodules: true

      # https://github.com/marketplace/actions/github-pages-action
      - name: Setup
        uses: peaceiris/actions-hugo@v2
        with:
          hugo-version: 'latest'

      - name: Build
        run: hugo --minify

      - name: Deploy
        uses: peaceiris/actions-gh-pages@v3
        with:
          github_token: ${{ secrets.GITHUB_TOKEN }}
          publish_branch: gh-pages
気を付ける点としては、最後の行で publish_branch を指定しているところくらいでしょうか。
これについては、以下の GitHub Pages の設定と合わせて説明します。
GitHub Pages
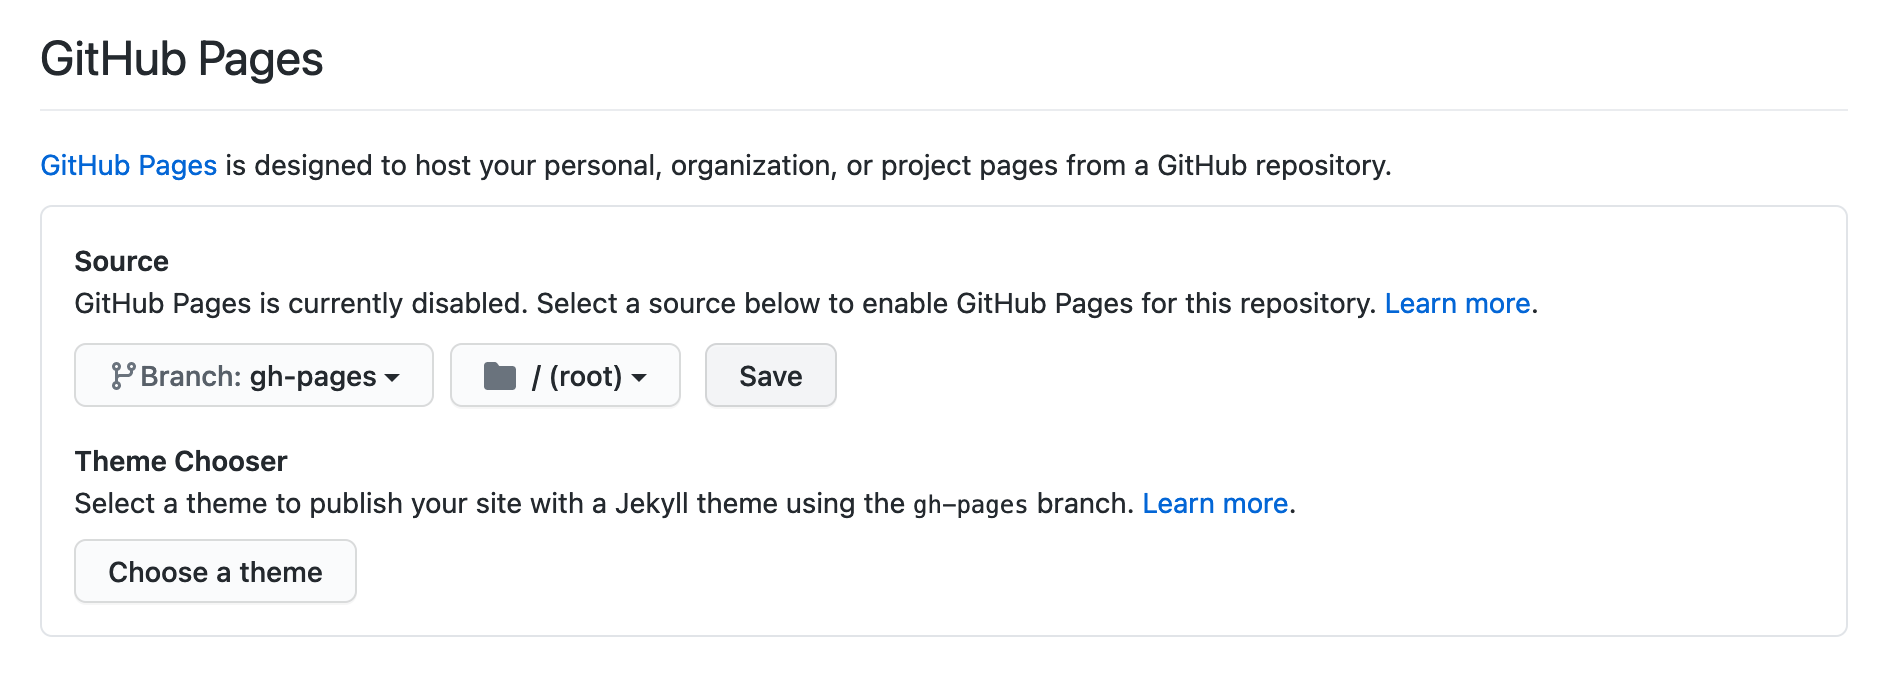
さて、いよいよ、サイトを公開する手順ですが、これも、特に難しくはありません。
リポジトリの Settings の下の方にある GitHub Pages の項目の「 Source 」のところのドロップダウンメニューから「 Branch: gh-pages 」を選択して「 Save 」を押すだけです。
たったこれだけで、このリポジトリに .github/workflows/gh-pages.yml を含む Hugo のソースを push すると、自動的にビルドされて、
例えば、リポジトリの URL が https://github.com/normalsalt/hugo-site なら、デフォルトでは https://normalsalt.github.io/hugo-site/ のような URL で、サイトが公開されるようになります。
そして、ここで重要なのは、自動的にビルドされた、その「 成果物 」は、
実は、**同じリポジトリの「 gh-pages という名前のブランチ 」にデプロイされている、**ということで、
まさに、上述した GitHub Actions の設定ファイルで、publish_branch( 公開ブランチ )として指定した通りですね。
逆に言えば「 main ブランチには、ビルドされたファイルは含まれない 」ということで、ローカルで管理するファイルには基本的に影響しないし、割と良い感じなのではないでしょうか?
ちなみに、ブランチではなく、リポジトリを分けても良いのですが、当然ながら、ちょっと Actions の設定が複雑になったりします。
余談
GitLab CI による GitLab Pages のデプロイでは、ブランチも含め、必ずしもリポジトリ上にはない「 CI でビルドしたもの 」を公開できているような気がするので、個人的には、少し戸惑いました。
別に、ブランチにあって困るということもないのですが、GitHub Pages では、公開されるソースも、完全にリポジトリで管理しないとダメなんでしょうかね?
ともかく、これからは、徐々に GitHub Actions の勉強もしていきたいと思います。
-
ドキュメント参照。https://docs.github.com/en/github/working-with-github-pages/about-github-pages ↩
-
テーマは、Hugo Themes から好きなものを選べます。 ↩
-
hugo newで追加したページをサイトに表示させるには、draft設定を無効(false)にしたりする必要があります。https://gohugo.io/getting-started/usage/#draft-future-and-expired-content ↩