この記事にはIoTLT Advent Calendar 2021 8日目の記事になります。IoTをして何かするというよりは、IoTをする時に少し便利になる情報を記事にしました。
はじめに
ESP32を使ってAWS IoTに接続する時、公式のサンプルを見ても証明書をソースコードに直書きするように説明されていますよね。
AWS IoTのコンソールから証明書をDLし、それを開いてコピペして書き込みをすればOKと書かれています。
# ifdef __cplusplus

//一部抜粋。こんな感じで証明書の中身をコピペしないと接続できません。
/*thing certificate:to be updated */
const char thingCA[] = {"-----BEGIN CERTIFICATE-----\n\
xxxxxxxxxxxxxxxxxxxxxxxxxxxxxxxxxxxxxxxxxxxxxxxxxxxxxxxxxxxxxxxx\n\
xxxxxxxxxxxxxxxxxxxxxxxxxxxxxxxxxxxxxxxxxxxxxxxxxxxxxxxxxxxxxxxx\n\
xxxxxxxxxxxxxxxxxxxxxxxxxxxxxxxxxxxxxxxxxxxxxxxxxxxxxxxxxxxxxxxx\n\
xxxxxxxxxxxxxxxxxxxxxxxxxxxxxxxxxxxxxxxxxxxxxxxxxxxxxxxxxxxxxxxx\n\
xxxxxxxxxxxxxxxxxxxxxxxxxxxxxxxxxxxxxxxxxxxxxxxxxxxxxxxxxxxxxxxx\n\
xxxxxxxxxxxxxxxxxxxxxxxxxxxxxxxxxxxxxxxxxxxxxxxxxxxxxxxxxxxxxxxx\n\
xxxxxxxxxxxxxxxxxxxxxxxxxxxxxxxxxxxxxxxxxxxxxxxxxxxxxxxxxxxxxxxx\n\
xxxxxxxxxxxxxxxxxxxxxxxxxxxxxxxxxxxxxxxxxxxxxxxxxxxxxxxxxxxxxxxx\n\
xxxxxxxxxxxxxxxxxxxxxxxxxxxxxxxxxxxxxxxxxxxxxxxxxxxxxxxxxxxxxxxx\n\
xxxxxxxxxxxxxxxxxxxxxxxxxxxxxxxxxxxxxxxxxxxxxxxxxxxxxxxxxxxxxxxx\n\
xxxxxxxxxxxxxxxxxxxxxxxxxxxxxxxxxxxxxxxxxxxxxxxxxxxxxxxxxxxxxxxx\n\
xxxxxxxxxxxxxxxxxxxxxxxxxxxxxxxxxxxxxxxxxxxxxxxxxxxxxxxxxxxxxxxx\n\
xxxxxxxxxxxxxxxxxxxxxxxxxxxxxxxxxxxxxxxxxxxxxxxxxxxxxxxxxxxxxxxx\n\
xxxxxxxxxxxxxxxxxxxxxxxxxxxxxxxxxxxxxxxxxxxxxxxxxxxxxxxxxxxxxxxx\n\
xxxxxxxxxxxxxxxxxxxxxxxxxxxxxxxxxxxxxxxxxxxxxxxxxxxxxxxxxxxxxxxx\n\
xxxxxxxxxxxxxxxxxxxxxxxxxxxxxxxxxxxxxxxxxxxxxxxxxxxxxxxxxxxxxxxx\n\
xxxxxxxxxxxxxxxxxxxxxxxxxxxxxxxxxxxxxxxxxxxxxxxxxxxxxxxxxxxxxxxx\n\
xxxxxxxxxxxxxxxxxxxxxxxxxxxxxxxxxxxxxxxxxxxxxxxxxxxxxxxxxxxxxxxx\n\
xxxxxxxxxxxxxxxxxxxxxxxxxxxxxxx\n\
-----END CERTIFICATE-----\n"};
1台だけ書き込むならこれでもいいかもしれませんが、複数台の場合面倒ですよね。
ESP32なんだしSPIFFSを使ったらもっと簡単にできるのでは無いか?
そう考えて試したところ、出来ました!ということで、そのやり方をこの記事では紹介します。
SPIFFSとは
SPIFFSはESP32のファイルシステムで、mp3データ、txtファイル、jpgなどをESP32に格納、読み込み、書き込みが可能です。このファイルシステムの特徴は自分の書いたプログラムから読み込み、書き込みができるというところにあります。自分のイメージでは高性能なEEPROMって感じですかね。
Arduinoで使う場合、プラグインがあるのでこちらを活用するのが良いと思います。
このSPIFFSを使って、証明書を読み込ませて接続をします。
書き込む際の注意
AWS IoTの証明書を書き込む際、DLしたファイルをそのまま書き込もうとするとエラーになります!!
これはSPIFFSがファイル名の長さに制約を持たせているためで、32byteまでの長さしか許されていません。
そのためDLしたファイル名は長すぎて書き込みエラーになってしまします。
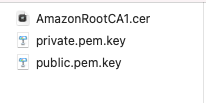
画像はあまりいい例ではありませんが、こんな感じでリネームを行ってください。

読み込みする
このコードはAWS IoTのMQTTのサンプルを参考に作っています。
まずはそちらで動きを見てもらい、それから応用する形でこのコードをマージしていくのが良いと考えます。
AWS IoTのMQTTに接続するシステムは
・WiFiClientSecure
・PubSubClient
ライブラリを活用し開発しました。
それでは、必要なコードの説明を行なっていきます
説明はコメントとして記載しています。
//変数の用意
char rootCA[2000];
char certificate[2000];
char privateKey[2000];

//変数が準備できたら、データの読み込みから格納をしたらOK
//セットアップのタイミングで、読み込みから格納を行います。
//初期設定を入力する
void setupAWS() {


  //  Serial.println("write ca");
  readFile(SPIFFS, "/", "AmazonRootCA1.cer", 0); //含まれているものを探して、書き込む
  readFile(SPIFFS, "/", "certificate.pem.crt", 1);
  readFile(SPIFFS, "/", "private.pem.key", 2);

  const char* root = rootCA;
  const char* cer = certificate;
  const char* priv = privateKey;

  // Configure WiFiClientSecure to use the AWS IoT device credentials
  net.setCACert(root);
  net.setCertificate(cer);
  net.setPrivateKey(priv);

  // Connect to the MQTT broker on the AWS endpoint we defined earlier
  mqttClient.setServer(endpoint, port);

  // Create a message handler
  mqttClient.setCallback(mqttCallback);//ここでsubscribeが受け取るれる

  Serial.println("AWS initial settings are completed!");

}
実はこれだけでOK.とても簡単ですね。
readFileが今回肝になっているので、こちら少し説明をします。
void readFile(fs::FS &fs, const char * dirname, String path , int num) {

  String targetString;
  char* result = "no data";
  File root = fs.open(dirname);//どのディレクションを開くか
  File file = root.openNextFile();
  while (file) {//ここでファイル名を検索、違っていれば次のを拾いにいく。
    String res = file.name();
    if (res.indexOf(path) != -1) {
      targetString = res;
      break;
    }
    file = root.openNextFile();
  }

  //エラーハンドリング
  if (targetString == "") {
    Serial.print("path error ");
    return;
  }
//  Serial.print("Reading file : ");
//  Serial.println(targetString);
  //ファイル名を生成する
  targetString = "/" + targetString;

  File targetFiles = fs.open(targetString);
  if (!file || file.isDirectory()) {
    Serial.println("- failed to open file for reading");
    return;
  }

  int i = 0;
  while (file.available()) {
    //    Serial.write(file.read());
    switch (num) {
      case 0:
        rootCA[i] = file.read();
        break;
      case 1:
        certificate[i] = file.read();
        break;
      case 2:
        privateKey[i] = file.read();
        break;
    }
    i++;
  }

  file.close();
  return;
}
さいごに
ファイル拡張しが違うので、もしかしたらできないかもと思っていたのですが、ESP32は普通にファイルを読み込みしてくれて、問題なく使うことができました。自動化により証明書のコピペエラーもなくなります。
参考にしていただければ幸いです。