Microsoft AzureのFace APIを使ってSinatraでWeb上で画像を渡して顔認証をやってもらいたいと思います。
顔の検出とか一致度とか色々出来るのでちょっと使ってみます。
準備
Microsoft AzureのFace APIを使います。
公式のガイドを参考に進めていきます。
登録を済ませた状態からはじめましょう。
キーとエンドポイントを準備しましょう。
こんな画面が出ていればOK。
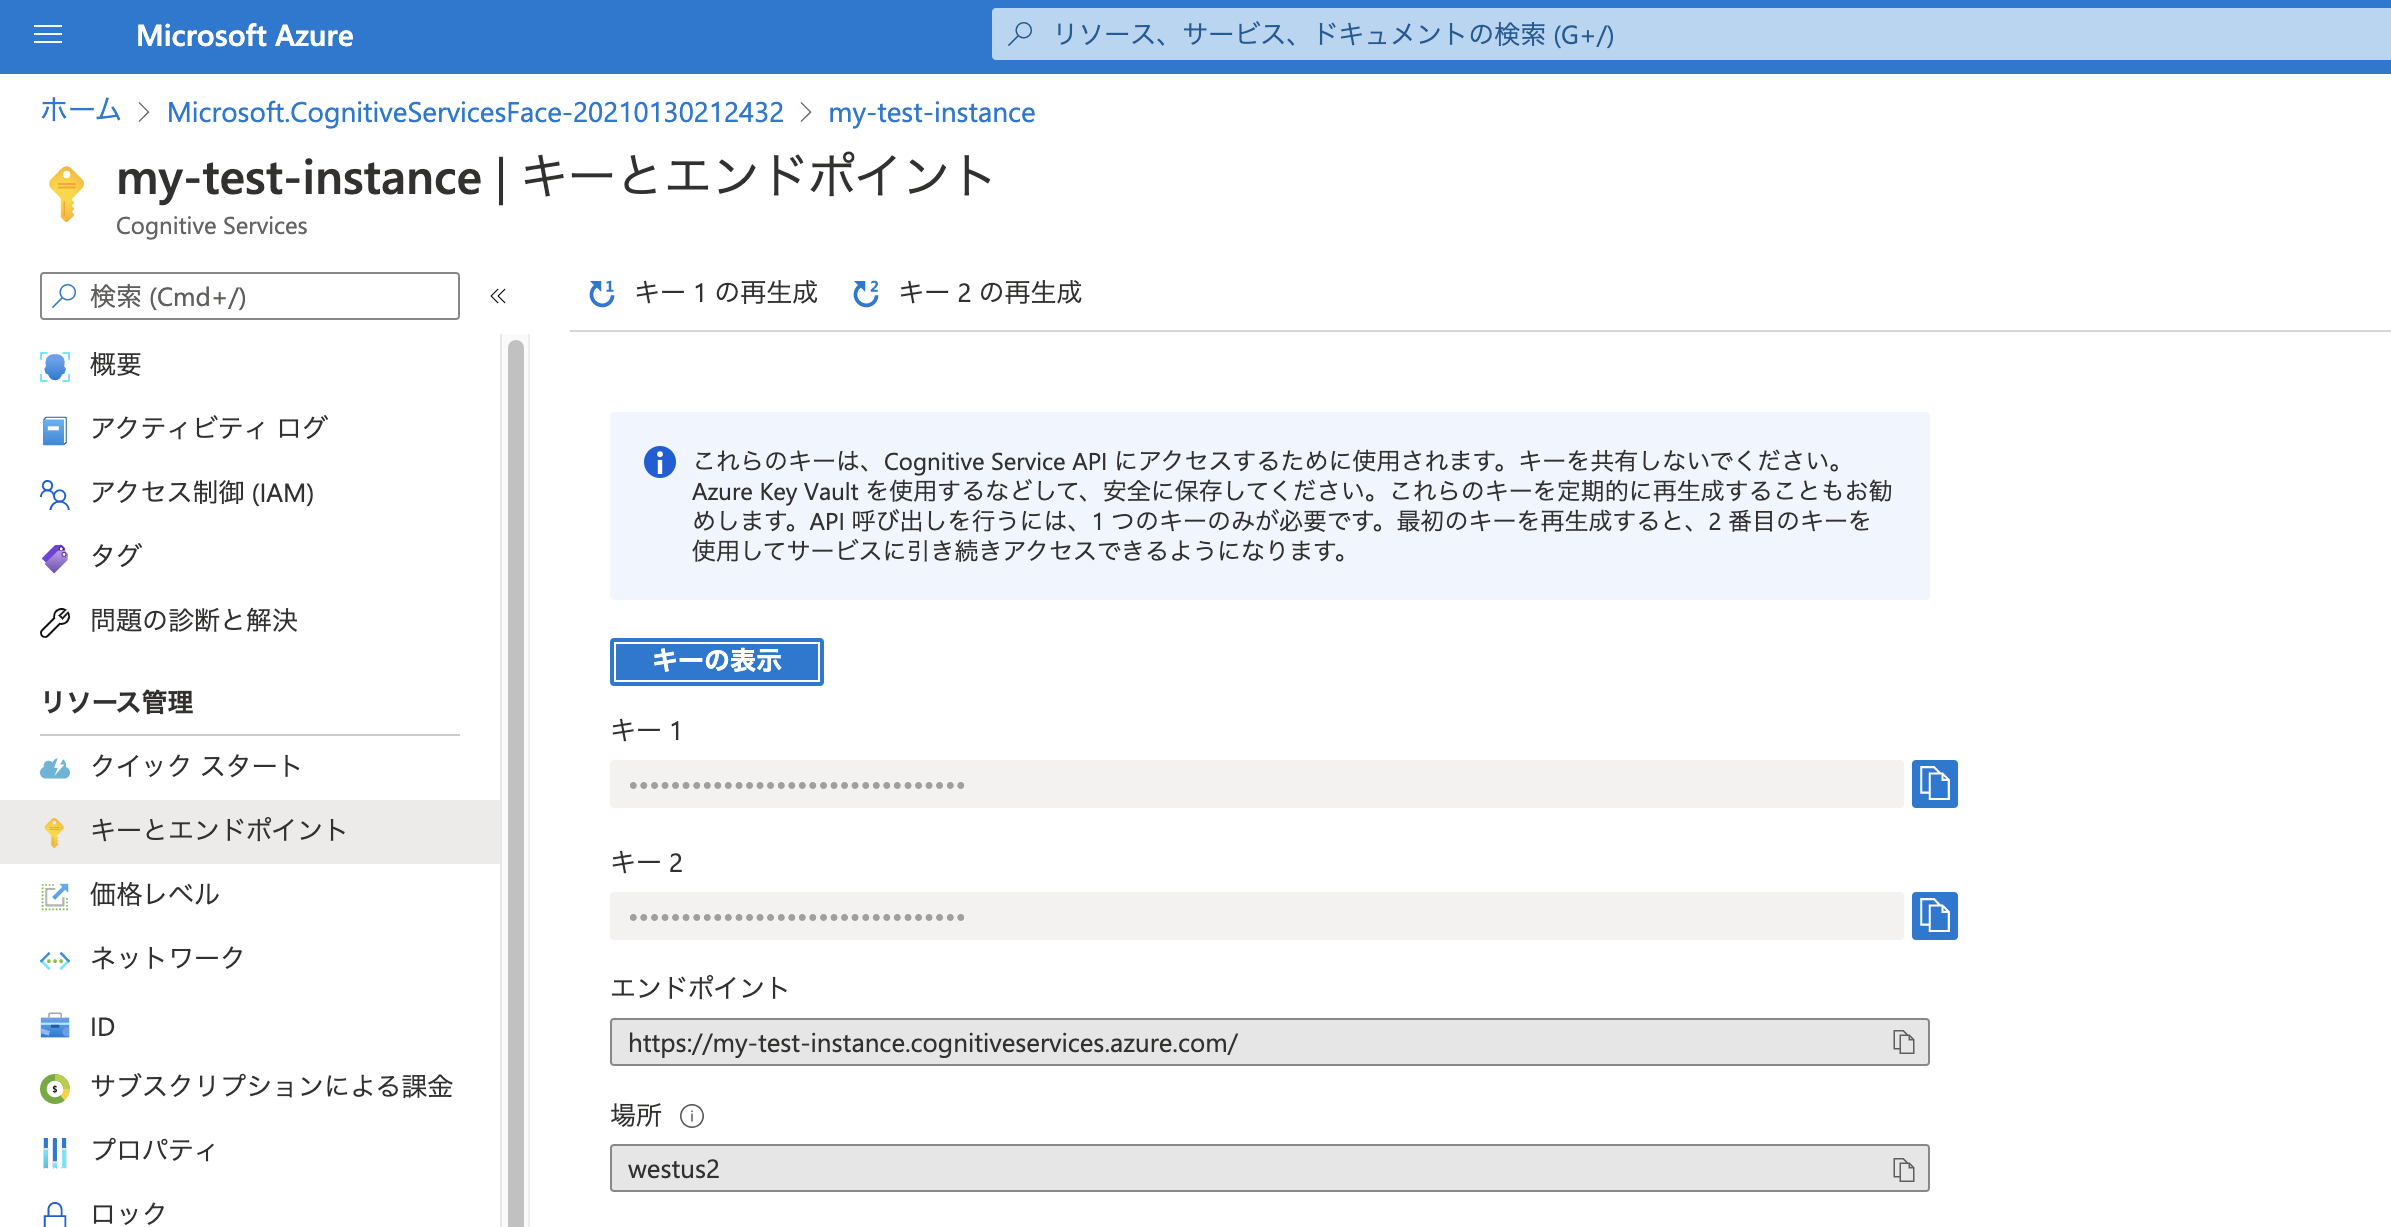
キー1とエンドポイントをコピーしておきましょう。
動くか確認
ターミナルでまず動作確認しましょう。
REST APIなのでコマンド叩けば意外と簡単に動かせちゃうのがいいですね。
curl -H "Ocp-Apim-Subscription-Key: 自分のキー" "自分のエンドポイント/face/v1.0/detect?detectionModel=detection_02&returnFaceId=true&returnFaceLandmarks=false" -H "Content-Type: application/json" --data-ascii "{\"url\":\"https://upload.wikimedia.org/wikipedia/commons/c/c3/RH_Louise_Lillian_Gish.jpg\"}"
コマンドの最後の方に渡されているWikipediaから引っ張ってきた画像が検出に使われてます。
実行結果としては、以下のようになるはずです。
[
  {
    "faceId": "49d55c17-e018-4a42-ba7b-8cbbdfae7c6f",
    "faceRectangle": {
      "top": 131,
      "left": 177,
      "width": 162,
      "height": 162
    }
  }
]
渡す画像を複数人の画像で試したいのでPeopleで検索して一番始めの画像で試してみます。
18人写ってます。
結果としてはこうなりました。
[ { "faceId":"48405c3d-f26d-4145-9f00-a3a4f8115935","faceRectangle": {"top":951,"left":1410,"width":244,"height":375}},
   {"faceId":"504c7c15-5e96-4c0c-bccb-c45a7c09aca0","faceRectangle":{"top":954,"left":385,"width":244,"height":360}},
   {"faceId":"007faff1-499d-4424-b09b-bb5dd8ddf4f1","faceRectangle":{"top":964,"left":729,"width":239,"height":346}},
   {"faceId":"6dd4e7d1-4e81-4f7b-a5c1-46f5f540d88d","faceRectangle":{"top":65,"left":1419,"width":246,"height":333}},
   {"faceId":"9fcf6d6d-5f53-4a01-940a-81ec281f6f77","faceRectangle":{"top":525,"left":382,"width":239,"height":340}},
   {"faceId":"4d6ed878-84df-4373-8e6b-3276a9695c2f","faceRectangle":{"top":41,"left":1765,"width":245,"height":331}},
   {"faceId":"c0675777-5215-41a2-abbb-a1ff02e6df56","faceRectangle":{"top":521,"left":1080,"width":235,"height":330}},
   {"faceId":"2f512e8d-2cf7-4186-896f-abba1f765949","faceRectangle":{"top":60,"left":399,"width":230,"height":322}},
   {"faceId":"e1ac1974-a318-4241-b71c-6ee23c5954ea","faceRectangle":{"top":66,"left":52,"width":236,"height":311}},
   {"faceId":"962a9f05-4629-4f74-92be-9d5869694ede","faceRectangle":{"top":527,"left":745,"width":230,"height":318}},
   {"faceId":"54568737-5f5c-4459-8781-b9bcf2c4293c","faceRectangle":{"top":987,"left":53,"width":232,"height":313}},
   {"faceId":"a4222801-f8d5-48aa-b8b5-3e0671af853d","faceRectangle":{"top":536,"left":56,"width":232,"height":302}},
   {"faceId":"475637de-e666-4d9d-98a4-df2b29b8afb6","faceRectangle":{"top":529,"left":1427,"width":233,"height":297}},
   {"faceId":"a7271d78-7ffc-4073-bcf0-205d1d68a35e","faceRectangle":{"top":94,"left":747,"width":235,"height":294}},
   {"faceId":"f29b20f1-d07f-4896-a009-96ecf046eafd","faceRectangle":{"top":65,"left":1088,"width":225,"height":298}},
   {"faceId":"cecc6fc2-e377-4576-b7cb-f6697059640c","faceRectangle":{"top":531,"left":1768,"width":221,"height":303}},
   {"faceId":"0ca58b06-8ad6-43a0-920e-721b93919eb0","faceRectangle":{"top":1003,"left":1765,"width":231,"height":288}},
   {"faceId":"628fc301-f2e4-4acc-8585-737f43cf0a15","faceRectangle":{"top":971,"left":1089,"width":211,"height":302}}]
ちゃんと18人分検出されているので安心して複数人にも使えそうです。
# Sinatraで実装
Post処理を書く
post '/analyze' do
  # 仮の画像
  img_url = "https://static01.nyt.com/images/2019/10/02/video/02-still-for-america-room-loop/02-still-for-america-room-loop-superJumbo.jpg"
  # Cloudinaryに画像をアップ
  if params[:file]
    puts params[:file]
    img = params[:file]
    tempfile = img[:tempfile]
    upload = Cloudinary::Uploader.upload(tempfile.path)
    img_url = upload['url']
  end

  # Face API 画像解析
  uri = URI.parse("自分のエンドポイント/face/v1.0/detect")
  http = Net::HTTP.new(uri.host, uri.port)
  http.use_ssl = uri.scheme === "https"
  params = {
    "detectionModel" => "detection_02",
    "returnFaceId" => "true",
    "returnFaceLandmarks" => "false",
    "url" => img_url
  }
  headers = {
    "Content-Type" => "application/json",
    "Ocp-Apim-Subscription-Key" => "自分のキー"
  }

  # 結果
  res = http.post(uri.path, params.to_json, headers)
  json JSON.parse(res.body)
end
説明
フォームで自分のPC上の画像も解析させたいのでCloudinaryというクラウドサービスを使って、画像をアップロードし、アップロード先のURLをFace APIに渡します。
Cloudinaryの実装は省略します。
顔の検出ということでパラメータの設定と、ヘッダーに自分のキーを渡すことで形を整えて処理を渡しています。
顔の検出以外をするときは、このパラメータを調整したりすることになります。
画面実装
とりあえずフォームを用意します。
<body>
  <div class="container">
    <h1>FACE APIで写真を解析</h1>
    <form action="/analyze" class="analyze" id="form">
      <label for="file">解析する画像を選択してください</label>
      <input type="file" name="file" accept="image/png, image/jpeg" onchange="previewImage(this);">
      <input type="submit" value="解析">
    </form>
    <h2>解析結果</h2>
    <div class="container">
      <canvas id="board" width='600' height='600'></canvas>
      <div class="result">
        <p>解析結果がありません</p>
      </div>
    </div>
  </div>
</body>
画面
こんな見た目になっていたらOK
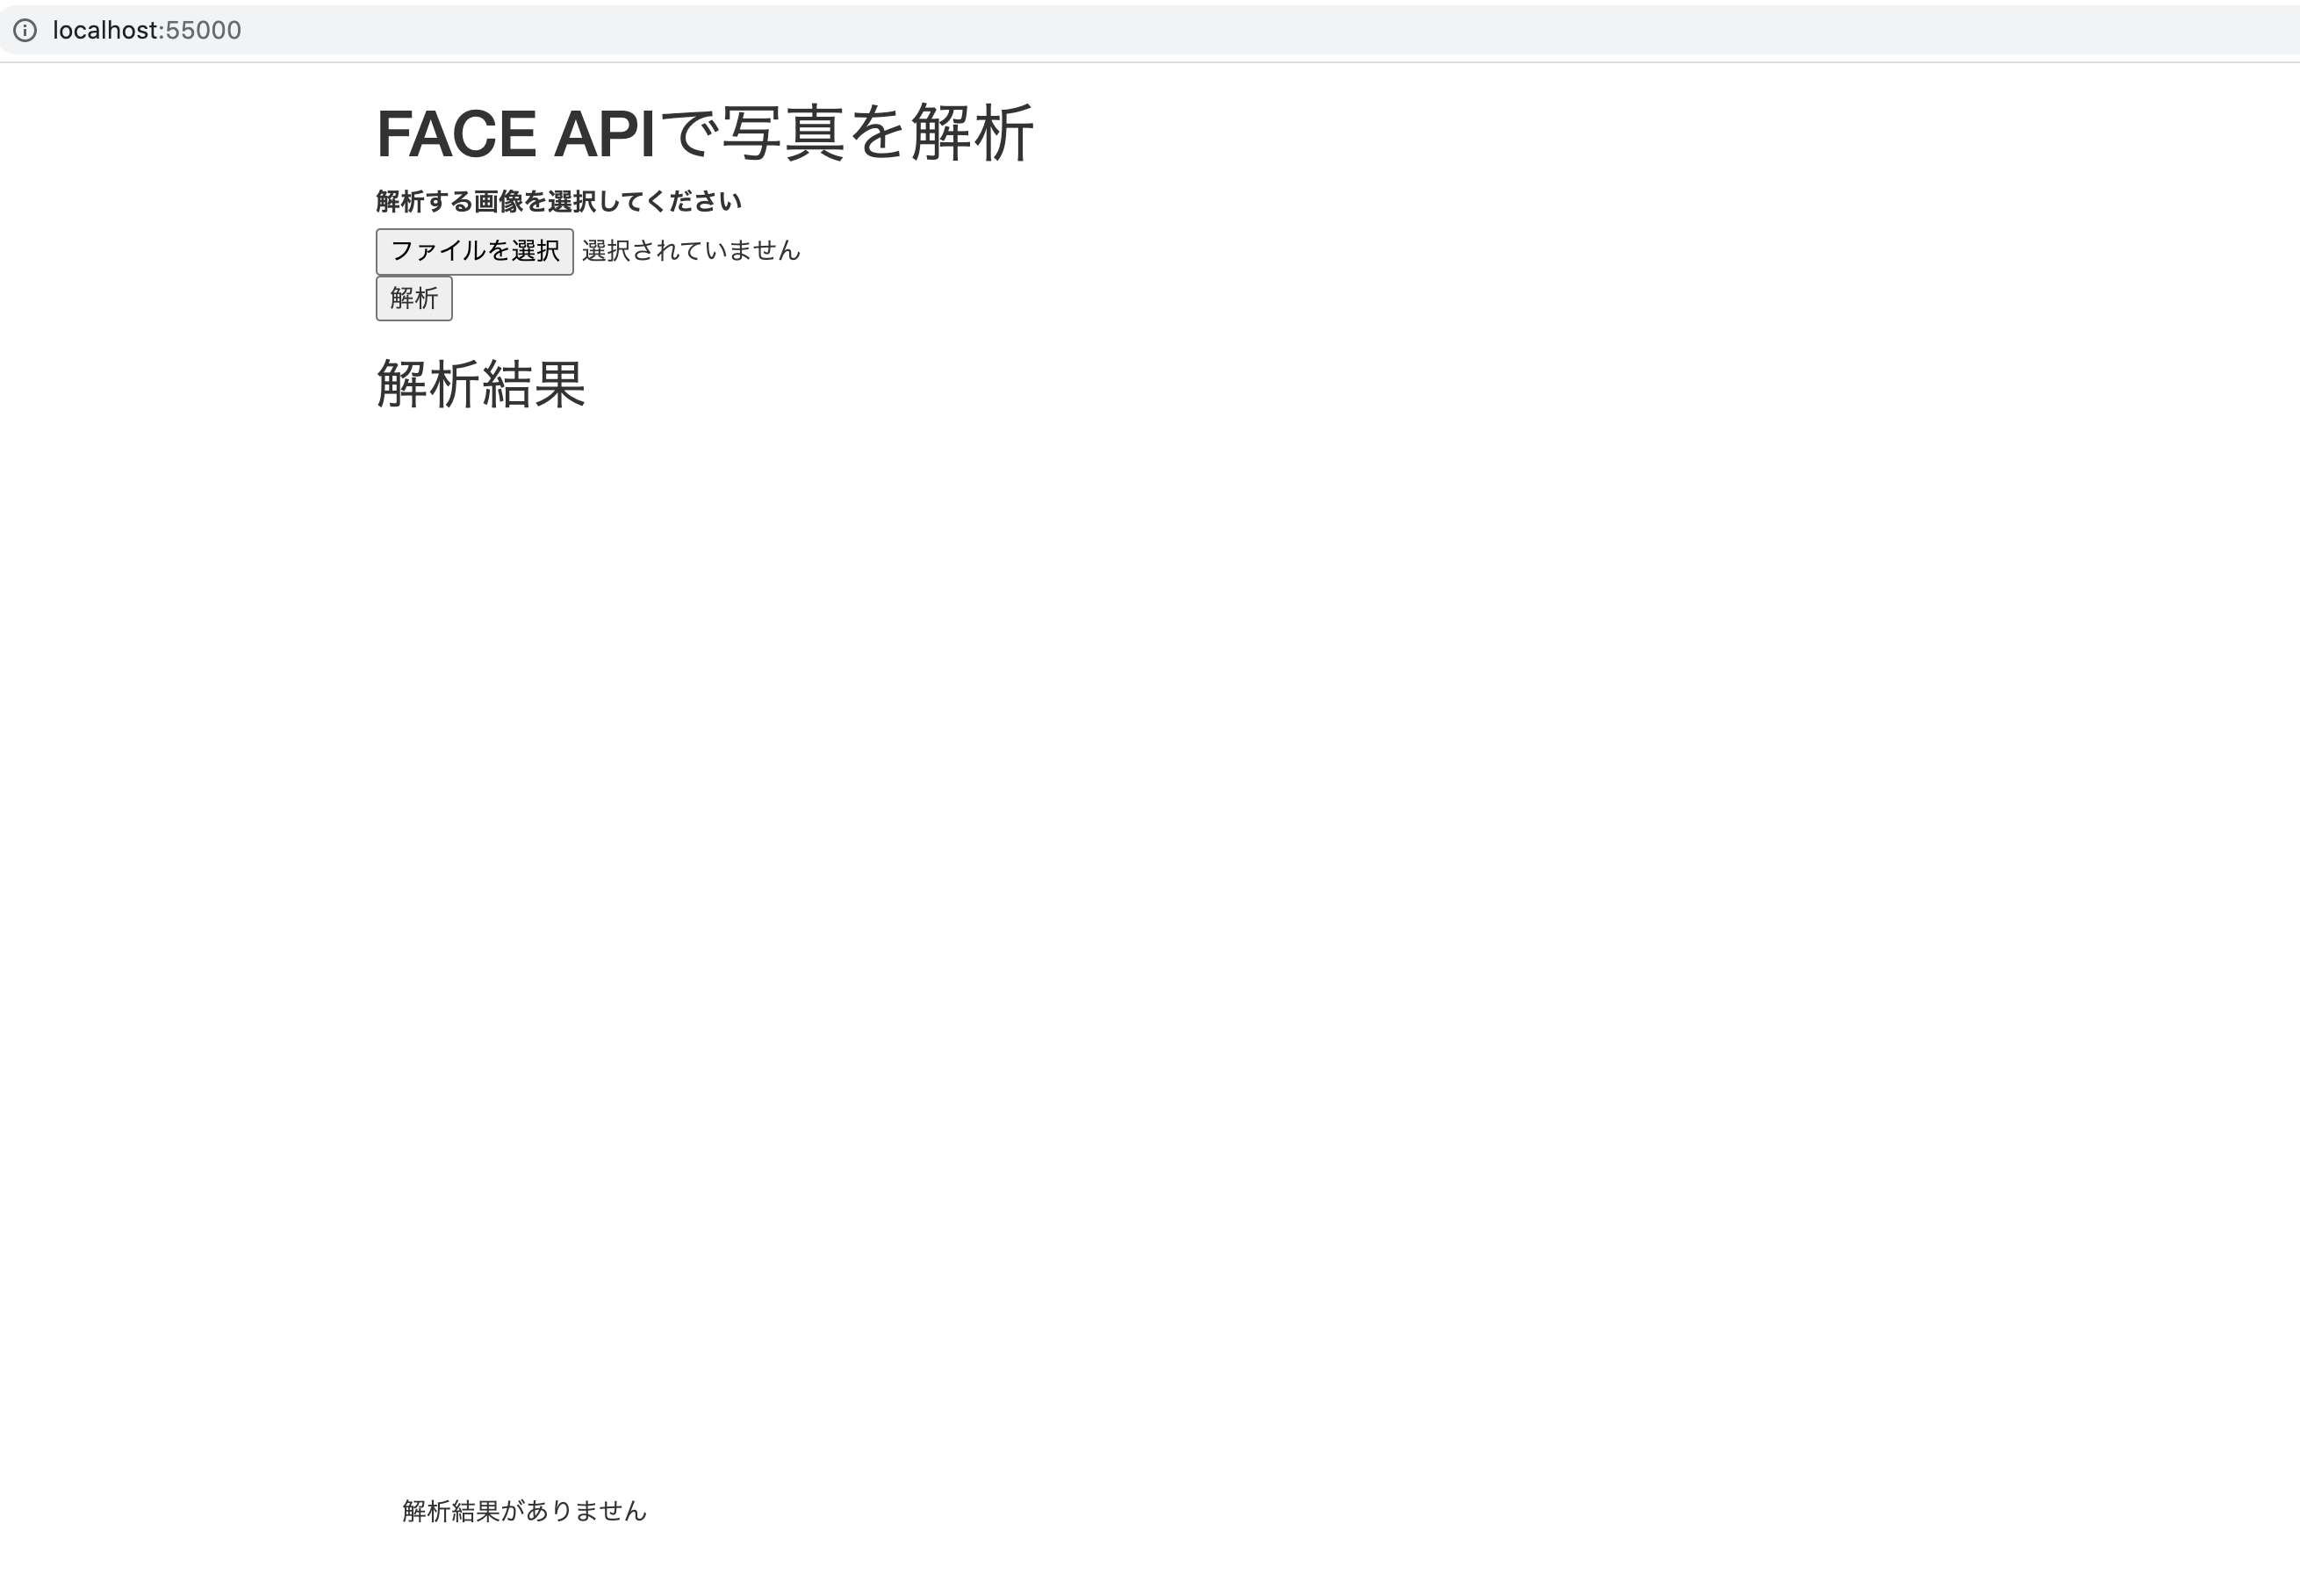
説明
画像を渡すフォームが前半部分です。
後半は結果を受け取る用に枠を用意しておきました。
結果受け取り
今の状態でとりあえずJSONは受け取れますが、ビジュアル的にわかりやすくしたいので検出された顔の位置を写真上に示せるようにしたいと思います。
JavaScriptで実装します。
<script>
var ctx;
document.body.onload = function(){
  ctx = $("#board").get(0).getContext('2d');
}
function previewImage(obj){
	var fileReader = new FileReader();
	fileReader.onload = (function() {
		var canvas = $("#board").get(0);
		var ctx = canvas.getContext('2d');
		var image = new Image();
		image.src = fileReader.result;
		image.onload = (function () {
			canvas.width = image.width;
			canvas.height = image.height;
			ctx.drawImage(image, 0, 0);
		});
	});
	fileReader.readAsDataURL(obj.files[0]);
}
$(".analyze").submit(function(){
  $(".result").empty();
  $("#board").empty();

  var fd = new FormData($("#form").get(0));
  $.ajax({
    url: "/analyze",
    method: "POST",
    data: fd,
    processData: false,
    contentType: false,
    dataType: "json"
  })
  .done(function(result){
    var img = new Image();
    if(result.length){
        for(i in result){
          var rectangle = result[i]["faceRectangle"];
          ctx.strokeRect(rectangle["left"], rectangle["top"], rectangle["width"], rectangle["height"]);
        }
    }else{
      $(".result").text("解析結果がありません");
    }
  });
  return false;
});
</script>
説明
やっていることは2つです。
フォームで画像を選択したときにその画像を表示するpreviewImage()
<input type="file" name="file" accept="image/png, image/jpeg" onchange="previewImage(this);">
ここで画像選択がされたときをpreviewImage()が実行されます。
描画先は<canvas id="board" width='600' height='600'></canvas>です。
渡した画像が元のサイズのまま表示されることに気をつけてサイズを調整しましょう。
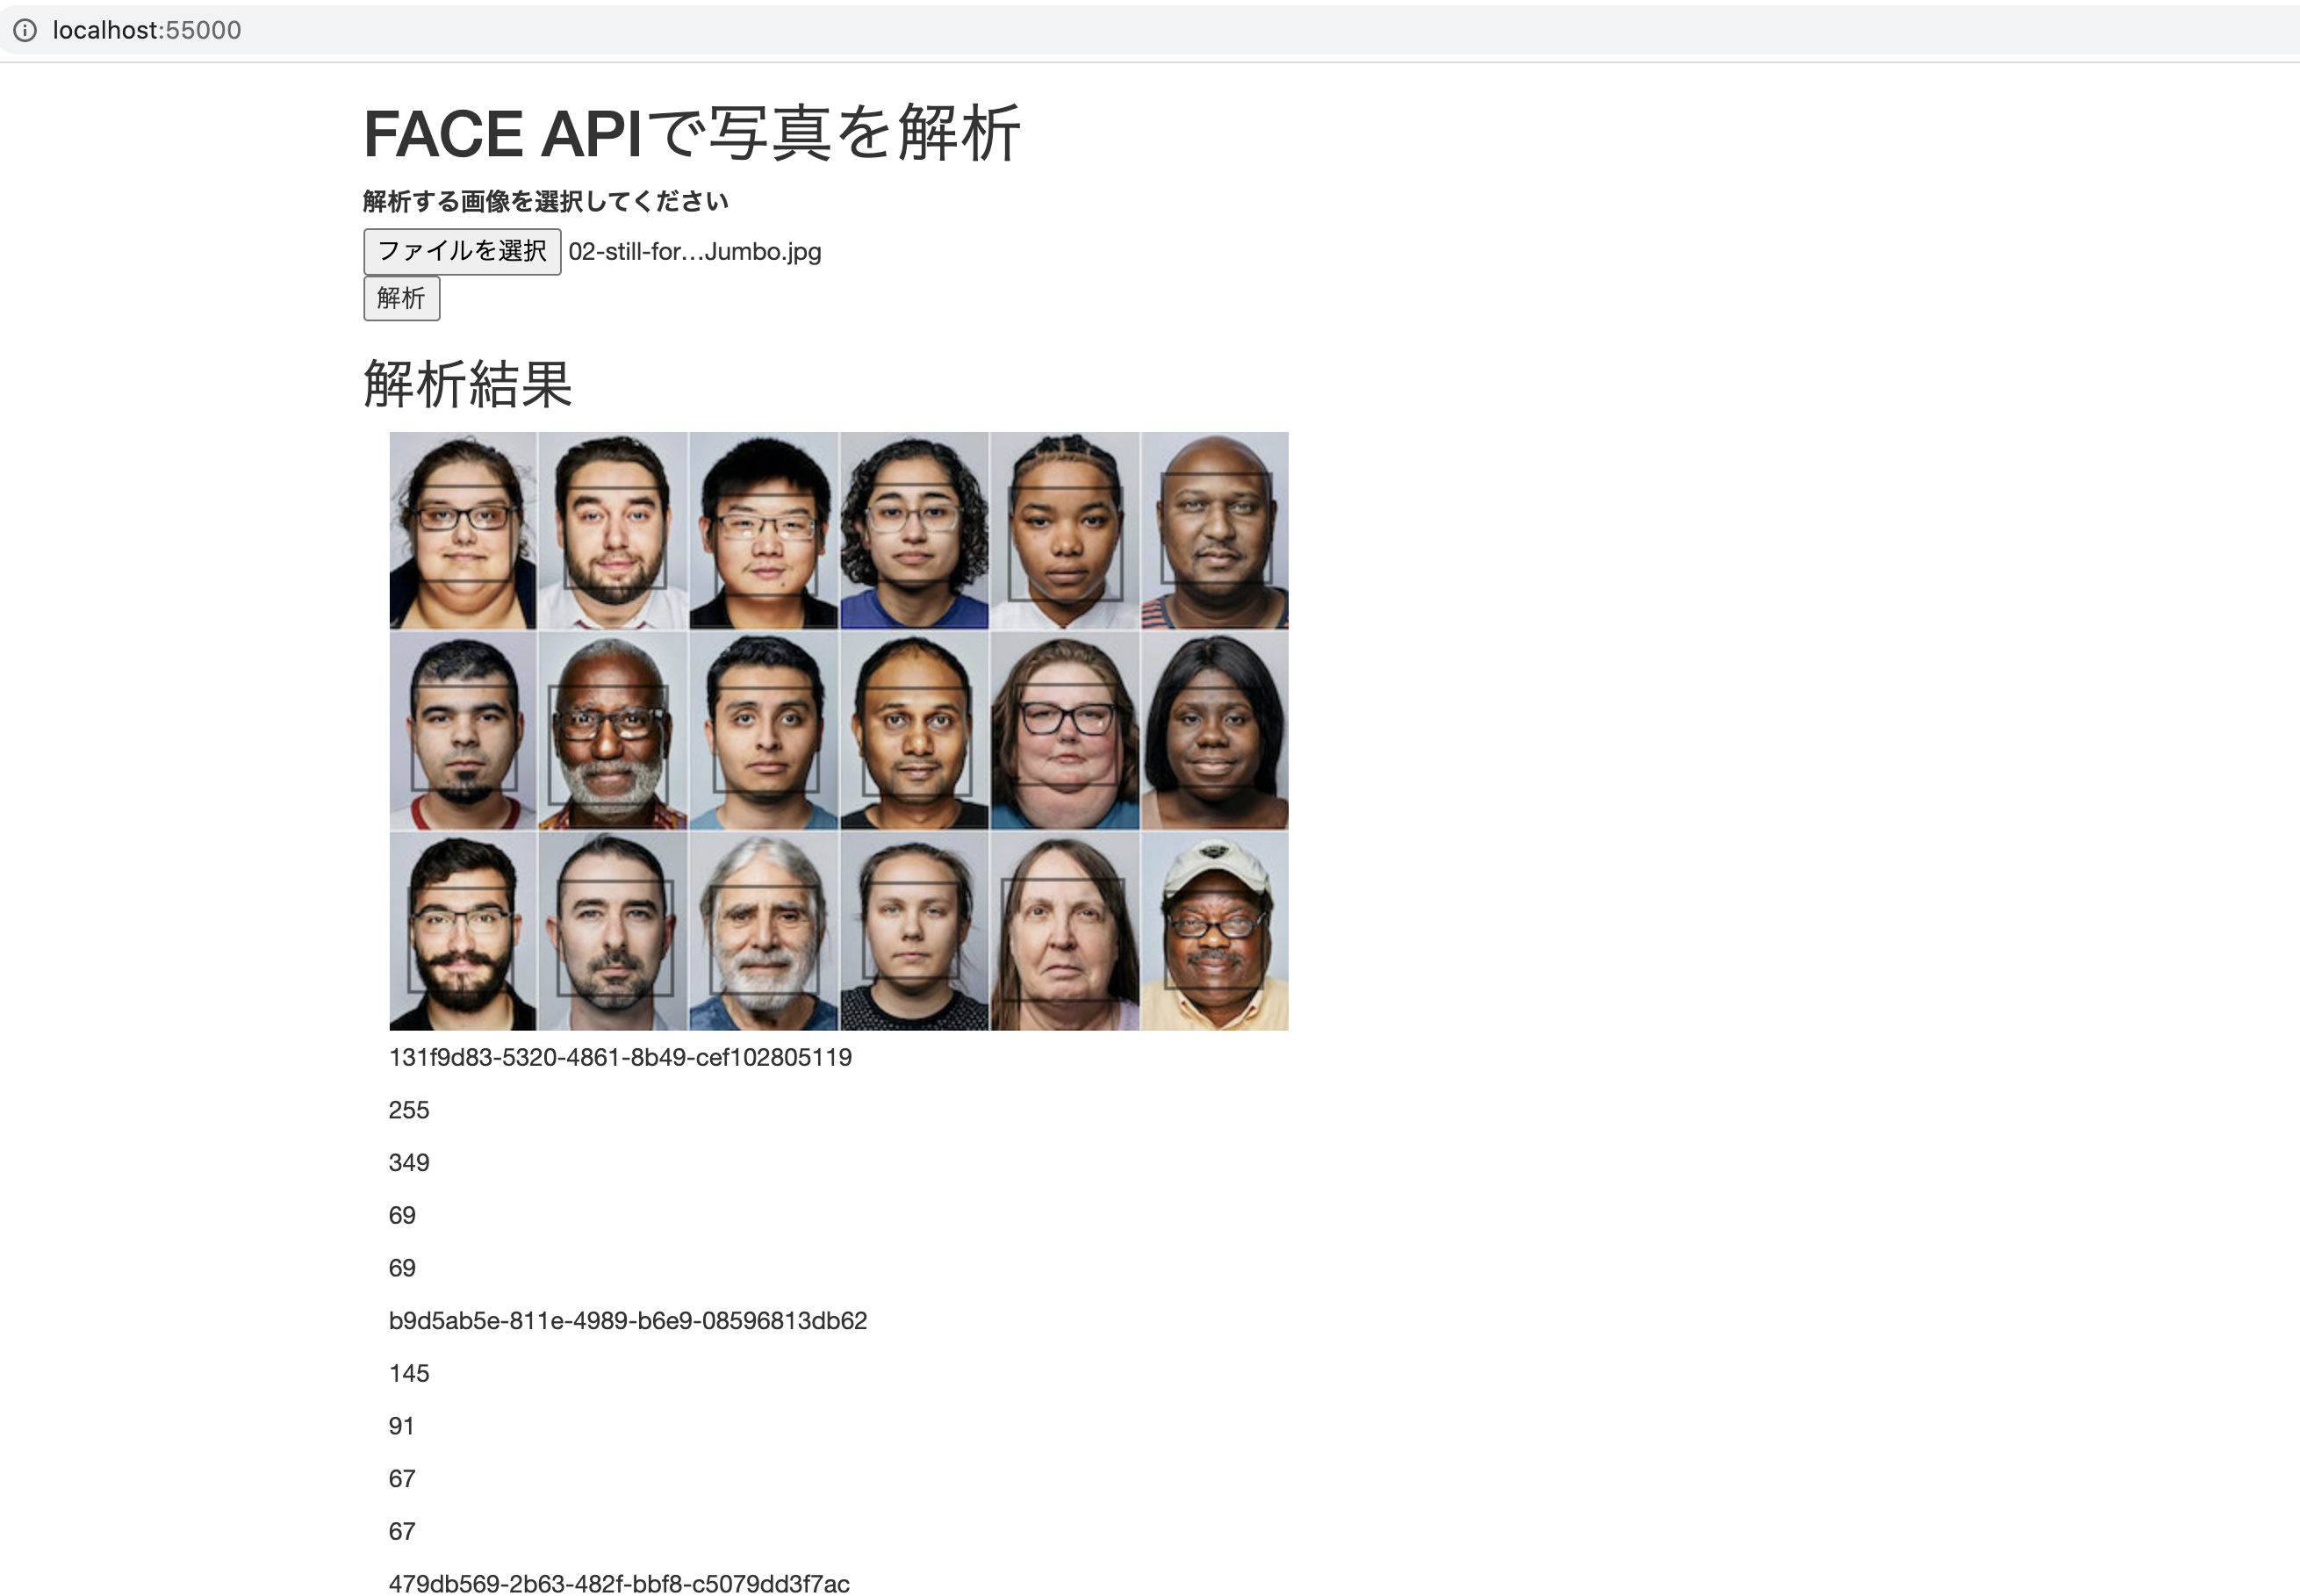
検出結果を受け取り顔の位置を描画する機能。
上で表示した画像に重ねて顔の位置に長方形を描画します。
肝となっているのはここです。
for(i in result){ var rectangle = result[i]["faceRectangle"]; ctx.strokeRect(rectangle["left"], rectangle["top"], rectangle["width"], rectangle["height"]); }
検出結果はJSON形式で帰ってくるので、その形に気をつけましょう。
実行結果
終わり
Face API自体はすごく使いやすく感じました。
Azureも無料で使える分があるので遊んでみるのに最適ですね。