tableタグのレスポンシブ対応は毎度工夫が必要だと感じています。
何度かtableのレスポンシブ対応例は投稿しているので、もしよろしければ他の記事もご覧ください。
今回は、料金表のような比較表をスマホサイズでも横スクロールなしで表示する事例を紹介いたします。
仕様と表示例
まずは完成イメージです。
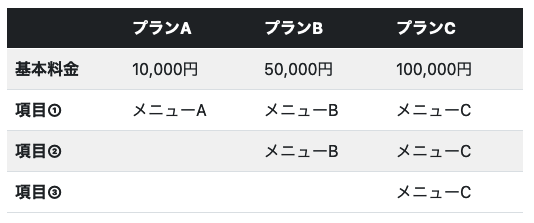
以下がPCモニターでの表示イメージです。
プラン別の料金比較表を想定しています。
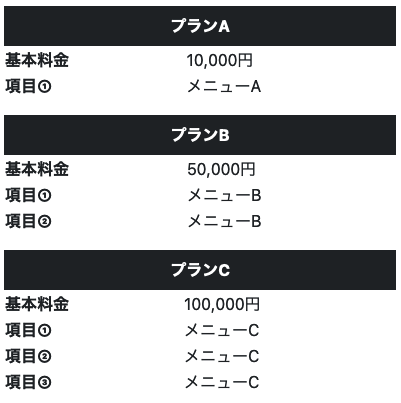
次にSPモニターでの表示イメージです。
- PCは横並び/SPは縦並び
- SPは非対応の項目(空白のセル)は表示しない
という仕様になります。
項目数が多かったりテキスト量が多いケースでは、こちらの方がすっきりして見やすいかもしれません。
実装
HTML
html側にはPC用の横並び表しか記述しません。
SP用のコードはJavaScriptで動的に挿入します。
そのため、SP用tableを挿入する箇所をID指定する必要があります。
<!-- bootstrapのclass名を記入していますが、class名は任意です -->
<table class="table table-striped">
    <thead class="table-dark">
        <tr>
            <th></th>
            <th>プランA</th>
            <th>プランB</th>
            <th>プランC</th>
        </tr>
    </thead>
    <tbody>
        <tr>
            <th>基本料金</th>
            <td>10,000円</td>
            <td>50,000円</td>
            <td>100,000円</td>
        </tr>

        <tr>
            <th>項目①</th>
            <td>メニューA</td>
            <td>メニューB</td>
            <td>メニューC</td>
        </tr>

        <tr>
            <th>項目②</th>
            <td></td>
            <td>メニューB</td>
            <td>メニューC</td>
        </tr>

        <tr>
            <th>項目③</th>
            <td></td>
            <td></td>
            <td>メニューC</td>
        </tr>
    </tbody>
</table>

<!-- SP用tableを挿入する箇所 -->
<div id="resTable"></div>
PC用tableの<thead>からプラン名を、<tbody>内<td>からテキストをそれぞれ取得するので、各タグは省略せず記述してください。
JavaScript
.tableというclass名はHTMLの<table>に指定したclass名に書き換えてください。
const resTable = document.getElementById('resTable'); // tableを挿入するdivを指定
const arrayMenu = [];

// 項目名を取得し配列に追加
document.querySelectorAll('.table > tbody > tr').forEach(function(menuName, index) {
  arrayMenu.push(menuName.children[0].innerHTML);
});

// 各プランの処理
document.querySelectorAll('.table > thead th').forEach(function(planName, index) {

  if (index > 0) { // 空白セルを無視

    const planTableSP = document.createElement('table');
    planTableSP.classList.add('table', 'table-striped'); // tableに追加するclass名。不要なら無しでOK

    const planClass = planName.getAttribute('class');

    // プラン名を挿入
    const tHead = document.createElement('thead');
    const tRow = document.createElement('tr');
    const thCell = document.createElement('th');

    tHead.classList.add('table-dark'); // 「プラン名」の<thead>に追加するclass名。不要なら無しでOK
    thCell.setAttribute('colspan', '2');
    thCell.classList.add(planClass, 'text-center'); // 「プラン名」の<th>に追加するclass名。不要なら無しでOK
    thCell.innerHTML = planName.innerHTML;
    tRow.appendChild(thCell);
    tHead.appendChild(tRow);
    planTableSP.appendChild(tHead);

    // tbody生成
    const tBody = document.createElement('tbody');

    // 各項目の処理
    document.querySelectorAll('.table > tbody > tr').forEach(function(row, rowIndex) {

      const menuRow = document.createElement('tr'); // tr生成
      const menuCell = document.createElement('th'); // th生成
      menuCell.innerHTML = arrayMenu[rowIndex];

      // 空白の項目は無視
      if (row.children[index].textContent !== '') {

        const menuContent = document.createElement('td'); // td生成
        menuContent.innerHTML = row.children[index].innerHTML;

        // trにth/tdを追加
        menuRow.appendChild(menuCell);
        menuRow.appendChild(menuContent);

        // tableにtrを追加
        planTableSP.appendChild(menuRow);
      } // if

    }); // forEach

    // 指定divに生成したtableを挿入
    resTable.appendChild(planTableSP);

  } // if

});
これでページを表示すると、元のPC用tableの下に動的に追加されたSP用のtableも表示されているのを確認できると思います。
あとは端末別に適切に表示すればいいので、JavaScriptなりCSSなりで対応しましょう。
力技ではありますが、ユーザーに適切に情報を届けることが優先されるべきなので、必ずしもCSSだけでレスポンシブ対応する必要は無いと思っています。
何かの参考になりましたら幸いです。

