dlibベースの顔照合が公開されている
https://github.com/ageitgey/face_recognition
setup.cfg によると1.4.0 のバージョンである。
PyPI のは、
face-recognition 1.3.0 Last released: 2020年2月20日
であり、バージョンが少し古い。
PyPIにあるProject Descriptionを和訳すると
「Face Recognition Pythonやコマンドラインから顔を認識して操作する世界で最も単純な顔認識ライブラリです。dlibの最先端の顔認識を使用して深層学習で構築されています。 モデルの精度はLabeled Faces in the Wild benchmark で99.38%です。このライブラリはまた簡単なコマンドラインツールを提供しており、画像フォルダの顔認識をコマンドラインから行うことができます。」
リポジトリには、日本語のREADMEが用意されている。
https://github.com/ageitgey/face_recognition/blob/master/README_Japanese.md
Install
https://github.com/ageitgey/face_recognition#installation
に書かれているとおりです。
公式にはサポートされてないけど、windowsでも動くよということが書かれています。
python3.x
face_recognition コマンド
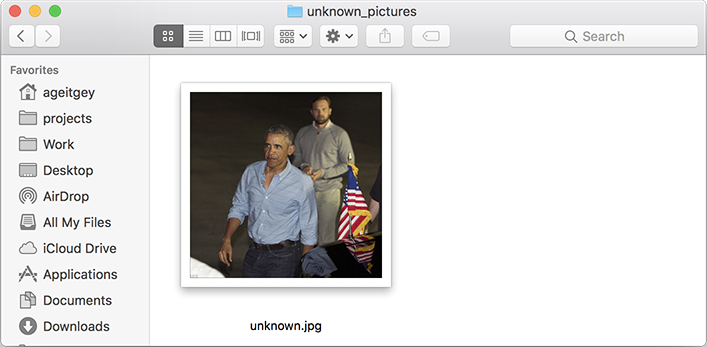
顔を知っている画像と、これから照合する画像とが置かれたそれぞれのディレクトリとを指定します。
引数に指定されているディレクトリとその中の画像は各自が用意します。
$ which face_recognition
/usr/local/bin/face_recognition
$
$ face_recognition ./pictures_of_people_i_know/ ./unknown_pictures/
face_recognition をコマンドとして実行しているときは、face_recognition/cli.py が動作しています。
そのスクリプトを読むと、表示させる許容度の数値を設定したり、
次のように画像間の距離(少ないほど一致がよい)を表示のon/offを切り替えられるようになっているのがわかります。
./pictures_of_people_i_know/のディレクトリには、名前のわかっている人の画像が複数与えられています。人名.拡張子になっています。
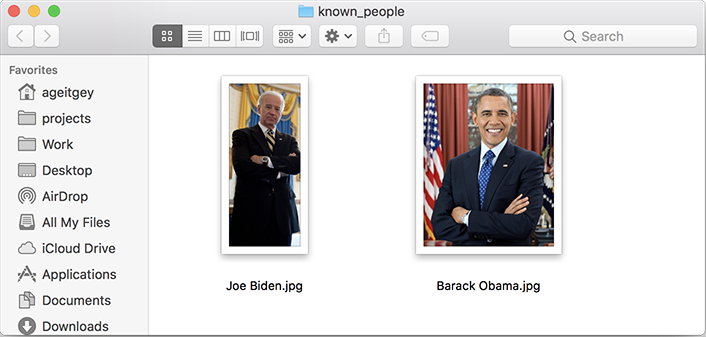
./unknown_pictures/ のディレクトリには、名前をこれから照合する画像のあるディレクトリを指定しています。
$ face_recognition --show-distance True --tolerance 0.5 ./pictures_of_people_i_know/ ./unknown_pictures/
Python Code Examples
https://github.com/ageitgey/face_recognition#python-code-examples
githubに書かれていることと、pythonスクリプトのコードを読めば十分ですが、
ほんの少しだけメモを書いてみました。
benchmark.py
https://github.com/ageitgey/face_recognition/blob/master/examples/benchmark.py
処理速度の評価のスクリプトのようです。
動作例
$ python benchmark.py
Benchmarks (Note: All benchmarks are only using a single CPU core)
()
Timings at 240p:
 - Face locations: 0.0702s (14.25 fps)
 - Face landmarks: 0.0030s (336.65 fps)
 - Encode face (inc. landmarks): 0.0115s (86.89 fps)
 - End-to-end: 0.0821s (12.18 fps)
()
Timings at 480p:
 - Face locations: 0.2718s (3.68 fps)
 - Face landmarks: 0.0035s (282.09 fps)
 - Encode face (inc. landmarks): 0.0116s (86.22 fps)
 - End-to-end: 0.2849s (3.51 fps)
()
Timings at 720p:
 - Face locations: 0.6189s (1.62 fps)
 - Face landmarks: 0.0036s (278.20 fps)
 - Encode face (inc. landmarks): 0.0115s (87.29 fps)
 - End-to-end: 0.6248s (1.60 fps)
()
Timings at 1080p:
 - Face locations: 1.3821s (0.72 fps)
 - Face landmarks: 0.0035s (281.77 fps)
 - Encode face (inc. landmarks): 0.0117s (85.42 fps)
 - End-to-end: 1.3945s (0.72 fps)
()
$
この結果によれば、顔位置の検出にかかる時間が処理時間の大半を占めていることがわかります。
digital_makeup.py
python digital_makeup.py
顔に細工をした画像が表示されます。
眉毛を太くして
目の輪郭
唇を赤く塗った顔を表示します。
入力画像:"biden.jpg"
出力: pil_image.show()を使って表示されます。
face_distance.py
$ python face_distance.py
The test image has a distance of 0.35 from known image #0
- With a normal cutoff of 0.6, would the test image match the known image? True
- With a very strict cutoff of 0.5, would the test image match the known image? True
()
The test image has a distance of 0.79 from known image #1
- With a normal cutoff of 0.6, would the test image match the known image? False
- With a very strict cutoff of 0.5, would the test image match the known image? False
()
$
既知の顔画像 "obama.jpg"、"biden.jpg"
未知の顔画像 "obama2.jpg"
で、未知の顔画像が、既知の顔画像とどれくらい似ているかを判定しています。
似ているほどface_distanceが小さくなります。
facerec_from_video_file.py
動画入力での顔照合のスクリプトです。
入力ファイル: hamilton_clip.mp4
出力ファイル: output.avi
名前のわかっている顔画像
"lin-manuel-miranda.png"
"alex-lacamoire.png"
注意点:考え方を示すための簡単な実装になっていること。2よりも多い顔のときには、書き換える必要があることを示しています。
# If you had more than 2 faces, you could make this logic a lot prettier
# but I kept it simple for the demo
facerec_from_webcam.py
https://github.com/ageitgey/face_recognition/blob/master/examples/facerec_from_webcam.py
webカメラ画像の顔照合
登録済み顔画像:"obama.jpg" の一例です。
一致したときに:"Barack" と表示されます。
注意点:このスクリプトでは、顔画像間距離の一番小さいものを選んでいるわけではないことに注意してください。
あるしきい値の以下の顔画像間距離になったときにmatchというリストの要素にTrueという値を返し、そうでないときにFalseを返しています。
match = face_recognition.compare_faces([obama_face_encoding], face_encoding)
facerec_from_webcam_faster.py
webカメラ画像の顔照合
登録済み顔画像:"obama.jpg" の一例です。
一致したときに:"Barack" と表示されます。
画像を1/4に縮小していることで、検出にかかる時間を短くしています。
顔の検出と照合をしているフレームは2フレームに1回となっています。
いずれも、顔照合の考え方を示すためのコードです。ですから照合の登録顔画像が1名分しか用意されていません。
facerec_on_raspberry_pi.py
RaspberryPiへの専用カメラでの顔照合の結果を返すもののようです。
以下のライブラリを使うことで、
RaspberryPiのカメラを使っています。
ですから、USBカメラをcv2.VideoCaptureは使っていません。
import picamera

camera = picamera.PiCamera()
camera.resolution = (320, 240)

camera.capture(output, format="rgb")
find_faces_in_batches.py
https://github.com/ageitgey/face_recognition/blob/master/examples/find_faces_in_batches.py
NVidiaのGPUを使えるときに使うのがよいようです。
find_faces_in_picture.py
https://github.com/ageitgey/face_recognition/blob/master/examples/find_faces_in_picture.py
入力画像:"biden.jpg"
$ python find_faces_in_picture.py
I found 1 face(s) in this photograph.
A face is located at pixel location Top: 241, Left: 419, Bottom: 562, Right: 740
$
find_faces_in_picture_cnn.py
https://github.com/ageitgey/face_recognition/blob/master/examples/find_faces_in_picture_cnn.py
入力画像:"biden.jpg"
次の1行でCNNを使って顔検出の指定をしている。
face_locations = face_recognition.face_locations(image, number_of_times_to_upsample=0, model="cnn")
$ python find_faces_in_picture_cnn.py
I found 1 face(s) in this photograph.
A face is located at pixel location Top: 235, Left: 428, Bottom: 518, Right: 712
find_facial_features_in_picture.py
入力画像:"biden.jpg"
顔特徴点に白線を引いて表示させます。
$ python find_facial_features_in_picture.py
I found 1 face(s) in this photograph.
The chin in this face has the following points: [(429, 328), (426, 368), (424, 408), (425, 447), (437, 484), (460, 515), (490, 538), (524, 556), (562, 564), (600, 566), (630, 554), (655, 533), (672, 507), (684, 476), (694, 445), (702, 413), (707, 382)]
The left_eyebrow in this face has the following points: [(488, 294), (509, 279), (535, 278), (561, 283), (584, 296)]
The right_eyebrow in this face has the following points: [(622, 307), (646, 305), (670, 309), (691, 321), (698, 344)]
The nose_bridge in this face has the following points: [(601, 328), (599, 352), (598, 375), (596, 400)]
The nose_tip in this face has the following points: [(555, 414), (570, 421), (586, 428), (601, 428), (614, 426)]
The left_eye in this face has the following points: [(512, 320), (528, 316), (544, 319), (557, 331), (541, 330), (525, 327)]
The right_eye in this face has the following points: [(629, 348), (647, 342), (661, 346), (672, 357), (659, 358), (644, 354)]
The top_lip in this face has the following points: [(519, 459), (545, 455), (566, 456), (580, 462), (595, 462), (610, 470), (627, 480), (620, 477), (593, 470), (579, 468), (564, 463), (527, 459)]
The bottom_lip in this face has the following points: [(627, 480), (606, 482), (589, 479), (575, 477), (560, 473), (540, 468), (519, 459), (527, 459), (563, 461), (577, 466), (592, 468), (620, 477)]
recognize_faces_in_pictures.py
登録済み画像:"biden.jpg"、"obama.jpg"
未知の画像:"obama2.jpg"
未知の画像が出てきときに登録済みの画像と一致しているかを判定している。
$ python recognize_faces_in_pictures.py
Is the unknown face a picture of Biden? False
Is the unknown face a picture of Obama? True
Is the unknown face a new person that we've never seen before? False
web_service_example.py
準備作業
$ sudo pip install flask
サーバー側の操作
$ python web_service_example.py
 * Running on http://0.0.0.0:5001/ (Press CTRL+C to quit)
 * Restarting with stat
 * Debugger is active!
 * Debugger PIN: 123-745-511
127.0.0.1 - - [11/Nov/2017 21:16:10] "POST / HTTP/1.1" 200 -
クライアント側の操作
$ curl -F "file=@obama2.jpg" http://127.0.0.1:5001
{
  "face_found_in_image": true,
  "is_picture_of_obama": true
}
$
このwebサーバーの側では、obamaの画像の顔特徴量を128次元の数値データとして持っていて処理しています。
実際の処理をさせようと思うときは、複数の照合用データをもつように改変することです。
1人を認証するためのデータは128個のfloatのデータになっています。しかも、この数値からでは元の顔画像を復元することはできないものになっています。固有顔に展開した時の係数を使う認証方式の問題は、平均顔と固有顔データの一式がもし外部に知られたときには、元の顔画像を復元できてしまうという点です。
そのことが、
https://docs.opencv.org/3.3.0/da/d60/tutorial_face_main.html
中の次の画像に示されています。
https://docs.opencv.org/3.3.0/eigenface_reconstruction_opencv.png
We've already seen, that we can reconstruct a face from its lower dimensional approximation. So let's see how many Eigenfaces are needed for a good reconstruction. I'll do a subplot with 10,30,…,310 Eigenfaces:
10 Eigenvectors are obviously not sufficient for a good image reconstruction, 50 Eigenvectors may already be sufficient to encode important facial features. You'll get a good reconstruction with approximately 300 Eigenvectors for the AT&T Facedatabase. There are rule of thumbs how many Eigenfaces you should choose for a successful face recognition, but it heavily depends on the input data. [205] is the perfect point to start researching for this:
face_recognition のモジュールがどのようにdlibのライブラリを使っているのか、どのようなアルゴリズムを使っているのかは、今後調べたい。
https://github.com/ageitgey/face_recognition/blob/master/face_recognition/api.py
のコードの中でimport dlib
しているので、dlib. の部分をみつけると、どのようにdlibを使っているのかをたどることができます。
face_recognition_models.__file__
Out[9]: '/usr/local/lib/python2.7/dist-packages/face_recognition_models/__init__.pyc'

face_recognition_models.__author__
Out[10]: 'Adam Geitgey'
注意点
face_locations が
(top, right, bottom, left)
の順序であることが
OpenCVのRect型と違うことを意識すること。
def rectsToLocations(rects):
    """convert list of Rect to list of location.
    note: location is (long(top), long(right), long(bottom), long(left))
    """
    locations = []
    for x, y, w, h in rects:
        left = x
        right = x + w
        top = y
        bottom = y+h
        locations.append((long(top), long(right), long(bottom), long(left)))

    return locations
この顔照合のプログラムで気になる点は、
クラス内分散とクラス間分散のことを気にしていないことです。
クラス内分散は、同一のクラスに属するデータの中での分散です。
一方クラス間分散は、別のクラスに属するデータ間での分散です。
クラス内分散は、同一の人物が照明や、角度や、本人の表情などによって顔画像が変化することを含みます。
このような違いを考慮していない場合には、照明条件や顔向きが共通性の高いデータを一致のよい顔として選んでしまう可能性があります。
face_recognition.face_locations(image) がしていること。
cnn_face_detector()
face_detector()
とを引数で使い分けられるようにしている。
以下はAPI
batch_face_locations(images, number_of_times_to_upsample=1, batch_size=128)
    Returns an 2d array of bounding boxes of human faces in a image using the cnn face detector
    If you are using a GPU, this can give you much faster results since the GPU
    can process batches of images at once. If you aren't using a GPU, you don't need this function.

    :param img: A list of images (each as a numpy array)
    :param number_of_times_to_upsample: How many times to upsample the image looking for faces. Higher numbers find smaller faces.
    :param batch_size: How many images to include in each GPU processing batch.
    :return: A list of tuples of found face locations in css (top, right, bottom, left) order

compare_faces(known_face_encodings, face_encoding_to_check, tolerance=0.6)
    Compare a list of face encodings against a candidate encoding to see if they match.

    :param known_face_encodings: A list of known face encodings
    :param face_encoding_to_check: A single face encoding to compare against the list
    :param tolerance: How much distance between faces to consider it a match. Lower is more strict. 0.6 is typical best performance.
    :return: A list of True/False values indicating which known_face_encodings match the face encoding to check

face_distance(face_encodings, face_to_compare)
    Given a list of face encodings, compare them to a known face encoding and get a euclidean distance
    for each comparison face. The distance tells you how similar the faces are.

    :param faces: List of face encodings to compare
    :param face_to_compare: A face encoding to compare against
    :return: A numpy ndarray with the distance for each face in the same order as the 'faces' array

face_encodings(face_image, known_face_locations=None, num_jitters=1)
    Given an image, return the 128-dimension face encoding for each face in the image.

    :param face_image: The image that contains one or more faces
    :param known_face_locations: Optional - the bounding boxes of each face if you already know them.
    :param num_jitters: How many times to re-sample the face when calculating encoding. Higher is more accurate, but slower (i.e. 100 is 100x slower)
    :return: A list of 128-dimentional face encodings (one for each face in the image)

face_landmarks(face_image, face_locations=None)
    Given an image, returns a dict of face feature locations (eyes, nose, etc) for each face in the image

    :param face_image: image to search
    :param face_locations: Optionally provide a list of face locations to check.
    :return: A list of dicts of face feature locations (eyes, nose, etc)

face_locations(img, number_of_times_to_upsample=1, model='hog')
    Returns an array of bounding boxes of human faces in a image

    :param img: An image (as a numpy array)
    :param number_of_times_to_upsample: How many times to upsample the image looking for faces. Higher numbers find smaller faces.
    :param model: Which face detection model to use. "hog" is less accurate but faster on CPUs. "cnn" is a more accurate
                  deep-learning model which is GPU/CUDA accelerated (if available). The default is "hog".
    :return: A list of tuples of found face locations in css (top, right, bottom, left) order

load_image_file(file, mode='RGB')
    Loads an image file (.jpg, .png, etc) into a numpy array

    :param file: image file name or file object to load
    :param mode: format to convert the image to. Only 'RGB' (8-bit RGB, 3 channels) and 'L' (black and white) are supported.
    :return: image contents as numpy array
付記
付記
Jetson 上でface_recognitionを利用する記事
JetsonNanoで顔認証(face_recognition)②
JetsonNanoで顔認証(face_recognition)⓵