この記事の内容
KubeVirtでk8sクラスタ内に作ったVMの画面を、k8sクラスタ外で表示できるようにします。
環境
この記事で作った環境を使います。
- AlmaLinux 9.5の3VMで、Masterノードx1、Workerノードx2でk8sクラスタを構成。
- ホストOS=RHEL/AlmaLinux、各ノードとするVMのゲストOS=AlmaLinuxです。
- k8sクラスタに対し、以下をインストール済みです。
-- KubeVirt(VM作成用)
-- MetalLB(ロードバランサ用)
-- kubernetes-dashboard(k8sクラスタの各リソース表示確認など) - KubeVirtでVMを1台作成しています(ゲストOS=RockyLinux)。
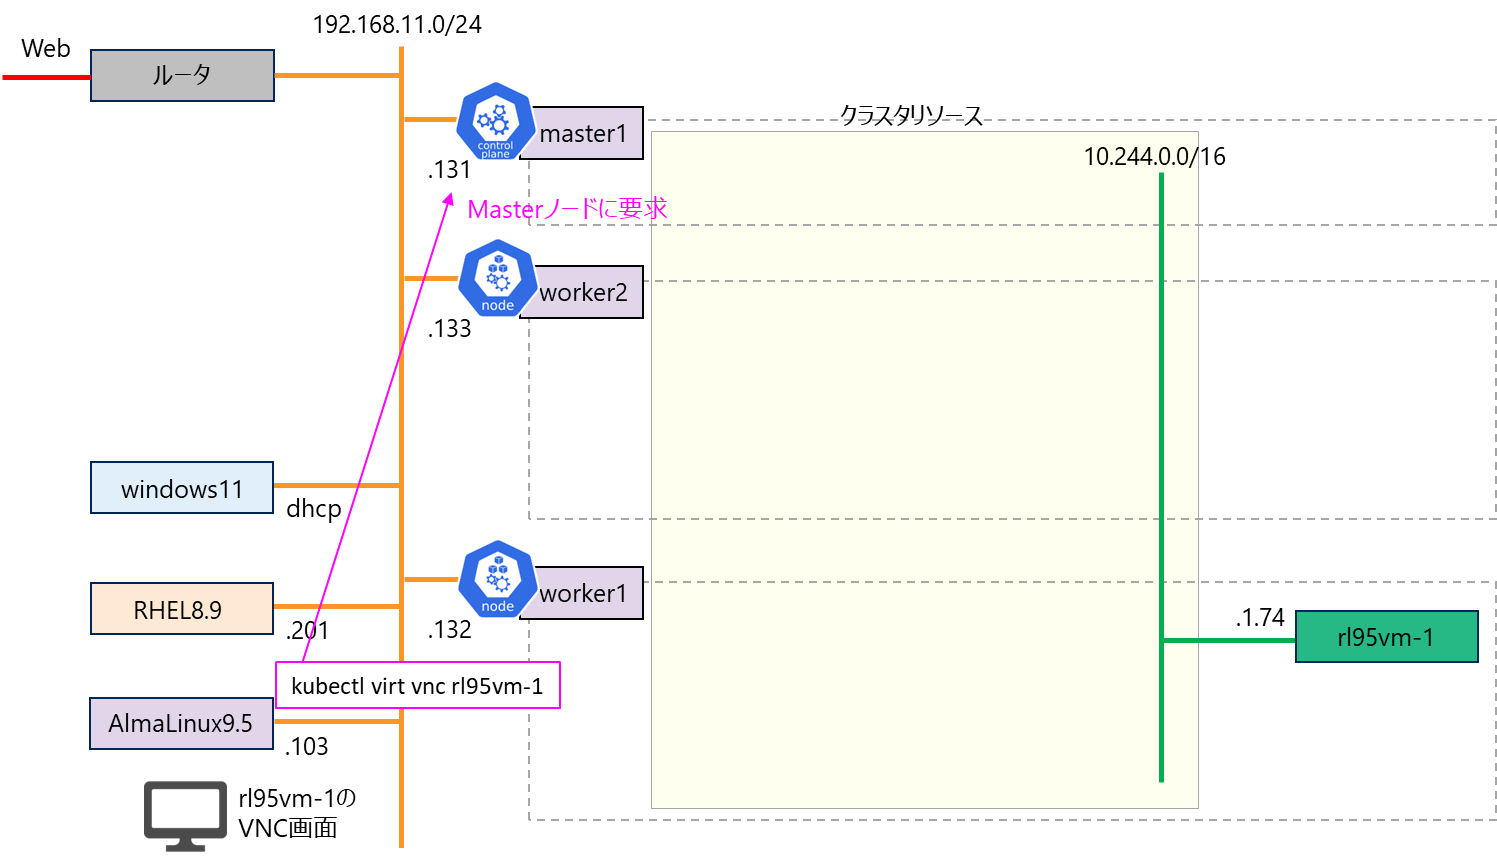
こういう構成です。


1. 仕組みについて
(1) kubectl virt vncコマンド実行
kubectl virt vnc vmnameコマンドを使うと、このコマンドを実行した環境で、VNCビューアが起動して、指定したVMの画面が表示されます。
(2) --proxy-onlyオプション追加
オプションを加えて、kubectl virt vnc --proxy-only vmnameコマンドを使うと、このコマンドを実行した環境に、VNCサーバのプロキシが作られます。コマンド実行時、待ち受けているエフェメラルポート番号が表示されるので、そのサーバで、localhost:portを宛先にVNCビューアで接続すると、VMの画面が表示されます。

(3) --address、--portオプション追加
さらにオプションを加えて、kubectl virt vnc --address=<IPアドレス> --port <ポート番号> --proxy-only vmnameコマンドを使うと、このコマンドを実行した環境で、指定したIPアドレス:ポート番号で、VNCサーバのプロキシが待ち受けます。同じネットワークの別のホストから、IPアドレス:ポート番号を宛先にVNCビューアで接続すると、VMの画面が表示されます。

(4) これらの仕組みの利用
ここでのポイントは、以下です。
- kubectl virt vncコマンドを実行した場所に、対象のVMの画面を表示するためのVNCサーバのプロキシが作られる。
- このコマンドを実行するホストは、k8sクラスタ内のノード、k8sクラスタ外のホストを問わない。
以上を踏まえ、本記事では、次の2パターンで、KubeVirtで作ったVMの画面を、同じネットワーク上のWindows11で表示できることを確認します。
- Windows11でkubectl virt vncコマンドを実行し、localhost宛てにVNCビューアを起動し、VM画面を表示する。
- Windows11と同じネットワークのLinuxホストでkubectl virt vncコマンドを実行し、そのLinuxホスト宛てにVNCビューアを起動し、VM画面を表示する。
2. Windows上でのVNCプロキシ起動とVM画面の表示
実施には、以下の下準備が要ります。
- kubectlコマンドと、virtctlプラグインをインストールし、kubectl virt vncコマンドを使えるようにする。
- VNCビューアを使えるようにする。
(1) kubectlコマンドのインストール
Windows11に、kubectlコマンドをインストールします。手順は以下に従います。
「Direct download」にあるリンクから、以下のバイナリダウンロードページを開きます。
「Download Options」で、
- Operating Systems:windows
- Architectures:amd64
を選び、kubectl.exeのリンクをクリックして、バイナリをダウンロードします。
現時点(2025/2)では、以下のリンクでした。
https://dl.k8s.io/v1.32.2/bin/windows/amd64/kubectl.exe
インストーラ形式ではなく、コマンドプロンプトから実行して使うバイナリファイルです。任意の場所に置いて実行できます。とりあえず、ユーザのホームフォルダ(%USERPROFILE%)に置きました。
続いて、ユーザのホームフォルダ(%USERPROFILE%)に、.kubeフォルダを作り、configファイルを配置します。このconfigファイルは、Masterノードにあるものをコピーしてきます(k8sクラスタを構築するとき、kubeadm initをして作成されたもの)。
手元の環境だと、以下のような内容でした。
[root@master1 ~]# ls -l ~/.kube/
total 8
drwxr-x---. 4 root root   35 Feb  9 15:18 cache
-rw-------. 1 root root 5654 Feb  9 15:18 config
[root@master1 ~]#
apiVersion: v1
clusters:
- cluster:
    certificate-authority-data: LS0tLS1CRUdJTiBDRVJUSUZJQ0FUR(略)VFN5VDl3ZVptTFkKY3NQMHZSL0Z3QlFzCi0tLS0tRU5EIENFUlRJRklDQVRFLS0tLS0K
    server: https://192.168.11.131:6443
  name: kubernetes
contexts:
- context:
    cluster: kubernetes
    user: kubernetes-admin
  name: kubernetes-admin@kubernetes
current-context: kubernetes-admin@kubernetes
kind: Config
preferences: {}
users:
- name: kubernetes-admin
  user:
    client-certificate-data: LS0tLS1CRUdJTiBDRVJUSUZJQ0FURS0tLS0tCk1JSURLVEND(略)yT0FqeDU0Ci0tLS0tRU5EIENFUlRJRklDQVRFLS0tLS0K
    client-key-data: LS0tLS1CRUdJTiBSU0EgUFJJVkFURSBLRVktLS0tLQpNSUlFb2(略)TWYyZVI5TmVRbmpFUFBJSFkvdE09Ci0tLS0tRU5EIFJTQSBQUklWQVRFIEtFWS0tLS0tCg==
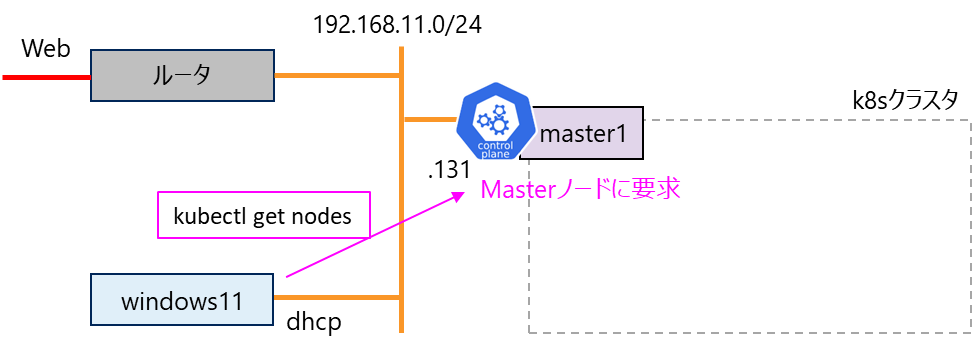
これで、windows11から、Masterノードに対してkubectlコマンドで要求できるようになりました。
C:\Users\myuser>kubectl.exe get nodes
NAME               STATUS   ROLES           AGE   VERSION
master1.internal   Ready    control-plane   9d    v1.32.1
worker1.internal   Ready    <none>          9d    v1.32.1
worker2.internal   Ready    <none>          9d    v1.32.1

C:\Users\myuser>
(2) krewのインストール
kubectlコマンドに、virtctlプラグインをインストールする手順は、以下にあります。
まず、gitのインストールが必要、とありますので、gitを入れます。
ここの、standalone installerの64bitをダウンロードして、インストールしました。現時点(2025/2)の最新は以下でした。
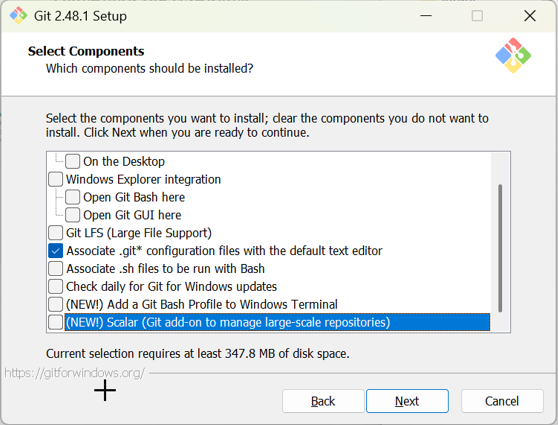
要は、gitコマンドが動けばいいので、最低限と思われる以下の選択にして、後はいずれも「Next」で進めてインストールしました。
続いて、krewのバイナリファイルをダウンロードします。
現時点(2025/2)の最新はv0.4.4で、以下のリンクからダウンロードしました。
コマンドプロンプトで、ダウンロードしたバイナリファイルを、以下のように実行してkrewをインストールします。
C:\Users\myuser\Downloads>krew.exe install krew
Adding "default" plugin index from https://github.com/kubernetes-sigs/krew-index.git.
Updated the local copy of plugin index.
Installing plugin: krew
Installed plugin: krew
\
 | Use this plugin:
 |      kubectl krew
 | Documentation:
 |      https://krew.sigs.k8s.io/
 | Caveats:
 | \
 |  | krew is now installed! To start using kubectl plugins, you need to add
 |  | krew's installation directory to your PATH:
 |  |
 |  |   * macOS/Linux:
 |  |     - Add the following to your ~/.bashrc or ~/.zshrc:
 |  |         export PATH="${KREW_ROOT:-$HOME/.krew}/bin:$PATH"
 |  |     - Restart your shell.
 |  |
 |  |   * Windows: Add %USERPROFILE%\.krew\bin to your PATH environment variable
 |  |
 |  | To list krew commands and to get help, run:
 |  |   $ kubectl krew
 |  | For a full list of available plugins, run:
 |  |   $ kubectl krew search
 |  |
 |  | You can find documentation at
 |  |   https://krew.sigs.k8s.io/docs/user-guide/quickstart/.
 | /
/

C:\Users\myuser\Downloads>
これで、ユーザのホームフォルダ(%USERPROFILE%)に、.krewフォルダが作られ、ここのbin/に実行ファイルが置かれているので、環境変数pathに、このフォルダを追加します。環境変数の追加の仕方は、以下を参考に、とのこと。
- タスクバーのWindowsアイコンを右クリックし、「システム」を開く。
- 「システムの詳細設定」-「環境変数」を開く。
- 「ユーザー環境変数」の「Path」を選択して、「編集」を押す。
- 「新規」を押し、以下のように、「%USERPROFILE%\.krew\bin」を追加する。

ついでに、kubectl.exeを.kube/フォルダに置いて、環境変数pathに「%USERPROFILE%\.kube」を追加しました。

(3) virtctlプラグインのインストール
以下に従い、kubectlコマンドに、virtctlプラグインをインストールします。
ここは、コマンドプロンプトを管理者権限で起動して、そこで実行する必要があります。
C:\Windows\System32>kubectl krew install virt
Updated the local copy of plugin index.
Installing plugin: virt
Installed plugin: virt
\
 | Use this plugin:
 |      kubectl virt
 | Documentation:
 |      https://github.com/kubevirt/kubectl-virt-plugin
 | Caveats:
 | \
 |  | virt plugin is a wrapper for virtctl originating from the KubeVirt project. In order to use virtctl you will
 |  | need to have KubeVirt installed on your Kubernetes cluster to use it. See https://kubevirt.io/ for details
 |  |
 |  | See
 |  |
 |  |   https://kubevirt.io/user-guide/virtual_machines/accessing_virtual_machines/#graphical-and-serial-console-access
 |  |
 |  | for a usage example
 | /
/
WARNING: You installed plugin "virt" from the krew-index plugin repository.
   These plugins are not audited for security by the Krew maintainers.
   Run them at your own risk.

C:\Windows\System32>
kubectlコマンドの、インストール済みプラグインは、これで確認できます。
C:\Windows\System32>kubectl plugin list
The following compatible plugins are available:

C:\Users\myuser\.krew\bin\kubectl-krew.exe
C:\Users\myuser\.krew\bin\kubectl-virt.exe

C:\Windows\System32>
これで、Windows11で、kubectl virtコマンドが使えるようになりました。
C:\Windows\System32>kubectl virt
Available Commands:
  addvolume         add a volume to a running VM
  adm               Administrate KubeVirt configuration.
  completion        Generate the autocompletion script for the specified shell
  console           Connect to a console of a virtual machine instance.
  create            Create a manifest for the specified Kind.
  credentials       Manipulate credentials on a virtual machine.
  expand            Return the VirtualMachine object with expanded instancetype and preference.
  expose            Expose a virtual machine instance, virtual machine, or virtual machine instance replica set as a new service.
  fslist            Return full list of filesystems available on the guest machine.
  guestfs           Start a shell into the libguestfs pod
  guestosinfo       Return guest agent info about operating system.
  help              Help about any command
  image-upload      Upload a VM image to a DataVolume/PersistentVolumeClaim.
  memory-dump       Dump the memory of a running VM to a pvc
  migrate           Migrate a virtual machine.
  migrate-cancel    Cancel migration of a virtual machine.
  pause             Pause a virtual machine
  permitted-devices List the permitted devices for vmis.
  port-forward      Forward local ports to a virtualmachine or virtualmachineinstance.
  removevolume      remove a volume from a running VM
  restart           Restart a virtual machine.
  scp               SCP files from/to a virtual machine instance.
  soft-reboot       Soft reboot a virtual machine instance
  ssh               Open a SSH connection to a virtual machine instance.
  start             Start a virtual machine.
  stop              Stop a virtual machine.
  unpause           Unpause a virtual machine
  usbredir          Redirect an USB device to a virtual machine instance.
  userlist          Return full list of logged in users on the guest machine.
  version           Print the client and server version information.
  vmexport          Export a VM volume.
  vnc               Open a vnc connection to a virtual machine instance.

Use "virtctl <command> --help" for more information about a given command.
Use "virtctl options" for a list of global command-line options (applies to all commands).

C:\Windows\System32>
(4) VM画面の表示
Vmリソース、Vmiリソースを確認し、rl95vm-1のVMが動いていることを確認します。
C:\Windows\System32>kubectl get vm
NAME       AGE    STATUS    READY
rl95vm-1   2d3h   Running   True

C:\Windows\System32>
C:\Windows\System32>kubectl get vmi
NAME       AGE   PHASE     IP            NODENAME           READY
rl95vm-1   57m   Running   10.244.3.97   worker2.internal   True

C:\Windows\System32>
rl95vm-1のVMの画面を表示するための、VNCサーバのプロキシを、windows11で立ち上げます。
C:\Windows\System32>kubectl virt vnc --proxy-only rl95vm-1
{"port":61900}
{"component":"portforward","level":"info","msg":"connection timeout: 1m0s","pos":"vnc.go:159","timestamp":"2025-02-18T11:32:28.234104Z"}
待ち受けポートは、61900であると表示されています。
VNCビューアをインストールして起動します。ここでは、UltraVNC Viewerをインストールし使用します。以下から入手して、インストールしました(v1.4.3.6の64bit版)。
起動し、接続先に「localhost:61900」(ポート番号は上で表示された値)を入れて「Connect」を押します。

接続先確認が表示されるので、「はい」を押すと、

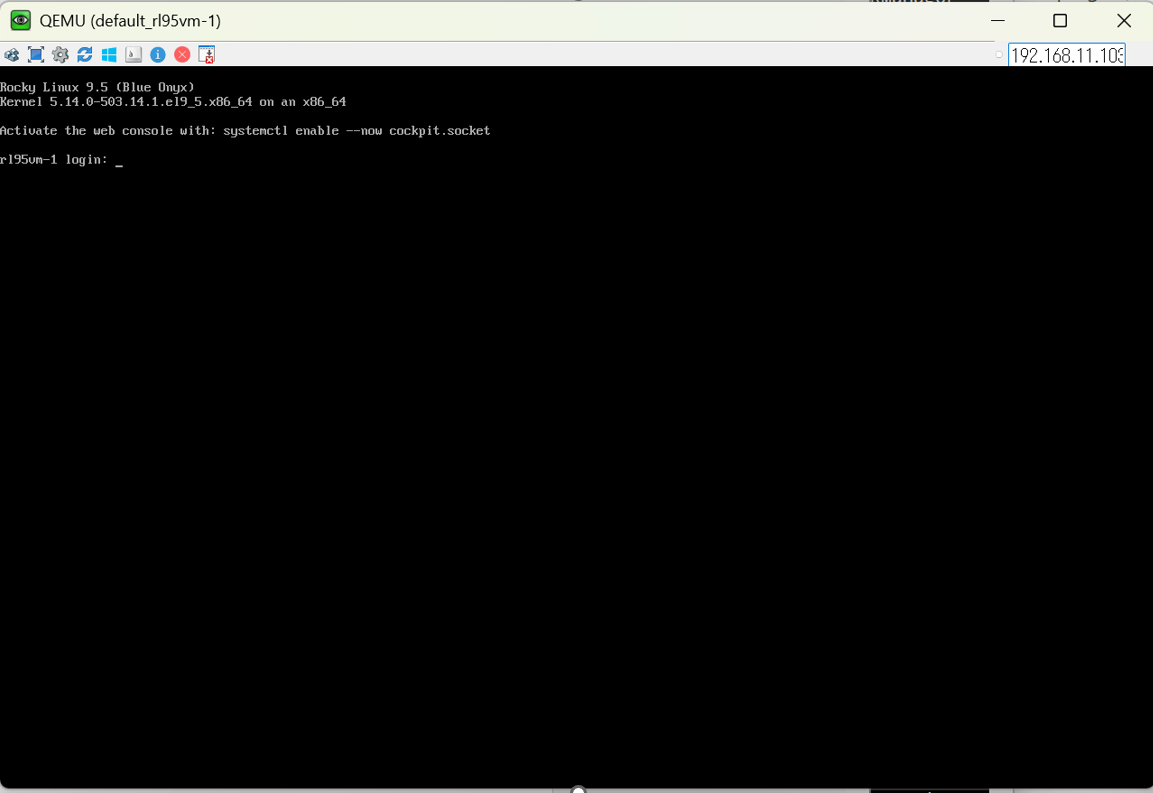
rl95vm-1のVMの画面が表示されました。

このような状態です。

- kubectl virt vncコマンドを実行した、windows11上に、VNCサーバのプロキシが作られた。(これは、windows11上でプロキシサーバが起動した、とか、VNCサーバが起動した、ではない。)
- 61900ポートで待ち受ける、と表示されたので、Windows11上で、localhost:61900を宛先にVNCビューアで接続したら、VMの画面が表示された。(rl95vm-1のゲストOS内で起動されたVNCサーバにVNC接続したわけではない。VNCサーバはKubeVirtが提供しているもの)
3. Linux上でのVNCプロキシ起動とWindowsでのVM画面の表示
続いて、windows11のとなりにあるAlmaLinux 9.5のホスト(al9host)で、kubectl virt vncコマンドでプロキシを作り、windows11からVNC接続する、というのをやります。
(1) kubectlコマンドのインストール
al9hostに、kubectlコマンドをインストールします。手順は以下に従います。
kubenetes.repoのリポジトリを登録し、yum install kubectlコマンドでインストールします。
cat <<EOF | sudo tee /etc/yum.repos.d/kubernetes.repo
[kubernetes]
name=Kubernetes
baseurl=https://pkgs.k8s.io/core:/stable:/v1.32/rpm/
enabled=1
gpgcheck=1
gpgkey=https://pkgs.k8s.io/core:/stable:/v1.32/rpm/repodata/repomd.xml.key
EOF
[root@al9host kubectl]# yum install kubectl
Kubernetes                                       12 kB/s | 9.8 kB     00:00
依存関係が解決しました。
================================================================================
 パッケージ     Arch          バージョン                リポジトリー      サイズ
================================================================================
インストール:
 kubectl        x86_64        1.32.2-150500.1.1         kubernetes         11 M

トランザクションの概要
================================================================================
インストール  1 パッケージ

ダウンロードサイズの合計: 11 M
インストール後のサイズ: 55 M
これでよろしいですか? [y/N]: y
パッケージのダウンロード:
~
インストール済み:
  kubectl-1.32.2-150500.1.1.x86_64

完了しました!
[root@al9host kubectl]#
続いて、/root/.kube/を作り、configファイルを配置します。このconfigファイルは、Masterノードにあるものをコピーしてきます。
これで、al9hostでも、kubectlコマンドが使えるようになりました。
[root@al9host kubectl]# kubectl get nodes
NAME               STATUS   ROLES           AGE   VERSION
master1.internal   Ready    control-plane   9d    v1.32.1
worker1.internal   Ready    <none>          9d    v1.32.1
worker2.internal   Ready    <none>          9d    v1.32.1
[root@al9host kubectl]#
(2) krewのインストール
krewのインストール手順は、こちらにあります。
まず、krewが必要とする、gitを入れます。
[root@al9host kubectl]# dnf install git
メタデータの期限切れの最終確認: 0:04:40 前の 2025年02月18日 22時20分13秒 に実施 しました。
依存関係が解決しました。
================================================================================
 パッケージ            Arch        バージョン              リポジトリー   サイズ
================================================================================
インストール:
 git                   x86_64      2.43.5-2.el9_5          appstream       50 k
依存関係のインストール:
 git-core              x86_64      2.43.5-2.el9_5          appstream      4.4 M
 git-core-doc          noarch      2.43.5-2.el9_5          appstream      2.7 M
 perl-Error            noarch      1:0.17029-7.el9         appstream       41 k
 perl-Git              noarch      2.43.5-2.el9_5          appstream       37 k
 perl-TermReadKey      x86_64      2.38-11.el9             appstream       36 k
 perl-lib              x86_64      0.65-481.el9            appstream       13 k

トランザクションの概要
================================================================================
インストール  7 パッケージ

ダウンロードサイズの合計: 7.2 M
インストール後のサイズ: 38 M
これでよろしいですか? [y/N]: y
パッケージのダウンロード:
~
インストール済み:
  git-2.43.5-2.el9_5.x86_64              git-core-2.43.5-2.el9_5.x86_64
  git-core-doc-2.43.5-2.el9_5.noarch     perl-Error-1:0.17029-7.el9.noarch
  perl-Git-2.43.5-2.el9_5.noarch         perl-TermReadKey-2.38-11.el9.x86_64
  perl-lib-0.65-481.el9.x86_64

完了しました!
[root@al9host kubectl]#
krewのインストールコマンドを実行します。
(
  set -x; cd "$(mktemp -d)" &&
  OS="$(uname | tr '[:upper:]' '[:lower:]')" &&
  ARCH="$(uname -m | sed -e 's/x86_64/amd64/' -e 's/\(arm\)\(64\)\?.*/\1\2/' -e 's/aarch64$/arm64/')" &&
  KREW="krew-${OS}_${ARCH}" &&
  curl -fsSLO "https://github.com/kubernetes-sigs/krew/releases/latest/download/${KREW}.tar.gz" &&
  tar zxvf "${KREW}.tar.gz" &&
  ./"${KREW}" install krew
)
以下のようになりました。
[root@al9host kubectl]# (
  set -x; cd "$(mktemp -d)" &&
  OS="$(uname | tr '[:upper:]' '[:lower:]')" &&
  ARCH="$(uname -m | sed -e 's/x86_64/amd64/' -e 's/\(arm\)\(64\)\?.*/\1\2/' -e 's/aarch64$/arm64/')" &&
  KREW="krew-${OS}_${ARCH}" &&
  curl -fsSLO "https://github.com/kubernetes-sigs/krew/releases/latest/download/${KREW}.tar.gz" &&
  tar zxvf "${KREW}.tar.gz" &&
  ./"${KREW}" install krew
)
++ mktemp -d
+ cd /tmp/tmp.DkyxHoiFSh
++ uname
++ tr '[:upper:]' '[:lower:]'
+ OS=linux
++ uname -m
++ sed -e s/x86_64/amd64/ -e 's/\(arm\)\(64\)\?.*/\1\2/' -e 's/aarch64$/arm64/'
+ ARCH=amd64
+ KREW=krew-linux_amd64
+ curl -fsSLO https://github.com/kubernetes-sigs/krew/releases/latest/download/krew-linux_amd64.tar.gz
+ tar zxvf krew-linux_amd64.tar.gz
./LICENSE
./krew-linux_amd64
+ ./krew-linux_amd64 install krew
Adding "default" plugin index from https://github.com/kubernetes-sigs/krew-index.git.
Updated the local copy of plugin index.
Installing plugin: krew
Installed plugin: krew
\
 | Use this plugin:
 |      kubectl krew
 | Documentation:
 |      https://krew.sigs.k8s.io/
 | Caveats:
 | \
 |  | krew is now installed! To start using kubectl plugins, you need to add
 |  | krew's installation directory to your PATH:
 |  |
 |  |   * macOS/Linux:
 |  |     - Add the following to your ~/.bashrc or ~/.zshrc:
 |  |         export PATH="${KREW_ROOT:-$HOME/.krew}/bin:$PATH"
 |  |     - Restart your shell.
 |  |
 |  |   * Windows: Add %USERPROFILE%\.krew\bin to your PATH environment variable
 |  |
 |  | To list krew commands and to get help, run:
 |  |   $ kubectl krew
 |  | For a full list of available plugins, run:
 |  |   $ kubectl krew search
 |  |
 |  | You can find documentation at
 |  |   https://krew.sigs.k8s.io/docs/user-guide/quickstart/.
 | /
/
[root@al9host kubectl]#
~/.bashrcにPATHを追加します。
[root@al9host kubectl]# vim /root/.bashrc
[root@al9host kubectl]#
[root@al9host kubectl]# cat /root/.bashrc
# .bashrc

# Source global definitions
if [ -f /etc/bashrc ]; then
        . /etc/bashrc
fi

# User specific environment
if ! [[ "$PATH" =~ "$HOME/.local/bin:$HOME/bin:" ]]
then
    PATH="$HOME/.local/bin:$HOME/bin:$PATH"
fi
export PATH
export PATH="${KREW_ROOT:-$HOME/.krew}/bin:$PATH"  # <===ここ追加
~
これで、端末に再接続すると、kubectl krewコマンドが使えるようになりました。
[root@al9host ~]# kubectl krew
krew is the kubectl plugin manager.
You can invoke krew through kubectl: "kubectl krew [command]..."

Usage:
  kubectl krew [command]

Available Commands:
  help        Help about any command
  index       Manage custom plugin indexes
  info        Show information about an available plugin
  install     Install kubectl plugins
  list        List installed kubectl plugins
  search      Discover kubectl plugins
  uninstall   Uninstall plugins
  update      Update the local copy of the plugin index
  upgrade     Upgrade installed plugins to newer versions
  version     Show krew version and diagnostics

Flags:
  -h, --help      help for krew
  -v, --v Level   number for the log level verbosity

Use "kubectl krew [command] --help" for more information about a command.
[root@al9host ~]#
(3) virtctlプラグインのインストール
以下に従い、kubectlコマンドに、virtctlプラグインをインストールします。
インストールします。
[root@al9host ~]# kubectl krew install virt
Updated the local copy of plugin index.
Installing plugin: virt
Installed plugin: virt
\
 | Use this plugin:
 |      kubectl virt
 | Documentation:
 |      https://github.com/kubevirt/kubectl-virt-plugin
 | Caveats:
 | \
 |  | virt plugin is a wrapper for virtctl originating from the KubeVirt project. In order to use virtctl you will
 |  | need to have KubeVirt installed on your Kubernetes cluster to use it. See https://kubevirt.io/ for details
 |  |
 |  | See
 |  |
 |  |   https://kubevirt.io/user-guide/virtual_machines/accessing_virtual_machines/#graphical-and-serial-console-access
 |  |
 |  | for a usage example
 | /
/
WARNING: You installed plugin "virt" from the krew-index plugin repository.
   These plugins are not audited for security by the Krew maintainers.
   Run them at your own risk.
[root@al9host ~]#
使えるようになりました。
[root@al9host ~]# kubectl virt
Available Commands:
  addvolume         add a volume to a running VM
  adm               Administrate KubeVirt configuration.
  completion        Generate the autocompletion script for the specified shell
  console           Connect to a console of a virtual machine instance.
  create            Create a manifest for the specified Kind.
  credentials       Manipulate credentials on a virtual machine.
  expand            Return the VirtualMachine object with expanded instancetype and preference.
  expose            Expose a virtual machine instance, virtual machine, or virtual machine instance replica set as a new service.
  fslist            Return full list of filesystems available on the guest machine.
  guestfs           Start a shell into the libguestfs pod
  guestosinfo       Return guest agent info about operating system.
  help              Help about any command
  image-upload      Upload a VM image to a DataVolume/PersistentVolumeClaim.
  memory-dump       Dump the memory of a running VM to a pvc
  migrate           Migrate a virtual machine.
  migrate-cancel    Cancel migration of a virtual machine.
  pause             Pause a virtual machine
  permitted-devices List the permitted devices for vmis.
  port-forward      Forward local ports to a virtualmachine or virtualmachineinstance.
  removevolume      remove a volume from a running VM
  restart           Restart a virtual machine.
  scp               SCP files from/to a virtual machine instance.
  soft-reboot       Soft reboot a virtual machine instance
  ssh               Open a SSH connection to a virtual machine instance.
  start             Start a virtual machine.
  stop              Stop a virtual machine.
  unpause           Unpause a virtual machine
  usbredir          Redirect an USB device to a virtual machine instance.
  userlist          Return full list of logged in users on the guest machine.
  version           Print the client and server version information.
  vmexport          Export a VM volume.
  vnc               Open a vnc connection to a virtual machine instance.

Use "kubectl virt <command> --help" for more information about a given command.
Use "kubectl virt options" for a list of global command-line options (applies to all commands).
[root@al9host ~]#
aliasも追加してみました。
[root@al9host ~]# vim /root/.bashrc
[root@al9host ~]#
[root@al9host ~]# cat /root/.bashrc
# .bashrc

# Source global definitions
if [ -f /etc/bashrc ]; then
        . /etc/bashrc
fi

# User specific environment
if ! [[ "$PATH" =~ "$HOME/.local/bin:$HOME/bin:" ]]
then
    PATH="$HOME/.local/bin:$HOME/bin:$PATH"
fi
export PATH
export PATH="${KREW_ROOT:-$HOME/.krew}/bin:$PATH"
alias virtctl='kubectl virt'  #<=== ここ追加
~
(4) VM画面の表示
rl95vm-1のVMの画面を表示するための、VNCサーバのプロキシを、al9hostで立ち上げます。また、待ち受けIPアドレスとポート番号を指定します。これらのオプションは、kubectl virt vncコマンドのヘルプで見られます。
[root@al9host ~]# kubectl virt vnc -h
Open a vnc connection to a virtual machine instance.

Usage:
  kubectl vnc (VMI) [flags]
  kubectl vnc [command]

Examples:
  # Connect to 'testvmi' via remote-viewer:
   kubectl virt vnc testvmi

Available Commands:
  screenshot  Create a VNC screenshot of a virtual machine instance.

Flags:
      --address string   --address=127.0.0.1: Setting this will change the listening address of the VNC server. Example: --address=0.0.0.0 will make the server listen on all interfaces. (default "127.0.0.1")
  -h, --help             help for vnc
      --port int         --port=0: Assigning a port value to this will try to run the proxy on the given port if the port is accessible; If unassigned, the proxy will run on a random port
      --proxy-only       --proxy-only=false: Setting this true will run only the virtctl vnc proxy and show the port where VNC viewers can connect

Use "kubectl virt options" for a list of global command-line options (applies to all commands).
[root@al9host ~]#
また、al9hostでプロキシを立ち上げ、windows11から5900番宛てにVNC接続するならば、firewalldのポート許可が必要なので、実施しておきます。
[root@al9host ~]# sudo firewall-cmd --zone=public --add-port=5900/tcp --permanent
success
[root@al9host ~]#
[root@al9host ~]# sudo firewall-cmd --reload
success
[root@al9host ~]#
[root@al9host ~]# sudo firewall-cmd --list-all
public (active)
  target: default
  icmp-block-inversion: no
  interfaces: bridge0 eno1
  sources:
  services: cockpit dhcpv6-client nfs ssh
  ports: 5900/tcp
  protocols:
  forward: yes
  masquerade: no
  forward-ports:
  source-ports:
  icmp-blocks:
  rich rules:
[root@al9host ~]#
プロキシを立ち上げます。
[root@al9host ~]# kubectl virt vnc --address=192.168.11.103 --port 5900 --proxy-only rl95vm-1
{"port":5900}
{"component":"portforward","level":"info","msg":"connection timeout: 1m0s","pos":"vnc.go:159","timestamp":"2025-02-18T13:41:45.596768Z"}
windows11でVNCビューアを起動し、宛先にal9hostのIPアドレス(192.168.11.103)と5900番ポートを指定して接続します。(接続先の警告は「はい」)

これで、rl95vm-1のVMの画面が表示されました。
このような状態です。

- kubectl virt vncコマンドを実行した、al9host上に、VNCサーバのプロキシが作られた。
- 192.168.11.103:5900で待ち受けるよう指定したので、Windows11上で、192.168.11.103:5900を宛先にVNCビューアで接続したら、VMの画面が表示された。
まとめ
KubeVirtで作ったVMの画面を、k8sクラスタ外のwindowsのVNCビューアで表示しました。VMの画面を表示するためのVNCサーバはk8sクラスタ内に作られ、k8sクラスタ外でプロキシを立てて、そのプロキシに対してVNC接続をして、VMの画面を表示しました。
参考にさせていただいた情報
ありがとうございます。