この記事の内容
KVM環境で、AlmaLinux9.5のVMを作り、異なるネットワーク間のルーティングを行うための設定方法を確認します。※k8s/KubeVirtは関係ありません。
1. テスト環境の作成
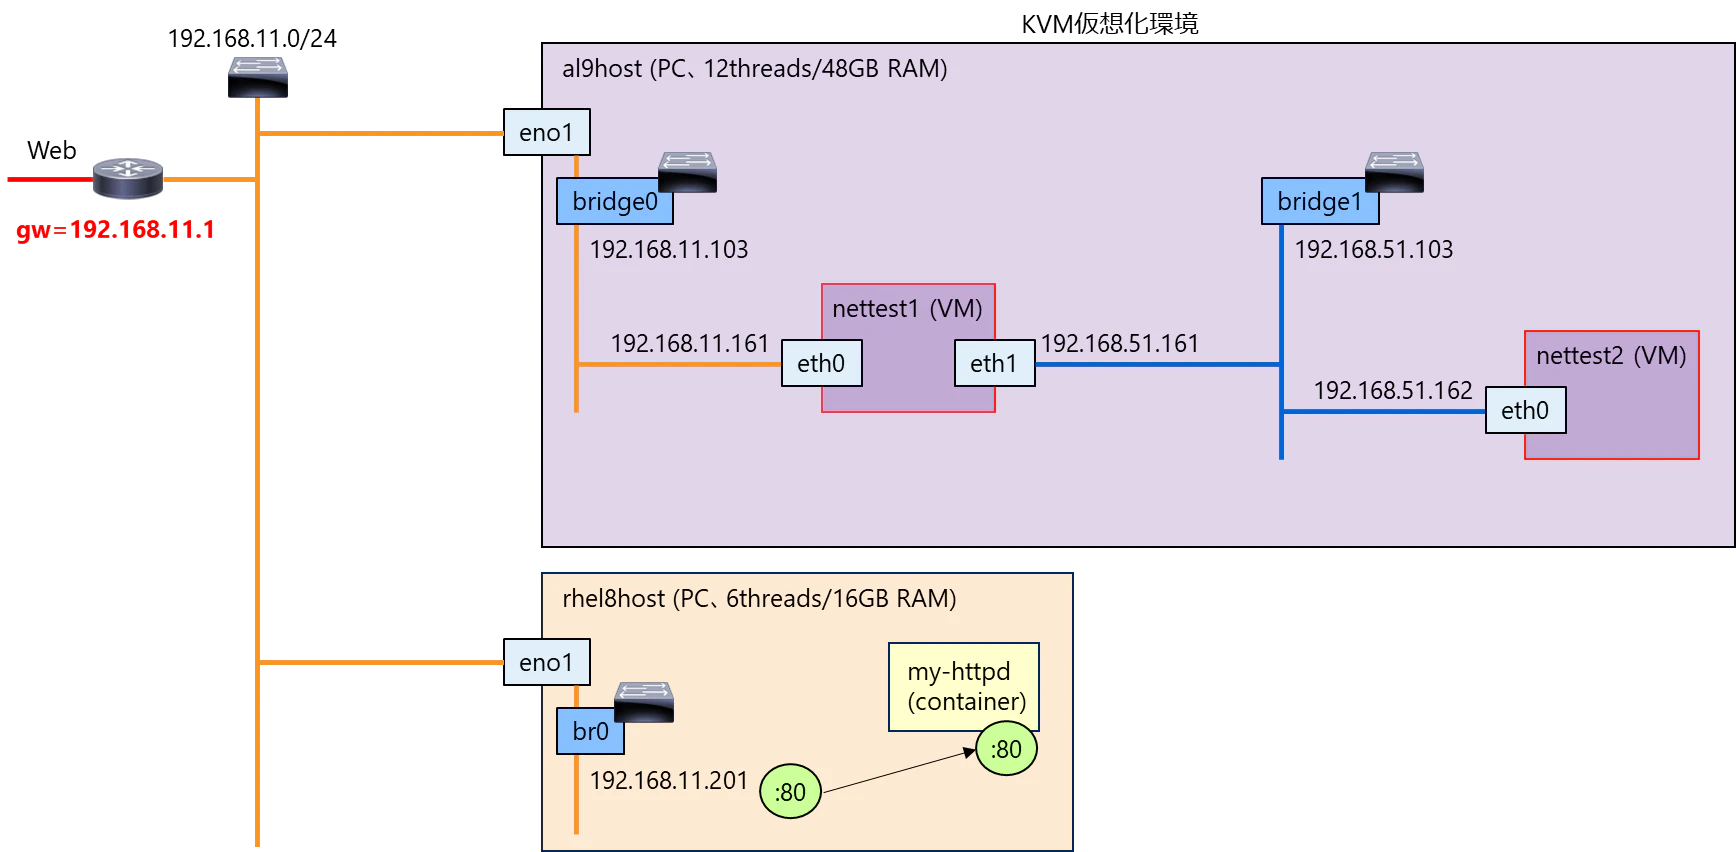
こんな感じのテスト環境を作って、pingとcurl応答を確認します。
(1) VMの作成
AlmaLinux 9.5のマシンイメージから、VMを2台作ります。作り方の詳細は、以下にあります。
al9host(AlmaLinux 9.5)のcockpit上で作成します。作成時の選択肢は以下のように指定しました。
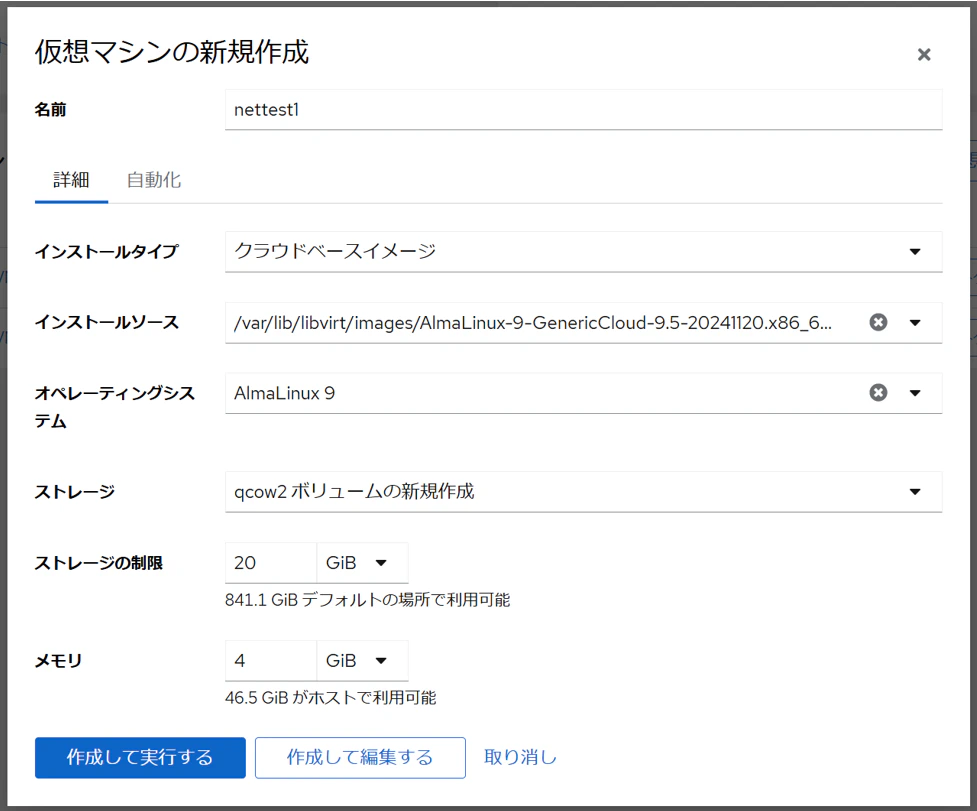

使用したマシンイメージファイルは以下です。
https://repo.almalinux.org/almalinux/9/cloud/x86_64/images/AlmaLinux-9-GenericCloud-9.5-20241120.x86_64.qcow2
(2) ゲストOSの設定
テストに使いやすいように、ゲストOSに以下の設定をします。
(1) ホスト名を設定する。
[root@localhost ~]# hostnamectl hostname nettest1.internal
[root@localhost ~]#
(2) firewalldを入れる。
[root@nettest1 ~]# dnf install firewalld
AlmaLinux 9 - AppStream                                       4.9 MB/s |  13 MB     00:02
AlmaLinux 9 - BaseOS                                          3.8 MB/s |  11 MB     00:02
AlmaLinux 9 - Extras                                           11 kB/s |  13 kB     00:01
Last metadata expiration check: 0:00:01 ago on Mon 24 Feb 2025 07:18:14 AM UTC.
Dependencies resolved.
==============================================================================================
 Package                      Architecture   Version                  Repository         Size
==============================================================================================
Installing:
 firewalld                    noarch         1.3.4-9.el9_5            baseos            452 k
Installing dependencies:
 firewalld-filesystem         noarch         1.3.4-9.el9_5            baseos            8.6 k
 ipset                        x86_64         7.11-11.el9_5            baseos             41 k
 ipset-libs                   x86_64         7.11-11.el9_5            baseos             68 k
 iptables-nft                 x86_64         1.8.10-4.el9_4           baseos            186 k
 libnftnl                     x86_64         1.2.6-4.el9_4            baseos             87 k
 nftables                     x86_64         1:1.0.9-3.el9            baseos            421 k
 python3-firewall             noarch         1.3.4-9.el9_5            baseos            355 k
 python3-nftables             x86_64         1:1.0.9-3.el9            baseos             20 k
Installing weak dependencies:
 libcap-ng-python3            x86_64         0.8.2-7.el9              appstream          29 k

Transaction Summary
==============================================================================================
Install  10 Packages
~
(3) タイムゾーンを設定する。
[root@nettest1 ~]# timedatectl set-timezone Asia/Tokyo
[root@nettest1 ~]#
[root@nettest1 ~]# timedatectl
               Local time: Mon 2025-02-24 16:18:48 JST
           Universal time: Mon 2025-02-24 07:18:48 UTC
                 RTC time: Mon 2025-02-24 07:18:48
                Time zone: Asia/Tokyo (JST, +0900)
System clock synchronized: yes
              NTP service: active
          RTC in local TZ: no
[root@nettest1 ~]#
(4) sshdのrootログインを許可する。(/etc/ssh/sshd_configに、「PermitRootLogin yes」を追加し、sshd.serviceを再起動)
(5) ネットワーク調査系のパッケージ、などを入れる(使わないかもなのもとりあえずで)。
[root@nettest1 ~]# dnf install vim net-tools iptraf-ng traceroute bind-utils
Last metadata expiration check: 0:01:34 ago on Mon 24 Feb 2025 04:18:14 PM JST.
Dependencies resolved.
==============================================================================================
 Package               Architecture  Version                           Repository        Size
==============================================================================================
Installing:
 bind-utils            x86_64        32:9.16.23-24.el9_5.3             appstream        201 k
 iptraf-ng             x86_64        1.2.1-4.el9                       baseos           258 k
 net-tools             x86_64        2.0-0.64.20160912git.el9          baseos           294 k
 traceroute            x86_64        3:2.1.0-18.el9                    baseos            56 k
 vim-enhanced          x86_64        2:8.2.2637-21.el9                 appstream        1.7 M
Installing dependencies:
 bind-libs             x86_64        32:9.16.23-24.el9_5.3             appstream        1.2 M
 bind-license          noarch        32:9.16.23-24.el9_5.3             appstream         12 k
 fstrm                 x86_64        0.6.1-3.el9                       appstream         27 k
 gpm-libs              x86_64        1.20.7-29.el9                     appstream         20 k
 libuv                 x86_64        1:1.42.0-2.el9_4                  appstream        146 k
 protobuf-c            x86_64        1.3.3-13.el9                      baseos            34 k
 vim-common            x86_64        2:8.2.2637-21.el9                 appstream        6.6 M
 vim-filesystem        noarch        2:8.2.2637-21.el9                 baseos           9.2 k

Transaction Summary
==============================================================================================
Install  13 Packages
~
標準で入らないnet-toolsなどを入れるのは邪道かもですが、使い慣れたのから離れるのも大変ですよね。
(3) ブリッジの作成
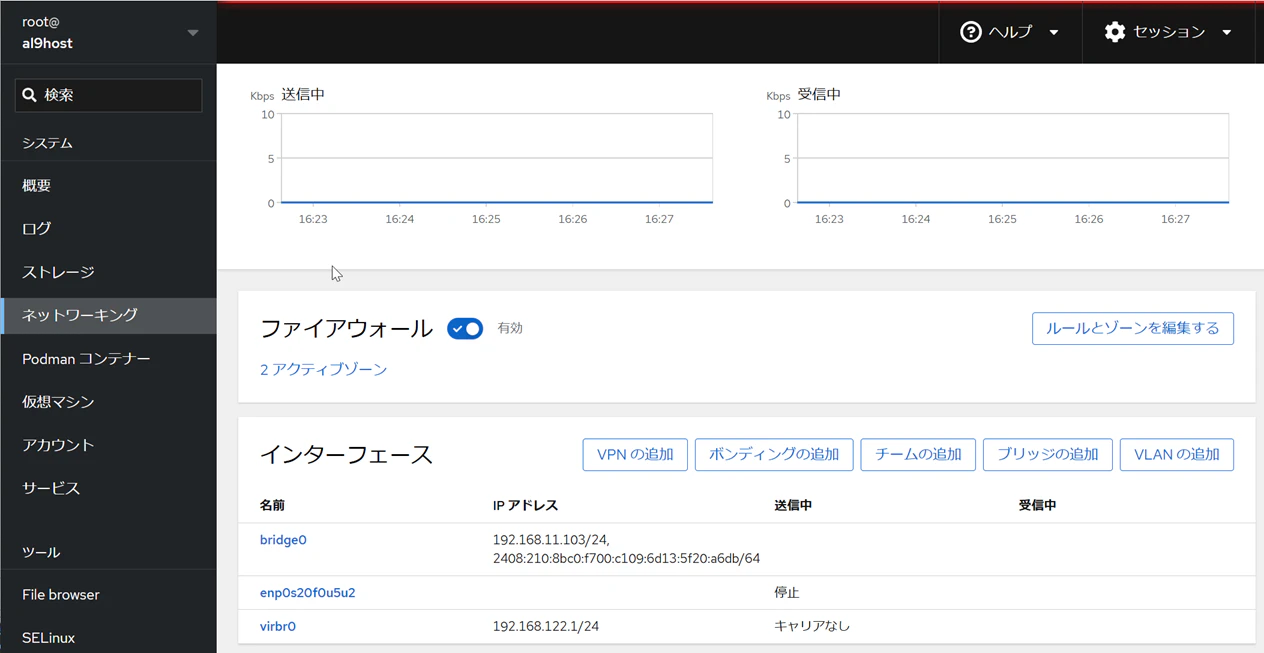
al9hostのWeb UI(cockpit)にアクセスし、ブリッジを追加します。
「ブリッジの追加」から。
名前を指定(bridge1)して、「追加」します。物理NICとの対応はしません(VMとホスト間のみの通信用)。
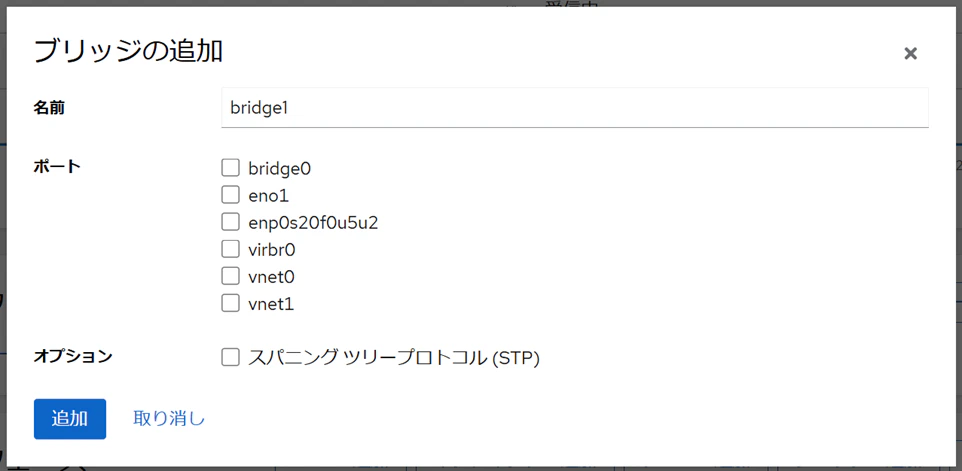
追加後、bridge1の設定を開き、IPアドレスを固定設定します。

(4) ブリッジとVMの対応設定
VMの「ネットワークインターフェース」の設定から、以下のようにVMのNICを設定します。
-
nettest1のVM
-- NIC1:bridge0に接続
-- NIC2:bridge1に接続 -
nettest2のVM
-- NIC1:bridge1に接続
nettest1の例:
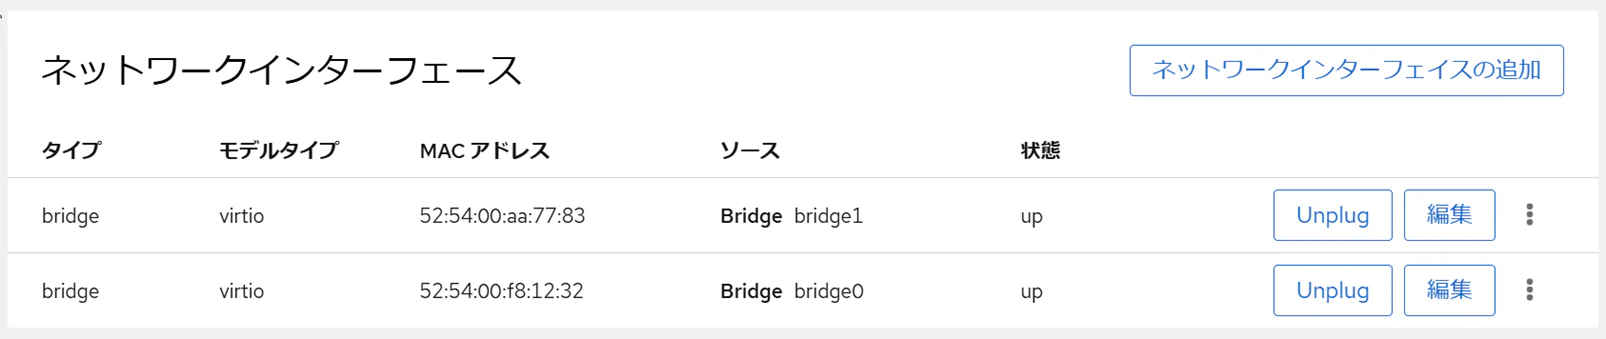
nettest2の例:

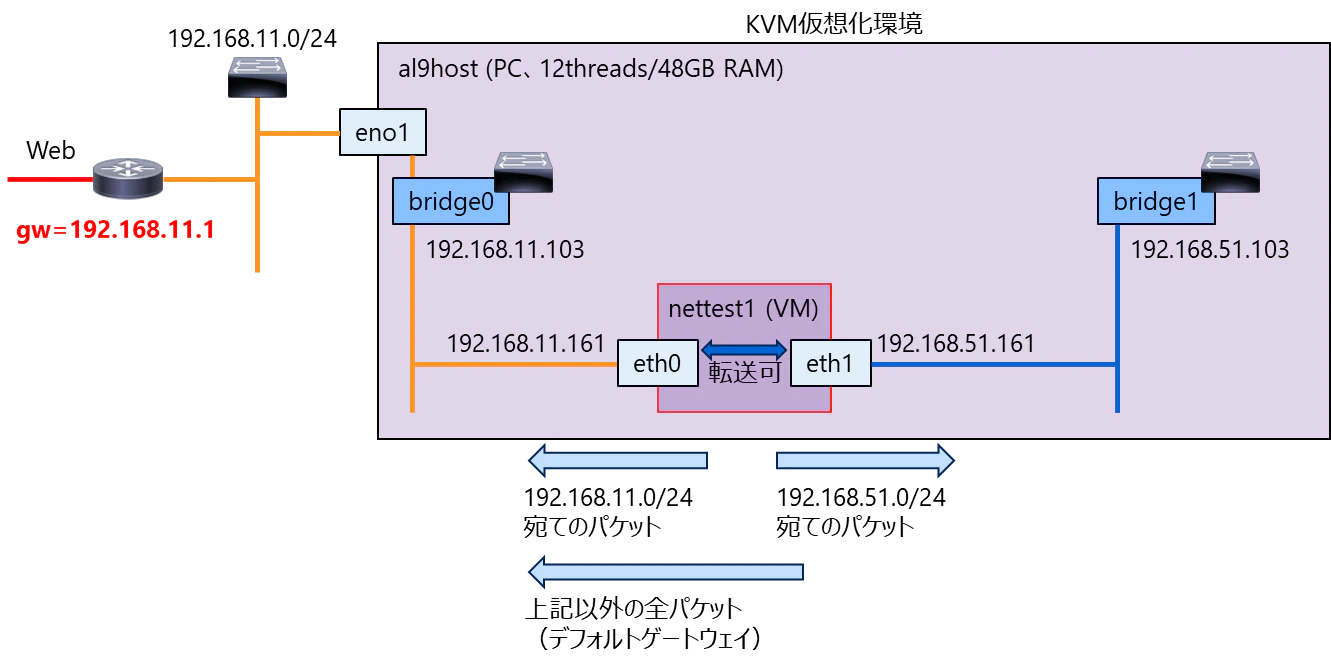
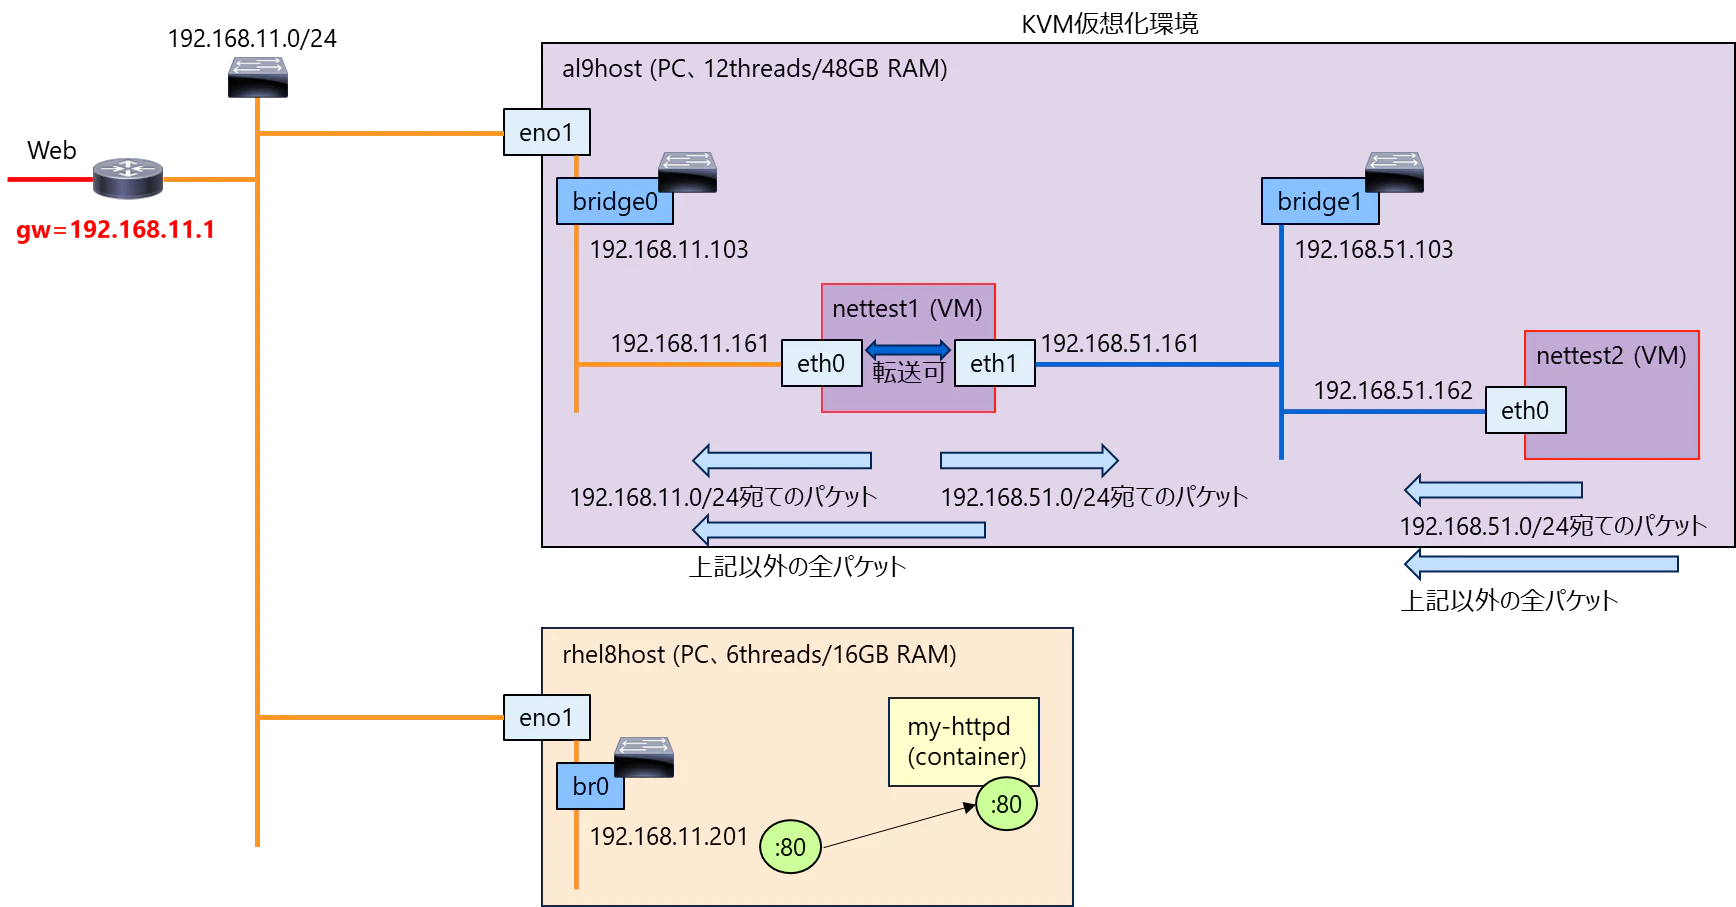
ここまでで、このように設定しました。

- VMが2つ。
- bridge0は元からあったもので、物理NICに対応しPCの外部と通信可。Webにつながる。
- bridge1を追加した。
- nettest1はNICが2つ。nettest2はNICが1つ。
- それぞれ、図のようにIPアドレスを設定。
(5) LAN内の別PCでhttpd起動
curlを打って応答を確認する先として、隣のPCで、httpdコンテナを起動します。httpdコンテナは、以下で確認に使ったものを、podmanに流用します。(どんな感じに変えればいいかは、copilotに教えてもらった)
まず、以下のスクリプトを作ります。
#!/bin/sh
NODE_IP=$(hostname -I | awk '{print $1}')
POD_IP=$(hostname -I | awk '{print $1}')
NODE_NAME=$(hostname)
POD_NAME=my-httpd

echo "<html><body>Node: $NODE_NAME($NODE_IP), Pod: $POD_NAME($POD_IP)</body></html>" > /usr/local/apache2/htdocs/index.html
コンテナを起動する処理も、スクリプトにします。コンテナを起動し、シェルをコピーして、シェルを実行してindex.htmlを生成する、という処理です。
#!/bin/bash

podman run -d --name my-httpd -p 80:80 docker.io/library/httpd:latest

podman cp create_html.sh my-httpd:/create_html.sh
podman exec my-httpd /bin/sh /create_html.sh
実行権限を付けます。
[root@rhel8host network-test]# chmod a+x create_html.sh
[root@rhel8host network-test]# chmod a+x create_httpd.sh
[root@rhel8host network-test]#
実行します。
[root@rhel8host network-test]# ./create_httpd.sh
Trying to pull docker.io/library/httpd:latest...
Getting image source signatures
Copying blob 80350326cd93 done
Copying blob c29f5b76f736 done
Copying blob 830a84f99cc8 done
Copying blob 35b1ecb71608 done
Copying blob a1a1b409f475 done
Copying blob 4f4fb700ef54 done
Copying config 4d98e80840 done
Writing manifest to image destination
9ab386525fd1c13ec7d847232461a9a09ddbccad79c22458c70860ab2a5d83f8
[root@rhel8host network-test]#
コンテナが作られました。(名前はmy-httpd)
[root@rhel8host network-test]# podman ps
CONTAINER ID  IMAGE                           COMMAND           CREATED        STATUS        PORTS               NAMES
9ab386525fd1  docker.io/library/httpd:latest  httpd-foreground  6 seconds ago  Up 6 seconds  0.0.0.0:80->80/tcp  my-httpd
[root@rhel8host network-test]#
これで、rhel8hostの80番ポート宛てにcurlすると、コンテナの80番に渡され、コンテナ内のホスト名とIPと、コンテナ名を返してくれます。
[root@rhel8host network-test]# curl http://localhost:80
<html><body>Node: 9ab386525fd1(10.88.0.2), Pod: my-httpd(10.88.0.2)</body></html>
[root@rhel8host network-test]#
これで、こういう状態です。

(6) nettest1のゲストOSネットワーク設定
まず、sysctlの「net.ipv4.ip_forward」を「1」に設定して、OS上のNIC間でIPパケット転送できるようにします。
sysctlの設定ファイルに追記します。
[root@nettest1 ~]# echo "net.ipv4.ip_forward = 1" >> /etc/sysctl.conf
[root@nettest1 ~]#
反映します。
[root@nettest1 ~]# sysctl -p
net.ipv4.ip_forward = 1
[root@nettest1 ~]#
IPアドレスは、次のように設定しました。(nmtuiを使用)
root@nettest1 ~]# ifconfig | grep mtu -A1
eth0: flags=4163<UP,BROADCAST,RUNNING,MULTICAST>  mtu 1500
        inet 192.168.11.161  netmask 255.255.255.0  broadcast 192.168.11.255
--
eth1: flags=4163<UP,BROADCAST,RUNNING,MULTICAST>  mtu 1500
        inet 192.168.51.161  netmask 255.255.255.0  broadcast 192.168.51.255
--
lo: flags=73<UP,LOOPBACK,RUNNING>  mtu 65536
        inet 127.0.0.1  netmask 255.0.0.0
[root@nettest1 ~]#
ルーティングテーブルは、以下の設定です。
- eth0が192.168.11.161/24なので、192.168.11.0/24宛てのパケットは、eth0へ。
- eth1が192.168.51.161/24なので、192.168.51.0/24宛てのパケットは、eth1へ。
- デフォルトゲートウェイを192.168.11.1にしたので、上記以外は、eth0へ。
[root@nettest1 ~]# netstat -nr
Kernel IP routing table
Destination     Gateway         Genmask         Flags   MSS Window  irtt Iface
0.0.0.0         192.168.11.1    0.0.0.0         UG        0 0          0 eth0
192.168.11.0    0.0.0.0         255.255.255.0   U         0 0          0 eth0
192.168.51.0    0.0.0.0         255.255.255.0   U         0 0          0 eth1
[root@nettest1 ~]#
別コマンドで見たもの。内容は一緒ですね。
[root@nettest1 ~]# ip route show
default via 192.168.11.1 dev eth0 proto static metric 100
192.168.11.0/24 dev eth0 proto kernel scope link src 192.168.11.161 metric 100
192.168.51.0/24 dev eth1 proto kernel scope link src 192.168.51.161 metric 101
[root@nettest1 ~]#
図にすると、こう。
(7) nettest2のゲストOSネットワーク設定
IPアドレスは、次のように設定しました。(nmtuiを使用)
[root@nettest2 ~]# ifconfig | grep mtu -A1
eth0: flags=4163<UP,BROADCAST,RUNNING,MULTICAST>  mtu 1500
        inet 192.168.51.162  netmask 255.255.255.0  broadcast 192.168.51.255
--
lo: flags=73<UP,LOOPBACK,RUNNING>  mtu 65536
        inet 127.0.0.1  netmask 255.0.0.0
[root@nettest2 ~]#
ルーティングテーブルは、以下の設定です。
- eth0が192.168.51.162/24なので、192.168.51.0/24宛てのパケットは、eth0へ。
- デフォルトゲートウェイを192.168.51.161にしたので、上記以外は、eth0へ。
つまり、どのパケットも、eth0へ。(NIC1個しかないし)
[root@nettest2 ~]# netstat -nr
Kernel IP routing table
Destination     Gateway         Genmask         Flags   MSS Window  irtt Iface
0.0.0.0         192.168.51.161  0.0.0.0         UG        0 0          0 eth0
192.168.51.0    0.0.0.0         255.255.255.0   U         0 0          0 eth0
[root@nettest2 ~]#
[root@nettest2 ~]# ip route show
default via 192.168.51.161 dev eth0 proto static metric 100
192.168.51.0/24 dev eth0 proto kernel scope link src 192.168.51.162 metric 100
[root@nettest2 ~]#
図にすると、こう。

また、これで、nettest2から、192.168.11.201に宛てて送信したパケットは、
- nettest1のeth1で受け取り、eth0から転送されて送信される。
- rhel8hostのeno1で受け取る。
で、rhel8hostに届くことが期待できます。
2. pingとcurlによるテスト
(1) nettest2からpingとcurl
pingを打ちますが、応答が返りません。
[root@nettest2 ~]# ping 192.168.11.201
PING 192.168.11.201 (192.168.11.201) 56(84) bytes of data.
^C
--- 192.168.11.201 ping statistics ---
5 packets transmitted, 0 received, 100% packet loss, time 4091ms

[root@nettest2 ~]#
また、curlを送りますが、こちらも、応答が返りません。数分でタイムアウトしました。
[root@nettest2 ~]# curl http://192.168.11.201
curl: (28) Failed to connect to 192.168.11.201 port 80: Connection timed out
[root@nettest2 ~]#
なぜだろう、ということで、pingを打ち続ける状態で、それぞれのNICに来ているのかどうか、tcpdumpで確認してみます。
(2) 各NICでのtcpdump確認
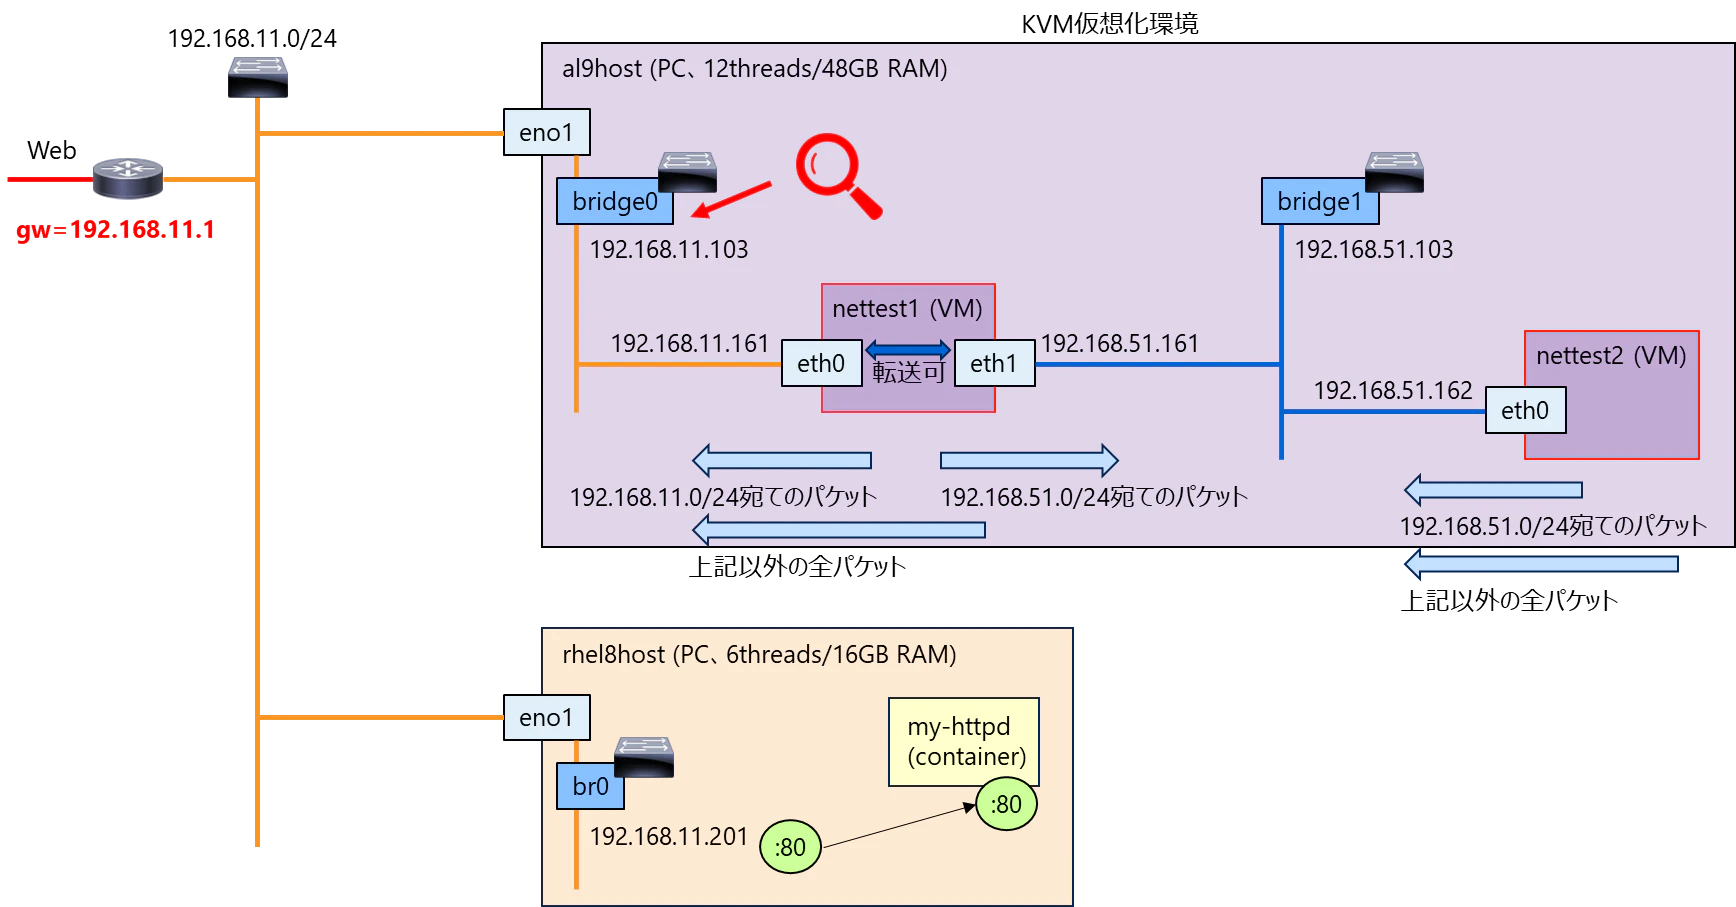
まず、ここを見ます。
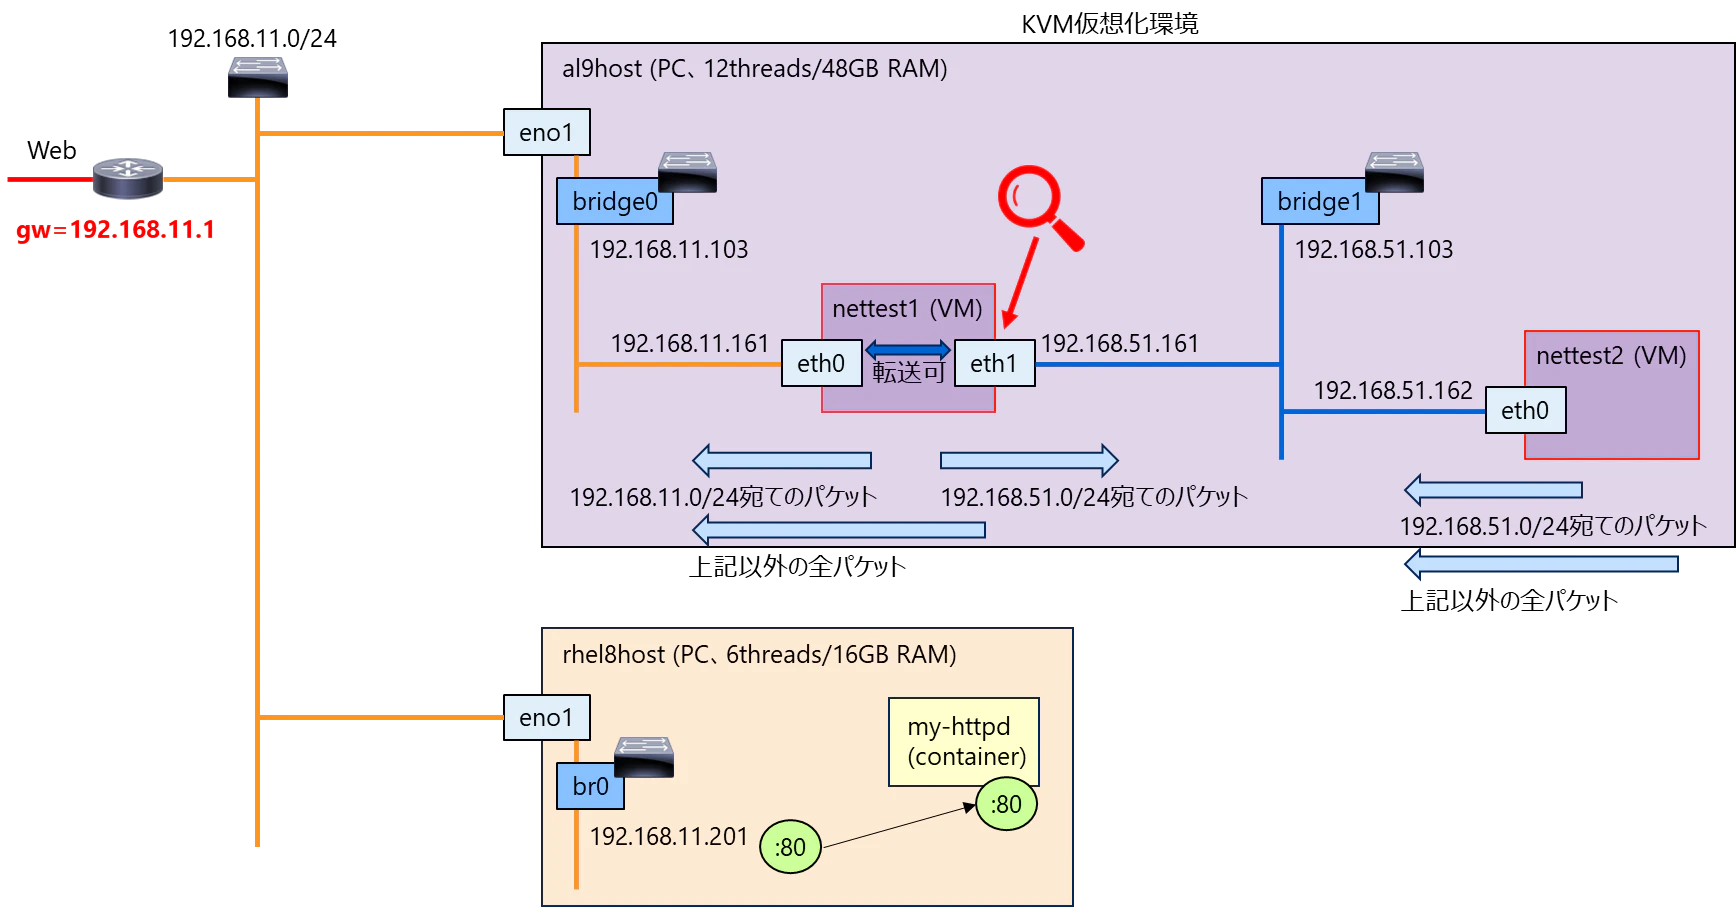
来てるのが分かります。
[root@nettest1 ~]# tcpdump -i eth1 -nn icmp
dropped privs to tcpdump
tcpdump: verbose output suppressed, use -v[v]... for full protocol decode
listening on eth1, link-type EN10MB (Ethernet), snapshot length 262144 bytes
23:39:00.816381 IP 192.168.51.162 > 192.168.11.201: ICMP echo request, id 4, seq 83, length 64
23:39:01.840405 IP 192.168.51.162 > 192.168.11.201: ICMP echo request, id 4, seq 84, length 64
23:39:02.864393 IP 192.168.51.162 > 192.168.11.201: ICMP echo request, id 4, seq 85, length 64
^C
3 packets captured
3 packets received by filter
0 packets dropped by kernel
[root@nettest1 ~]#
では、ここはどうでしょう。
こちらも、来てます。なので、ちゃんと、nettest1でルーティングはされているようです。
[root@al9host ~]# tcpdump -i bridge0 -nn icmp
dropped privs to tcpdump
tcpdump: verbose output suppressed, use -v[v]... for full protocol decode
listening on bridge0, link-type EN10MB (Ethernet), snapshot length 262144 bytes
23:41:01.649354 IP 192.168.51.162 > 192.168.11.201: ICMP echo request, id 4, seq 201, length 64
23:41:02.673341 IP 192.168.51.162 > 192.168.11.201: ICMP echo request, id 4, seq 202, length 64
23:41:03.697416 IP 192.168.51.162 > 192.168.11.201: ICMP echo request, id 4, seq 203, length 64
^C
3 packets captured
3 packets received by filter
0 packets dropped by kernel
[root@al9host ~]#
al9hostのbridge0まで来てるなら、当然、rhel8hostのbr0にも来ています。
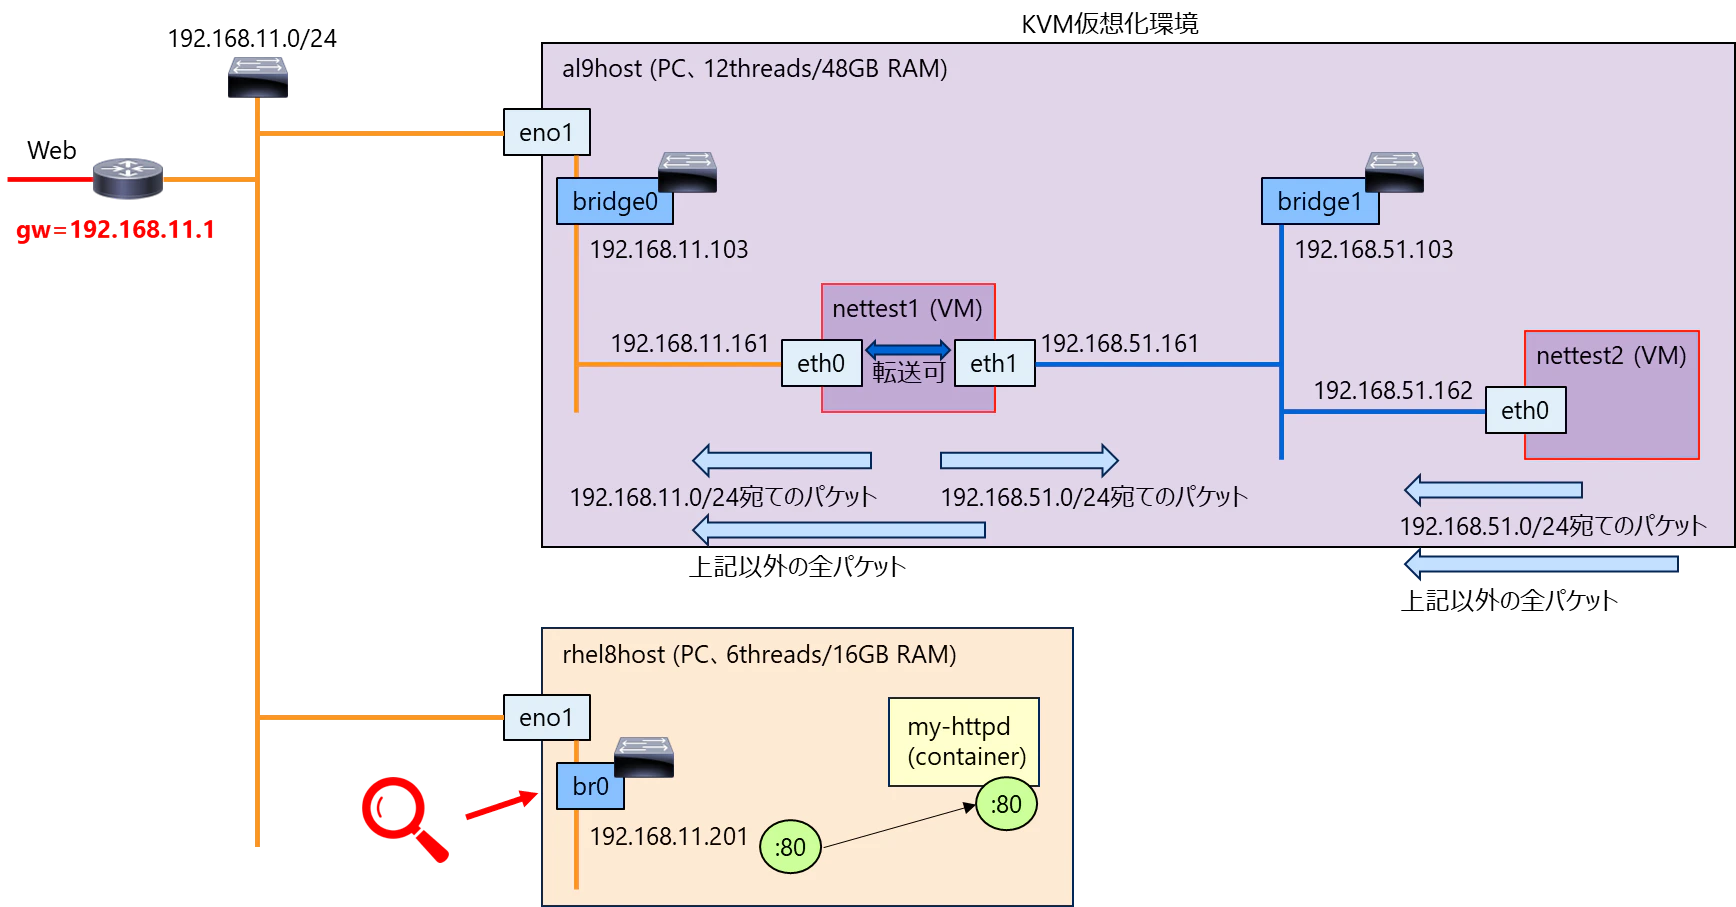
おや?なんか2つずつ、出力されているぞ?
[root@rhel8host network-test]# tcpdump -i br0 -nn icmp
dropped privs to tcpdump
tcpdump: verbose output suppressed, use -v or -vv for full protocol decode
listening on br0, link-type EN10MB (Ethernet), capture size 262144 bytes
23:43:57.777195 IP 192.168.51.162 > 192.168.11.201: ICMP echo request, id 4, seq 373, length 64
23:43:57.777227 IP 192.168.11.201 > 192.168.51.162: ICMP echo reply, id 4, seq 373, length 64
23:43:58.801273 IP 192.168.51.162 > 192.168.11.201: ICMP echo request, id 4, seq 374, length 64
23:43:58.801305 IP 192.168.11.201 > 192.168.51.162: ICMP echo reply, id 4, seq 374, length 64
23:43:59.825163 IP 192.168.51.162 > 192.168.11.201: ICMP echo request, id 4, seq 375, length 64
23:43:59.825209 IP 192.168.11.201 > 192.168.51.162: ICMP echo reply, id 4, seq 375, length 64
^C
6 packets captured
7 packets received by filter
0 packets dropped by kernel
[root@rhel8host network-test]#
これを見ると、
- 192.168.51.162 から 192.168.11.201のICMP echo request
- 192.168.11.201 から 192.168.51.162のICMP echo reply
が、1秒おきに出力されています。ただ、2つ目のICMP echo replyは、ここまでに見てきた3か所(al9hostのbridge0、nettest1のeth1、nettest2のeth0)のいずれも、出力されていませんでした。
ということは、rhel8hostからpingの応答を送った後、al9hostのbridge0に届いていない、ということ。
rhel8hostのルーティングテーブルを見ると以下です。
[root@rhel8host network-test]# netstat -nr
Kernel IP routing table
Destination     Gateway         Genmask         Flags   MSS Window  irtt Iface
0.0.0.0         192.168.11.1    0.0.0.0         UG        0 0          0 br0
10.88.0.0       0.0.0.0         255.255.0.0     U         0 0          0 cni-podman0
192.168.11.0    0.0.0.0         255.255.255.0   U         0 0          0 br0
192.168.122.0   0.0.0.0         255.255.255.0   U         0 0          0 virbr0
[root@rhel8host network-test]#
ここから、192.168.51.162に対するICMP echo replyは、どのスタティックルートにも該当しないため、デフォルトゲートウェイである、192.168.11.1に送られる、ということが分かります。これではnettest2には届きません。
つまり、設定としては、rhel8hostに、192.168.51.0/24のネットワークに対するスタティックルートを追加する必要があります。
(3) rhel8hostのOSネットワーク設定
IPアドレスは、こうなっています。
[root@rhel8host network-test]# ifconfig | grep mtu -A1
br0: flags=4163<UP,BROADCAST,RUNNING,MULTICAST>  mtu 1500
        inet 192.168.11.201  netmask 255.255.255.0  broadcast 192.168.11.255
--
cni-podman0: flags=4163<UP,BROADCAST,RUNNING,MULTICAST>  mtu 1500
        inet 10.88.0.1  netmask 255.255.0.0  broadcast 10.88.255.255
--
eno1: flags=4163<UP,BROADCAST,RUNNING,MULTICAST>  mtu 1500
        ether c8:96:85:cd:43:6f  txqueuelen 1000  (Ethernet)
--
lo: flags=73<UP,LOOPBACK,RUNNING>  mtu 65536
        inet 127.0.0.1  netmask 255.0.0.0
--
vethb734b667: flags=4163<UP,BROADCAST,RUNNING,MULTICAST>  mtu 1500
        inet6 fe80::4c2e:2eff:fedd:2512  prefixlen 64  scopeid 0x20<link>
--
virbr0: flags=4099<UP,BROADCAST,MULTICAST>  mtu 1500
        inet 192.168.122.1  netmask 255.255.255.0  broadcast 192.168.122.255
--
vnet0: flags=4163<UP,BROADCAST,RUNNING,MULTICAST>  mtu 1500
        inet6 fe80::fc54:ff:fe89:6ed8  prefixlen 64  scopeid 0x20<link>
[root@rhel8host network-test]#
ルーティングテーブルにルールを設定するため、以下のコマンドを実行します。
[root@rhel8host network-test]# ip route add 192.168.51.0/24 via 192.168.11.161 dev br0
[root@rhel8host network-test]#
これで、rhel8hostのbr0からのパケットの内、192.168.51.0/24宛てのパケットは、nettest1のeth0に送られるようになります。
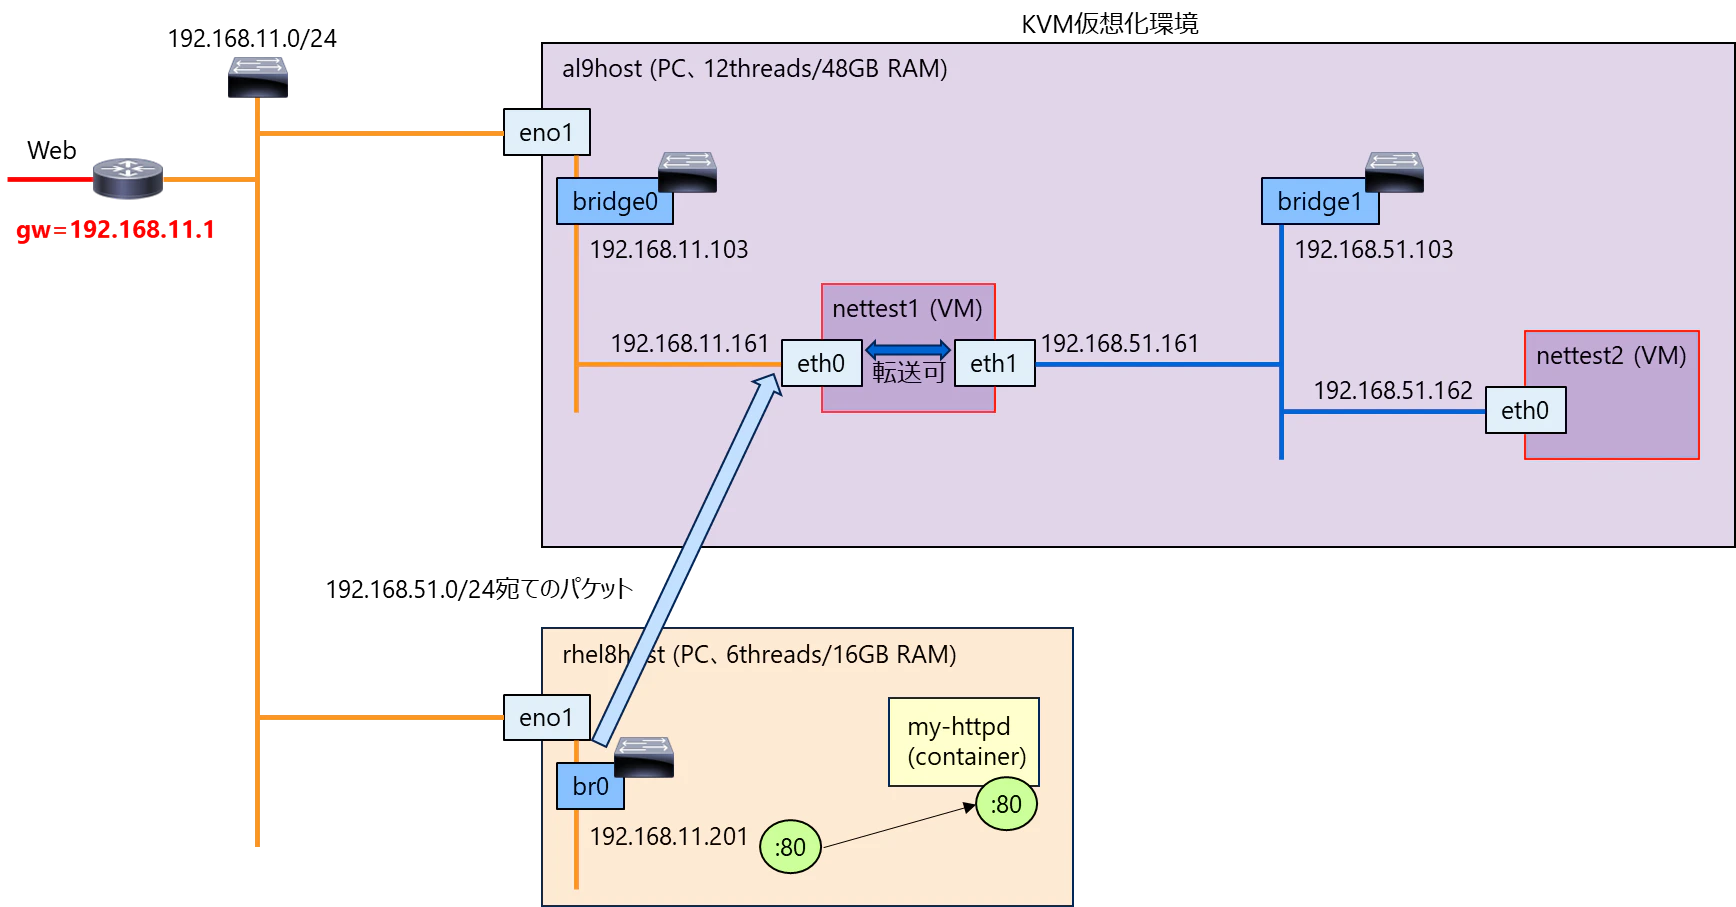
ルーティングテーブルはこうなります。
[root@rhel8host network-test]# netstat -nr
Kernel IP routing table
Destination     Gateway         Genmask         Flags   MSS Window  irtt Iface
0.0.0.0         192.168.11.1    0.0.0.0         UG        0 0          0 br0
10.88.0.0       0.0.0.0         255.255.0.0     U         0 0          0 cni-podman0
192.168.11.0    0.0.0.0         255.255.255.0   U         0 0          0 br0
192.168.51.0    192.168.11.161  255.255.255.0   UG        0 0          0 br0
192.168.122.0   0.0.0.0         255.255.255.0   U         0 0          0 virbr0
[root@rhel8host network-test]#
「192.168.51.0 192.168.11.161 255.255.255.0 UG 0 0 0 br0」の設定が大事。
別コマンドだとこうなります。
[root@rhel8host network-test]# ip route show
default via 192.168.11.1 dev br0 proto static metric 425
10.88.0.0/16 dev cni-podman0 proto kernel scope link src 10.88.0.1
192.168.11.0/24 dev br0 proto kernel scope link src 192.168.11.201 metric 425
192.168.51.0/24 via 192.168.11.161 dev br0
192.168.122.0/24 dev virbr0 proto kernel scope link src 192.168.122.1 linkdown
[root@rhel8host network-test]#
(4) 再度、nettest2からpingとcurl
pingを打つと、今度は、応答が返りました。
[root@nettest2 ~]# ping 192.168.11.201
PING 192.168.11.201 (192.168.11.201) 56(84) bytes of data.
64 bytes from 192.168.11.201: icmp_seq=1 ttl=63 time=0.720 ms
64 bytes from 192.168.11.201: icmp_seq=2 ttl=63 time=0.656 ms
64 bytes from 192.168.11.201: icmp_seq=3 ttl=63 time=0.619 ms
^C
--- 192.168.11.201 ping statistics ---
3 packets transmitted, 3 received, 0% packet loss, time 2026ms
rtt min/avg/max/mdev = 0.619/0.665/0.720/0.041 ms
[root@nettest2 ~]#
また、curlを送っても、応答が返りました。
[root@nettest2 ~]# curl http://192.168.11.201
<html><body>Node: 9ab386525fd1(10.88.0.2), Pod: my-httpd(10.88.0.2)</body></html>
[root@nettest2 ~]#
[root@nettest2 ~]# curl http://192.168.11.201
<html><body>Node: 9ab386525fd1(10.88.0.2), Pod: my-httpd(10.88.0.2)</body></html>
[root@nettest2 ~]#
[root@nettest2 ~]# curl http://192.168.11.201
<html><body>Node: 9ab386525fd1(10.88.0.2), Pod: my-httpd(10.88.0.2)</body></html>
[root@nettest2 ~]#
まとめ
KVM環境で、AlmaLinux9.5のVMを2つ作り、異なるネットワーク間でルーティングするよう設定し、pingとcurlが届いて応答が返ることを確認しました。