はじめに
前回は「24 日目に LINE ミニアプリが完成する初心者 ―― Day21. クーポン表示機能を実装」と題して、二次元コードリーダーを使ったクーポン表示機能を実装しました。
今回からは、Messaging APIの学習を行って行きたいと思います。
ローディングアニメーションを表示する
現在の実装だと問い合わせの返信を返すまでに時間が掛かっています。
その間の離脱を防ぐためにローディングアニメーションの表示を実装して行きたいと思います。
リクエスト
ローディングアニペーションはエンドポイントを叩くことで表示ができます。
POST https://api.line.me/v2/bot/chat/loading/start
リクエストヘッダー
| Content-Type | 必須 | application/json |
| Authorization | 必須 | Bearer {channel access token}
|
リクエストボディ
| CchatId (string) | 必須 | ローディングのアニメーションを表示する対象ユーザーのユーザー ID。 |
| loadingSeconds (number) | 任意 | ローディングのアニメーションを表示する秒数。5、10、15、20、25、30、35、40、45、50、55、60 のいずれかの値を指定可能。デフォルト値は 20。 |
実装
では上記の内容を元に実装を行ってみます。
以前作ったwebhook.tsに関数を追加して行きます。
時間はデフォルトの 20 秒で十分なのでchatIdとしてuserIdだけ渡して行きます。
src/nextjs/pages/api/webhook.ts
async function sendLoading({ userId }: { userId: string }) {
  const url = "https://api.line.me/v2/bot/chat/loading/start";
  await fetch(url, {
    method: "POST",
    headers: {
      "Content-Type": "application/json",
      Authorization: `Bearer ${process.env.NEXT_PUBLIC_LINE_ACCESS_TOKEN}`,
    },
    body: JSON.stringify({ chatId: userId }),
  });
}
それぞれの送信処理の前に関数の呼び出しを追加して行きます。
src/nextjs/pages/api/webhook.ts
export default async function handler(req, res) {
  if (req.method === "POST") {
    const { events } = req.body;

    if (!events || events.length === 0) {
      return res.status(200).json({ message: "No events" });
    }

    const event = events[0];
    if (event.type === "message" && event.message.type === "text") {
      const userMessage = event.message.text;
      const userId = event.source.userId;

      const options = [
        "物件情報の問い合わせ",
        "お家探しの情報収集のやり方",
        "住宅購入資金の考え方・予算について",
        "新築と中古どちらを買うべきか?",
        "リノベーションの流れについて",
        "湘南エリアの魅力",
        "リノベ不動産辻堂羽鳥店について",
        "その他",
      ];

      if (userMessage === ">お問い合わせ") {
        userState.set(userId, { step: "categorySelection" });

        const flexMessage = {
          type: "flex",
          altText: "問い合わせカテゴリ",
          contents: {
            type: "bubble",
            body: {
              type: "box",
              layout: "vertical",
              contents: [
                {
                  type: "box",
                  layout: "vertical",
                  contents: [
                    {
                      type: "text",
                      text: "お問い合わせの種類を選択してください。",
                      weight: "regular",
                      offsetStart: "xxl",
                      margin: "sm",
                      offsetTop: "md",
                    },
                    {
                      type: "separator",
                      margin: "xxl",
                      color: "#e5e5e5",
                    },
                  ],
                  backgroundColor: "#fafafa",
                },
                {
                  type: "box",
                  layout: "vertical",
                  contents: [
                    ...options.map((option) => ({
                      type: "button",
                      action: {
                        type: "message",
                        label: option,
                        text: option,
                      },
                    })),
                  ],
                  paddingTop: "md",
                  paddingBottom: "md",
                },
              ],
              paddingAll: "none",
            },
            styles: {
              footer: {
                separator: true,
              },
            },
          },
        };
        await sendLoading({ userId }); // ここに追加
        await sendReply(event.replyToken, [flexMessage]);
      } else if (options.includes(userMessage)) {
        userState.set(userId, { step: "detailsInput", category: userMessage });

        await sendLoading({ userId }); // ここに追加
        await sendReply(event.replyToken, [
          { type: "text", text: "お問い合わせ内容を入力してください。" },
        ]);
      } else if (
        userState.has(userId) &&
        userState.get(userId).step === "detailsInput"
      ) {
        const state = userState.get(userId);
        const category = state.category;
        const details = userMessage;

        await sendLoading({ userId }); // ここに追加

        // Google Apps Script にPOSTリクエスト
        await saveToSpreadsheet({ userId, category, details });

        userState.delete(userId);

        await sendReply(event.replyToken, [
          {
            type: "text",
            text: "お問い合わせいただきありがとうございます!ご回答には通常2営業日以内に返答いたします。なにかご不明点があれば、お気軽にお問合せください!",
          },
        ]);
      }
    }

    return res.status(200).json({ message: "Event processed" });
  } else {
    res.setHeader("Allow", ["POST"]);
    return res.status(405).json({ error: `Method ${req.method} Not Allowed` });
  }
}
これで実装は完了です!
デプロイ
いつも通り以下のコマンドをline-liff-v2-starter配下で実行しデプロイを行います。
$ netlify deploy --build --prod
動作確認
実際に動作を確認してみます。
お問い合わせを行ってみると返信前にローディングが表示されているのが分かります。
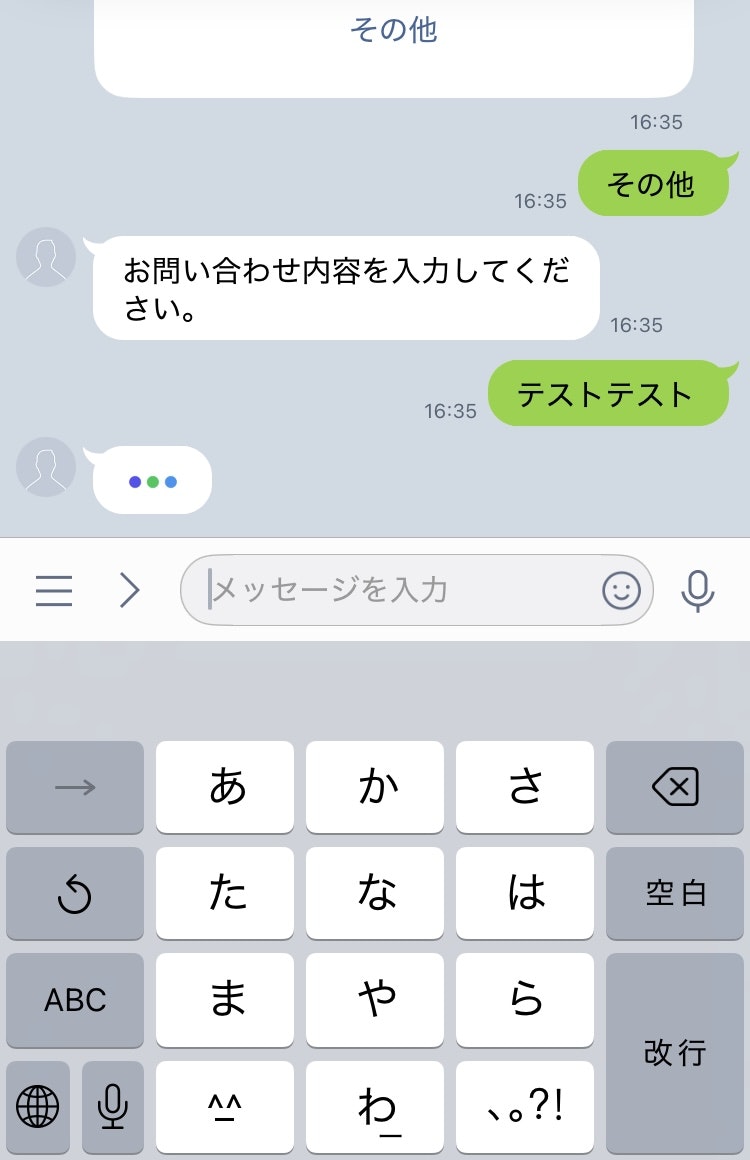
時間はデフォルトの 20 秒の設定ですが、メッセージがポストされると中断されるため、実際に表示されているのは 1~5 秒ほどです。
これでユーザーに視覚的に次のメッセージが来ることを伝えることができるようになりました。
まとめ
ここまでで問い合わせ時のローディングアニメーションを実装してきました。
次回も、Messaging API について学習を行って行きます。
残りは 2 日!
気になる方は是非フォローやカレンダー購読をお願いします![]()