内容
redmine-APIを簡単に利用出来る手順になります。
Vagrant + Cakephp3 の環境でシェルコマンド実行し、redmine-APIが返却されるようになります。
redmine-APIを使うための準備
Vagrant環境構築
    #ツールインストール
    yum -y install git zip unzip vim

    #epel,remi インストール
    yum -y install epel-release
    rpm -Uvh http://rpms.famillecollet.com/enterprise/remi-release-7.rpm

    #phpインストール
    yum -y install --enablerepo=remi,epel,remi-php70 php php-intl php-mbstring
    php-pdo php-mysqlnd php-xml

    #composerインストール
    curl -sS https://getcomposer.org/installer | php
    mv composer.phar /usr/local/bin/composer

    #composerでライブラリをインストール
    cd /vagrant/app/
    yes | /usr/local/bin/composer install
※今回シェルを使用するためApacheとDBはインストールしていません。
php-redmine-api側の要件
PHP >= 5.4
The PHP cURL extension
The PHP SimpleXML extension
The PHP JSON extension
PHPUnit >= 4.0 (optional) to run the test suite
"Enable REST web service" for your Redmine project (/settings/edit?tab=authentication)
then obtain your API access key in your profile page : /my/account
or use your username & password
curl とjson のモジュールは最初から入っていたため、php-xmlのみ取得しています。
[vagrant@10x0x2x15 app]$ php -m | grep curl
curl
[vagrant@10x0x2x15 app]$ php -m | grep json
json
composer.json
    {
        "name": "cakephp/app",
        "description": "CakePHP skeleton app",
        "homepage": "http://cakephp.org",
        "type": "project",
        "license": "MIT",
        "require": {
            "php": ">=5.5.9",
            "cakephp/cakephp": "3.3.*",
            "mobiledetect/mobiledetectlib": "2.*",
            "cakephp/migrations": "~1.0",
            "cakephp/plugin-installer": "*",
            "kbsali/redmine-api": "~1.0"
        },
        "require-dev": {
            "psy/psysh": "@stable",
            "cakephp/debug_kit": "~3.2",
            "cakephp/bake": "~1.1"
        },
        "suggest": {
            "markstory/asset_compress": "An asset compression plugin which provides file concatenation and a flexible filter system for preprocessing and minification.",
            "phpunit/phpunit": "Allows automated tests to be run without system-wide install.",
            "cakephp/cakephp-codesniffer": "Allows to check the code against the coding standards used in CakePHP."
        },
        "autoload": {
            "psr-4": {
                "App\\": "src"
            }
        },
        "autoload-dev": {
            "psr-4": {
                "App\\Test\\": "tests",
                "Cake\\Test\\": "./vendor/cakephp/cakephp/tests"
            }
        },
        "scripts": {
            "post-install-cmd": "App\\Console\\Installer::postInstall",
            "post-create-project-cmd": "App\\Console\\Installer::postInstall",
            "post-autoload-dump": "Cake\\Composer\\Installer\\PluginInstaller::postAutoloadDump"
        },
        "minimum-stability": "beta",
        "prefer-stable": true
    }
"kbsali/redmine-api": "~1.0"を追加しています。
composer.json に kbsali/redmine-api を追記したことによって
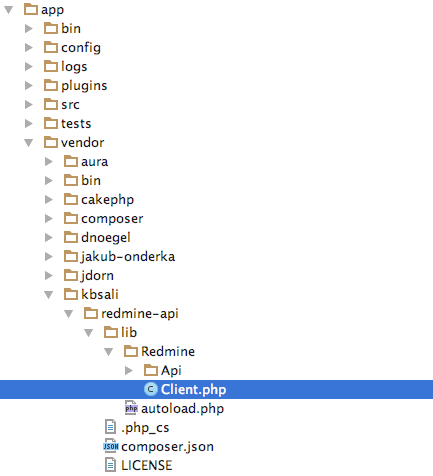
下記のディレクトリやファイルが生成されます。
app/vendor/kbsali/redmine-api/lib/Redmine/Api
app/vendor/kbsali/redmine-api/lib/Redmine/Client.php
composer.lock
githubを使っている場合は、git管理から除外せずに、
.gitignoreにも記載しないで大丈夫です。
cakephp側での設定
app/config/bootstrap (既存のファイルに追記)
    (70行目あたりから一部抜粋)

    /*
     * Read configuration file and inject configuration into various
     * CakePHP classes.
     *
     * By default there is only one configuration file. It is often a good
     * idea to create multiple configuration files, and separate the configuration
     * that changes from configuration that does not. This makes deployment simpler.
     */
    try {
        Configure::config('default', new PhpConfig());
        Configure::load('app', 'default', false);
        Configure::load('redmine', 'default', false);
    } catch (\Exception $e) {
        exit($e->getMessage() . "\n");
    }

    (85行目以降を省略)
Configure::load('redmine', 'default', false);のみ追加しています。
bootstrap.phpにrenmineを追加したら
新規にファイルを作成します。app/config/redmine.php
    <?php
    return [
        'redmine' => [
            'api' => [
                'key' => 'hoge123redmine123hoge123api123key',
                'url' => 'https://redmine2.hogeAPI.com'
            ]
        ]
    ];
keyは、redmineにログイン後に個人設定から簡単に取得できます。
http://redmine.jp/glossary/r/rest-api/
ここまでで事前の準備は大方終了です。
redmine-APIの仕組み
大元の流れを理解する上では下記を見ると早いかもしれません。
http://www.redmine.org/projects/redmine/wiki/rest_api
GET /issues.[format]
例えば、GETはURLのことで、formatは、.xmlか.jsonをさしています。
APIのデータに、リクエストを出すことで、対応するデータが取得できます。
https://redmine2.hogeAPI.com/issues.xml
上記のようにURLを叩くと、データが取得できます。.xmlを.jsonに変えても同じです。
ここにgetパラメータを入れるとさらに細かい情報が取得できます。
https://redmine2.hogeAPI.com/issues.xml?status_id=closed
取得したデータをphpのライブラリが、URLやgetパラメータに変換しています。
redmineAPIを呼び出すシェルの作成
サンプル
サンプルは丁寧に書かれています。
https://github.com/kbsali/php-redmine-api/blob/master/example.php
シェルファイルの作成
app/src/Shell/任意名のシェルファイル
app/src/Shell/TestShell.php を新規作成
    <?php
    namespace App\Shell;

    use Cake\Console\Shell;
    use Cake\Core\Configure;
    use Redmine\Client;

    /**
     * Test shell command.
     */
    class TestShell extends Shell
    {

    /**
     * @return \Cake\Console\ConsoleOptionParser
     */
    public function getOptionParser()
    {
        $parser = parent::getOptionParser();

        return $parser;
    }

    /**
     * main() method.
     */
    public function main()
    {
        $client = new Client(Configure::read('redmine.api.url'), Configure::read('redmine.api.key'));

        //チケット数の取得
        $issues['all'] = $client->issue->all([
            'limit' => 1,
            'status_id' => '*',
        ])['total_count'];

        $issues['open'] = $client->issue->all([
            'limit' => 1,
            'status_id' => 'open',
        ])['total_count'];
        $issues['close'] = $client->issue->all([
            'limit' => 1,
            'status_id' => 'closed',
        ])['total_count'];
        debug($issues);
    }
}
シェルを実行する
[vagrant@10x0x2x15 app]$ bin/cake test

Welcome to CakePHP v3.3.7 Console
---------------------------------------------------------------
App : src
Path: /vagrant/app/src/
PHP : 7.0.12
---------------------------------------------------------------
/src/Shell/testShell.php (line 38)
########## DEBUG ##########
[
    'all' => (int) 150,
    'open' => (int) 30,
    'close' => (int) 120
]
他にもトラッカーやステータスなど取得可能です。
//トラッカー一覧表示 all()が詳細、listingは名前を一覧表示
debug($client->tracker->listing());

//チケットのステータス取得
debug($client->issue_status->all());
